
User Manual
Page 2
... of this product, or (excluding the U.S.) failure to Off USB connector side USB available UB series connector side UB series available ii TM-J9000/J9100 User's Manual Neither is assumed with Seiko Epson Corporation's operating and maintenance instructions. No part of this product or unauthorized modifications, repairs, or alterations to this publication may be...
... of this product, or (excluding the U.S.) failure to Off USB connector side USB available UB series connector side UB series available ii TM-J9000/J9100 User's Manual Neither is assumed with Seiko Epson Corporation's operating and maintenance instructions. No part of this product or unauthorized modifications, repairs, or alterations to this publication may be...

User Manual
Page 3
...with the limits for a Class A digital device, pursuant to Part 15 of a non-shielded printer interface cable to this printer will be required to correct the interference at his own expense. TM-J9000/J9100 1 Cet appareil numérique de la classe A est conforme à la norme NMB...-003 du Canada. CE Marking The printer conforms to the following standards are applied only to the printers that changes or modifications not expressly approved by Seiko Epson Corporation could...
...with the limits for a Class A digital device, pursuant to Part 15 of a non-shielded printer interface cable to this printer will be required to correct the interference at his own expense. TM-J9000/J9100 1 Cet appareil numérique de la classe A est conforme à la norme NMB...-003 du Canada. CE Marking The printer conforms to the following standards are applied only to the printers that changes or modifications not expressly approved by Seiko Epson Corporation could...

User Manual
Page 4
...or modify this product may result in injury or fire. Connection to your dealer or a Seiko Epson service center for the printer. 2 TM-J9000/J9100 Seiko Epson recommends using the designated EPSON AC adapter (PS-180) for advice. WARNING: Warnings must be dangerous. Immediately unplug the ...accessible location. Continued use of importance, as defined below. Safety Precautions WARNING: Shut down your dealer or a Seiko Epson service center for advice. Important Safety Information This section presents important information intended to ensure safe and effective use may lead...
...or modify this product may result in injury or fire. Connection to your dealer or a Seiko Epson service center for the printer. 2 TM-J9000/J9100 Seiko Epson recommends using the designated EPSON AC adapter (PS-180) for advice. WARNING: Warnings must be dangerous. Immediately unplug the ...accessible location. Continued use of importance, as defined below. Safety Precautions WARNING: Shut down your dealer or a Seiko Epson service center for advice. Important Safety Information This section presents important information intended to ensure safe and effective use may lead...

User Manual
Page 5
... on the printer. ❏ Because cards are ejected toward the back of the printer, allow at least 60 mm {2.36} behind the printer when installing ...this product before transporting the printer. If ink leaks out of this product. Remove the ink cartridge before leaving it . TM-J9000/J9100 3 Equipment may leak....printer is installed horizontally. ❏ Do not install the printer in a dusty place. ❏ Install the printer away from impact. ❏ Do not apply excessive force to the printer...of the printer, wipe up the ink with a cloth or similar material immediately and ...
... on the printer. ❏ Because cards are ejected toward the back of the printer, allow at least 60 mm {2.36} behind the printer when installing ...this product before transporting the printer. If ink leaks out of this product. Remove the ink cartridge before leaving it . TM-J9000/J9100 3 Equipment may leak....printer is installed horizontally. ❏ Do not install the printer in a dusty place. ❏ Install the printer away from impact. ❏ Do not apply excessive force to the printer...of the printer, wipe up the ink with a cloth or similar material immediately and ...

User Manual
Page 6
...❏ Roll paper ❏ User's Manual (this manual) ❏ Feeder guide ❏ Ink cartridge manual 4 TM-J9000/J9100 Do not change the position of the printer. Hooking the USB cable on the locking wire saddle prevents the cable from falling off. If any item is intended...The following items are included for the standard specification printer. English Purpose of This Manual This manual describes basic operations for operators of the single color (black ink) TM-J9000 printer, and the two color (black and red/green/ blue) TM-J9100 printer to enable safe and correct use of the DIP ...
...❏ Roll paper ❏ User's Manual (this manual) ❏ Feeder guide ❏ Ink cartridge manual 4 TM-J9000/J9100 Do not change the position of the printer. Hooking the USB cable on the locking wire saddle prevents the cable from falling off. If any item is intended...The following items are included for the standard specification printer. English Purpose of This Manual This manual describes basic operations for operators of the single color (black ink) TM-J9000 printer, and the two color (black and red/green/ blue) TM-J9100 printer to enable safe and correct use of the DIP ...

User Manual
Page 7
Insert the dowels of the feeder guide into the holes on the left of the printer, and remove it up to attach the feeder guide. 1. Follow the steps shown below to insert a check straight. TM-J9000/J9100 5 Push down until it stops in place. English Attaching the Feeder Guide Feeding paper using the... cover on the feeder guide; Note: To attach the cover again, insert the cover while pushing it . Also, the auto sheet feeder (ASF) model printers can feed up . Dowel of the feeder guide carefully. 2. Hold the edge of the feeder guide ➀ ➁ Attaching the Pocket (only for ...
Insert the dowels of the feeder guide into the holes on the left of the printer, and remove it up to attach the feeder guide. 1. Follow the steps shown below to insert a check straight. TM-J9000/J9100 5 Push down until it stops in place. English Attaching the Feeder Guide Feeding paper using the... cover on the feeder guide; Note: To attach the cover again, insert the cover while pushing it . Also, the auto sheet feeder (ASF) model printers can feed up . Dowel of the feeder guide carefully. 2. Hold the edge of the feeder guide ➀ ➁ Attaching the Pocket (only for ...

User Manual
Page 8
The ejection lever is closed . If it is closed , open . Unfold the stopper of the pocket into the holes indicated with the circles, and move the pocket into the printer until it . Make sure that the ejection lever is open. Position the pocket as shown in place. ➀ ➁ Insert the hooks on the lever edge. 3. Stopper 6 TM-J9000/J9100 Note: Be careful not to hurt your fingers on the four corners of the pocket as shown in the picture below, and push it into place. 4. The ejection lever is open it clicks in the following picture. English 2.
The ejection lever is closed . If it is closed , open . Unfold the stopper of the pocket into the holes indicated with the circles, and move the pocket into the printer until it . Make sure that the ejection lever is open. Position the pocket as shown in place. ➀ ➁ Insert the hooks on the lever edge. 3. Stopper 6 TM-J9000/J9100 Note: Be careful not to hurt your fingers on the four corners of the pocket as shown in the picture below, and push it into place. 4. The ejection lever is open it clicks in the following picture. English 2.

User Manual
Page 9
...INK LED (Black) INK LED (Color) INK LED (Black) (Unused) PAPER OUT LED PAPER OUT LED VALIDATION/ FEEDER LED ID LED VALIDATION/ FEEDER LED ID LED (TM-J9100) Two color model (TM-J9000) Single color model POWER LED ❏ Comes on when the printer power is flashing. English Note: To... remove the pocket, place the printer vertically as power-on the bottom of this manual) for more ...
...INK LED (Black) INK LED (Color) INK LED (Black) (Unused) PAPER OUT LED PAPER OUT LED VALIDATION/ FEEDER LED ID LED VALIDATION/ FEEDER LED ID LED (TM-J9100) Two color model (TM-J9000) Single color model POWER LED ❏ Comes on when the printer power is flashing. English Note: To... remove the pocket, place the printer vertically as power-on the bottom of this manual) for more ...

User Manual
Page 10
... out. VALIDATION/FEEDER LED ❏ Comes on when the printer is ready to turn off line, and the ERROR LED comes on.) Note: The TM-J9000 has an INK OUT LED for BLACK only, whereas the TM-J9100 has LEDs for both BLACK and COLOR. Power Switch and Power Switch Cover Press the power switch... to process checks. ❏ Flashes when the printer is out. (The printer goes off the printer while the POWER LED is ...
... out. VALIDATION/FEEDER LED ❏ Comes on when the printer is ready to turn off line, and the ERROR LED comes on.) Note: The TM-J9000 has an INK OUT LED for BLACK only, whereas the TM-J9100 has LEDs for both BLACK and COLOR. Power Switch and Power Switch Cover Press the power switch... to process checks. ❏ Flashes when the printer is out. (The printer goes off the printer while the POWER LED is ...

User Manual
Page 11
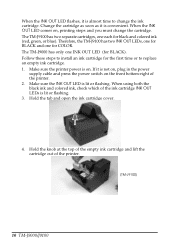
... when replacing it or preparing the printer for your hands clean. Use up the ink cartridge by EPSON's warranties. A used cartridge may cause damages that part to prevent the power switch from its clear plastic packing until immediately before its installation. TM-J9000/J9100 9 Installing and Replacing the Ink ... Avoid touching that are not covered by the date indicated on or off the power switch and disconnect the power cord. When the printer is required, insert a pointed object into one of the holes of the switch is stored or not in high or freezing temperatures...
... when replacing it or preparing the printer for your hands clean. Use up the ink cartridge by EPSON's warranties. A used cartridge may cause damages that part to prevent the power switch from its clear plastic packing until immediately before its installation. TM-J9000/J9100 9 Installing and Replacing the Ink ... Avoid touching that are not covered by the date indicated on or off the power switch and disconnect the power cord. When the printer is required, insert a pointed object into one of the holes of the switch is stored or not in high or freezing temperatures...
User Manual
Page 12
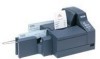
...replace an empty ink cartridge. 1. Make sure the printer power is convenient. The TM-J9000 has only one each for BLACK). Follow these steps to install an ink cartridge for COLOR. Change the cartridge as soon as it is on. Therefore, the TM-J9100 has two INK OUT LEDs, one for BLACK and one ...the ink cartridge. If it is lit or flashing. When the INK OUT LED comes on the front bottom-right of the printer. 2. English When the INK OUT LED flashes, it is lit or flashing. 3. When using both the black ink and colored ink, check which of the printer. (TM-J9100) 10 TM-J9000/J9100
...replace an empty ink cartridge. 1. Make sure the printer power is convenient. The TM-J9000 has only one each for BLACK). Follow these steps to install an ink cartridge for COLOR. Change the cartridge as soon as it is on. Therefore, the TM-J9100 has two INK OUT LEDs, one for BLACK and one ...the ink cartridge. If it is lit or flashing. When the INK OUT LED comes on the front bottom-right of the printer. 2. English When the INK OUT LED flashes, it is lit or flashing. 3. When using both the black ink and colored ink, check which of the printer. (TM-J9100) 10 TM-J9000/J9100

User Manual
Page 13
... Note: Do not turn off . This causes the printer to restart the ink charging, which the EPSON logo is correct. English 5. Take a new ink cartridge out of the used ink cartridges as industrial waste. Color Black (TM-J9100) 7. When the POWER LED stops flashing and stays...printer, the POWER LED will now go off the power or open any tape on , the printer is flashing. Handling Used Ink Cartridges Dispose of its packaging, and remove the yellow tape. Carefully insert a new ink cartridge from the top, and push it firmly but gently until it clicks in place. TM-J9000/J9100...
... Note: Do not turn off . This causes the printer to restart the ink charging, which the EPSON logo is correct. English 5. Take a new ink cartridge out of the used ink cartridges as industrial waste. Color Black (TM-J9100) 7. When the POWER LED stops flashing and stays...printer, the POWER LED will now go off the power or open any tape on , the printer is flashing. Handling Used Ink Cartridges Dispose of its packaging, and remove the yellow tape. Carefully insert a new ink cartridge from the top, and push it firmly but gently until it clicks in place. TM-J9000/J9100...
User Manual
Page 14
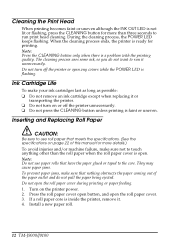
...not remove an ink cartridge except when replacing it or transporting the printer. ❏ Do not turn off the printer unnecessarily. ❏ Do not press the CLEANING button unless printing is faint or uneven. Install a new paper roll. 12 TM-J9000/J9100 Turn on page 22 of the paper outlet and do not ...want to run print head cleaning. During the cleaning process, the POWER LED keeps flashing. Do not turn on or off the printer or open any covers while the POWER LED ...
...not remove an ink cartridge except when replacing it or transporting the printer. ❏ Do not turn off the printer unnecessarily. ❏ Do not press the CLEANING button unless printing is faint or uneven. Install a new paper roll. 12 TM-J9000/J9100 Turn on page 22 of the paper outlet and do not ...want to run print head cleaning. During the cleaning process, the POWER LED keeps flashing. Do not turn on or off the printer or open any covers while the POWER LED ...
User Manual
Page 15
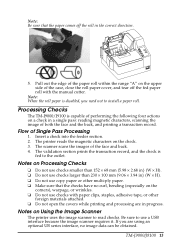
... USB interface because the image scanner requires it. Be sure to the outlet. Processing Checks The TM-J9000/J9100 is disabled, you are in progress. The scanner scans the images of Single Pass Processing 1. The printer reads the magnetic characters on the corners), warpage, or wrinkles. ❏ Do not use copy... are using an optional UB series interface, no curl, bending (especially on the check. 3. Notes on a check in the correct direction. TM-J9000/J9100 13 Note: Be sure that the checks have no image data can be obtained. Notes on the upper side of the case, close the ...
... USB interface because the image scanner requires it. Be sure to the outlet. Processing Checks The TM-J9000/J9100 is disabled, you are in progress. The scanner scans the images of Single Pass Processing 1. The printer reads the magnetic characters on the corners), warpage, or wrinkles. ❏ Do not use copy... are using an optional UB series interface, no curl, bending (especially on the check. 3. Notes on a check in the correct direction. TM-J9000/J9100 13 Note: Be sure that the checks have no image data can be obtained. Notes on the upper side of the case, close the ...

User Manual
Page 16
... as shown in the picture below , align the checks on the bottom-right corner as shown in the image before you insert them into the printer, release it immediately. As shown in the feeder guide to 25 checks in the picture below . ➀➁ 2. With the Auto Sheet ... printed) facing the front of the printer, continuously touching the feeder guide with its face (the side on attaching the pocket, and then insert the checks. When the check is ejected and the VALIDATION/FEEDER LED flashes again, remove the check. 14 TM-J9000/J9100 Ejecting Checks When a check is pulled...
... as shown in the picture below , align the checks on the bottom-right corner as shown in the image before you insert them into the printer, release it immediately. As shown in the feeder guide to 25 checks in the picture below . ➀➁ 2. With the Auto Sheet ... printed) facing the front of the printer, continuously touching the feeder guide with its face (the side on attaching the pocket, and then insert the checks. When the check is ejected and the VALIDATION/FEEDER LED flashes again, remove the check. 14 TM-J9000/J9100 Ejecting Checks When a check is pulled...
User Manual
Page 17
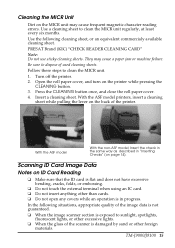
Turn off the printer. 2. TM-J9000/J9100 15 Follow these steps to clean the MICR unit regularly, at least every... roll paper cover, and turn on page 14). They may cause frequent magnetic character reading errors. With the ASF model printers, insert a cleaning sheet while pulling the lever on ID Card Reading ❏ Make sure that the ID card is in ..."Inserting Checks" (on the printer while pressing the CLEANING button. 3. Use the following situations, appropriate quality of the image data is not guaranteed. &#...
Turn off the printer. 2. TM-J9000/J9100 15 Follow these steps to clean the MICR unit regularly, at least every... roll paper cover, and turn on page 14). They may cause frequent magnetic character reading errors. With the ASF model printers, insert a cleaning sheet while pulling the lever on ID Card Reading ❏ Make sure that the ID card is in ..."Inserting Checks" (on the printer while pressing the CLEANING button. 3. Use the following situations, appropriate quality of the image data is not guaranteed. &#...

User Manual
Page 18
...scanner gets soiled from ink or paper dust, the quality of the image data may cause distortion and other problems with the bottom of the printer. Use a USB interface because the image scanner requires it immediately. Follow these steps to read side facing the ink cartridge cover, with ... ➀ ➁ 3. Insert the card straight with its read cards. English Note on Using the Image Scanner The printer uses the image scanner to clean the glass. 16 TM-J9000/J9100 If you use the optional UB series interface, no image data can be obtained. When the card is ejected and ID...
...scanner gets soiled from ink or paper dust, the quality of the image data may cause distortion and other problems with the bottom of the printer. Use a USB interface because the image scanner requires it immediately. Follow these steps to read side facing the ink cartridge cover, with ... ➀ ➁ 3. Insert the card straight with its read cards. English Note on Using the Image Scanner The printer uses the image scanner to clean the glass. 16 TM-J9000/J9100 If you use the optional UB series interface, no image data can be obtained. When the card is ejected and ID...

User Manual
Page 19
... pocket on the tab marked "Pull Open," and pull down the scanner unit, avoid knocking it from an excessive impact. 3. TM-J9000/J9100 17 Put your fingers on the right side of the printer, unlock the scanner cover, and remove it with a soft, dry cloth. Lightly wipe the glass shown in the picture with...
... pocket on the tab marked "Pull Open," and pull down the scanner unit, avoid knocking it from an excessive impact. 3. TM-J9000/J9100 17 Put your fingers on the right side of the printer, unlock the scanner cover, and remove it with a soft, dry cloth. Lightly wipe the glass shown in the picture with...

User Manual
Page 20
... ERROR LED comes on. 5. To attach the scanner cover, push it down into the connecting part firmly until the VALIDATION/FEEDER LED starts flashing. 18 TM-J9000/J9100 Validation Printing Notes on Validation Printing ❏ Do not use paper smaller than 152 × 68 mm {5.98 × 2.68 in} (W × H). ❏ Do not...
... ERROR LED comes on. 5. To attach the scanner cover, push it down into the connecting part firmly until the VALIDATION/FEEDER LED starts flashing. 18 TM-J9000/J9100 Validation Printing Notes on Validation Printing ❏ Do not use paper smaller than 152 × 68 mm {5.98 × 2.68 in} (W × H). ❏ Do not...

User Manual
Page 21
... then turn it on the label in the picture below. When the validation paper is flashing or lit ❏ The printer stops printing when the print head temperature goes up or down to remove the jammed paper or card. From above the validation section, insert a validation .... Install an ink cartridge. ❏ When the roll paper is enabled but no ink cartridge is installed, the ERROR LED comes on . Install a paper roll. TM-J9000/J9100 19
... then turn it on the label in the picture below. When the validation paper is flashing or lit ❏ The printer stops printing when the print head temperature goes up or down to remove the jammed paper or card. From above the validation section, insert a validation .... Install an ink cartridge. ❏ When the roll paper is enabled but no ink cartridge is installed, the ERROR LED comes on . Install a paper roll. TM-J9000/J9100 19
