
Technical Brief (Impact Printers)
Page 1
... printheads and superior quality ribbons. Contents This technical brief provides detailed information on the following topics, related to all have 3 numbers in their reliability with LQ FX-980-Nine-pin narrow carriage Wide carriage printers have 4 number in their names Narrow carriage printers have paper loaded and waiting. only impact printers can all EPSON impact printers: Functionality M Printing technology...
... printheads and superior quality ribbons. Contents This technical brief provides detailed information on the following topics, related to all have 3 numbers in their reliability with LQ FX-980-Nine-pin narrow carriage Wide carriage printers have 4 number in their names Narrow carriage printers have paper loaded and waiting. only impact printers can all EPSON impact printers: Functionality M Printing technology...
Technical Brief (Impact Printers)
Page 6
... print head EPSON Sales Training EPSON is a registered trademark of Seiko Epson Corporation. 1/00 Other trademarks are the property of the ribbon, the printer can be larger, since it doesn't have the extra weight of their respective owners. L EPSON brand ribbons are ... Technical Brief-Multimedia projectors Page 6 Reliability-Ribbon quality EPSON brand impact printer ribbons are superior to move the ribbon with the...
... print head EPSON Sales Training EPSON is a registered trademark of Seiko Epson Corporation. 1/00 Other trademarks are the property of the ribbon, the printer can be larger, since it doesn't have the extra weight of their respective owners. L EPSON brand ribbons are ... Technical Brief-Multimedia projectors Page 6 Reliability-Ribbon quality EPSON brand impact printer ribbons are superior to move the ribbon with the...

Product Support Bulletin(s)
Page 4
...Platen gap motor HP not detected correctly c. Physical obstruction such as a jammed ribbon 11 Skewed paper detect error. An undefined op-code was detected. Both features ...the ROMA board may require a repair, adjustment or replacement. PSB No: P-0076 Page: 4 of 4 LQ-2550 cont. 03 A 'Verify After Write" check to ensure proper paper handling and prevent paper jams, ...documented in printhead failures. The correct settings are usually caused by turning the printer off, taking out the paper and turning the printer back on. Four possible areas of these errors are corrected by new operators ...
...Platen gap motor HP not detected correctly c. Physical obstruction such as a jammed ribbon 11 Skewed paper detect error. An undefined op-code was detected. Both features ...the ROMA board may require a repair, adjustment or replacement. PSB No: P-0076 Page: 4 of 4 LQ-2550 cont. 03 A 'Verify After Write" check to ensure proper paper handling and prevent paper jams, ...documented in printhead failures. The correct settings are usually caused by turning the printer off, taking out the paper and turning the printer back on. Four possible areas of these errors are corrected by new operators ...
Product Support Bulletin(s)
Page 5
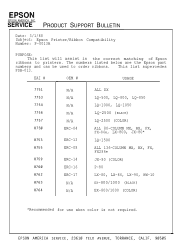
... ALL DX LQ-500, LQ-800, LQ-850 LQ-1000, LQ-1050 LQ-2500 (BLACK) LQ-2500 (COLOR) ALL 80-COLUMN MX, RX, FX, FX-86e, LX-800, JX-80* LQ-1500 ALL 136-COLUMN MX, RX, FX, FX286e JX-80 (COLOR) P-80 LX-80, LX-86, LX-90, HW-10 EX-800/1000 (BLACK) EX-800/1000 (COLOR...) *Recommended for use when color is not required. EPSON AMERICA SERVICE, 23610 TELO AVENUE, TORRANCE, CALIF. 90505 The numbers listed below are the Epson part numbers and can be used to printers. SERVICE PRODUCT SUPPORT BULLETIN Date: 3/1/88 Subject: Epson Printer/Ribbon Compatibility Number:...
... ALL DX LQ-500, LQ-800, LQ-850 LQ-1000, LQ-1050 LQ-2500 (BLACK) LQ-2500 (COLOR) ALL 80-COLUMN MX, RX, FX, FX-86e, LX-800, JX-80* LQ-1500 ALL 136-COLUMN MX, RX, FX, FX286e JX-80 (COLOR) P-80 LX-80, LX-86, LX-90, HW-10 EX-800/1000 (BLACK) EX-800/1000 (COLOR...) *Recommended for use when color is not required. EPSON AMERICA SERVICE, 23610 TELO AVENUE, TORRANCE, CALIF. 90505 The numbers listed below are the Epson part numbers and can be used to printers. SERVICE PRODUCT SUPPORT BULLETIN Date: 3/1/88 Subject: Epson Printer/Ribbon Compatibility Number:...

User Manual
Page 4
Contents Introduction Intro-1 1 Setting Up Your LQ Printer 1-1 Unpacking Your Printer 1-1 Installing the paper feed knob 1-3 Selecting the Right Location 1-4 Installing the Ribbon 1-5 Replacing the ribbon 1-8 Loading Single-Sheet Paper 1-8 Installing the single-sheet guide 1-8 Loading the paper 1-9... LINE FEED/DRAFT 1-15 Selecting the Letter Quality or Draft Mode 1-16 Running the Self Test 1-16 Connecting Your Printer to Your Computer 1-17 The parallel interface 1-18 The serial interface 1-18 Printing Your First Document 1-19 2 The...
Contents Introduction Intro-1 1 Setting Up Your LQ Printer 1-1 Unpacking Your Printer 1-1 Installing the paper feed knob 1-3 Selecting the Right Location 1-4 Installing the Ribbon 1-5 Replacing the ribbon 1-8 Loading Single-Sheet Paper 1-8 Installing the single-sheet guide 1-8 Loading the paper 1-9... LINE FEED/DRAFT 1-15 Selecting the Letter Quality or Draft Mode 1-16 Running the Self Test 1-16 Connecting Your Printer to Your Computer 1-17 The parallel interface 1-18 The serial interface 1-18 Printing Your First Document 1-19 2 The...

User Manual
Page 8
... Figures 1-1 The LQ-800 1-2 1-2 The LQ-1000 1-2 1-3 Installing the paper feed knob 1-3 1-4 Tightening the ribbon 1-5 1-5 Loading the LQ-800 ribbon cartridge 1-6 1-6 Loading the LQ-1000 ribbon cartridge 1-6 1-7 Positioning the ribbon 1-7 1-8 Installing the single-sheet guide 1-9 1-9 Loading single-sheet paper 1-10 1-10 Paper thickness lever 1-12 1-11 Turning on 2-9 2-9 Removing the cut sheet feeder 2-11 3-1 Continuous-feed paper with printer stand . . . . . . 3-1 3-2 Continuous...
... Figures 1-1 The LQ-800 1-2 1-2 The LQ-1000 1-2 1-3 Installing the paper feed knob 1-3 1-4 Tightening the ribbon 1-5 1-5 Loading the LQ-800 ribbon cartridge 1-6 1-6 Loading the LQ-1000 ribbon cartridge 1-6 1-7 Positioning the ribbon 1-7 1-8 Installing the single-sheet guide 1-9 1-9 Loading single-sheet paper 1-10 1-10 Paper thickness lever 1-12 1-11 Turning on 2-9 2-9 Removing the cut sheet feeder 2-11 3-1 Continuous-feed paper with printer stand . . . . . . 3-1 3-2 Continuous...

User Manual
Page 12
... changed to make it easier to use your new printer with earlier Epson manuals, you from unpacking, through ribbon and paper loading, to setting up your own characters, and more descriptive. If you are familiar with word processors, create graphics, define your new LQ-800 or LQ-1000, this man- Using this manual, doublewidth is used...
... changed to make it easier to use your new printer with earlier Epson manuals, you from unpacking, through ribbon and paper loading, to setting up your own characters, and more descriptive. If you are familiar with word processors, create graphics, define your new LQ-800 or LQ-1000, this man- Using this manual, doublewidth is used...

User Manual
Page 17
... shown in the direction of the platen. Now you're ready to the printer for ribbon installation and paper loading. If you've been using your printer. Manually move the print head to the middle of the arrow to touch the print head because it becomes hot during use. 2. Moving... the print head when the power is ON may damage your printer just before changing the ribbon cartridge, be OFF when moving the print head. Figure 1-4. Tightening the ribbon 1-5 The next time you install a ribbon or load paper, you can leave the cover on top in Figure 1-4. 3 Installing ...
... shown in the direction of the platen. Now you're ready to the printer for ribbon installation and paper loading. If you've been using your printer. Manually move the print head to the middle of the arrow to touch the print head because it becomes hot during use. 2. Moving... the print head when the power is ON may damage your printer just before changing the ribbon cartridge, be OFF when moving the print head. Figure 1-4. Tightening the ribbon 1-5 The next time you install a ribbon or load paper, you can leave the cover on top in Figure 1-4. 3 Installing ...

User Manual
Page 18
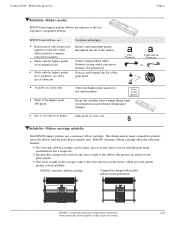
For the LQ-800, hold the cartridge by the raised plastic fin on each end of the cartridge; Press firmly on each . Loading the LQ-1000 ribbon cartridge 1-6 end of the cartridge into the printer, guiding the two square pins on top of the cartridge to make sure the pins are firmly seated in Figures 1-5 and 1-6. Loading the LQ-800 ribbon cartridge Figure 1-6. Figure 1-5. 3. Lower the cartridge into the slots in the printer frame, as shown in the slots. for the LQ-1000 hold the ribbon cartridge by the two plastic tabs.
For the LQ-800, hold the cartridge by the raised plastic fin on each end of the cartridge; Press firmly on each . Loading the LQ-1000 ribbon cartridge 1-6 end of the cartridge into the printer, guiding the two square pins on top of the cartridge to make sure the pins are firmly seated in Figures 1-5 and 1-6. Loading the LQ-800 ribbon cartridge Figure 1-6. Figure 1-5. 3. Lower the cartridge into the slots in the printer frame, as shown in the slots. for the LQ-1000 hold the ribbon cartridge by the two plastic tabs.

User Manual
Page 20
... complete the remaining setup steps before installing either of the optional systems. It is set up on the raised fin on top of the LQ-800 cartridge, or the two plastic tabs on single sheets of the printer. Also, ribbon cartridges for other Epson printers, such as shown below. Even if you install an optional system.
... complete the remaining setup steps before installing either of the optional systems. It is set up on the raised fin on top of the LQ-800 cartridge, or the two plastic tabs on single sheets of the printer. Also, ribbon cartridges for other Epson printers, such as shown below. Even if you install an optional system.

User Manual
Page 24
... paper thickness (about 1/500th of the printer as shown in Figure 1-10. To return the lever to the standard position, push it back until it clicks into the standard setting. 5 Turning On the Power With the ribbon and paper installed in the LQ, it's time to accommodate varying thicknesses ...of the printer. For thicker paper or multiple copies, pull the lever toward the front of paper. Adjusting the paper ...
... paper thickness (about 1/500th of the printer as shown in Figure 1-10. To return the lever to the standard position, push it back until it clicks into the standard setting. 5 Turning On the Power With the ribbon and paper installed in the LQ, it's time to accommodate varying thicknesses ...of the printer. For thicker paper or multiple copies, pull the lever toward the front of paper. Adjusting the paper ...

User Manual
Page 31
...if you are using the correct interface (serial or parallel)? trol panel ON? If not, press the ON LINE button to work with the LQ. q Is your printer properly connected to your first document, check the following chapter explains how to set the DIP switches accordingly? If you able to print. Are...above it. If you're using a serial interface, have any difficulty printing your computer? Make sure the ribbon is in Appendix D. 1-19 q Did you set up your word processor to place the LQ on the con- If not, check the DIP switch settings and try again. The following list to ...
...if you are using the correct interface (serial or parallel)? trol panel ON? If not, press the ON LINE button to work with the LQ. q Is your printer properly connected to your first document, check the following chapter explains how to set the DIP switches accordingly? If you able to print. Are...above it. If you're using a serial interface, have any difficulty printing your computer? Make sure the ribbon is in Appendix D. 1-19 q Did you set up your word processor to place the LQ on the con- If not, check the DIP switch settings and try again. The following list to ...

User Manual
Page 53
Top-of-page position Setting the top-of -page setting. The printer remembers this setting and uses it when any program tells it to move to advance the paper. Figure 3-10. Once you've loaded continuous-feed paper into the LQ and are familiar with the top of the next page, or when..., you are using a word processor or other applications program and the printing is OFF and use the FORM FEED button to the top of the ribbon guide, as shown in Figure 3-10. The separator ensures that the paper coming out of -page position so that comes packaged in . 3-8 If you can...
Top-of-page position Setting the top-of -page setting. The printer remembers this setting and uses it when any program tells it to move to advance the paper. Figure 3-10. Once you've loaded continuous-feed paper into the LQ and are familiar with the top of the next page, or when..., you are using a word processor or other applications program and the printing is OFF and use the FORM FEED button to the top of the ribbon guide, as shown in Figure 3-10. The separator ensures that the paper coming out of -page position so that comes packaged in . 3-8 If you can...

User Manual
Page 80
... it against the paper to produce a small dot. Each time a pin fires, it strikes the inked ribbon and presses it moves across the paper in draft or Letter Quality mode, the pins fire time after time... of 24 pins arranged in more than one column, but the intelligence of the printer handles the timing of unbroken lines. The LQ's print head has 24 pins. As the head moves across the page, electrical ...easiest way to print graphics on your monitor and then give a command to send the image to the printer. Instead, the letters and symbols seem to be made of pin firings so that the effect is ...
... it against the paper to produce a small dot. Each time a pin fires, it strikes the inked ribbon and presses it moves across the paper in draft or Letter Quality mode, the pins fire time after time... of 24 pins arranged in more than one column, but the intelligence of the printer handles the timing of unbroken lines. The LQ's print head has 24 pins. As the head moves across the page, electrical ...easiest way to print graphics on your monitor and then give a command to send the image to the printer. Instead, the letters and symbols seem to be made of pin firings so that the effect is ...

User Manual
Page 120
...head by moving the two locking levers to the left side of the printer. (The connector blocks stay attached to the left and right, as shown in Figure D-1. Figure D-1. Disconnect the two copper-colored ribbon cables by the arrows in Figure D-2. Print head replacement Slide the ...print head over to the printer.) D-9 Now lift the print head assembly out of the printer, and lift the print head off the carriage as indicated by...
...head by moving the two locking levers to the left side of the printer. (The connector blocks stay attached to the left and right, as shown in Figure D-1. Figure D-1. Disconnect the two copper-colored ribbon cables by the arrows in Figure D-2. Print head replacement Slide the ...print head over to the printer.) D-9 Now lift the print head assembly out of the printer, and lift the print head off the carriage as indicated by...

User Manual
Page 132
...Remove the dust cover. Remove the ribbon cartridge. Removing and replacing the printer case 1. many of the components are present inside the printer when the power is unplugged from its outlet. Do not remove the case and install optional interfaces unless the printer is switched OFF and the AC ..., beware of touching contacts on your body. G-2 WARNING High voltages are sensitive to both the printer and the computer, and disconnect the interface cable from the printer. 3. Internally Mounted Interface Cards Before you need to take off the paper feed knob on the right side ...
...Remove the dust cover. Remove the ribbon cartridge. Removing and replacing the printer case 1. many of the components are present inside the printer when the power is unplugged from its outlet. Do not remove the case and install optional interfaces unless the printer is switched OFF and the AC ..., beware of touching contacts on your body. G-2 WARNING High voltages are sensitive to both the printer and the computer, and disconnect the interface cable from the printer. 3. Internally Mounted Interface Cards Before you need to take off the paper feed knob on the right side ...

User Manual
Page 141
...) Vibration Operating 0.25 G, 55Hz (maximum) Storage 0.50 G, 55Hz (maximum) Insulation resistance . . . . . 10 megaohms between AC power line and chassis H-3 LQ-1000 3.8 in. 23.5 in. 13.2 in . Depth 13.2 in . Printer Ribbon Cartridge ribbon, black Ribbon life expectancy . . . . 2 million characters MCBF 5 million lines (excluding print head life) Print head life 200 million strokes Dimensions and weight...
...) Vibration Operating 0.25 G, 55Hz (maximum) Storage 0.50 G, 55Hz (maximum) Insulation resistance . . . . . 10 megaohms between AC power line and chassis H-3 LQ-1000 3.8 in. 23.5 in. 13.2 in . Depth 13.2 in . Printer Ribbon Cartridge ribbon, black Ribbon life expectancy . . . . 2 million characters MCBF 5 million lines (excluding print head life) Print head life 200 million strokes Dimensions and weight...

User Manual
Page 177
... buttons, 1-13-1-14 Paper bail, 1-9, 2-1, 3-3 feed knob, 1-2 release lever, 1-4, 1-9 separator, 3-8-3-9 thickness lever, 1-11 Paper loading continuous-feed, 3-1, 3-3-3-8 single-sheet, 1-8-1-11 troubleshooting, D-1 Parallel interface, 1-17, F-1-F-4 Parts, printer, 1-1 Pica mode, 5-5 Pin-feed paper. See Paper loading, continuous-feed Pin-feed holder and pin-feed lever, 3-14 Pins, firing and numbering, 6-3-6-4 Pitches. See Top...
... buttons, 1-13-1-14 Paper bail, 1-9, 2-1, 3-3 feed knob, 1-2 release lever, 1-4, 1-9 separator, 3-8-3-9 thickness lever, 1-11 Paper loading continuous-feed, 3-1, 3-3-3-8 single-sheet, 1-8-1-11 troubleshooting, D-1 Parallel interface, 1-17, F-1-F-4 Parts, printer, 1-1 Pica mode, 5-5 Pin-feed paper. See Paper loading, continuous-feed Pin-feed holder and pin-feed lever, 3-14 Pins, firing and numbering, 6-3-6-4 Pitches. See Top...


