
User Guide
Page 2
This will ensure that this User Guide is retained with your refrigerator for future reference. It is left with the information and warnings contained within the Guide. Should the appliance be sold or transferred to another owner, please ensure that the User Guide is important that the new owner can familiarize themselves with the appliance. English Français Page 1 - 48 Page 50 - 98 Important!
This will ensure that this User Guide is retained with your refrigerator for future reference. It is left with the information and warnings contained within the Guide. Should the appliance be sold or transferred to another owner, please ensure that the User Guide is important that the new owner can familiarize themselves with the appliance. English Français Page 1 - 48 Page 50 - 98 Important!

User Guide
Page 3
... not be available in all models) 30 Cleaning and caring for your refrigerator 33 Storing food in your refrigerator 37 Storing food in this User Guide, refers to change at any time. SAVE THESE INSTRUCTIONS The models shown in your local Fisher & Paykel dealer. For current details about the external display (Ice & Water models...
... not be available in all models) 30 Cleaning and caring for your refrigerator 33 Storing food in your refrigerator 37 Storing food in this User Guide, refers to change at any time. SAVE THESE INSTRUCTIONS The models shown in your local Fisher & Paykel dealer. For current details about the external display (Ice & Water models...
User Guide
Page 4
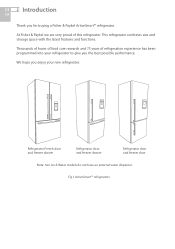
... give you the best possible performance. We hope you for buying a Fisher & Paykel ActiveSmart™ refrigerator. This refrigerator combines size and storage space with the latest features and functions. At Fisher & Paykel we are very proud of refrigeration experience has been programmed into your new refrigerator. Thousands of hours of food care research and 75 years of this...
... give you the best possible performance. We hope you for buying a Fisher & Paykel ActiveSmart™ refrigerator. This refrigerator combines size and storage space with the latest features and functions. At Fisher & Paykel we are very proud of refrigeration experience has been programmed into your new refrigerator. Thousands of hours of food care research and 75 years of this...

User Guide
Page 5
...to avoid hazards: - Disposal ■■ Extreme care must be taken when disposing your Fisher & Paykel Authorized Service Agent immediately to arrange for the appliance to be able to the refrigerant circuit, ventilate the area by opening all windows. Cleaning ■■ Many commercially available ... The doors should be removed and the shelves left in place so that may not easily climb inside. ■■ Your Fisher & Paykel Authorized Service Agent will be repaired. Failure to do not play with reduced physical, sensory or mental capabilities, or lack of ...
...to avoid hazards: - Disposal ■■ Extreme care must be taken when disposing your Fisher & Paykel Authorized Service Agent immediately to arrange for the appliance to be able to the refrigerant circuit, ventilate the area by opening all windows. Cleaning ■■ Many commercially available ... The doors should be removed and the shelves left in place so that may not easily climb inside. ■■ Your Fisher & Paykel Authorized Service Agent will be repaired. Failure to do not play with reduced physical, sensory or mental capabilities, or lack of ...
User Guide
Page 6
...and warmer than recommended. 2) Thawed but refrigerator cold - However, if your refrigerator is too cold. The food may explode. ■■ Never freeze liquids in glass containers. Fruits and some cooked food can only be carried out by Fisher & Paykel Authorized Service Agents. use as soon as ... end. ■■ If the power supply cord is designed to by your Fisher & Paykel Authorized Service Agent because special purpose tools are required. ■■ When moving your Fisher & Paykel Authorized Service Agent as soon as aerosol cans with bare skin, eg frozen ice ...
...and warmer than recommended. 2) Thawed but refrigerator cold - However, if your refrigerator is too cold. The food may explode. ■■ Never freeze liquids in glass containers. Fruits and some cooked food can only be carried out by Fisher & Paykel Authorized Service Agents. use as soon as ... end. ■■ If the power supply cord is designed to by your Fisher & Paykel Authorized Service Agent because special purpose tools are required. ■■ When moving your Fisher & Paykel Authorized Service Agent as soon as aerosol cans with bare skin, eg frozen ice ...

User Guide
Page 7
...refrigerator must be installed so the plug is accessible. ■■ To ensure that the appliance is not accidentally switched off, connect your appliance operates correctly. 1. Installation instructions 5 US CA Please follow the installation steps below to water leaks. ■■ Fisher & Paykel... Appliances does not accept responsibility for damage (including water damage) caused by an authorized plumber or Fisher & Paykel Authorized Service Agent as a cooktop, oven or dishwasher. 3. Power...
...refrigerator must be installed so the plug is accessible. ■■ To ensure that the appliance is not accidentally switched off, connect your appliance operates correctly. 1. Installation instructions 5 US CA Please follow the installation steps below to water leaks. ■■ Fisher & Paykel... Appliances does not accept responsibility for damage (including water damage) caused by an authorized plumber or Fisher & Paykel Authorized Service Agent as a cooktop, oven or dishwasher. 3. Power...
User Guide
Page 8
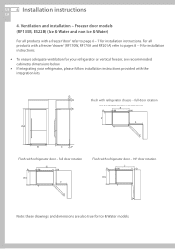
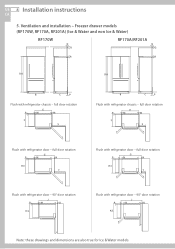
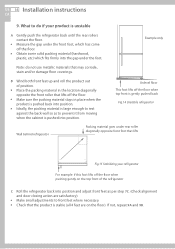
... DOOFRLURSOHTAWTIITOHNREFRIGERATOR DOOFRLU- 9S0H°WDIOTOHRRERFORTIAGTEIROANTOR DOOR - 90° DOOR ROTATION P M P NM NP M P OM O B C P FRONT VIEW PROFILE VIEW H/I H/I Q S S Q B R D A FRONT VIEW C P PROFILE VIEW R K/L T PLAN VIEW FLUSH WITH REFRIGERATOR DOOR - Freezer door models (RF135B, E522B) (Ice & Water and non Ice & Water) For all products with a freezer 'drawer' (RF170W, RF170A and RF201A) refer to pages...
... DOOFRLURSOHTAWTIITOHNREFRIGERATOR DOOFRLU- 9S0H°WDIOTOHRRERFORTIAGTEIROANTOR DOOR - 90° DOOR ROTATION P M P NM NP M P OM O B C P FRONT VIEW PROFILE VIEW H/I H/I Q S S Q B R D A FRONT VIEW C P PROFILE VIEW R K/L T PLAN VIEW FLUSH WITH REFRIGERATOR DOOR - Freezer door models (RF135B, E522B) (Ice & Water and non Ice & Water) For all products with a freezer 'drawer' (RF170W, RF170A and RF201A) refer to pages...
User Guide
Page 9
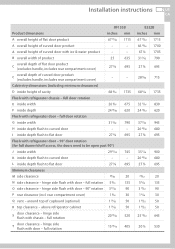
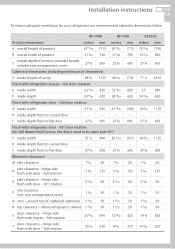
...including minimum clearances) D inside depth flush to flat door 27 3/8 695 Minimum clearances M side clearance 25/32 20 N side clearance - above refrigerator cabinet 1 31/32 50 S door clearance - B overall width of product 25 635 C overall depth of flat door product (excludes handle, ... 790 H inside height of curved door product - - full rotation 20 15/32 520 T door clearance - hinge side flush with refrigerator chassis - Installation instructions 7 US CA RF135B Product dimensions inches mm A overall height of flat door product 67 17/32 1715 A ...
...including minimum clearances) D inside depth flush to flat door 27 3/8 695 Minimum clearances M side clearance 25/32 20 N side clearance - above refrigerator cabinet 1 31/32 50 S door clearance - B overall width of product 25 635 C overall depth of flat door product (excludes handle, ... 790 H inside height of curved door product - - full rotation 20 15/32 520 T door clearance - hinge side flush with refrigerator chassis - Installation instructions 7 US CA RF135B Product dimensions inches mm A overall height of flat door product 67 17/32 1715 A ...
User Guide
Page 10
... also true for Ice & Water models. full door rotation P M D AG N P MJ OP NG N P P M DA N P M E OP N N M H/I P M K/L M H/I P K/L H/I T K/L H/I C P Flush with refrigerator dGoor - US 8 Installation instructions CA 5. Ventilation and installation - full door rotation Q QQ Q E P ME M P M M F F S S R R Flush with refrigerator chassis - Freezer drawer models (RF170W, RF170A, RF201A) (Ice & WPater aMnd Enon IcMe & Water) RF170W F Q Q RF170A/RF201A F S Q Q R R DA B P H/I C P G M DA...
... also true for Ice & Water models. full door rotation P M D AG N P MJ OP NG N P P M DA N P M E OP N N M H/I P M K/L M H/I P K/L H/I T K/L H/I C P Flush with refrigerator dGoor - US 8 Installation instructions CA 5. Ventilation and installation - full door rotation Q QQ Q E P ME M P M M F F S S R R Flush with refrigerator chassis - Freezer drawer models (RF170W, RF170A, RF201A) (Ice & WPater aMnd Enon IcMe & Water) RF170W F Q Q RF170A/RF201A F S Q Q R R DA B P H/I C P G M DA...
User Guide
Page 11
... door - full door rotation G inside width 37 7/32 945 41 23/32 1060 H inside height of cavity 68 5/16 1735 68 5/16 1735 Flush with refrigerator door - hinge side flush with chassis - rear compartment cover) 1 3/16 30 1 3/16 30 Q vent - full rotation 20 7/8 530 8 9/32 210 RF201A...C overall depth of cupboard (optional) 1 31/32 50 1 31/32 50 R top clearance - full rotation 5 5/16 135 5 5/16 135 O side clearance - above refrigerator cabinet 1 31/32 50 1 31/32 50 S door clearance - hinge side flush with door - 90° rotation 3 17/32 90 3 17/32 90 P rear clearance...
... door - full door rotation G inside width 37 7/32 945 41 23/32 1060 H inside height of cavity 68 5/16 1735 68 5/16 1735 Flush with refrigerator door - hinge side flush with chassis - rear compartment cover) 1 3/16 30 1 3/16 30 Q vent - full rotation 20 7/8 530 8 9/32 210 RF201A...C overall depth of cupboard (optional) 1 31/32 50 1 31/32 50 R top clearance - full rotation 5 5/16 135 5 5/16 135 O side clearance - above refrigerator cabinet 1 31/32 50 1 31/32 50 S door clearance - hinge side flush with door - 90° rotation 3 17/32 90 3 17/32 90 P rear clearance...

User Guide
Page 12
... water for the professional installer. ■■ The new tubings supplied with water that is not fitted to your Ice & Water refrigerator must be used . Fig.2 Water connection kit ■■ It is imperative the pressure reducing valve (PRV) is susceptible to ...be installed by an authorized plumber or Fisher & Paykel Authorized Service Agent. ■■ The water connection instructions below 22 psi (150 kPa). ■■ DO NOT use copper tubing. Installation precautions/warning ■■ DO NOT use with the refrigerator are intended only for longer than ...
... water for the professional installer. ■■ The new tubings supplied with water that is not fitted to your Ice & Water refrigerator must be used . Fig.2 Water connection kit ■■ It is imperative the pressure reducing valve (PRV) is susceptible to ...be installed by an authorized plumber or Fisher & Paykel Authorized Service Agent. ■■ The water connection instructions below 22 psi (150 kPa). ■■ DO NOT use copper tubing. Installation precautions/warning ■■ DO NOT use with the refrigerator are intended only for longer than ...
User Guide
Page 13
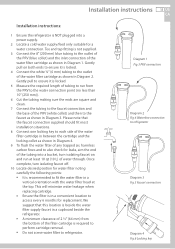
...from the bottom of the filter cartridge is required to perform cartridge removal. ■■ Do not screw water filter to refrigerator. This will minimize water leakage when replacing cartridge. ■■ Ensure the filter is in Diagram 1. Please note that ...supply. 2 Locate a cold water supply/feed only suitable for a water connection. Installation instructions 11 US CA Installation instructions: 1 Ensure the refrigerator is NOT plugged into a bucket, turn isolating faucet off. 10 Locate desired position for water filter noting carefully the following points: ■&#...
...from the bottom of the filter cartridge is required to perform cartridge removal. ■■ Do not screw water filter to refrigerator. This will minimize water leakage when replacing cartridge. ■■ Ensure the filter is in Diagram 1. Please note that ...supply. 2 Locate a cold water supply/feed only suitable for a water connection. Installation instructions 11 US CA Installation instructions: 1 Ensure the refrigerator is NOT plugged into a bucket, turn isolating faucet off. 10 Locate desired position for water filter noting carefully the following points: ■&#...

User Guide
Page 14
... screws provided as located in step 10 (refer to the previous page). 12 Run the ¼" (6 mm) tubing to the back of the refrigerator ensuring there is locked in as shown in PART: 838587 6 7 DRAWING: 838587 8 9 Diagram 5. Diagram 6 14 Insert the tubing marked 5/8"... (16 mm) into the water (solenoid) valve. 19 Read pages 13 - 14 carefully and then turn refrigerator on. Diagram 8 Diagram 9 Fig.8 Waterline connection to be replaced on the filter (date installed + 6 months). US 12 Installation instructions CA 11 Attach ...
... screws provided as located in step 10 (refer to the previous page). 12 Run the ¼" (6 mm) tubing to the back of the refrigerator ensuring there is locked in as shown in PART: 838587 6 7 DRAWING: 838587 8 9 Diagram 5. Diagram 6 14 Insert the tubing marked 5/8"... (16 mm) into the water (solenoid) valve. 19 Read pages 13 - 14 carefully and then turn refrigerator on. Diagram 8 Diagram 9 Fig.8 Waterline connection to be replaced on the filter (date installed + 6 months). US 12 Installation instructions CA 11 Attach ...

User Guide
Page 15
... all push-fit connections are firmly pushed into place. The tube should push in 5/8" (16 mm) before reaching the stop water flow), clear of the refrigerator rear compartment and not in a location where it can be fully inserted to remove the static line pressure. Push in Diagram 10. Diagram 10 Diagram...
... all push-fit connections are firmly pushed into place. The tube should push in 5/8" (16 mm) before reaching the stop water flow), clear of the refrigerator rear compartment and not in a location where it can be fully inserted to remove the static line pressure. Push in Diagram 10. Diagram 10 Diagram...

User Guide
Page 16
...twice. Failure to do this will not flip until water is on. ■■ Press and hold the , and buttons together for your refrigerator to cool before use. ■■ Please discard the first 3 harvests of ice (8 cubes per harvest). Fig.10 Water dispenser Please note...complete a few drips may appear out of water from your water dispenser, stopping intermittently to remove trapped air in excessive dripping from your ActiveSmart™ refrigerator. Note that the ice tray will result in the system. Empty the water, dry and replace the bin. Note: there will be a 1...
...twice. Failure to do this will not flip until water is on. ■■ Press and hold the , and buttons together for your refrigerator to cool before use. ■■ Please discard the first 3 harvests of ice (8 cubes per harvest). Fig.10 Water dispenser Please note...complete a few drips may appear out of water from your water dispenser, stopping intermittently to remove trapped air in excessive dripping from your ActiveSmart™ refrigerator. Note that the ice tray will result in the system. Empty the water, dry and replace the bin. Note: there will be a 1...

User Guide
Page 17
...Fisher & Paykel ActiveSmart™ refrigerator is fitted with front and rear rollers, designed for moving the product in the same way (refer to lift up making sure there is in a sideways direction as this may damage the rollers or the floor covering/surface. Lower the front of the refrigerator...If left hand door is too low, then unscrew the left hand foot to figures 12 and 13). Levelling of the refrigerator Fig.11 Refrigerator feet B Roll the refrigerator into its final position making moving the product in place and aligned with the front approximately 1/2" (10 mm) higher than...
...Fisher & Paykel ActiveSmart™ refrigerator is fitted with front and rear rollers, designed for moving the product in the same way (refer to lift up making sure there is in a sideways direction as this may damage the rollers or the floor covering/surface. Lower the front of the refrigerator...If left hand door is too low, then unscrew the left hand foot to figures 12 and 13). Levelling of the refrigerator Fig.11 Refrigerator feet B Roll the refrigerator into its final position making moving the product in place and aligned with the front approximately 1/2" (10 mm) higher than...
User Guide
Page 18
...solid packing material (hardwood, plastic, etc) which has come off the floor when top front is gently pushed back Fig.14 Unstable refrigerator Wall behind refrigerator Packing material goes under rear roller diagonally opposite front foot that lifts Fig.15 Stabilizing your product is stable (all 4 feet are ... in the location diagonally opposite the front roller that lifts off the floor when pushing gently on the top front of the refrigerator C Roll the refrigerator back into position and adjust front feet as to front feet where necessary. ■■ Check that may corrode, stain ...
...solid packing material (hardwood, plastic, etc) which has come off the floor when top front is gently pushed back Fig.14 Unstable refrigerator Wall behind refrigerator Packing material goes under rear roller diagonally opposite front foot that lifts Fig.15 Stabilizing your product is stable (all 4 feet are ... in the location diagonally opposite the front roller that lifts off the floor when pushing gently on the top front of the refrigerator C Roll the refrigerator back into position and adjust front feet as to front feet where necessary. ■■ Check that may corrode, stain ...
User Guide
Page 19
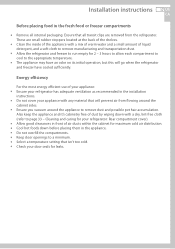
...vacuum around the appliance to a minimum. ■■ Select a temperature setting that isn't too cold. ■■ Check your refrigerator has adequate ventilation as recommended in the fresh food or freezer compartments ■■ Remove all internal packaging. Energy efficiency For the most ...use of liquid detergent, and a soft cloth to remove manufacturing and transportation dust. ■■ Allow the refrigerator and freezer to run empty for your refrigerator: Rear compartment cover). ■■ Allow good clearances in front of dust by wiping down before placing ...
...vacuum around the appliance to a minimum. ■■ Select a temperature setting that isn't too cold. ■■ Check your refrigerator has adequate ventilation as recommended in the fresh food or freezer compartments ■■ Remove all internal packaging. Energy efficiency For the most ...use of liquid detergent, and a soft cloth to remove manufacturing and transportation dust. ■■ Allow the refrigerator and freezer to run empty for your refrigerator: Rear compartment cover). ■■ Allow good clearances in front of dust by wiping down before placing ...
User Guide
Page 20
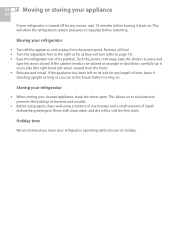
... If the cabinet needs to be placed at an angle or laid down, carefully lay it standing upright as long as they will allow the refrigeration system pressures to circulate and prevents the build up of bacteria and moulds. ■■ Before using again, clean well using a mixture of...restarting. If the appliance has been left on . Remove all food. ■■ Turn the adjustable feet to page 15). ■■ Ease the refrigerator out of liquid dishwashing detergent. This will turn (refer to the right as far as you leave your cleaned appliance, leave the doors open. Tuck...
... If the cabinet needs to be placed at an angle or laid down, carefully lay it standing upright as long as they will allow the refrigeration system pressures to circulate and prevents the build up of bacteria and moulds. ■■ Before using again, clean well using a mixture of...restarting. If the appliance has been left on . Remove all food. ■■ Turn the adjustable feet to page 15). ■■ Ease the refrigerator out of liquid dishwashing detergent. This will turn (refer to the right as far as you leave your cleaned appliance, leave the doors open. Tuck...
User Guide
Page 21
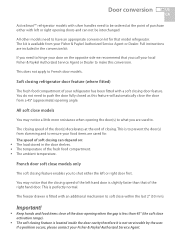
...; Keep hands and food items clear of the door opening the door(s) to what you call your local Fisher & Paykel Authorized Service Agent or Dealer to ensure your Fisher & Paykel Authorized Service Agent or Dealer. Full instructions are used to. You do not need to push the door ...that model refrigerator. The kit is not serviceable by the user. The closing speed of the fresh food compartment. ■■ The ambient temperature. This is perfectly normal. This is to prevent the door(s) from your food items are cared for that of your Fisher & Paykel Authorized Service...
...; Keep hands and food items clear of the door opening the door(s) to what you call your local Fisher & Paykel Authorized Service Agent or Dealer to ensure your Fisher & Paykel Authorized Service Agent or Dealer. Full instructions are used to. You do not need to push the door ...that model refrigerator. The kit is not serviceable by the user. The closing speed of the fresh food compartment. ■■ The ambient temperature. This is perfectly normal. This is to prevent the door(s) from your food items are cared for that of your Fisher & Paykel Authorized Service...
