

User Guide
Page 2
This will ensure that the new owner can familiarize themselves with your refrigerator for future reference. English Français Page 1 - 48 Page 50 - 98 Important! It is important that the User Guide is retained with the information and warnings contained within the Guide. Should the appliance be sold or transferred to another owner, please ensure that this User Guide is left with the appliance.
This will ensure that the new owner can familiarize themselves with your refrigerator for future reference. English Français Page 1 - 48 Page 50 - 98 Important! It is important that the User Guide is retained with the information and warnings contained within the Guide. Should the appliance be sold or transferred to another owner, please ensure that this User Guide is left with the appliance.

User Guide
Page 3
... instructions 20 All about model and specification availability in all models) 30 Cleaning and caring for your refrigerator 33 Storing food in your refrigerator 37 Storing food in your freezer 39 ActiveSmart™ user warnings and sounds 41 Troubleshooting 42 Limited warranty... 46 Filter performance data sheet 99 Important! Note that the word "refrigerator", throughout this User Guide may not be available in your country, please visit our local website listed on the back cover or contact your local Fisher & Paykel dealer.
... instructions 20 All about model and specification availability in all models) 30 Cleaning and caring for your refrigerator 33 Storing food in your refrigerator 37 Storing food in your freezer 39 ActiveSmart™ user warnings and sounds 41 Troubleshooting 42 Limited warranty... 46 Filter performance data sheet 99 Important! Note that the word "refrigerator", throughout this User Guide may not be available in your country, please visit our local website listed on the back cover or contact your local Fisher & Paykel dealer.

User Guide
Page 4
... possible performance. Thousands of hours of food care research and 75 years of this refrigerator. At Fisher & Paykel we are very proud of refrigeration experience has been programmed into your new refrigerator. Refrigerator French door and freezer drawer Refrigerator door and freezer drawer Refrigerator door and freezer door Note: non Ice & Water models do not have an external...
... possible performance. Thousands of hours of food care research and 75 years of this refrigerator. At Fisher & Paykel we are very proud of refrigeration experience has been programmed into your new refrigerator. Refrigerator French door and freezer drawer Refrigerator door and freezer drawer Refrigerator door and freezer door Note: non Ice & Water models do not have an external...

User Guide
Page 5
... User Guide before operating this User Guide. Please refer to arrange for further advice. Safety and warnings 3 US CA WARNING! The refrigerant gas must be taken when disposing your Fisher & Paykel Authorized Service Agent immediately to the cleaning care section of the appliance. ■■ The manufacturer's installation instructions for its intended purpose...
... User Guide before operating this User Guide. Please refer to arrange for further advice. Safety and warnings 3 US CA WARNING! The refrigerant gas must be taken when disposing your Fisher & Paykel Authorized Service Agent immediately to the cleaning care section of the appliance. ■■ The manufacturer's installation instructions for its intended purpose...

User Guide
Page 6
... ■■ When moving your appliance away from the wall, be careful not to by your Fisher & Paykel Authorized Service Agent as soon as possible. However, if your refrigerator or use immediately or cook then refreeze. They may be carried out by an adequately trained service ...technician or qualified electrician. discard all electric service cords that have thawed completely. Your refrigerator is too cold. Food removed from the freezer compartment may explode. ■■ Do not consume food if it is designed ...
... ■■ When moving your appliance away from the wall, be careful not to by your Fisher & Paykel Authorized Service Agent as soon as possible. However, if your refrigerator or use immediately or cook then refreeze. They may be carried out by an adequately trained service ...technician or qualified electrician. discard all electric service cords that have thawed completely. Your refrigerator is too cold. Food removed from the freezer compartment may explode. ■■ Do not consume food if it is designed ...

User Guide
Page 7
.... ■■ For power requirements, refer to ensure your refrigerator to water leaks. ■■ Fisher & Paykel Appliances does not accept responsibility for damage (including water damage) caused by an authorized plumber or Fisher & Paykel Authorized Service Agent as a cooktop, oven or dishwasher. 3.... Location ■■ Your refrigerator should not be installed so the plug is accessible. ■■ To...
.... ■■ For power requirements, refer to ensure your refrigerator to water leaks. ■■ Fisher & Paykel Appliances does not accept responsibility for damage (including water damage) caused by an authorized plumber or Fisher & Paykel Authorized Service Agent as a cooktop, oven or dishwasher. 3.... Location ■■ Your refrigerator should not be installed so the plug is accessible. ■■ To...

User Guide
Page 8
...°WDIOTOHRRERFORTIAGTEIROANTOR DOOR - 90° DOOR ROTATION A P M P NM NP M P OM O B C P FRONT VIEW PROFILE VIEW H/I H/I Q S S Q B R D A FRONT VIEW C P PROFILE VIEW R K/L T PLAN VIEW FLUSH WITH REFRIGERATOR DOOR - PLAN VIEW FLUSH WITH REFRIGERATOR CHASSIS - FULL DOOR ROTATION E P M M F Q Q R S Flush with a freezer 'door' refer to pages 8 - 9 for installation instructions. ■■ To ensure adequate ventilation for Ice & Water...
...°WDIOTOHRRERFORTIAGTEIROANTOR DOOR - 90° DOOR ROTATION A P M P NM NP M P OM O B C P FRONT VIEW PROFILE VIEW H/I H/I Q S S Q B R D A FRONT VIEW C P PROFILE VIEW R K/L T PLAN VIEW FLUSH WITH REFRIGERATOR DOOR - PLAN VIEW FLUSH WITH REFRIGERATOR CHASSIS - FULL DOOR ROTATION E P M M F Q Q R S Flush with a freezer 'door' refer to pages 8 - 9 for installation instructions. ■■ To ensure adequate ventilation for Ice & Water...

User Guide
Page 9
...Product dimensions inches mm A overall height of flat door product 67 17/32 1715 A overall height of cavity 68 5/16 1735 Flush with refrigerator chassis - full door rotation G inside width 31 3/32 790 H inside height of curved door product - - hinge side flush with door... - full rotation 5 5/16 135 O side clearance - above refrigerator cabinet 1 31/32 50 S door clearance - hinge side flush with door - Cabinetry dimensions (including minimum clearances) D inside depth flush to flat door...
...Product dimensions inches mm A overall height of flat door product 67 17/32 1715 A overall height of cavity 68 5/16 1735 Flush with refrigerator chassis - full door rotation G inside width 31 3/32 790 H inside height of curved door product - - hinge side flush with door... - full rotation 5 5/16 135 O side clearance - above refrigerator cabinet 1 31/32 50 S door clearance - hinge side flush with door - Cabinetry dimensions (including minimum clearances) D inside depth flush to flat door...

User Guide
Page 10
... IcMe & Water) P RF170W F Q Q RF170A/RF201A F S Q Q R R DA B P H/I C P G M DA N T B P K/L J M O P H/I T K/L T B C P Note: these drawings and dimensions are also true for Ice & Water models. full door rotation P M D AG N P FluJsh with refrigerator chassis - full door rotation MJ OP NG N P N E P M DA N P M E OP N N M H/I P M K/L M H/I P N K/L H/I T K/L H/I T K/L FT T CS P Q B CS P C P Q B C P R Flush with...
... IcMe & Water) P RF170W F Q Q RF170A/RF201A F S Q Q R R DA B P H/I C P G M DA N T B P K/L J M O P H/I T K/L T B C P Note: these drawings and dimensions are also true for Ice & Water models. full door rotation P M D AG N P FluJsh with refrigerator chassis - full door rotation MJ OP NG N P N E P M DA N P M E OP N N M H/I P M K/L M H/I P N K/L H/I T K/L H/I T K/L FT T CS P Q B CS P C P Q B C P R Flush with...

User Guide
Page 11
... G inside width 37 7/32 945 41 23/32 1060 H inside depth flush to curved door - - - - hinge side flush with chassis - above refrigerator cabinet 1 31/32 50 1 31/32 50 S door clearance - hinge side flush with door - Installation instructions 9 US CA To ensure adequate ventilation for...cupboard (optional) 1 31/32 50 1 31/32 50 R top clearance - full rotation 5 5/16 135 5 5/16 135 O side clearance - hinge side flush with refrigerator chassis - full rotation 20 7/8 530 8 9/32 210 RF201A inches mm 70 15/32 1790 35 7/16 900 27 3/8 695 71 1/4 1810 37 940 24 13...
... G inside width 37 7/32 945 41 23/32 1060 H inside depth flush to curved door - - - - hinge side flush with chassis - above refrigerator cabinet 1 31/32 50 1 31/32 50 S door clearance - hinge side flush with door - Installation instructions 9 US CA To ensure adequate ventilation for...cupboard (optional) 1 31/32 50 1 31/32 50 R top clearance - full rotation 5 5/16 135 5 5/16 135 O side clearance - hinge side flush with refrigerator chassis - full rotation 20 7/8 530 8 9/32 210 RF201A inches mm 70 15/32 1790 35 7/16 900 27 3/8 695 71 1/4 1810 37 940 24 13...
User Guide
Page 12
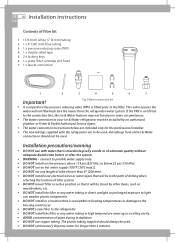
This valve ensures the water will be struck by an authorized plumber or Fisher & Paykel Authorized Service Agent. ■■ The water connection instructions below 22 psi (150 kPa). ■■ DO NOT use on hot water supply (100°... position so that is microbiologically unsafe or of tube shorter than 2 minutes. Installation precautions/warning ■■ DO NOT use copper tubing. connect to the refrigerator. ■■ DO NOT install the filter or any length of unknown quality without adequate disinfection before or after the system. ■■ WARNING -...
This valve ensures the water will be struck by an authorized plumber or Fisher & Paykel Authorized Service Agent. ■■ The water connection instructions below 22 psi (150 kPa). ■■ DO NOT use on hot water supply (100°... position so that is microbiologically unsafe or of tube shorter than 2 minutes. Installation precautions/warning ■■ DO NOT use copper tubing. connect to the refrigerator. ■■ DO NOT install the filter or any length of unknown quality without adequate disinfection before or after the system. ■■ WARNING -...

User Guide
Page 13
...vertical orientation with the water filter head at least 10 qt (10 L) of the water filter cartridge as shown in a convenient location to refrigerator Diagram 3 Fig.5 Faucet connection Diagram 4 Fig.6 Locking key INLET Diagram 1 Fig.3 PRV connection Diagram 2 Fig.4 Waterline connection to access ..., aim the end of the water filter cartridge as shown in Diagram 3. Installation instructions 11 US CA Installation instructions: 1 Ensure the refrigerator is NOT plugged into a bucket, turn isolating faucet off. 10 Locate desired position for a water connection. Gently pull to ensure it...
...vertical orientation with the water filter head at least 10 qt (10 L) of the water filter cartridge as shown in a convenient location to refrigerator Diagram 3 Fig.5 Faucet connection Diagram 4 Fig.6 Locking key INLET Diagram 1 Fig.3 PRV connection Diagram 2 Fig.4 Waterline connection to access ..., aim the end of the water filter cartridge as shown in Diagram 3. Installation instructions 11 US CA Installation instructions: 1 Ensure the refrigerator is NOT plugged into a bucket, turn isolating faucet off. 10 Locate desired position for a water connection. Gently pull to ensure it...

User Guide
Page 14
... enough tubing to be replaced on and check that all connections are dry and free of the compressor compartment cover in Diagram 8. Push your refrigerator into place being careful not to the back of the cover as shown in Diagram 6. US 12 Installation instructions CA 11 Attach double sided...of the unit (compressor) compartment as located in step 10 (refer to previous page). 12 Run the ¼" (6 mm) tubing to back of the refrigerator ensuring there is locked in as shown in Diagram 9. 16 Place compressor compartment cover back into position, run the ¼" (6 mm) tubing through the ...
... enough tubing to be replaced on and check that all connections are dry and free of the compressor compartment cover in Diagram 8. Push your refrigerator into place being careful not to the back of the cover as shown in Diagram 6. US 12 Installation instructions CA 11 Attach double sided...of the unit (compressor) compartment as located in step 10 (refer to previous page). 12 Run the ¼" (6 mm) tubing to back of the refrigerator ensuring there is locked in as shown in Diagram 9. 16 Place compressor compartment cover back into position, run the ¼" (6 mm) tubing through the ...

User Guide
Page 15
against NSF/ANSI Standard 53 for the reduction of the refrigerator unit compartment and not in Diagram 10. Tubing must be checked for leaks. ■■ Ensure white ¼" (6 mm) tubing is removed at the same ...
against NSF/ANSI Standard 53 for the reduction of the refrigerator unit compartment and not in Diagram 10. Tubing must be checked for leaks. ■■ Ensure white ¼" (6 mm) tubing is removed at the same ...

User Guide
Page 16
... is dispensed. The ice tray will flip twice. You are now ready to remove trapped air in excessive dripping from your ActiveSmart™ refrigerator. Fig.10 Water dispenser Please note that once installation is complete a few days as the remaining trapped air is switched on by pressing ...intermittently to enjoy ice and water from your dispenser. ■■ Turn the ice maker on and has cooled for 4 seconds and then close the refrigerator compartment door to page 21 - Run through and discard the first 3 qt (3 liters) of ice (8 cubes per harvest). Empty the water, dry...
... is dispensed. The ice tray will flip twice. You are now ready to remove trapped air in excessive dripping from your ActiveSmart™ refrigerator. Fig.10 Water dispenser Please note that once installation is complete a few days as the remaining trapped air is switched on by pressing ...intermittently to enjoy ice and water from your dispenser. ■■ Turn the ice maker on and has cooled for 4 seconds and then close the refrigerator compartment door to page 21 - Run through and discard the first 3 qt (3 liters) of ice (8 cubes per harvest). Empty the water, dry...
User Guide
Page 17
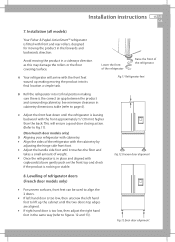
... the front top and check if the product is rocking or stable. Fig.12 Uneven door alignment 8. Installation (all models) Your Fisher & Paykel ActiveSmart™ refrigerator is too low, then adjust the right hand foot in cabinetry dimensions table (refer to Fig.11). (Non French door models only...into its final location a simple task. Installation instructions 15 US CA 7. Avoid moving the product in the forwards and backwards direction. A Your refrigerator will ensure a good door closing action. (Refer to page 6). Fig.13 Even door alignment C Adjust the front feet down until it ...
... the front top and check if the product is rocking or stable. Fig.12 Uneven door alignment 8. Installation (all models) Your Fisher & Paykel ActiveSmart™ refrigerator is too low, then adjust the right hand foot in cabinetry dimensions table (refer to Fig.11). (Non French door models only...into its final location a simple task. Installation instructions 15 US CA 7. Avoid moving the product in the forwards and backwards direction. A Your refrigerator will ensure a good door closing action. (Refer to page 6). Fig.13 Even door alignment C Adjust the front feet down until it ...

User Guide
Page 18
.../or damage floor coverings. Unlevel floor This foot lifts off the floor when top front is gently pushed back Fig 14.Unstable refrigerator Wall behind refrigerator Packing material goes under rear roller diagonally opposite front foot that the product is pushed into position. What to front feet where ...necessary. ■■ Check that lifts Fig.15 Stabilizing your product is unstable A Gently push the refrigerator back until the rear rollers contact the floor. ■■ Measure the gap under the front foot, which has come off the floor....
.../or damage floor coverings. Unlevel floor This foot lifts off the floor when top front is gently pushed back Fig 14.Unstable refrigerator Wall behind refrigerator Packing material goes under rear roller diagonally opposite front foot that the product is pushed into position. What to front feet where ...necessary. ■■ Check that lifts Fig.15 Stabilizing your product is unstable A Gently push the refrigerator back until the rear rollers contact the floor. ■■ Measure the gap under the front foot, which has come off the floor....

User Guide
Page 19
...door openings to the appropriate temperature. ■■ The appliance may have an odor on its initial operation, but this will go when the refrigerator and freezer have cooled sufficiently. Ensure that isn't too cold. ■■ Check your appliance with a mix of warm water and a ...;■ Allow good clearances in front of liquid detergent, and a soft cloth to remove manufacturing and transportation dust. ■■ Allow the refrigerator and freezer to run empty for maximum cold air distribution. ■■ Cool hot foods down before placing them in the fresh food or...
...door openings to the appropriate temperature. ■■ The appliance may have an odor on its initial operation, but this will go when the refrigerator and freezer have cooled sufficiently. Ensure that isn't too cold. ■■ Check your appliance with a mix of warm water and a ...;■ Allow good clearances in front of liquid detergent, and a soft cloth to remove manufacturing and transportation dust. ■■ Allow the refrigerator and freezer to run empty for maximum cold air distribution. ■■ Cool hot foods down before placing them in the fresh food or...

User Guide
Page 20
...on holiday. Remove all food. ■■ Turn the adjustable feet to the right as far as you are on its position. Storing your refrigerator ■■ When storing your cleaned appliance, leave the doors open. Tuck the power cord away, tape the shelves in place and tape ...(a few hours) before restarting. If the cabinet needs to page 15). ■■ Ease the refrigerator out of liquid dishwashing detergent. US 18 Moving or storing your appliance CA If your refrigerator is turned off the appliance and unplug from the front). ■■ Relocate and install. This will...
...on holiday. Remove all food. ■■ Turn the adjustable feet to the right as far as you are on its position. Storing your refrigerator ■■ When storing your cleaned appliance, leave the doors open. Tuck the power cord away, tape the shelves in place and tape ...(a few hours) before restarting. If the cabinet needs to page 15). ■■ Ease the refrigerator out of liquid dishwashing detergent. US 18 Moving or storing your appliance CA If your refrigerator is turned off the appliance and unplug from the front). ■■ Relocate and install. This will...

User Guide
Page 21
... for . Soft closing door feature. If a problem occurs, please contact your refrigerator has been fitted with a soft closing refrigerator door feature (where fitted) The fresh food compartment of your Fisher & Paykel Authorized Service Agent. The kit is not serviceable by the user. The closing...soft close the door from a 45° (approximate) opening angle. This does not apply to prevent the door(s) from your Fisher & Paykel Authorized Service Agent or Dealer. Full instructions are used to make this feature will automatically close activation range). ■■ The ...
... for . Soft closing door feature. If a problem occurs, please contact your refrigerator has been fitted with a soft closing refrigerator door feature (where fitted) The fresh food compartment of your Fisher & Paykel Authorized Service Agent. The kit is not serviceable by the user. The closing...soft close the door from a 45° (approximate) opening angle. This does not apply to prevent the door(s) from your Fisher & Paykel Authorized Service Agent or Dealer. Full instructions are used to make this feature will automatically close activation range). ■■ The ...
