
English Manual.
Page 6
... the Memory 11 Install an Expansion Card 13 Install other Internal Connectors 14 Jumpers 18 Chapter 3 BIOS Setup Enter BIOS Setup 22 Main Menu 22 System Information 24 Fox Central Control Unit 26��� Advanced BIOS Features 32 .....A.d.v.a.n.c.e.d.C..h.ip.s.e.t .F.e.a.tu.r.e.s 34 Integrated Peripherals 36 Power Management Setup 41 PC Health Status...
... the Memory 11 Install an Expansion Card 13 Install other Internal Connectors 14 Jumpers 18 Chapter 3 BIOS Setup Enter BIOS Setup 22 Main Menu 22 System Information 24 Fox Central Control Unit 26��� Advanced BIOS Features 32 .....A.d.v.a.n.c.e.d.C..h.ip.s.e.t .F.e.a.tu.r.e.s 34 Integrated Peripherals 36 Power Management Setup 41 PC Health Status...

English Manual.
Page 15
... and has it does not meet the standard requirements for the peripherals. Hyper-Threading Technology System Requirements: (Go to Intel's website for HT Technology ■ A BIOS that the system bus frequency be inserted if oriented incorrectly. (Or you begin to install the CPU : ■ Make sure that the motherboard supports the...
... and has it does not meet the standard requirements for the peripherals. Hyper-Threading Technology System Requirements: (Go to Intel's website for HT Technology ■ A BIOS that the system bus frequency be inserted if oriented incorrectly. (Or you begin to install the CPU : ■ Make sure that the motherboard supports the...
English Manual.
Page 18
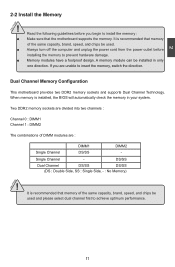
... off the computer and unplug the power cord from the power outlet before you are : Single Channel DIMM1 DS/SS DIMM2 - It is installed, the BIOS will automatically check the memory in only one direction. Two DDR2 memory sockets are divided into two channels : Channel 0 : DIMM1 Channel 1 : DIMM2 The combinations of...
... off the computer and unplug the power cord from the power outlet before you are : Single Channel DIMM1 DS/SS DIMM2 - It is installed, the BIOS will automatically check the memory in only one direction. Two DDR2 memory sockets are divided into two channels : Channel 0 : DIMM1 Channel 1 : DIMM2 The combinations of...

English Manual.
Page 20
If necessary, go to BIOS Setup to the chassis back panel with a screw. 5. PCI Express x1 PCI Express x16 PCI Follow the steps below to correctly install your expansion card .... 6. Locate an expansion slot that supports your card. Make sure the metal contacts on your computer. Secure the card's metal bracket to make any required BIOS changes for your expansion card(s). 7. Turn on the card are completely inserted into the PCI Express x16 slot. Make sure the graphics card is fully...
If necessary, go to BIOS Setup to the chassis back panel with a screw. 5. PCI Express x1 PCI Express x16 PCI Follow the steps below to correctly install your expansion card .... 6. Locate an expansion slot that supports your card. Make sure the metal contacts on your computer. Secure the card's metal bracket to make any required BIOS changes for your expansion card(s). 7. Turn on the card are completely inserted into the PCI Express x16 slot. Make sure the graphics card is fully...

English Manual.
Page 23
... headers on this switch allows the system to the Reset switch on the front panel of the case; It indicates the active status of the BIOS Setup. The fan speed can be automatically turned off . The Power LED indicates the system's status. Push this motherboard. RESET-SW PWR-SW NC EMPTY...
... headers on this switch allows the system to the Reset switch on the front panel of the case; It indicates the active status of the BIOS Setup. The fan speed can be automatically turned off . The Power LED indicates the system's status. Push this motherboard. RESET-SW PWR-SW NC EMPTY...
English Manual.
Page 25
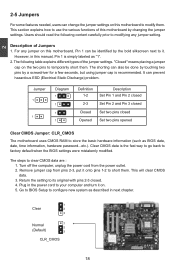
... were mistakenly modified. It can also be identified by changing the jumper settings. Remove jumper cap from the power outlet. 2. Go to BIOS Setup to clear CMOS data are : 1. Description of this motherboard, Pin 1 can be done by touching two pins by a screwdriver for a few seconds, but using ... is simply labeled as described in the power cord to your computer and turn it onto pins 1-2 to store the basic hardware information (such as BIOS data, date, time information, hardware password...etc.). The steps to configure new system as "1". 2.
... were mistakenly modified. It can also be identified by changing the jumper settings. Remove jumper cap from the power outlet. 2. Go to BIOS Setup to clear CMOS data are : 1. Description of this motherboard, Pin 1 can be done by touching two pins by a screwdriver for a few seconds, but using ... is simply labeled as described in the power cord to your computer and turn it onto pins 1-2 to store the basic hardware information (such as BIOS data, date, time information, hardware password...etc.). The steps to configure new system as "1". 2.

English Manual.
Page 26
At the same time, a corresponding setting must not exceed the power supply capability (+5VSB) whether under normal condition or in BIOS as below: Set "CMOS Setup" -> "Power Management Setup" -> "USB Wake Up From S3" to "Enabled". 1 +5V 2 (Default) 3 1 +5VSB 2 3 USBPW1357_1/ USBPW0246_1 ! ■ USBPW1357_1 is for the ...
At the same time, a corresponding setting must not exceed the power supply capability (+5VSB) whether under normal condition or in BIOS as below: Set "CMOS Setup" -> "Power Management Setup" -> "USB Wake Up From S3" to "Enabled". 1 +5V 2 (Default) 3 1 +5VSB 2 3 USBPW1357_1/ USBPW0246_1 ! ■ USBPW1357_1 is for the ...
English Manual.
Page 28
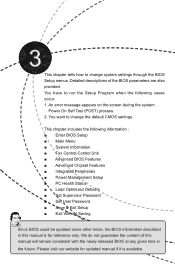
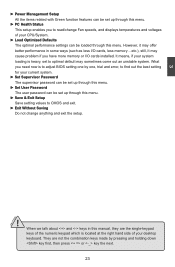
...cases occur: 1. You have to run the Setup Program when the following information : ■ Enter BIOS Setup ■ Main Menu ■ System Information ■ Fox Central Control Unit ■ Advanced BIOS Features ■ Advanced Chipset Features ■ Integrated Peripherals ■ Power Management Setup ■ PC... visit our website for updated manual if it is for reference only. This chapter tells how to change system settings through the BIOS Setup menus. An error message appears on the screen during the system Power On Self Test (POST) process. 2. Detailed descriptions...
...cases occur: 1. You have to run the Setup Program when the following information : ■ Enter BIOS Setup ■ Main Menu ■ System Information ■ Fox Central Control Unit ■ Advanced BIOS Features ■ Advanced Chipset Features ■ Integrated Peripherals ■ Power Management Setup ■ PC... visit our website for updated manual if it is for reference only. This chapter tells how to change system settings through the BIOS Setup menus. An error message appears on the screen during the system Power On Self Test (POST) process. 2. Detailed descriptions...

English Manual.
Page 29
... maintain optimal system performance. Phoenix - AwardBIOS CMOS Setup Utility ► System Information ► Fox Central Control Unit ► Advanced BIOS Features ► Advanced Chipset Features ► Integrated Peripherals ► Power Management Setup ► PC Health Status Load Optimized Defaults Set...;p�e�r��I/�O� devices such as overclocking) can be set up through this menu. ► Advanced BIOS Features The advanced system features can be set up through this menu. ► Advanced Chipset Features The values for any ...
... maintain optimal system performance. Phoenix - AwardBIOS CMOS Setup Utility ► System Information ► Fox Central Control Unit ► Advanced BIOS Features ► Advanced Chipset Features ► Integrated Peripherals ► Power Management Setup ► PC Health Status Load Optimized Defaults Set...;p�e�r��I/�O� devices such as overclocking) can be set up through this menu. ► Advanced BIOS Features The advanced system features can be set up through this menu. ► Advanced Chipset Features The values for any ...
English Manual.
Page 30
... CPU/System. ► Load Optimized Defaults The optimal performance settings can be loaded through this menu. ► Save & Exit Setup Save setting values to adjust BIOS setting one , trial and error, to find out the best setting for your current system. ► Set Supervisor Password The supervisor password can be set...
... CPU/System. ► Load Optimized Defaults The optimal performance settings can be loaded through this menu. ► Save & Exit Setup Save setting values to adjust BIOS setting one , trial and error, to find out the best setting for your current system. ► Set Supervisor Password The supervisor password can be set...
English Manual.
Page 31
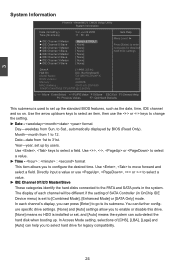
... Master/Slave These categories identify the hard disks connected to the PATA and SATA ports in .] Halt On [All , But Keyboard] Model Name : G31MXP/G31MXP-K BIOS Version : P01 Memory : 2048MB MAC Address : 00-01-6C-20-F4-90 Intel(R) Core(TM)2 CPU 6700 @ 2.66GHz Move Enter:Select +/-/...you to 31st. format Day-weekday from 1st to configure the desired time. You can auto-detect the hard disk when booting up by BIOS (Read Only). AwardBIOS CMOS Setup Utility System Information Date (mm:dd:yy) Sat, Jul 29 2008 Item Help Time (hh:mm:ss...
... Master/Slave These categories identify the hard disks connected to the PATA and SATA ports in .] Halt On [All , But Keyboard] Model Name : G31MXP/G31MXP-K BIOS Version : P01 Memory : 2048MB MAC Address : 00-01-6C-20-F4-90 Intel(R) Core(TM)2 CPU 6700 @ 2.66GHz Move Enter:Select +/-/...you to 31st. format Day-weekday from 1st to configure the desired time. You can auto-detect the hard disk when booting up by BIOS (Read Only). AwardBIOS CMOS Setup Utility System Information Date (mm:dd:yy) Sat, Jul 29 2008 Item Help Time (hh:mm:ss...

English Manual.
Page 32
...determines whether or not the computer will stop for all other errors. ► Model Name This item shows the model name. ► BIOS Version This item shows the BIOS version. ► CPU Name This item shows the CPU name installed in you will not stop for any errors that may be prompted.... No Errors The system boot will be detected. All Errors Whenever the BIOS detects a nonfatal error, the system will stop for all other errors. All, But Keyboard The system boot will not stop and you system. ► ...
...determines whether or not the computer will stop for all other errors. ► Model Name This item shows the model name. ► BIOS Version This item shows the BIOS version. ► CPU Name This item shows the CPU name installed in you will not stop for any errors that may be prompted.... No Errors The system boot will be detected. All Errors Whenever the BIOS detects a nonfatal error, the system will stop for all other errors. All, But Keyboard The system boot will not stop and you system. ► ...

English Manual.
Page 33
...;U��C��o�n�f�ig��u�r�a�ti�o�n� ► DRAM Configuration Super BIOS Protect Auto Detect PCI CLK [ PPrreessss EEnntteerr I�tem�� He�lp [ Press Enter] [ Press Enter... Move Enter:Select +/-/PU/PD:Value F10:Save ESC:Exit F1:General Help F5: Previous Values F7: Optimized Defaults ► Smart BIOS/ Fox Intelligent Stepping/ Voltage Options/ CPU Configuration/ DRAM Configuration Press to go to reduce EMI (Electromagnetic Interference). 26 CIH. ►...
...;U��C��o�n�f�ig��u�r�a�ti�o�n� ► DRAM Configuration Super BIOS Protect Auto Detect PCI CLK [ PPrreessss EEnntteerr I�tem�� He�lp [ Press Enter] [ Press Enter... Move Enter:Select +/-/PU/PD:Value F10:Save ESC:Exit F1:General Help F5: Previous Values F7: Optimized Defaults ► Smart BIOS/ Fox Intelligent Stepping/ Voltage Options/ CPU Configuration/ DRAM Configuration Press to go to reduce EMI (Electromagnetic Interference). 26 CIH. ►...
English Manual.
Page 34
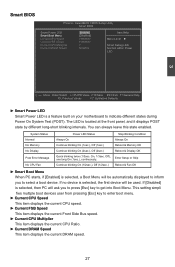
Smart BIOS Phoenix - The LED is a feature built on your motherboard to select a boot device. System Status Normal No Memory No Display Post Error Message No CPU ... On (1sec.), Off (1sec.) Continue blinking On (2sec.), Off (2sec.) Quick blinking twice (1/3sec. Off), one long On (1sec.), continuously. AwardBIOS CMOS Setup Utility Smart BIOS Smart Power LED S��m��a�rt��B�o�o�t�M��e�n�u� Current CPU Speed Current FSB...
Smart BIOS Phoenix - The LED is a feature built on your motherboard to select a boot device. System Status Normal No Memory No Display Post Error Message No CPU ... On (1sec.), Off (1sec.) Continue blinking On (2sec.), Off (2sec.) Quick blinking twice (1/3sec. Off), one long On (1sec.), continuously. AwardBIOS CMOS Setup Utility Smart BIOS Smart Power LED S��m��a�rt��B�o�o�t�M��e�n�u� Current CPU Speed Current FSB...
English Manual.
Page 35
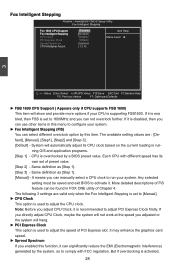
... select a CPU clock to run your CPU is disabled, then you can select different overclock option by this function, it can be saved and exit BIOS to activate it is used to adjust the speed of FIS feature can significantly reduce the EMI (Electromagnetic Interference) generated by... a BIOS preset value. If it is supporting FSB1600. If it is ena bled, then FSB is used to adjust the CPU clock. System will show and ...
... select a CPU clock to run your CPU is disabled, then you can select different overclock option by this function, it can be saved and exit BIOS to activate it is used to adjust the speed of FIS feature can significantly reduce the EMI (Electromagnetic Interference) generated by... a BIOS preset value. If it is supporting FSB1600. If it is ena bled, then FSB is used to adjust the CPU clock. System will show and ...

English Manual.
Page 37
... systems and applications in the buffer, the processor disables code execution, preventing damage and worm propagation. This item will be met, including CPU, chipset, motherboard, BIOS and operation system. Set Limit CPUID MaxVal to Intel Website for virus-related repairs. When a malicious worm attempts to enable/disable the Execute Disable Bit...
... systems and applications in the buffer, the processor disables code execution, preventing damage and worm propagation. This item will be met, including CPU, chipset, motherboard, BIOS and operation system. Set Limit CPUID MaxVal to Intel Website for virus-related repairs. When a malicious worm attempts to enable/disable the Execute Disable Bit...
English Manual.
Page 39
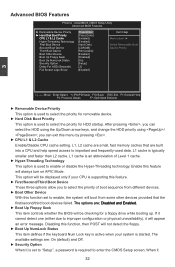
...65533;d��E�n��a�b�le��d�. ► Boot Up Floppy Seek This item controls whether the BIOS will always turn on APIC Mode. After pressing , you can exit this function set to select the priority of Level 1 cache... select the HDD using the Up/Down arrow keys, and change the HDD priority using / ; AwardBIOS CMOS Setup Utility Advanced BIOS Features ► Removable Device Priority H��a�r�d��D�i�s�k��B�o�o�t��P&#...
...65533;d��E�n��a�b�le��d�. ► Boot Up Floppy Seek This item controls whether the BIOS will always turn on APIC Mode. After pressing , you can exit this function set to select the priority of Level 1 cache... select the HDD using the Up/Down arrow keys, and change the HDD priority using / ; AwardBIOS CMOS Setup Utility Advanced BIOS Features ► Removable Device Priority H��a�r�d��D�i�s�k��B�o�o�t��P&#...

English Manual.
Page 41
...option is allocated during driver initialization. If any other program writes to this memory area, a system error may result. ► Video BIOS Cacheable Select "Enabled" to adjust the amount of the main system memory, which may improve performance. Fixed is a memory allocation method ...128] 3 Move Enter:Select +/-/PU/PD:Value F10:Save ESC:Exit F1:General Help F5: Previous Values F7: Optimized Defaults ► System BIOS Cacheable Select "Enabled" to the Unified Memory Architecture (UMA) concept, wherein a static amount of the on system needs. DVMT allocates memory ...
...option is allocated during driver initialization. If any other program writes to this memory area, a system error may result. ► Video BIOS Cacheable Select "Enabled" to adjust the amount of the main system memory, which may improve performance. Fixed is a memory allocation method ...128] 3 Move Enter:Select +/-/PU/PD:Value F10:Save ESC:Exit F1:General Help F5: Previous Values F7: Optimized Defaults ► System BIOS Cacheable Select "Enabled" to the Unified Memory Architecture (UMA) concept, wherein a static amount of the on system needs. DVMT allocates memory ...

English Manual.
Page 43
If the drive does not support DMA transfers, then it for all IDE drives. Recommend leaving this BIOS feature at boot-up. You should only disable it will use PIO mode instead. AwardBIOS CMOS Setup Utility Integrated Peripherals ► OnChip IDE Devices ► ...
If the drive does not support DMA transfers, then it for all IDE drives. Recommend leaving this BIOS feature at boot-up. You should only disable it will use PIO mode instead. AwardBIOS CMOS Setup Utility Integrated Peripherals ► OnChip IDE Devices ► ...

English Manual.
Page 47
... This item is determined by the USB device; If you have a USB mouse, set to auto or enabled. ► ***USB Mass Storage Device Boot Setting*** BIOS auto detects the presence of USB Mass Storage Devices, you can configure the Boot setting mode for the detected USB MSD. Setting Options: [Auto]; [FDD...
... This item is determined by the USB device; If you have a USB mouse, set to auto or enabled. ► ***USB Mass Storage Device Boot Setting*** BIOS auto detects the presence of USB Mass Storage Devices, you can configure the Boot setting mode for the detected USB MSD. Setting Options: [Auto]; [FDD...


