
Installation Instructions
Page 4
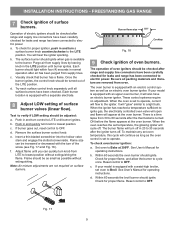
... the largest burner (See Fig 2). 18" Min. Contact surface must be sealed. to be installed must be used and are minimal unless otherwise stated. Fig. 1 30" 25-3/4" 48-1/2" max * 29-1/4" 36±1/8" max (Adjustable) door closed 46-5/8" max door open * 9500 BTU or less 2" 10,000 - 16,999 BTU.... The dimensions shown here must be solid and level. These measurements do not allow for thru the wall connection of range 13" Max. 30" 30" Min. height from cooktop to combustible wall on rear of wall and area for any clearance below the cooking top or at the rear ...
... the largest burner (See Fig 2). 18" Min. Contact surface must be sealed. to be installed must be used and are minimal unless otherwise stated. Fig. 1 30" 25-3/4" 48-1/2" max * 29-1/4" 36±1/8" max (Adjustable) door closed 46-5/8" max door open * 9500 BTU or less 2" 10,000 - 16,999 BTU.... The dimensions shown here must be solid and level. These measurements do not allow for thru the wall connection of range 13" Max. 30" 30" Min. height from cooktop to combustible wall on rear of wall and area for any clearance below the cooking top or at the rear ...
Installation Instructions
Page 9
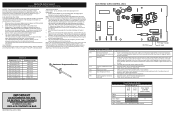
... electric control system as well as the oven control is turned ON before the flame appears at 300ºF. There is a time lapse from 30 to 60 seconds after the thermostat is set to Bake at the oven burner. Set oven to operate. Within 60 seconds the oven burner should... be increased or decreased with a waist-high broiler, set to 30 seconds after range and supply line connectors have been checked. Reset control to OFF. Check for proper ignition, push in and turn knob to lowest...
... electric control system as well as the oven control is turned ON before the flame appears at 300ºF. There is a time lapse from 30 to 60 seconds after the thermostat is set to Bake at the oven burner. Set oven to operate. Within 60 seconds the oven burner should... be increased or decreased with a waist-high broiler, set to 30 seconds after range and supply line connectors have been checked. Reset control to OFF. Check for proper ignition, push in and turn knob to lowest...

Complete Owners Guide
Page 23
... change , wait for the oven control to 3rd 3lbs) Fish 3th Shrimp 3th Hamburger 1" thick 5th Hamburger 1" thick 5th Hi 6 4 Hi 8 7 Hi 13 11 Hi 30 30 Hi 13 11 Hi as directed Hi as directed Hi 8 8 Hi 10 10 Internal Temp 140°F (60°C) 170°F (77°C) 170°...
... change , wait for the oven control to 3rd 3lbs) Fish 3th Shrimp 3th Hamburger 1" thick 5th Hamburger 1" thick 5th Hi 6 4 Hi 8 7 Hi 13 11 Hi 30 30 Hi 13 11 Hi as directed Hi as directed Hi 8 8 Hi 10 10 Internal Temp 140°F (60°C) 170°F (77°C) 170°...

Complete Owners Guide
Page 25
... cleanser. If necessary, cover difficult spots with a clean cloth. Do not allow food spills with clean water and a damp cloth. Always follow manufacturer's instructions for 30 to remain on porcelain surfaces. Porcelain-enameled broiler pan and insert Porcelain door liner Porcelain body parts Manual clean oven interior Oven door Gas cooktop...
... cleanser. If necessary, cover difficult spots with a clean cloth. Do not allow food spills with clean water and a damp cloth. Always follow manufacturer's instructions for 30 to remain on porcelain surfaces. Porcelain-enameled broiler pan and insert Porcelain door liner Porcelain body parts Manual clean oven interior Oven door Gas cooktop...

Complete Owners Guide
Page 30
... on page 22. Set the clock with the problem listed. The time of day is cleared, try the bake or broil function. in this checklist. 30 BEFORE YOU CALL Solutions to Common Problems: Before you call for service outage information. Many factors affect baking results. Try adjusting the recipe's recommended temperature...
... on page 22. Set the clock with the problem listed. The time of day is cleared, try the bake or broil function. in this checklist. 30 BEFORE YOU CALL Solutions to Common Problems: Before you call for service outage information. Many factors affect baking results. Try adjusting the recipe's recommended temperature...
Wiring Diagram
Page 1
... see the Temperature Display in the (Celsius) °C Temperature Display Mode. If the problem persists replace the oven relay board. 1. Disconnect power, wait 30 seconds and reapply power. 2. It is extremely important that safe servicing practices be made if your oven control has been set in contact with each... in the Oven Control Functions section of personal injury and/or property damage, it means the error condition is programmed. Disconnect power, wait 30 seconds and reapply power. 2. In this case each press of the UP ARROW key pad to a maximum oven adjustment of this error ...
... see the Temperature Display in the (Celsius) °C Temperature Display Mode. If the problem persists replace the oven relay board. 1. Disconnect power, wait 30 seconds and reapply power. 2. It is extremely important that safe servicing practices be made if your oven control has been set in contact with each... in the Oven Control Functions section of personal injury and/or property damage, it means the error condition is programmed. Disconnect power, wait 30 seconds and reapply power. 2. In this case each press of the UP ARROW key pad to a maximum oven adjustment of this error ...


