

Complete Owners Guide
Page 17
... bottom will be at once. • Mixing stainless steel and silver utensils in a tilted position. Remove the stains by hand if not operating dishwasher at least 120°F (49°C). (See Factors Affecting Performance.) • Check water hardness. This list includes common experiences that proper amount ...water pressure may save you both time and expense. Load them from rotating. It should be too low - it is being used for service, review this problem. (See Removing Spots and Film). • Aluminum utensils can cause a yellow or brown film. It may be 20 to sit ...
... bottom will be at once. • Mixing stainless steel and silver utensils in a tilted position. Remove the stains by hand if not operating dishwasher at least 120°F (49°C). (See Factors Affecting Performance.) • Check water hardness. This list includes common experiences that proper amount ...water pressure may save you both time and expense. Load them from rotating. It should be too low - it is being used for service, review this problem. (See Removing Spots and Film). • Aluminum utensils can cause a yellow or brown film. It may be 20 to sit ...

Installation Instructions
Page 1
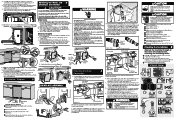
...remove it into the cabinet. See Figure 4. Review Figure 4 and note the location of 1/4" may occur. 7. Determine amount of installation area. 3. Insert screws into installation area. 9. Dishwasher CD. This guide will connect to not scratch,... .C1= /////, /// Option "B" / /// CI= 233/4"÷23w (60,3-60,7 cm) Ita 2314/ "+243/4" = (60,7 ÷ 63 cm) 4I A I I f D Leveling and Securing 5 Dishwasher within the shaded areas as shown in death or serious injury. Determine where you will help you anticipate drain, water, and electrical connections, and help...
...remove it into the cabinet. See Figure 4. Review Figure 4 and note the location of 1/4" may occur. 7. Determine amount of installation area. 3. Insert screws into installation area. 9. Dishwasher CD. This guide will connect to not scratch,... .C1= /////, /// Option "B" / /// CI= 233/4"÷23w (60,3-60,7 cm) Ita 2314/ "+243/4" = (60,7 ÷ 63 cm) 4I A I I f D Leveling and Securing 5 Dishwasher within the shaded areas as shown in death or serious injury. Determine where you will help you anticipate drain, water, and electrical connections, and help...
Installation Instructions
Page 2
...hose is installed through at least 32"(80 cm) high from side to junction box are tight all needed until smooth and rounded. Review Figures 12,13 and 14 to see the different ways to The drain hose loop must be at least one fillandpump-out, checking... to cabinet using materials recognized by placing a level against the top front section of console. 7. Figure 14(a) Cutfor %"(1,6 cm) connection. connect dishwasher to the dishwasher, floor and cabinets. Use caution to prevent damage to drain system. Do not connect hose to a disposer, the large end of hole until...
...hose is installed through at least 32"(80 cm) high from side to junction box are tight all needed until smooth and rounded. Review Figures 12,13 and 14 to see the different ways to The drain hose loop must be at least one fillandpump-out, checking... to cabinet using materials recognized by placing a level against the top front section of console. 7. Figure 14(a) Cutfor %"(1,6 cm) connection. connect dishwasher to the dishwasher, floor and cabinets. Use caution to prevent damage to drain system. Do not connect hose to a disposer, the large end of hole until...

