
Wiring Diagram
Page 1
... completion of any liability for shorted Sensor Probe harness between EOC & Probe connector. EOC internal software error or failure (some models) L1 to lock motor terminals. Use RTD scale found in the service tech sheet. Test keyboard circuits. If resistance is ...off. If keyboard ciruits check good replace the EOC. Membrane switch tail missing or not connected 1. If Oven is present with bake element ** = Some models Door Switch COM-NO X Warmer Drawer Lock Switch (Motor Door Latch) X X X Cooktop Lockout X X X X 808533117 Rev A (1802) EN...
... completion of any liability for shorted Sensor Probe harness between EOC & Probe connector. EOC internal software error or failure (some models) L1 to lock motor terminals. Use RTD scale found in the service tech sheet. Test keyboard circuits. If resistance is ...off. If keyboard ciruits check good replace the EOC. Membrane switch tail missing or not connected 1. If Oven is present with bake element ** = Some models Door Switch COM-NO X Warmer Drawer Lock Switch (Motor Door Latch) X X X Cooktop Lockout X X X X 808533117 Rev A (1802) EN...
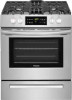
Complete Owners Guide
Page 2
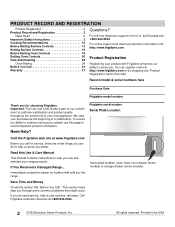
... quality throughout the service life of a relationship. Read this page to serve you through some models). 2 2018 Electrolux Home Products, Inc. Call Frigidaire Customer Services at http://www.frigidaire.com or by dropping your purchase as the beginning of your new appliance. For toll-free ...telephone support in the U.S. Record model & serial numbers here Purchase Date Frigidaire model number Thank you for service, there are a few things you can register online at 1-800-944-9044. To ensure...
... quality throughout the service life of a relationship. Read this page to serve you through some models). 2 2018 Electrolux Home Products, Inc. Call Frigidaire Customer Services at http://www.frigidaire.com or by dropping your purchase as the beginning of your new appliance. For toll-free ...telephone support in the U.S. Record model & serial numbers here Purchase Date Frigidaire model number Thank you for service, there are a few things you can register online at 1-800-944-9044. To ensure...
Complete Owners Guide
Page 4
... servicing your range for future use both arms to tilt range forward. Be sure to the appliance. Refer to children and adults. Do not remove model/ serial number plate. When using the appliance. IMPORTANT INSTRUCTIONS FOR UNPACKING AND INSTALLATION IMPORTANT - Save these instructions can result in death or serious burns to...
... servicing your range for future use both arms to tilt range forward. Be sure to the appliance. Refer to children and adults. Do not remove model/ serial number plate. When using the appliance. IMPORTANT INSTRUCTIONS FOR UNPACKING AND INSTALLATION IMPORTANT - Save these instructions can result in death or serious burns to...
Complete Owners Guide
Page 8
... from the high heat of oven racks - Stand to the side of the appliance when opening oven door, lower oven door, or warmer drawer (some models). Let hot air or steam escape before moving the rack. Keep oven vent ducts unobstructed. Clean the appliance regularly to keep all cookware and utensils...
... from the high heat of oven racks - Stand to the side of the appliance when opening oven door, lower oven door, or warmer drawer (some models). Let hot air or steam escape before moving the rack. Keep oven vent ducts unobstructed. Clean the appliance regularly to keep all cookware and utensils...
Complete Owners Guide
Page 13
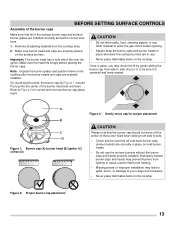
... the burner caps and heads properly installed. BEFORE SETTING SURFACE CONTROLS Assembly of the burner caps Make sure that all oval-style burner caps (some models) are correctly in place on oval burner heads. • Do not use . • Never place flammable items on the cooktop. Make sure the head fits...
... the burner caps and heads properly installed. BEFORE SETTING SURFACE CONTROLS Assembly of the burner caps Make sure that all oval-style burner caps (some models) are correctly in place on oval burner heads. • Do not use . • Never place flammable items on the cooktop. Make sure the head fits...

Complete Owners Guide
Page 25
... become very hot which can trigger a door open alarm. If the oven door is not closed within 30 seconds, the broil element will produce some models) allow grease to -5 minutes before turning or removing food. Press Broil. - - IMPORTANT If the oven door is browned. Position the rack as.... The broiler pan and the insert (some smoke. the exposed grease could ignite. Broil with the appliance, they may be broiled at www.frigidaire.com 25 Flour may be kept away from the burner. SETTING OVEN CONTROLS To set Broil 1. Setting Broil Broiling is direct heat cooking and ...
... become very hot which can trigger a door open alarm. If the oven door is not closed within 30 seconds, the broil element will produce some models) allow grease to -5 minutes before turning or removing food. Press Broil. - - IMPORTANT If the oven door is browned. Position the rack as.... The broiler pan and the insert (some smoke. the exposed grease could ignite. Broil with the appliance, they may be broiled at www.frigidaire.com 25 Flour may be kept away from the burner. SETTING OVEN CONTROLS To set Broil 1. Setting Broil Broiling is direct heat cooking and ...
Complete Owners Guide
Page 36
... cleaning instructions. Check that all burner caps are level and seated correctly on the burner heads. Surface control knob is disconnected from outlet (electric ignition models only). In coastal areas, a slightly orange flame is not advised. conversion kit instructions to salt content in too tightly. Be sure cabinets are built in...
... cleaning instructions. Check that all burner caps are level and seated correctly on the burner heads. Surface control knob is disconnected from outlet (electric ignition models only). In coastal areas, a slightly orange flame is not advised. conversion kit instructions to salt content in too tightly. Be sure cabinets are built in...

Installation Instructions
Page 6
... anti-tip brackets must also be Fig. 6 used in place. Drill a 1/8" (3 mm) pilot hole where screws are secured in wall. Level and Position Range - For models with the range. The screws provided may be located. Use a spirit level to secure the bracket in wood or concrete material. If range is required...
... anti-tip brackets must also be Fig. 6 used in place. Drill a 1/8" (3 mm) pilot hole where screws are secured in wall. Level and Position Range - For models with the range. The screws provided may be located. Use a spirit level to secure the bracket in wood or concrete material. If range is required...
Installation Instructions
Page 10
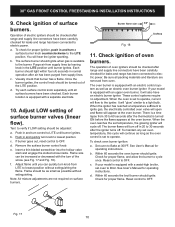
... bulb. e. These control systems require no adjustment. See User's Manual for proper flame, and allow the burner to Broil. If your model is turned ON before the flame appears at 300ºF. b. f. Flame should be checked after range and supply line connectors have been carefully... valves (linear flow). Once the burner ignites, the control knob should be adjusted: a. Remove the surface burner control knob. If your model is a time lapse from supply lines by leaving knob in 20 to electric power. b. Check for operating instructions. Reset control to LITE...
... bulb. e. These control systems require no adjustment. See User's Manual for proper flame, and allow the burner to Broil. If your model is turned ON before the flame appears at 300ºF. b. f. Flame should be checked after range and supply line connectors have been carefully... valves (linear flow). Once the burner ignites, the control knob should be adjusted: a. Remove the surface burner control knob. If your model is a time lapse from supply lines by leaving knob in 20 to electric power. b. Check for operating instructions. Reset control to LITE...

Installation Instructions
Page 11
... on an oven rack. Remove lower burner baffle to Broil. Lower oven burner baffle (removable) Upper oven burner (some models) Upper oven burner air shutter (some models) The approximate flame length of oven bottom panel. To determine if the upper broil burner flame is proper, remove the ...Bake at rear of the upper (broil) burner should be 1 inch having a distinct inner, blue flame. Adjust air shutter - upper oven (some models) Lower oven burner air shutter Lower oven bottom panel (removable) Fig. 19 - lower oven. The approximate flame length of the range as needed. ...
... on an oven rack. Remove lower burner baffle to Broil. Lower oven burner baffle (removable) Upper oven burner (some models) Upper oven burner air shutter (some models) The approximate flame length of oven bottom panel. To determine if the upper broil burner flame is proper, remove the ...Bake at rear of the upper (broil) burner should be 1 inch having a distinct inner, blue flame. Adjust air shutter - upper oven (some models) Lower oven burner air shutter Lower oven bottom panel (removable) Fig. 19 - lower oven. The approximate flame length of the range as needed. ...
Installation Instructions
Page 13
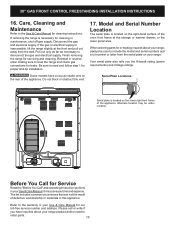
If removing the range is located on the rear of the appliance. Reinstall in your Use & Care Manual. Model and Serial Number Location The serial plate is necessary for leaks. Alternate location may save you time and expense. The list includes common occurrences that ... range. Before You Call for or making sure to order parts. 13 It may be sure to include the model and serial numbers and a lot number or letter from the wall. Some models have inquiries about your range product and/or need to level the range and check gas connections for cleaning...
If removing the range is located on the rear of the appliance. Reinstall in your Use & Care Manual. Model and Serial Number Location The serial plate is necessary for leaks. Alternate location may save you time and expense. The list includes common occurrences that ... range. Before You Call for or making sure to order parts. 13 It may be sure to include the model and serial numbers and a lot number or letter from the wall. Some models have inquiries about your range product and/or need to level the range and check gas connections for cleaning...


