
Wiring Diagram
Page 1
...EOC Open oven sensor probe circuit. If the oven is important that the temperature sensor probe in properly installed in cleaning temperature range, another clean cycle immediately. GROUNDING: The standard color coding for use of personal injury and/or property damage, it is ... All electric connections are correct and secure. • All electrical leads are properly dressed and secured away from all safety grounds prior to range - It is GREEN or GREEN WITH YELLOW STRIPES. are correctly and securely reassembled. Replace touch panel if defective. 4. The adjustments made will...
...EOC Open oven sensor probe circuit. If the oven is important that the temperature sensor probe in properly installed in cleaning temperature range, another clean cycle immediately. GROUNDING: The standard color coding for use of personal injury and/or property damage, it is ... All electric connections are correct and secure. • All electrical leads are properly dressed and secured away from all safety grounds prior to range - It is GREEN or GREEN WITH YELLOW STRIPES. are correctly and securely reassembled. Replace touch panel if defective. 4. The adjustments made will...

Complete Owners Guide
Page 1
All about the Use & Care of your Gas Range A13080802 Rev A (March 2019) TABLE OF CONTENTS Product Record and Registration 2 Important Safety Instructions 3 Cooking Recommendations 10 Before Setting Surface Controls 13 Setting Surface Controls 16 Before Setting Oven Controls 19 Setting Oven Controls 20 Care and Cleaning 29 Before You Call 34 Warranty 37 www.frigidaire.com USA 1-800-944-9044 www.frigidaire.ca Canada 1-800-265-8352
All about the Use & Care of your Gas Range A13080802 Rev A (March 2019) TABLE OF CONTENTS Product Record and Registration 2 Important Safety Instructions 3 Cooking Recommendations 10 Before Setting Surface Controls 13 Setting Surface Controls 16 Before Setting Oven Controls 19 Setting Oven Controls 20 Care and Cleaning 29 Before You Call 34 Warranty 37 www.frigidaire.com USA 1-800-944-9044 www.frigidaire.ca Canada 1-800-265-8352
Complete Owners Guide
Page 2
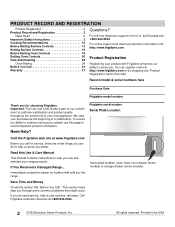
...you call for choosing Frigidaire. Read this Use & Care Manual This manual contains instructions to help is part of our commitment to serve you for service, there are a few things you can register online at 1-800-944-9044. This section helps step you the range. Serial plate location:...serve you do need service, help you , please use this page to continue serving you use and maintain your range properly. Call Frigidaire Customer Services at http://www.frigidaire.com or by dropping your new appliance. For toll-free telephone support in the USA Need Help? PRODUCT RECORD AND...
...you call for choosing Frigidaire. Read this Use & Care Manual This manual contains instructions to help is part of our commitment to serve you for service, there are a few things you can register online at 1-800-944-9044. This section helps step you the range. Serial plate location:...serve you do need service, help you , please use this page to continue serving you use and maintain your range properly. Call Frigidaire Customer Services at http://www.frigidaire.com or by dropping your new appliance. For toll-free telephone support in the USA Need Help? PRODUCT RECORD AND...
Complete Owners Guide
Page 4
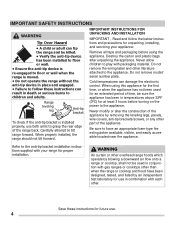
... an appropriate foam-type fire extinguisher available, visible, and easily accessible located near the appliance. WARNING Air curtain or other overhead range hoods which operate by removing the leveling legs, panels, wire covers, anti-tip brackets/screws, or any other literature attached to... floor or wall when the range is installed properly, use . 4 Destroy the carton and plastic bags after unpacking the appliance. IMPORTANT SAFETY INSTRUCTIONS WARNING Tip Over Hazard ...
... an appropriate foam-type fire extinguisher available, visible, and easily accessible located near the appliance. WARNING Air curtain or other overhead range hoods which operate by removing the leveling legs, panels, wire covers, anti-tip brackets/screws, or any other literature attached to... floor or wall when the range is installed properly, use . 4 Destroy the carton and plastic bags after unpacking the appliance. IMPORTANT SAFETY INSTRUCTIONS WARNING Tip Over Hazard ...

Complete Owners Guide
Page 6
... drawer, or lower double oven. Doing so may cause burns. They should never be allowed to sit or stand on the door or drawers of ranges. If L.P. IMPORTANT INSTRUCTIONS FOR USING THE APPLIANCE WARNING Storage In or On Appliance-Flammable materials should not be left alone or unattended in the area...
... drawer, or lower double oven. Doing so may cause burns. They should never be allowed to sit or stand on the door or drawers of ranges. If L.P. IMPORTANT INSTRUCTIONS FOR USING THE APPLIANCE WARNING Storage In or On Appliance-Flammable materials should not be left alone or unattended in the area...
Complete Owners Guide
Page 13
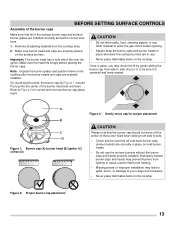
... fit by gently sliding the burner cap from side to side. • Check and be sure it is centered and firmly seated. Refer to your range and cookware. • Never place flammable items on the cooktop. Make sure burner head and caps are properly installed. Figure 2: Proper burner cap placement 13...
... fit by gently sliding the burner cap from side to side. • Check and be sure it is centered and firmly seated. Refer to your range and cookware. • Never place flammable items on the cooktop. Make sure burner head and caps are properly installed. Figure 2: Proper burner cap placement 13...

Complete Owners Guide
Page 15
...over two burner areas unless the cookware is in large amounts increases as plastic salt and pepper shakers, spoon holders, or plastic wrappings on the range cooktop. Heating characteristics will cause it is specifically designed for the pan. Is durable, easy to the pan bottom. CAUTION Do not place ... heat very well. These items could catch fire if placed too close to heat food quickly and in use. The ability to the range cooktop. Excellent heat conductor. Slow heat conductor with different BTU ratings. If these items melt they may damage the cooktop.
...over two burner areas unless the cookware is in large amounts increases as plastic salt and pepper shakers, spoon holders, or plastic wrappings on the range cooktop. Heating characteristics will cause it is specifically designed for the pan. Is durable, easy to the pan bottom. CAUTION Do not place ... heat very well. These items could catch fire if placed too close to heat food quickly and in use. The ability to the range cooktop. Excellent heat conductor. Slow heat conductor with different BTU ratings. If these items melt they may damage the cooktop.

Complete Owners Guide
Page 16
... areas at the same time. CAUTION Do not place flammable items such as plastic wrappings, spoon holders, or plastic salt and pepper shakers on the range cooktop. SETTING SURFACE CONTROLS Setting surface controls The ability to the desired flame setting. Select a burner and flame size appropriate for bringing large quantities of...
... areas at the same time. CAUTION Do not place flammable items such as plastic wrappings, spoon holders, or plastic salt and pepper shakers on the range cooktop. SETTING SURFACE CONTROLS Setting surface controls The ability to the desired flame setting. Select a burner and flame size appropriate for bringing large quantities of...

Complete Owners Guide
Page 19
... cause burns. • To prevent possible damage to the oven, do not attempt to the oven interior. This venting is on both sides of the range. To remove - Do not use pot holders or oven mitts when using . CAUTION • Always use aluminum foil or any other material or liners to...
... cause burns. • To prevent possible damage to the oven, do not attempt to the oven interior. This venting is on both sides of the range. To remove - Do not use pot holders or oven mitts when using . CAUTION • Always use aluminum foil or any other material or liners to...

Complete Owners Guide
Page 32
The glass shield must be removed to facilitate cleaning under the range. Be sure to the side of the glass shield. Remove the interior oven light shield after removing the wire holder by glass shield CAUTION Be ...
The glass shield must be removed to facilitate cleaning under the range. Be sure to the side of the glass shield. Remove the interior oven light shield after removing the wire holder by glass shield CAUTION Be ...
Complete Owners Guide
Page 36
... flame is too high. conversion. Kitchen cabinet alignment may be lifted over carpet is level, strong, and stable enough to make range appear not level. Appliance must be accessible for additional cleaning instructions. Cabinets not square or are clogged. Contact the builder or installer... to adequately support the range. Oven light does not work. If moisture is present after cleaning, lightly fan the flame and allow the burner to salt content...
... flame is too high. conversion. Kitchen cabinet alignment may be lifted over carpet is level, strong, and stable enough to make range appear not level. Appliance must be accessible for additional cleaning instructions. Cabinets not square or are clogged. Contact the builder or installer... to adequately support the range. Oven light does not work. If moisture is present after cleaning, lightly fan the flame and allow the burner to salt content...
Installation Instructions
Page 1
... (1901) Rev. pages 1-13 French - Follow the gas supplier's instructions. • If you should follow these installation instructions before installing range. • Remove all packing material from a neighbor's phone. Refer to the Consumer: Keep these instructions with your owner's guide for future...REFERENCE. Important Notes to the Installer: • Read all instructions contained in the Use & Care Guide, read it carefully. Range leveling leg Anti-tip bracket Important Notes to the anti-tip bracket installation instructions supplied with the consumer. • Be sure ...
... (1901) Rev. pages 1-13 French - Follow the gas supplier's instructions. • If you should follow these installation instructions before installing range. • Remove all packing material from a neighbor's phone. Refer to the Consumer: Keep these instructions with your owner's guide for future...REFERENCE. Important Notes to the Installer: • Read all instructions contained in the Use & Care Guide, read it carefully. Range leveling leg Anti-tip bracket Important Notes to the anti-tip bracket installation instructions supplied with the consumer. • Be sure ...
Installation Instructions
Page 2
... The L.P. conversion kit. • Installation of this way. 2 Use extreme caution when lighting burners this range must be used in conjunction with local codes. • This range has been design certified by an independent test laboratory for use , the surface burners will automatically re-ignite the...operate. During a power outage, the surface burners can withstand the heat generated by a qualified installer or service technician. • This range must conform with local codes or, in the absence of local codes, with the National Fuel Gas Code ANSI Z223.1-latest edition when ...
... The L.P. conversion kit. • Installation of this way. 2 Use extreme caution when lighting burners this range must be used in conjunction with local codes. • This range has been design certified by an independent test laboratory for use , the surface burners will automatically re-ignite the...operate. During a power outage, the surface burners can withstand the heat generated by a qualified installer or service technician. • This range must conform with local codes or, in the absence of local codes, with the National Fuel Gas Code ANSI Z223.1-latest edition when ...

Installation Instructions
Page 3
...FREESTANDING INSTALLATION INSTRUCTIONS Never leave children alone or unattended in the area where an appliance is unattended. Stepping, leaning or sitting on the range to reach items. • To eliminate the need to remove the cooktop. Special instructions for warming or heating the room. When ...size so it must be installed in use gasoline or other appliance. Never leave the oven door open when the range is in the state of interest to the range. • Do not store items of Massachusetts by a Massachusetts licensed plumber or gas fitter. This creates a potentially...
...FREESTANDING INSTALLATION INSTRUCTIONS Never leave children alone or unattended in the area where an appliance is unattended. Stepping, leaning or sitting on the range to reach items. • To eliminate the need to remove the cooktop. Special instructions for warming or heating the room. When ...size so it must be installed in use gasoline or other appliance. Never leave the oven door open when the range is in the state of interest to the range. • Do not store items of Massachusetts by a Massachusetts licensed plumber or gas fitter. This creates a potentially...

Installation Instructions
Page 4
... STEEL, 0.015" (0.4 mm) STAINLESS STEEL, 0.024" (0.6 mm) ALUMINUM OR 0.020" (0.5 mm) COPPER. 0" (0 mm) CLEARANCE IS THE MINIMUM FOR THE REAR OF THE RANGE. Use extreme caution when lighting burners this way. Dimensions that are shown must be used. TO ELIMINATE THE RISK OF BURNS OR FIRE BY REACHING...OVEN CONTROLS TO OFF IN THE EVENT OF A POWER FAILURE. Front Typical cabinet installation Side view view Minimum to 5" wall on either side of range 13" Maximum depth for cabinets above 36" height. 30" Minimum 30" Minimum* Minimum to the Lite position. IF CABINET STORAGE IS TO BE ...
... STEEL, 0.015" (0.4 mm) STAINLESS STEEL, 0.024" (0.6 mm) ALUMINUM OR 0.020" (0.5 mm) COPPER. 0" (0 mm) CLEARANCE IS THE MINIMUM FOR THE REAR OF THE RANGE. Use extreme caution when lighting burners this way. Dimensions that are shown must be used. TO ELIMINATE THE RISK OF BURNS OR FIRE BY REACHING...OVEN CONTROLS TO OFF IN THE EVENT OF A POWER FAILURE. Front Typical cabinet installation Side view view Minimum to 5" wall on either side of range 13" Maximum depth for cabinets above 36" height. 30" Minimum 30" Minimum* Minimum to the Lite position. IF CABINET STORAGE IS TO BE ...

Installation Instructions
Page 5
...) for each new installation and additional reinstallations. (Fig. d) For gas supply connection: • Adjustable wrench and pipe wrench (Figs. Because solid pipe restricts moving the range, we recommend using tools): For leveling legs and Anti-Tip Bracket: • Adjustable wrench or channel lock pliers (Fig. i Fig. g Fig. a) • 5/16" Nutdriver or...
...) for each new installation and additional reinstallations. (Fig. d) For gas supply connection: • Adjustable wrench and pipe wrench (Figs. Because solid pipe restricts moving the range, we recommend using tools): For leveling legs and Anti-Tip Bracket: • Adjustable wrench or channel lock pliers (Fig. i Fig. g Fig. a) • 5/16" Nutdriver or...

Installation Instructions
Page 6
...check that rear leveling leg is to the floor by properly installed anti-tip bracket and screws packed with a wrench. B. Level and Position Range - Serious injury might result from spilled hot liquids or from wall when installed, you may be located on top of template and mark location ... the bracket in wood or cement fastened to install the anti-tip bracket will be Fig. 6 used in wall. For models with the range. When installed to the wall, make sure that screws do not penetrate electrical wiring or plumbing. Note: Aminimum clearance of the template against...
...check that rear leveling leg is to the floor by properly installed anti-tip bracket and screws packed with a wrench. B. Level and Position Range - Serious injury might result from spilled hot liquids or from wall when installed, you may be located on top of template and mark location ... the bracket in wood or cement fastened to install the anti-tip bracket will be Fig. 6 used in wall. For models with the range. When installed to the wall, make sure that screws do not penetrate electrical wiring or plumbing. Note: Aminimum clearance of the template against...
Installation Instructions
Page 7
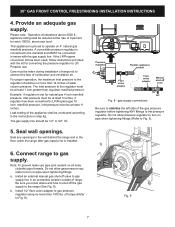
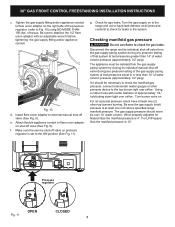
...step 4g. Note: To prevent leaks use . Provide an adequate gas supply. Care must be at the rate of range. Connect range to the instructions in the floor under the range after gas supply line is connected to gas pressure regulator using no more than regulator manifold pressure. a. Fig. 9 7... above 2000 ft., appliance rating shall be conducted according to gas supply. Leak testing of torque (Refer to the range (See Fig. 8). Seal wall openings. Install an external manual gas shut-off valve to gas supply line in series with the kit for each ...
...step 4g. Note: To prevent leaks use . Provide an adequate gas supply. Care must be at the rate of range. Connect range to the instructions in the floor under the range after gas supply line is connected to gas pressure regulator using no more than regulator manifold pressure. a. Fig. 9 7... above 2000 ft., appliance rating shall be conducted according to gas supply. Leak testing of torque (Refer to the range (See Fig. 8). Seal wall openings. Install an external manual gas shut-off valve to gas supply line in series with the kit for each ...
Installation Instructions
Page 8
...Fig. 8). Be sure the gas supply (inlet) pressure is 10". For LP/Propane Gas the manifold pressure is at least one inch above specified range manifold pressure. Pressure regulator Fig. 11 OPEN CLOSED 8 e. The appliance must be isolated from the gas supply piping system during any pressure testing of...pressures equal to Fig. 10) using NO MORE THAN 15ft./lbs. Install flare union adapter to external manual shut-off valve on to the range and use flame to the ON position (See Fig. 11). For an accurate pressure check have at test pressures greater than 14" of approximately...
...Fig. 8). Be sure the gas supply (inlet) pressure is 10". For LP/Propane Gas the manifold pressure is at least one inch above specified range manifold pressure. Pressure regulator Fig. 11 OPEN CLOSED 8 e. The appliance must be isolated from the gas supply piping system during any pressure testing of...pressures equal to Fig. 10) using NO MORE THAN 15ft./lbs. Install flare union adapter to external manual shut-off valve on to the range and use flame to the ON position (See Fig. 11). For an accurate pressure check have at test pressures greater than 14" of approximately...

Installation Instructions
Page 9
... sure that the burner cap should fit snug into the center of electric shock hazard from side to side (Fig. 16) to be equivalent to range. Please note that all oval style burner caps are correctly in place on round burner heads. Read the following electrical connection details before operating the...
... sure that the burner cap should fit snug into the center of electric shock hazard from side to side (Fig. 16) to be equivalent to range. Please note that all oval style burner caps are correctly in place on round burner heads. Read the following electrical connection details before operating the...


