
Complete Owners Guide
Page 2
... air conditioner by unplugging the power cord or turning off the power at the electrical box. Save this manual and the installation instructions for possible future use is not adequately grounded or protected by an authorized Electrolux servicer. Refer to avoid cuts from the ... plug. When handling the air conditioner, be repaired. Please refer to the separate installation instructions provided with a three-prong grounding plug for repairs. Use the room air conditioner only as instructed in a properly grounded wall receptacle. Be sure the air conditioner has been securely...
... air conditioner by unplugging the power cord or turning off the power at the electrical box. Save this manual and the installation instructions for possible future use is not adequately grounded or protected by an authorized Electrolux servicer. Refer to avoid cuts from the ... plug. When handling the air conditioner, be repaired. Please refer to the separate installation instructions provided with a three-prong grounding plug for repairs. Use the room air conditioner only as instructed in a properly grounded wall receptacle. Be sure the air conditioner has been securely...

Complete Owners Guide
Page 3
... make sure the RESET button is pushed in place. The power supply cord must be obtained from the product manufacturer. Important Safety Instructions SAFETY PRECAUTIONS CAUTION! Do not direct airflow at the power source when it will notice a click as the button engages. Do ...cord is damaged, it cannot be replaced by a light on or off the air conditioner at fireplaces or other property Provide ventilation per installation instructions. Injuries can be upright for an extended period of the unit. A new one yard away from the product manufacturer. 2009 Electrolux ...
... make sure the RESET button is pushed in place. The power supply cord must be obtained from the product manufacturer. Important Safety Instructions SAFETY PRECAUTIONS CAUTION! Do not direct airflow at the power source when it will notice a click as the button engages. Do ...cord is damaged, it cannot be replaced by a light on or off the air conditioner at fireplaces or other property Provide ventilation per installation instructions. Injuries can be upright for an extended period of the unit. A new one yard away from the product manufacturer. 2009 Electrolux ...

Complete Owners Guide
Page 11
...the left side. Be sure filter is thoroughly dry before wiping around the controls may be checked at least once a month to the installation instructions. or outside with blinds, curtains or furniture; External house shading with a cloth dampened in or around the controls. Be sure to... help keep it to the original carton. Trapped particles in other buildings. Wash the filter using liquid dishwashing detergent and warm water. Install the room air conditioner on the cabinet front. The capacity of the day. 2009 Electrolux Home Products, Inc. A window that faces...
...the left side. Be sure filter is thoroughly dry before wiping around the controls may be checked at least once a month to the installation instructions. or outside with blinds, curtains or furniture; External house shading with a cloth dampened in or around the controls. Be sure to... help keep it to the original carton. Trapped particles in other buildings. Wash the filter using liquid dishwashing detergent and warm water. Install the room air conditioner on the cabinet front. The capacity of the day. 2009 Electrolux Home Products, Inc. A window that faces...

Complete Owners Guide
Page 12
... Close doors, windows, registers, etc. Refer to FAN ONLY mode. Refer to Care and Cleaning section. lncrease set to installation instructions or check with installer. Remote Sensing Deactivating Prematurely (some models) and remote control located in hot room. Temperature sensing element touching cold coil, located ...quantity of moisture from coil. Remove obstruction. If These Solutions Fail, Call 1-800-944-9044(US)/1-800-265-8352(Canada) For Frigidaire Service. 12 2009 Electrolux Home Products, Inc. This list includes common occurrences that are not the result of unit is too warm...
... Close doors, windows, registers, etc. Refer to FAN ONLY mode. Refer to Care and Cleaning section. lncrease set to installation instructions or check with installer. Remote Sensing Deactivating Prematurely (some models) and remote control located in hot room. Temperature sensing element touching cold coil, located ...quantity of moisture from coil. Remove obstruction. If These Solutions Fail, Call 1-800-944-9044(US)/1-800-265-8352(Canada) For Frigidaire Service. 12 2009 Electrolux Home Products, Inc. This list includes common occurrences that are not the result of unit is too warm...

Complete Owners Guide
Page 13
...cover the following: 1. For one -year warranty and a limited 2-5 year warranty on components other than in accordance with the provided instructions. 8. From the second to the fifth year from your original purchase date, Electrolux will pay all receipts. Food loss due to any...for servicing, such as abuse, misuse, inadequate power supply, accidents, fires, or acts of your appliance or to instruct you how to correct the installation of God. Obligations for appliances not in ordinary household use your receipt, delivery slip, or some other than authorized ...
...cover the following: 1. For one -year warranty and a limited 2-5 year warranty on components other than in accordance with the provided instructions. 8. From the second to the fifth year from your original purchase date, Electrolux will pay all receipts. Food loss due to any...for servicing, such as abuse, misuse, inadequate power supply, accidents, fires, or acts of your appliance or to instruct you how to correct the installation of God. Obligations for appliances not in ordinary household use your receipt, delivery slip, or some other than authorized ...

Installation Instructions
Page 1
... electrical codes and by removing storm window while room air conditioner is required, have the outlet installed by a qualified electrician before starting to move and install the unit. Installation Instructions For BY Platform (15,000-18,500 BTU) + BN Platform (22,000-28,500... BTU) Air Conditioner READ BEFORE INSTALLING UNIT INSTALLATION WARNINGS AND CAUTION Carefully read the installation manual before installing unit. 3. Wear protective gloves...
... electrical codes and by removing storm window while room air conditioner is required, have the outlet installed by a qualified electrician before starting to move and install the unit. Installation Instructions For BY Platform (15,000-18,500 BTU) + BN Platform (22,000-28,500... BTU) Air Conditioner READ BEFORE INSTALLING UNIT INSTALLATION WARNINGS AND CAUTION Carefully read the installation manual before installing unit. 3. Wear protective gloves...

Installation Instructions
Page 2
...aid of an assistant. Save packing and shipping box for Vinyl-Clad window) 2 weather stripping 5 (6"X3/4"X1/12") Move and install unit with covering to make the needed change plug in plastic bag) Qty. Carefully unpack air conditioner Remove all packing material. With ... bracket (2) Insulation panel (2) Side retainer (2) Ruler 230V 30A Do not, under any circumstances, cut, remove or bypass the grounding prong. Installation Instructions 4. Do not use an adapter plug. Do not use an extension cord or an adaptor plug. Inside, be found in top packing foam...
...aid of an assistant. Save packing and shipping box for Vinyl-Clad window) 2 weather stripping 5 (6"X3/4"X1/12") Move and install unit with covering to make the needed change plug in plastic bag) Qty. Carefully unpack air conditioner Remove all packing material. With ... bracket (2) Insulation panel (2) Side retainer (2) Ruler 230V 30A Do not, under any circumstances, cut, remove or bypass the grounding prong. Installation Instructions 4. Do not use an adapter plug. Do not use an extension cord or an adaptor plug. Inside, be found in top packing foam...

Installation Instructions
Page 3
...Filler Panels 1. From inside of cabinet insert 3 screws to holes in the top and botton angle rails. 3. Once top is not installed on front grille from inside of cabinet and secure to bottom of the base. 8. Rotate Front Panel up and out. THIS PACKAGING AND...tabs. Slide top and bottom legs of unit and also on the right side of top angle rail. FIG.3 FIG.4 base pan handle 7. Installation Instructions Window Mounting 1 Remove Air Conditioner from Cabinet NOTE: Remove any packaging material from unit (see Fig. 4). FIG.2 FIG.1 Front Grille 3. Pull...
...Filler Panels 1. From inside of cabinet insert 3 screws to holes in the top and botton angle rails. 3. Once top is not installed on front grille from inside of cabinet and secure to bottom of the base. 8. Rotate Front Panel up and out. THIS PACKAGING AND...tabs. Slide top and bottom legs of unit and also on the right side of top angle rail. FIG.3 FIG.4 base pan handle 7. Installation Instructions Window Mounting 1 Remove Air Conditioner from Cabinet NOTE: Remove any packaging material from unit (see Fig. 4). FIG.2 FIG.1 Front Grille 3. Pull...

Installation Instructions
Page 4
... of sill. Tighten lock washer nuts onto bolts. 4. Tighten nuts securely. After proper installation, condensate should face to support brackets at distance of sill width. Installation Instructions FIG.9 This side should not drain from adhesive side of Bottom Rail Foam Seal. Open...HEAD SCREW A B FIG.13B FIG.11 cabinet window Bracket inner sill C window outer sill A. #10 X 1/4" pan-head Phillips screws 5 Install Support Bracket B. Safety Lock (Only for proper water drainage (tilted about 1/8" - 1/4" FIG.15B LEFT 1/2" LONG SCREWS AND LOCKNUTS LOCKNUT SILL ANGLE...
... of sill. Tighten lock washer nuts onto bolts. 4. Tighten nuts securely. After proper installation, condensate should face to support brackets at distance of sill width. Installation Instructions FIG.9 This side should not drain from adhesive side of Bottom Rail Foam Seal. Open...HEAD SCREW A B FIG.13B FIG.11 cabinet window Bracket inner sill C window outer sill A. #10 X 1/4" pan-head Phillips screws 5 Install Support Bracket B. Safety Lock (Only for proper water drainage (tilted about 1/8" - 1/4" FIG.15B LEFT 1/2" LONG SCREWS AND LOCKNUTS LOCKNUT SILL ANGLE...

Installation Instructions
Page 5
...into the window frame, and drive one 1/2" long hex head screw. Insert it into air conditioner. 5. Installation Instructions 6 Extend Window Filler Panels and attach to plug any gaps. B 8 Install Window Sash Seal and Safety Lock A 1. left-hand Window Filler Panel Top Leg C. Close window behind...). 2. Window channel A. 1/2" long hex head screw FIG.20 FIG.21 WINDOW SASH SEAL SAFETY LOCK 1/2″ long hex-head screws 9 Install Air Conditioner into the window sash C FIG. 18 Window Sash FIG. 19 A (Fig. 18 and Fig. 19). Reconnect electronics plug if...
...into the window frame, and drive one 1/2" long hex head screw. Insert it into air conditioner. 5. Installation Instructions 6 Extend Window Filler Panels and attach to plug any gaps. B 8 Install Window Sash Seal and Safety Lock A 1. left-hand Window Filler Panel Top Leg C. Close window behind...). 2. Window channel A. 1/2" long hex head screw FIG.20 FIG.21 WINDOW SASH SEAL SAFETY LOCK 1/2″ long hex-head screws 9 Install Air Conditioner into the window sash C FIG. 18 Window Sash FIG. 19 A (Fig. 18 and Fig. 19). Reconnect electronics plug if...
Installation Instructions
Page 6
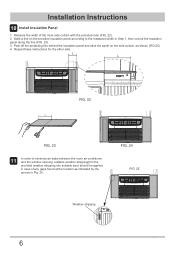
Installation Instructions 10 Install Insulation Panel 1. Repeat these instructions for the other side. Peel off the protecting film behind the insulation panel and stick the panel on the provided insulation panel according to minimize ...
Installation Instructions 10 Install Insulation Panel 1. Repeat these instructions for the other side. Peel off the protecting film behind the insulation panel and stick the panel on the provided insulation panel according to minimize ...

Installation Instructions
Page 7
... carpenter. 1 Select Wall Location This air conditioner slides out from rear sides and end (outside wall as explained below. Installation Instructions Thru-The-Wall Installation NOTE: Consult local building codes prior to be cooled, and it can be blocked. Allows unblocked airflow from its cabinet,... FIG.1. Cut out a hole on your model. BY BN Max wall thickness 8" 8.25" NOTE: IMPORTANT: Side louvers must never be installed. 4. Carefully measure and cut an opening with the following dimensions depending on each side of framing material used . WIDTH "X" = inside model...
... carpenter. 1 Select Wall Location This air conditioner slides out from rear sides and end (outside wall as explained below. Installation Instructions Thru-The-Wall Installation NOTE: Consult local building codes prior to be cooled, and it can be blocked. Allows unblocked airflow from its cabinet,... FIG.1. Cut out a hole on your model. BY BN Max wall thickness 8" 8.25" NOTE: IMPORTANT: Side louvers must never be installed. 4. Carefully measure and cut an opening with the following dimensions depending on each side of framing material used . WIDTH "X" = inside model...

Installation Instructions
Page 8
... opending to the studs with dry wall. Unit must tilt back about 1/8" - 1/4" 1" LONG WOOD SCREW Side Louvers Refer to eliminate cabinet distortion. Installation Instructions 4. Fill in Step 3. 8 Secure bottom rail to wood frame with two large wood screws 1" (2.5 cm) long using shims as shown. 5.... wall. NAIL SPACERS TO STUDS FIG.3 FIG.4 LEVEL CAULK AS REQUIRED ALUMINUM FLASHING OVER BOTTOM OF FRAME OVER 8-1/2" 3 Prepare and Install Cabinet 1. Place cabinet into opening to spacers with front flush with wood spacers, as needed to Step 5 of Window Mounting for...
... opending to the studs with dry wall. Unit must tilt back about 1/8" - 1/4" 1" LONG WOOD SCREW Side Louvers Refer to eliminate cabinet distortion. Installation Instructions 4. Fill in Step 3. 8 Secure bottom rail to wood frame with two large wood screws 1" (2.5 cm) long using shims as shown. 5.... wall. NAIL SPACERS TO STUDS FIG.3 FIG.4 LEVEL CAULK AS REQUIRED ALUMINUM FLASHING OVER BOTTOM OF FRAME OVER 8-1/2" 3 Prepare and Install Cabinet 1. Place cabinet into opening to spacers with front flush with wood spacers, as needed to Step 5 of Window Mounting for...

Installation Instructions
Page 9
... to masonry wall. Existing holes in the masonry wall similar to the frame construction (refer to Step 2 of cabinet.) 3. Installation Instructions FIG.7 FIG.8 Support bracket Sill angle bracket Wooden strip 6. Masonry Construction 1. Install exterior cabinet support brackets as the one shown in Step 3 of Window Mounting. On the outside, caulk opendings around top...
... to masonry wall. Existing holes in the masonry wall similar to the frame construction (refer to Step 2 of cabinet.) 3. Installation Instructions FIG.7 FIG.8 Support bracket Sill angle bracket Wooden strip 6. Masonry Construction 1. Install exterior cabinet support brackets as the one shown in Step 3 of Window Mounting. On the outside, caulk opendings around top...

Product Specifications Sheet
Page 2
... Drive • Charlotte, NC 28262 • 1-800-FRIGIDAIRE • frigidaire.com CANADA • 5855 Terry Fox Way • Mississauga, ON L5V 3E4 • 1-800-265-8352 • frigidaire.ca FFRE2533U2 03/20 © 2020 Electrolux Home Products, Inc. Wall...230V / 208V 10.7 / 11.7 2,420 / 2,380 5' / 6' LCDI (6-20P) WALL CUTOUT DIMENSIONS F - Refer to Product Installation Guide for detailed installation instructions on the web at frigidaire.com. FFRE2533U2 HOME COMFORT HEAVY-DUTY AIR CONDITIONER PERFORMANCE BTU (Cool) Dehumidification (Pints / Hour) Cool Area (Up To Sq. Height...
... Drive • Charlotte, NC 28262 • 1-800-FRIGIDAIRE • frigidaire.com CANADA • 5855 Terry Fox Way • Mississauga, ON L5V 3E4 • 1-800-265-8352 • frigidaire.ca FFRE2533U2 03/20 © 2020 Electrolux Home Products, Inc. Wall...230V / 208V 10.7 / 11.7 2,420 / 2,380 5' / 6' LCDI (6-20P) WALL CUTOUT DIMENSIONS F - Refer to Product Installation Guide for detailed installation instructions on the web at frigidaire.com. FFRE2533U2 HOME COMFORT HEAVY-DUTY AIR CONDITIONER PERFORMANCE BTU (Cool) Dehumidification (Pints / Hour) Cool Area (Up To Sq. Height...


