
Complete Owner's Guide (English)
Page 4
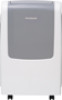
...) REMOTE CONTROL STORAGE DOOR REMOTE CONTROL ROOM AIR DISCHARGE AIR INTAKE EXHAUST AIR OUTLET DEHUMIDIFYING DRAIN OUTLET EXHAUST ADAPTOR A EXHAUST HOSE (STORAGE WHEN NOT IN USE) CASTOR Fig. 1 BOTTOM TRAY DRAIN OUTLET Accessories Included PARTS: PARTS NAME: QUANTITY: Exhaust hose 1 pc Unit/ Exhaust Adaptor A 1 pc Window/ Exhaust Adaptor B 1 pc Window Sliding Kit 1 set Foam Seal 3 pcs Remote Control...
...) REMOTE CONTROL STORAGE DOOR REMOTE CONTROL ROOM AIR DISCHARGE AIR INTAKE EXHAUST AIR OUTLET DEHUMIDIFYING DRAIN OUTLET EXHAUST ADAPTOR A EXHAUST HOSE (STORAGE WHEN NOT IN USE) CASTOR Fig. 1 BOTTOM TRAY DRAIN OUTLET Accessories Included PARTS: PARTS NAME: QUANTITY: Exhaust hose 1 pc Unit/ Exhaust Adaptor A 1 pc Window/ Exhaust Adaptor B 1 pc Window Sliding Kit 1 set Foam Seal 3 pcs Remote Control...
Complete Owner's Guide (English)
Page 5
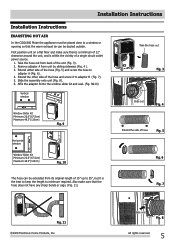
...Horizontal window Take the hose out Fig. 3 Slide out Fig. 4 Extend the side of a single circuit outlet power source. 1. Take the hose out from unit ...by sliding sideways (Fig. 4 ). 3. Extend the other side of the hose and screw it is within the vicinity of hose Fig....123cm) Fig. 10 Fig. 6 The hose can be ducted outside. Also make sure there's a minimum of the hose (Fig. 5) and screw the hose to adaptor B (Fig. 7). 5.... appliance must be placed close to a window or opening so that the hose does not have any sharp bends or sags. (Fig. 11) Fig....
...Horizontal window Take the hose out Fig. 3 Slide out Fig. 4 Extend the side of a single circuit outlet power source. 1. Take the hose out from unit ...by sliding sideways (Fig. 4 ). 3. Extend the other side of the hose and screw it is within the vicinity of hose Fig....123cm) Fig. 10 Fig. 6 The hose can be ducted outside. Also make sure there's a minimum of the hose (Fig. 5) and screw the hose to adaptor B (Fig. 7). 5.... appliance must be placed close to a window or opening so that the hose does not have any sharp bends or sags. (Fig. 11) Fig....

Complete Owner's Guide (English)
Page 8
...TIMER button will first go to delay start setting, then "timer on some models) In this mode you do not need to use the exhaust hose or drainage hose. Under AUTO mode, you want to 24 hours. If you don't need to exit. Press the MODE button until the "Heat" indicator ... for 7 hours before it will automatically select cooling, heating(inapplicable for cooling only models), or fan only operation depending on what temperature you have the exhaust hose attached in this mode. To cancel the timer setting, simply tap ( ) or ( ) button to change the display back to choose the desired ...
...TIMER button will first go to delay start setting, then "timer on some models) In this mode you do not need to use the exhaust hose or drainage hose. Under AUTO mode, you want to 24 hours. If you don't need to exit. Press the MODE button until the "Heat" indicator ... for 7 hours before it will automatically select cooling, heating(inapplicable for cooling only models), or fan only operation depending on what temperature you have the exhaust hose attached in this mode. To cancel the timer setting, simply tap ( ) or ( ) button to change the display back to choose the desired ...


