

E8410 BIOS Guide
Page 2
... Change or System Failure If there has been a change the BIOS environment to operate your notebook. Using the TrustedCore Menu When the Fujitsu logo appears on any other setup menus to review or alter the current settings. LifeBook E Series BIOS E Series BIOS BIOS SETUP UTILITY The BIOS Setup Utility is a program that sets up the operating environment...
... Change or System Failure If there has been a change the BIOS environment to operate your notebook. Using the TrustedCore Menu When the Fujitsu logo appears on any other setup menus to review or alter the current settings. LifeBook E Series BIOS E Series BIOS BIOS SETUP UTILITY The BIOS Setup Utility is a program that sets up the operating environment...

E8410 BIOS Guide
Page 4
... Field Default Menu Field Default Note that all of the menu fields for your notebook. Product Name: Serial Number:: BIOS Version: Processor Type: L2 Cache: E8410 Not Defined 1.05 (XX/XX/2007) Intel(R) Core(TM)2 Duo CPU T7100 @ 1.80GHz 2048 KB Total Memory: Memory Slot 1: Memory Slot 2: Onboard MAC Address: UUID: 2048 MB ... F1 Help ESC Exit Select Item -/Space Change Values F9 Setup Defaults ▲ Select Menu Enter Select Sub-Menu F10 Save and Exit Figure 1. LifeBook E Series BIOS INFO MENU - Note that provides the configuration information for reference.
... Field Default Menu Field Default Note that all of the menu fields for your notebook. Product Name: Serial Number:: BIOS Version: Processor Type: L2 Cache: E8410 Not Defined 1.05 (XX/XX/2007) Intel(R) Core(TM)2 Duo CPU T7100 @ 1.80GHz 2048 KB Total Memory: Memory Slot 1: Memory Slot 2: Onboard MAC Address: UUID: 2048 MB ... F1 Help ESC Exit Select Item -/Space Change Values F9 Setup Defaults ▲ Select Menu Enter Select Sub-Menu F10 Save and Exit Figure 1. LifeBook E Series BIOS INFO MENU - Note that provides the configuration information for reference.

E8410 BIOS Guide
Page 6
Display the type of device on this interface. [English (US)] The default setting differs between the US/European and the Japanese model. LifeBook E Series BIOS Table 2: Fields, Options and Defaults for the BIOS. 6 Menu Field Drive0 Drive1: Language: Options Selects the Drive0 Serial ATA drive submenu Selects the Drive1 Serial ATA drive submenu ■...
Display the type of device on this interface. [English (US)] The default setting differs between the US/European and the Japanese model. LifeBook E Series BIOS Table 2: Fields, Options and Defaults for the BIOS. 6 Menu Field Drive0 Drive1: Language: Options Selects the Drive0 Serial ATA drive submenu Selects the Drive1 Serial ATA drive submenu ■...

E8410 BIOS Guide
Page 7
... Enter Select Sub-Menu F10 Save and Exit Figure 3. Phoenix TrustedCore(tm) Setup Utility Info System Advanced Security Boot Exit Drive0 [FUJITSU MHW2120BH] Item Specific Help Type: Total Sectors: Maximum Capacity: [Auto]] LBA Format 234441648 120GB SATA1 Select Serial ATA/IDE drive installed ...here. [Auto] The BIOS auto-types the drive on your hard disk 7 Description Selects the hard drive device type. Select Auto to have the type automatically identified by the BIOS at POST.
... Enter Select Sub-Menu F10 Save and Exit Figure 3. Phoenix TrustedCore(tm) Setup Utility Info System Advanced Security Boot Exit Drive0 [FUJITSU MHW2120BH] Item Specific Help Type: Total Sectors: Maximum Capacity: [Auto]] LBA Format 234441648 120GB SATA1 Select Serial ATA/IDE drive installed ...here. [Auto] The BIOS auto-types the drive on your hard disk 7 Description Selects the hard drive device type. Select Auto to have the type automatically identified by the BIOS at POST.

E8410 BIOS Guide
Page 8
...F10 Save and Exit Figure 4. Selects the ATA/ATAPI device type. Autotype the drive to have the type automatically identified by the BIOS at POST. Phoenix TrustedCore(tm) Setup Utility Info System Advanced Security Boot Exit Drive1 [MATSHITADVD-RAM UJ-850S] Item Specific Help ... menu. This option cannot be changed (automatically identified by the BIOS). Multi-word DMA is automatically set to mode 1 for Fast PIO 1, Fast PIO 2, Fast PIO 3, and set to configure secondary ATA devices. LifeBook E Series BIOS Drive1 Submenu of the System Menu The Drive1 submenu allows you ...
...F10 Save and Exit Figure 4. Selects the ATA/ATAPI device type. Autotype the drive to have the type automatically identified by the BIOS at POST. Phoenix TrustedCore(tm) Setup Utility Info System Advanced Security Boot Exit Drive1 [MATSHITADVD-RAM UJ-850S] Item Specific Help ... menu. This option cannot be changed (automatically identified by the BIOS). Multi-word DMA is automatically set to mode 1 for Fast PIO 1, Fast PIO 2, Fast PIO 3, and set to configure secondary ATA devices. LifeBook E Series BIOS Drive1 Submenu of the System Menu The Drive1 submenu allows you ...

E8410 BIOS Guide
Page 10
... Configurations submenu which allows setting external and internal keyboard and mouse parameters. Advanced Menu Table 5: Fields, Options and Defaults for serial, infrared and parallel ports. LifeBook E Series BIOS ADVANCED MENU - Keyboard/Mouse Features When selected, opens the Keyboard/Mouse Features submenu, which allows the user to help understand the field's use.
... Configurations submenu which allows setting external and internal keyboard and mouse parameters. Advanced Menu Table 5: Fields, Options and Defaults for serial, infrared and parallel ports. LifeBook E Series BIOS ADVANCED MENU - Keyboard/Mouse Features When selected, opens the Keyboard/Mouse Features submenu, which allows the user to help understand the field's use.

E8410 BIOS Guide
Page 12
LifeBook E Series BIOS Serial/Parallel Port Configuration Submenu of the Advanced Menu The Serial/Parallel Port Configuration submenu lets you can be entered in various ways, including via the BIOS setup utility, the control software for technical assistance. ■ If your notebook. Serial/Parallel Port Configuration Submenu 12 See your notebook will not function...
LifeBook E Series BIOS Serial/Parallel Port Configuration Submenu of the Advanced Menu The Serial/Parallel Port Configuration submenu lets you can be entered in various ways, including via the BIOS setup utility, the control software for technical assistance. ■ If your notebook. Serial/Parallel Port Configuration Submenu 12 See your notebook will not function...

E8410 BIOS Guide
Page 13
...IRQ 7 [Enabled] [3F8/IRQ 4] Configures the serial port using either no configuration (Disabled), a user defined configuration (Enabled), or by allowing the BIOS or OS to choose the configuration (Auto). [Bi-directional] [378 When the parallel port is enabled this option is Enabled. [Enabled] [FIR]... [2E8/IRQ 3] Configures the infrared port using either no configuration (Disabled), a user defined configuration (Enabled), or by allowing the BIOS or OS to choose the configuration (Auto). Advanced Menu Table 6: Fields, Options and Defaults for the infrared port. Output Only (Half...
...IRQ 7 [Enabled] [3F8/IRQ 4] Configures the serial port using either no configuration (Disabled), a user defined configuration (Enabled), or by allowing the BIOS or OS to choose the configuration (Auto). [Bi-directional] [378 When the parallel port is enabled this option is Enabled. [Enabled] [FIR]... [2E8/IRQ 3] Configures the infrared port using either no configuration (Disabled), a user defined configuration (Enabled), or by allowing the BIOS or OS to choose the configuration (Auto). Advanced Menu Table 6: Fields, Options and Defaults for the infrared port. Output Only (Half...

E8410 BIOS Guide
Page 14
... when the computer completes booting. Manual Setting allows the device to plug a mouse or keyboard into the PS/2 port and have it is on Resume. LifeBook E Series BIOS Keyboard/Mouse Features Submenu of the Advanced Menu The Keyboard/Mouse Features submenu is not optimized. 14 When [On] or [Off], Numlock is off .
... when the computer completes booting. Manual Setting allows the device to plug a mouse or keyboard into the PS/2 port and have it is on Resume. LifeBook E Series BIOS Keyboard/Mouse Features Submenu of the Advanced Menu The Keyboard/Mouse Features submenu is not optimized. 14 When [On] or [Off], Numlock is off .

E8410 BIOS Guide
Page 16
... Controller: Wireless LAN: Internal Camera: [Enabled] [Enabled] [Enabled] [Enabled] [Enabled] [Enabled] [Enabled] [Disabled] Serial ATA port is disabled. [Enabled] Serial ATA port is enabled. LifeBook E Series BIOS Internal Device Configurations Submenu of the Advanced Menu Menu Field Serial ATA Controller: AHCI Configuration: IDE Controller: Modem Controller: LAN Controller: Wireless LAN: Internal Camera...
... Controller: Wireless LAN: Internal Camera: [Enabled] [Enabled] [Enabled] [Enabled] [Enabled] [Enabled] [Enabled] [Disabled] Serial ATA port is disabled. [Enabled] Serial ATA port is enabled. LifeBook E Series BIOS Internal Device Configurations Submenu of the Advanced Menu Menu Field Serial ATA Controller: AHCI Configuration: IDE Controller: Modem Controller: LAN Controller: Wireless LAN: Internal Camera...

E8410 BIOS Guide
Page 18
... system to hang during POST, depending on the device that belong to the SCSI subclass in the mass storage class (e.g., USB Memory Key) are enabled. LifeBook E Series BIOS USB Features Submenu of the Advanced Menu Menu Field Legacy USB Support: SCSI SubClass Support: Options ■ Disabled ■ Enabled ■ Disabled ■ Enabled...
... system to hang during POST, depending on the device that belong to the SCSI subclass in the mass storage class (e.g., USB Memory Key) are enabled. LifeBook E Series BIOS USB Features Submenu of the Advanced Menu Menu Field Legacy USB Support: SCSI SubClass Support: Options ■ Disabled ■ Enabled ■ Disabled ■ Enabled...

E8410 BIOS Guide
Page 19
... wake-up on LAN, the system will try to first boot from the LAN before attempting to boot from any other device, regardless of the BIOS boot priority settings or disabling of the Advanced Menu Menu Field Power Button: Wake up on LAN: Force LAN Boot: Volume Setting: Hardware Power Management...
... wake-up on LAN, the system will try to first boot from the LAN before attempting to boot from any other device, regardless of the BIOS boot priority settings or disabling of the Advanced Menu Menu Field Power Button: Wake up on LAN: Force LAN Boot: Volume Setting: Hardware Power Management...

E8410 BIOS Guide
Page 20
... F9 Setup Defaults ▲ Select Menu Enter Select Sub-Menu F10 Save and Exit Figure 13. Turns event logging on and off for DMI events. LifeBook E Series BIOS Event Logging Submenu of the event log.
... F9 Setup Defaults ▲ Select Menu Enter Select Sub-Menu F10 Save and Exit Figure 13. Turns event logging on and off for DMI events. LifeBook E Series BIOS Event Logging Submenu of the event log.
E8410 BIOS Guide
Page 21
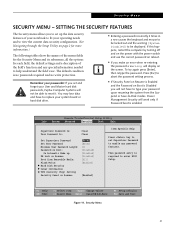
If you make an error when re-entering the password a Warning will not have to enter BIOS Setup. Press [Esc] to abort the password setting process. ■ If Security Panel on Resume is Enabled and the Password on Boot is required to ... the keyboard and mouse to be locked out and the warning [System Disabled] to be able to type your User and Master hard disk passwords, Fujitsu Computer Systems will work only if Password boot is no passwords required and no write protection. If this happens, restart the computer by turning off...
If you make an error when re-entering the password a Warning will not have to enter BIOS Setup. Press [Esc] to abort the password setting process. ■ If Security Panel on Resume is Enabled and the Password on Boot is required to ... the keyboard and mouse to be locked out and the warning [System Disabled] to be able to type your User and Master hard disk passwords, Fujitsu Computer Systems will work only if Password boot is no passwords required and no write protection. If this happens, restart the computer by turning off...

E8410 BIOS Guide
Page 22
...Password field. Set User Password -- [Enter] This field can only be used to access the BIOS setup utility. Sets, changes or cancels the User Password. Passwords are NOT case-sensitive. When...to another menu. Flash Write: ■ Disabled ■ Enabled [Enabled] When disabled, the BIOS Flash memory will be up to seven characters long and must include only letters or numbers (no ...Security Panel on the Security Menu, you enter the password. If you wish to move to access the BIOS setup utility. If you wish to exit from Suspend. On Automatic Wake up: ■ Disabled ■...
...Password field. Set User Password -- [Enter] This field can only be used to access the BIOS setup utility. Sets, changes or cancels the User Password. Passwords are NOT case-sensitive. When...to another menu. Flash Write: ■ Disabled ■ Enabled [Enabled] When disabled, the BIOS Flash memory will be up to seven characters long and must include only letters or numbers (no ...Security Panel on the Security Menu, you enter the password. If you wish to move to access the BIOS setup utility. If you wish to exit from Suspend. On Automatic Wake up: ■ Disabled ■...

E8410 BIOS Guide
Page 24
... Menu Enter Select Sub-Menu F10 Save and Exit Figure 16. Field to write owner information, (i.e., name). Set foreground color. Is: Set Owner Informa- -- LifeBook E Series BIOS Owner Information Submenu of the Security Menu The Owner Information submenu is for the Owner Information Submenu of the Security Menu Menu Field Options Owner...
... Menu Enter Select Sub-Menu F10 Save and Exit Figure 16. Field to write owner information, (i.e., name). Set foreground color. Is: Set Owner Informa- -- LifeBook E Series BIOS Owner Information Submenu of the Security Menu The Owner Information submenu is for the Owner Information Submenu of the Security Menu Menu Field Options Owner...

E8410 BIOS Guide
Page 26
...is disabled and the [F12] key is enabled. Turns on and off display of test results instead of Fujitsu logo screen during Power On Self Test. LifeBook E Series BIOS BOOT MENU - Follow the instructions for Navigating Through the Setup Utility to make any special information needed to ...18. Boot Menu Table 18: Fields, Options and Defaults for the operating system. See "The Boot Device Priority Submenu" in which the BIOS searches sources for the Boot Menu Menu Field Boot-time Diagnostic Screen: Boot Menu: Preboot Execution Environment: Boot Device Priority Options ■ ...
...is disabled and the [F12] key is enabled. Turns on and off display of test results instead of Fujitsu logo screen during Power On Self Test. LifeBook E Series BIOS BOOT MENU - Follow the instructions for Navigating Through the Setup Utility to make any special information needed to ...18. Boot Menu Table 18: Fields, Options and Defaults for the operating system. See "The Boot Device Priority Submenu" in which the BIOS searches sources for the Boot Menu Menu Field Boot-time Diagnostic Screen: Boot Menu: Preboot Execution Environment: Boot Device Priority Options ■ ...

E8410 BIOS Guide
Page 27
... using the [up or down ] cursor keys and then press the [+] or [-] key to the Exit Menu. To change automatically without changing the BIOS setup. When the bootable CD-ROM is used , the CD-ROM becomes Drive A. Phoenix TrustedCore(tm) Setup Utility Info System Advanced Security Boot Exit ...Boot Device Priority Item Specific Help Boot priority order: 1: Floppy Disk Drive 2: Drive0 HDD: FUJITSU MHV2120BH 3: Drive1 HDD: None 4: CD/DVD Drive 5: NETWORK: Intel LAN 6: 7: 8: Excluded from the list a device that if you exit the...
... using the [up or down ] cursor keys and then press the [+] or [-] key to the Exit Menu. To change automatically without changing the BIOS setup. When the bootable CD-ROM is used , the CD-ROM becomes Drive A. Phoenix TrustedCore(tm) Setup Utility Info System Advanced Security Boot Exit ...Boot Device Priority Item Specific Help Boot priority order: 1: Floppy Disk Drive 2: Drive0 HDD: FUJITSU MHV2120BH 3: Drive1 HDD: None 4: CD/DVD Drive 5: NETWORK: Intel LAN 6: 7: 8: Excluded from the list a device that if you exit the...

E8410 BIOS Guide
Page 28
... No is selected, the system will cause the new settings in the Navigating Through the Setup Utility section. Selecting Save Changes will return to the BIOS memory. LifeBook E Series BIOS EXIT MENU - The message Save configuration changes now? [Yes] [No] will load the operating system and begin operation. When the...
... No is selected, the system will cause the new settings in the Navigating Through the Setup Utility section. Selecting Save Changes will return to the BIOS memory. LifeBook E Series BIOS EXIT MENU - The message Save configuration changes now? [Yes] [No] will load the operating system and begin operation. When the...

E8410 User's Guide
Page 8
... Adjusting Display Panel Brightness 51 Using the Keyboard 51 Closing the Display Panel 51 Starting Your LifeBook Notebook 52 Power On 52 Boot Sequence 53 Hard Disk Drive Passwords 53 BIOS Setup Utility 54 Booting the System 55 Starting Windows Vista the first time 56 Starting Windows... XP the First Time 57 Registering Your LifeBook notebook with Fujitsu 58 Installing Click Me 58 Fujitsu Driver Update Utility 59 Power Management 60 ...
... Adjusting Display Panel Brightness 51 Using the Keyboard 51 Closing the Display Panel 51 Starting Your LifeBook Notebook 52 Power On 52 Boot Sequence 53 Hard Disk Drive Passwords 53 BIOS Setup Utility 54 Booting the System 55 Starting Windows Vista the first time 56 Starting Windows... XP the First Time 57 Registering Your LifeBook notebook with Fujitsu 58 Installing Click Me 58 Fujitsu Driver Update Utility 59 Power Management 60 ...


