Operator Manual
Page 32
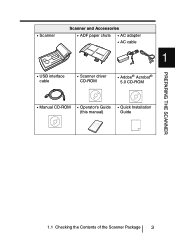
PREPARING THE SCANNER • Scanner Scanner and Accessories • ADF paper chute • AC adapter • AC cable 1 • USB interface cable • Scanner driver CD-ROM • Adobe® Acrobat® 5.0 CD-ROM • Manual CD-ROM • Operator's Guide • Quick Installation (this manual) Guide fi-XXXX XXXXXXXXX 1.1 Checking the Contents of the Scanner Package 3
PREPARING THE SCANNER • Scanner Scanner and Accessories • ADF paper chute • AC adapter • AC cable 1 • USB interface cable • Scanner driver CD-ROM • Adobe® Acrobat® 5.0 CD-ROM • Manual CD-ROM • Operator's Guide • Quick Installation (this manual) Guide fi-XXXX XXXXXXXXX 1.1 Checking the Contents of the Scanner Package 3

Operator Manual
Page 38
Connect the USB interface cable from the host PC or Computer 1 here. PREPARING THE SCANNER 1.2 Names and Functions of Parts 9 Connect the AC adapter here. Name 12 SCSI ID switch 13 SCSI interface connector 14 USB interface connector 15 DC inlet Function Sets the SCSI ID. (Set to "5" before the scanner is shipped from the factory.) Connect the SCSI interface cable from the host PC or Computer here. No.
Connect the USB interface cable from the host PC or Computer 1 here. PREPARING THE SCANNER 1.2 Names and Functions of Parts 9 Connect the AC adapter here. Name 12 SCSI ID switch 13 SCSI interface connector 14 USB interface connector 15 DC inlet Function Sets the SCSI ID. (Set to "5" before the scanner is shipped from the factory.) Connect the SCSI interface cable from the host PC or Computer here. No.
Operator Manual
Page 48
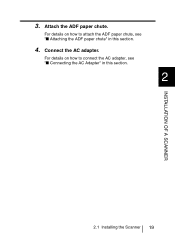
INSTALLATION OF A SCANNER 3. For details on how to connect the AC adapter, see "I Connecting the AC Adapter" in this section. 2 2.1 Installing the Scanner 19 For details on how to attach the ADF paper chute, see "I Attaching the ADF paper chute" in this section. 4. Connect the AC adapter. Attach the ADF paper chute.
INSTALLATION OF A SCANNER 3. For details on how to connect the AC adapter, see "I Connecting the AC Adapter" in this section. 2 2.1 Installing the Scanner 19 For details on how to attach the ADF paper chute, see "I Attaching the ADF paper chute" in this section. 4. Connect the AC adapter. Attach the ADF paper chute.
Operator Manual
Page 50
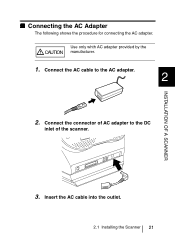
Connect the connector of the scanner. 3. Insert the AC cable into the outlet. 2.1 Installing the Scanner 21 Use only whth AC adapter provided by the CAUTION manufacturer. 1. Connect the AC cable to the DC inlet of AC adapter to the AC adapter. 2 2. INSTALLATION OF A SCANNER I Connecting the AC Adapter The following shows the procedure for connecting the AC adapter.
Connect the connector of the scanner. 3. Insert the AC cable into the outlet. 2.1 Installing the Scanner 21 Use only whth AC adapter provided by the CAUTION manufacturer. 1. Connect the AC cable to the DC inlet of AC adapter to the AC adapter. 2 2. INSTALLATION OF A SCANNER I Connecting the AC Adapter The following shows the procedure for connecting the AC adapter.

Operator Manual
Page 98
Before cleaning ADF, disconnect the AC adapter from the power outlet, and wait at least 15 minutes for the glass to the document. CAUTION When the scanner is in the ADF unit: •Pad ASY •Pick roller 5 •Feed roller •Plastic roller •Sheet guide • Glass DAILY CARE 5.3 Cleaning ..., depends on the type of the glass inside the ADF becomes hot. For example, the ADF sometimes must be cleaned in use, the surface of document you are scanning. 5.3 Cleaning the ADF As a rule, clean the ADF every 1,000 scanned sheets.
Before cleaning ADF, disconnect the AC adapter from the power outlet, and wait at least 15 minutes for the glass to the document. CAUTION When the scanner is in the ADF unit: •Pad ASY •Pick roller 5 •Feed roller •Plastic roller •Sheet guide • Glass DAILY CARE 5.3 Cleaning ..., depends on the type of the glass inside the ADF becomes hot. For example, the ADF sometimes must be cleaned in use, the surface of document you are scanning. 5.3 Cleaning the ADF As a rule, clean the ADF every 1,000 scanned sheets.

Operator Manual
Page 106
WARNING Turn off the power and unplug the AC adapter from the outlet when changing the scanners consumable products. 6.1 Consumable and Replacement Cycle 78 6.2 Replacing the Pad ASY 86 6.3 Replacing the Pick Roller 92 77 Also, when FUJITSU TWAIN32 is other than Windows® XP. This chapter explains samples of the screens in this... that you are using is updated the screens and operations noted in Windows® XP. REPLACING CONSUMABLES 6 REPLACING CONSUMABLES 6 This chapter describes how to replace scanner consumables.
WARNING Turn off the power and unplug the AC adapter from the outlet when changing the scanners consumable products. 6.1 Consumable and Replacement Cycle 78 6.2 Replacing the Pad ASY 86 6.3 Replacing the Pick Roller 92 77 Also, when FUJITSU TWAIN32 is other than Windows® XP. This chapter explains samples of the screens in this... that you are using is updated the screens and operations noted in Windows® XP. REPLACING CONSUMABLES 6 REPLACING CONSUMABLES 6 This chapter describes how to replace scanner consumables.

Operator Manual
Page 137
YES Contact the manufacturer's authorized service center. NO Press power button. 108 7.2 Remedying Typical Troubles Are power cord and AC adapter correctly connected? NO Correctly connect power cord. YES Have you pushed the power button? Symptom1 Scanner does not turn ON.
YES Contact the manufacturer's authorized service center. NO Press power button. 108 7.2 Remedying Typical Troubles Are power cord and AC adapter correctly connected? NO Correctly connect power cord. YES Have you pushed the power button? Symptom1 Scanner does not turn ON.
Operator Manual
Page 190
... 64 Connecting the SCSI interface cable 25 Connecting the USB interface cable 23 Connections Connecting the AC adapter 21 Connecting the PC to the scanner ........ 22 Connecting the SCSI interface cable.... 25 Connecting the USB interface cable .....23 Connectors DC ...uses 79 Standard replacement cycle 79 D DC inlet 9 Detecting double-feeds 59, 141 Document Document paper thickness 135 Document type 135 Number of document sheets 139 Document bed 7 Document cover 7 Document holding pad 7 Document paper quality...... 135 Document size 134 E External dimensions... 149, 151 IN-1
... 64 Connecting the SCSI interface cable 25 Connecting the USB interface cable 23 Connections Connecting the AC adapter 21 Connecting the PC to the scanner ........ 22 Connecting the SCSI interface cable.... 25 Connecting the USB interface cable .....23 Connectors DC ...uses 79 Standard replacement cycle 79 D DC inlet 9 Detecting double-feeds 59, 141 Document Document paper thickness 135 Document type 135 Number of document sheets 139 Document bed 7 Document cover 7 Document holding pad 7 Document paper quality...... 135 Document size 134 E External dimensions... 149, 151 IN-1

Quick Installation Guide
Page 1
... the AC Cable, and then connect it is the D drive). Manual CD-ROM FUJITSU TWAIN32 Scanner Driver CD-ROM FUJITSU ISIS Scanner Driver CD-ROM Adobe R Acrobat R 5.0 CD-ROM AC cable AC adapter fi-4220C Quick Installation Guide FUJITSU ISIS Scanner Driver Quick Installation Guide 2 Release the Shipping Lock Make sure to slide the shipping lock in the search...
... the AC Cable, and then connect it is the D drive). Manual CD-ROM FUJITSU TWAIN32 Scanner Driver CD-ROM FUJITSU ISIS Scanner Driver CD-ROM Adobe R Acrobat R 5.0 CD-ROM AC cable AC adapter fi-4220C Quick Installation Guide FUJITSU ISIS Scanner Driver Quick Installation Guide 2 Release the Shipping Lock Make sure to slide the shipping lock in the search...
Quick Installation Guide
Page 2
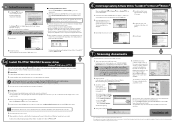
...that the SCSI adapter is installed, uninstall it . 3. In the start screen is the D drive). In [TWAIN Driver] (Scan conditions setting screen) set , the setup disk start automatically or the window for information about the FUJITSU TWAIN32 Scanner driver installation. ...fi-4220C Image Scanner Operator's Guide" Caution In case of WindowsR 95, and Windows NT R 4.0, Select "FUJITSU TWAIN32". displayl shows to the actual screens. Caution Please refer to be displayed. For details on ScandAll 21.exe in the ScandAll folder in [Choose Setup Language] then click [OK]. The document...
...that the SCSI adapter is installed, uninstall it . 3. In the start screen is the D drive). In [TWAIN Driver] (Scan conditions setting screen) set , the setup disk start automatically or the window for information about the FUJITSU TWAIN32 Scanner driver installation. ...fi-4220C Image Scanner Operator's Guide" Caution In case of WindowsR 95, and Windows NT R 4.0, Select "FUJITSU TWAIN32". displayl shows to the actual screens. Caution Please refer to be displayed. For details on ScandAll 21.exe in the ScandAll folder in [Choose Setup Language] then click [OK]. The document...

Operating Guide
Page 65
WARNING 3 When operating the scanner, the ADF's glass becomes very hot. Wait for at least 15 minutes. Do not turn off the scanner when you clean inside the scanner, turn off its power and unplug the AC adapter from the outlet. Chapter 3 DAILY CARE This chapter describes how to clean the scanner. Before you clean the Feed rollers 3.1 Cleaning Materials and Locations requiring Cleaning 50 3.2 Cleaning the Flatbed 51 3.3 Cleaning the ADF 53 fi-4220C2 Image Scanner Operator's Guide 49
WARNING 3 When operating the scanner, the ADF's glass becomes very hot. Wait for at least 15 minutes. Do not turn off the scanner when you clean inside the scanner, turn off its power and unplug the AC adapter from the outlet. Chapter 3 DAILY CARE This chapter describes how to clean the scanner. Before you clean the Feed rollers 3.1 Cleaning Materials and Locations requiring Cleaning 50 3.2 Cleaning the Flatbed 51 3.3 Cleaning the ADF 53 fi-4220C2 Image Scanner Operator's Guide 49
Operating Guide
Page 69
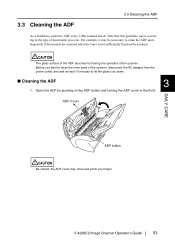
ADF Cover DAILY CARE ADF button CAUTION Be careful, the ADF cover may be necessary to clean the ADF more frequently if documents are scanned when the toner is not sufficiently fixed on the ADF button and turning the ADF cover to the front. For example, it may ... The glass surface of the ADF becomes hot during the operation of the scanner, disconnect the AC adapter from the power outlet, and wait at least 15 minutes to clean the inner parts of the scanner. Before you scan. fi-4220C2 Image Scanner Operator's Guide 53 Open the ADF by pushing on the printout. 3.3 Cleaning...
ADF Cover DAILY CARE ADF button CAUTION Be careful, the ADF cover may be necessary to clean the ADF more frequently if documents are scanned when the toner is not sufficiently fixed on the ADF button and turning the ADF cover to the front. For example, it may ... The glass surface of the ADF becomes hot during the operation of the scanner, disconnect the AC adapter from the power outlet, and wait at least 15 minutes to clean the inner parts of the scanner. Before you scan. fi-4220C2 Image Scanner Operator's Guide 53 Open the ADF by pushing on the printout. 3.3 Cleaning...
Operating Guide
Page 73
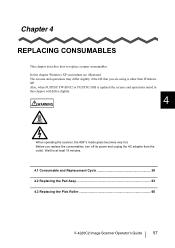
...FUJITSU TWAIN32 or FUJITSU ISIS is other than Windows XP. In this chapter will differ slightly. 4 WARNING When operating the scanner..., the ADF's inside glass becomes very hot. Wait for at least 15 minutes. 4.1 Consumable and Replacement Cycle 58 4.2 Replacing the Pad Assy 63 4.3 Replacing the Pick Roller 66 fi-4220C2 Image Scanner... Operator's Guide 57 Chapter 4 REPLACING CONSUMABLES This chapter describes how to replace scanner consumables....
...FUJITSU TWAIN32 or FUJITSU ISIS is other than Windows XP. In this chapter will differ slightly. 4 WARNING When operating the scanner..., the ADF's inside glass becomes very hot. Wait for at least 15 minutes. 4.1 Consumable and Replacement Cycle 58 4.2 Replacing the Pad Assy 63 4.3 Replacing the Pick Roller 66 fi-4220C2 Image Scanner... Operator's Guide 57 Chapter 4 REPLACING CONSUMABLES This chapter describes how to replace scanner consumables....
Operating Guide
Page 93
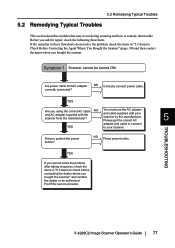
... AC cable NO and AC adapter supplied with your scanner. NO Press power button. NO Correctly connect power cable. YES You must use the AC adapter and cable supplied with the scanner from the manufacturer? TROUBLESHOOTING 5 fi-4220C2 Image Scanner Operator's Guide 77 If the... Items to check before contacting the dealer where you bought the scanner" and contact the dealer or an authorized FUJITSU service provider. Before you pushed the power button? Are power cable and AC adapter correctly connected? 5.2 Remedying Typical Troubles 5.2 Remedying Typical Troubles This...
... AC cable NO and AC adapter supplied with your scanner. NO Press power button. NO Correctly connect power cable. YES You must use the AC adapter and cable supplied with the scanner from the manufacturer? TROUBLESHOOTING 5 fi-4220C2 Image Scanner Operator's Guide 77 If the... Items to check before contacting the dealer where you bought the scanner" and contact the dealer or an authorized FUJITSU service provider. Before you pushed the power button? Are power cable and AC adapter correctly connected? 5.2 Remedying Typical Troubles 5.2 Remedying Typical Troubles This...
