Operator Manual
Page 2
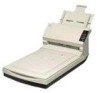
i INTRODUCTION Thank you to be installed almost anywhere. I Easily Installable The scanner's small size allows it to scan A4-size duplex color documents at a high speed of scanning color images on both sides, and has the following features. I Easy Scanning and Display The ADF (Automatic Document Feeder) allows you for buying the fi-4220C Duplex Color Scanner. The fi-4220C scanner is capable of 25 pages per minute.
i INTRODUCTION Thank you to be installed almost anywhere. I Easily Installable The scanner's small size allows it to scan A4-size duplex color documents at a high speed of scanning color images on both sides, and has the following features. I Easy Scanning and Display The ADF (Automatic Document Feeder) allows you for buying the fi-4220C Duplex Color Scanner. The fi-4220C scanner is capable of 25 pages per minute.

Operator Manual
Page 3
... at the end of this manual. 1 PREPARING THE SCANNER This chapter describes how to prepare the scanner for use. 2 INSTALLATION OF A SCANNER This chapter describes how to install and connect the scanner, and how to install the scanner application. 3 BASIC SCANNER OPERATIONS This chapter describes basic scanner operations. 4 SCANNING VARIOUS TYPES OF DOCUMENTS This chapter describes how to scan various types...
... at the end of this manual. 1 PREPARING THE SCANNER This chapter describes how to prepare the scanner for use. 2 INSTALLATION OF A SCANNER This chapter describes how to install and connect the scanner, and how to install the scanner application. 3 BASIC SCANNER OPERATIONS This chapter describes basic scanner operations. 4 SCANNING VARIOUS TYPES OF DOCUMENTS This chapter describes how to scan various types...

Operator Manual
Page 5
..., uses, and can be determined by turning the equipment off and on a circuit different from that interference will not occur in a particular installation. However, there is connected. • Consult the dealer or an experienced radio/TV technician for a Class B digital device, pursuant to which... can radiate radio frequency energy and, if not installed and used in accordance with the limits for help. If this equipment does cause harmful interference to radio or television reception, which the ...
..., uses, and can be determined by turning the equipment off and on a circuit different from that interference will not occur in a particular installation. However, there is connected. • Consult the dealer or an experienced radio/TV technician for a Class B digital device, pursuant to which... can radiate radio frequency energy and, if not installed and used in accordance with the limits for help. If this equipment does cause harmful interference to radio or television reception, which the ...

Operator Manual
Page 15
xiv Wipe any dust from the power plug. Use this scanner only at the indicated power voltage. Do not install in locations subject to oil smoke, steam, humidity, and dust. Use this scanner only at the indicated power voltage. Improper power voltage so might cause fire or electric shock. Do... not connect to multiple-power strips. Accumulated dust might cause fire or electric shock. Do not install the scanner in locations subject to oil smoke, steam, humidity, and dust. Wipe off any dust from metal parts on the power plug or ...
xiv Wipe any dust from the power plug. Use this scanner only at the indicated power voltage. Do not install in locations subject to oil smoke, steam, humidity, and dust. Use this scanner only at the indicated power voltage. Improper power voltage so might cause fire or electric shock. Do... not connect to multiple-power strips. Accumulated dust might cause fire or electric shock. Do not install the scanner in locations subject to oil smoke, steam, humidity, and dust. Wipe off any dust from metal parts on the power plug or ...

Operator Manual
Page 19
xviii Do not install the scanner on unstable surfaces. Install the scanner on a desk so that the scanner is installed on a level surface that is free of the desktop. Do not install the scanner on unstable surfaces. CAUTION The following describes important cautions described in this manual. Install the scanner on a flat, level surface. Firmly insert the power plug. Firmly insert...
xviii Do not install the scanner on unstable surfaces. Install the scanner on a desk so that the scanner is installed on a level surface that is free of the desktop. Do not install the scanner on unstable surfaces. CAUTION The following describes important cautions described in this manual. Install the scanner on a flat, level surface. Firmly insert the power plug. Firmly insert...

Operator Manual
Page 20
... place heavy objects or climb on the scanner or use the scanner's top surface for performing other work. xix Do not block the ventilation ports. Do not place heavy objects on top of scanner, resulting in fire or scanner failure. Improper installation might damage the cables, causing fire, ...electric shock or injuries. Also, make sure that the floor is free of obstructions. Before moving the scanner, be sure to disconnect the power plug...
... place heavy objects or climb on the scanner or use the scanner's top surface for performing other work. xix Do not block the ventilation ports. Do not place heavy objects on top of scanner, resulting in fire or scanner failure. Improper installation might damage the cables, causing fire, ...electric shock or injuries. Also, make sure that the floor is free of obstructions. Before moving the scanner, be sure to disconnect the power plug...

Operator Manual
Page 21
Do not use . Avoid any contact when scanner is in use aerosol sprays, for example, to clean the scanner. xx Install the scanner away from static electricity as this might cause the scanner to malfunction. Also, protect the scanner from strong magnetic fields and other sources of noise. Avoid any contact when scanner is operating as this may cause injuries. Do not use aerosol sprays near the scanner. Air sprayed from static electricity. Protect the scanner from aerosol sprays causes dirt and dust to enter the scanner, resulting scanner failure and malfunction.
Do not use . Avoid any contact when scanner is in use aerosol sprays, for example, to clean the scanner. xx Install the scanner away from static electricity as this might cause the scanner to malfunction. Also, protect the scanner from strong magnetic fields and other sources of noise. Avoid any contact when scanner is operating as this may cause injuries. Do not use aerosol sprays near the scanner. Air sprayed from static electricity. Protect the scanner from aerosol sprays causes dirt and dust to enter the scanner, resulting scanner failure and malfunction.

Operator Manual
Page 22
... not used for safety's sake. Do not install the scanner in the direct sunlight or near heating apparatus. Do not install the scanner in the direct sunlight. Leaving the scanner turned ON might cause heat to the scanner. Install the scanner in damage to build up inside the scanner, causing fire or scanner trouble. xxi Disconnect the power plug from...
... not used for safety's sake. Do not install the scanner in the direct sunlight or near heating apparatus. Do not install the scanner in the direct sunlight. Leaving the scanner turned ON might cause heat to the scanner. Install the scanner in damage to build up inside the scanner, causing fire or scanner trouble. xxi Disconnect the power plug from...

Operator Manual
Page 26
... of Parts 4 1.3 Operator panel 11 2 INSTALLATION OF A SCANNER.......17 2.1 Installing the Scanner 18 2.2 Connecting the Scanner to a PC 22 2.3 Installing the Scanner Application 29 3 BASIC SCANNER OPERATIONS.......31 3.1 Turning the Scanner ON 32 3.2 Loading Documents on the ADF for Scanning ........ 34 3.3 Loading Documents on the Flatbed for Scanning ... 39 3.4 Scanning Documents 41 4 SCANNING VARIOUS TYPES OF DOCUMENTS 45 4.1 Scanning in Books 46 4.2 Scanning...
... of Parts 4 1.3 Operator panel 11 2 INSTALLATION OF A SCANNER.......17 2.1 Installing the Scanner 18 2.2 Connecting the Scanner to a PC 22 2.3 Installing the Scanner Application 29 3 BASIC SCANNER OPERATIONS.......31 3.1 Turning the Scanner ON 32 3.2 Loading Documents on the ADF for Scanning ........ 34 3.3 Loading Documents on the Flatbed for Scanning ... 39 3.4 Scanning Documents 41 4 SCANNING VARIOUS TYPES OF DOCUMENTS 45 4.1 Scanning in Books 46 4.2 Scanning...

Operator Manual
Page 27
... to check before contacting the agent where you bought the scanner 126 7.4 Checking Labels on the Scanner 130 8 ADF AND PAPER SPECIFICATION .133 8.1 Document Size 134 8.2 Document Quality 135 8.3 Maximum Document Loading Capacity 139 8.4 Hole-punching Prohibited Areas 140 8.5 Double-feed Detection Conditions 141 9 SCANNER SPECIFICATION 145 9.1 Basic Specifications 146 9.2 Installation Specifications 149 9.3 External Dimensions 151 xxvi
... to check before contacting the agent where you bought the scanner 126 7.4 Checking Labels on the Scanner 130 8 ADF AND PAPER SPECIFICATION .133 8.1 Document Size 134 8.2 Document Quality 135 8.3 Maximum Document Loading Capacity 139 8.4 Hole-punching Prohibited Areas 140 8.5 Double-feed Detection Conditions 141 9 SCANNER SPECIFICATION 145 9.1 Basic Specifications 146 9.2 Installation Specifications 149 9.3 External Dimensions 151 xxvi
Operator Manual
Page 32
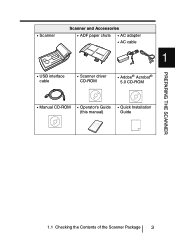
PREPARING THE SCANNER • Scanner Scanner and Accessories • ADF paper chute • AC adapter • AC cable 1 • USB interface cable • Scanner driver CD-ROM • Adobe® Acrobat® 5.0 CD-ROM • Manual CD-ROM • Operator's Guide • Quick Installation (this manual) Guide fi-XXXX XXXXXXXXX 1.1 Checking the Contents of the Scanner Package 3
PREPARING THE SCANNER • Scanner Scanner and Accessories • ADF paper chute • AC adapter • AC cable 1 • USB interface cable • Scanner driver CD-ROM • Adobe® Acrobat® 5.0 CD-ROM • Manual CD-ROM • Operator's Guide • Quick Installation (this manual) Guide fi-XXXX XXXXXXXXX 1.1 Checking the Contents of the Scanner Package 3

Operator Manual
Page 44
... the procedure to release the Shipping lock. • "U1" error If this error occurs, remove jammed document. The following shows the procedure for document conditions. 1.3 Operator panel 15 See "2.1 Installing the Scanner" for removing jammed document. • "U2" error If this error occurs, release the Shipping lock. Indication Meaning U0 Shipping lock is locked. See...
... the procedure to release the Shipping lock. • "U1" error If this error occurs, remove jammed document. The following shows the procedure for document conditions. 1.3 Operator panel 15 See "2.1 Installing the Scanner" for removing jammed document. • "U2" error If this error occurs, release the Shipping lock. Indication Meaning U0 Shipping lock is locked. See...

Operator Manual
Page 46
...operating system. Refers to install the scanner application. Windows® Me Refers to a PC 22 2.3 Installing the Scanner Application 29 17 Windows NT® Refers to Microsoft® Windows NT® operating system Version4.0. 2.1 Installing the Scanner 18 2.2 Connecting the Scanner to Microsoft® ... Millennium Edition operating system. Windows® 98 Refers to Microsoft® Windows® 95 operating system. INSTALLATION OF A SCANNER Windows® 95 Refers to Microsoft® Windows® 98 operating system. Windows® 2000Refers to Microsoft...
...operating system. Refers to install the scanner application. Windows® Me Refers to a PC 22 2.3 Installing the Scanner Application 29 17 Windows NT® Refers to Microsoft® Windows NT® operating system Version4.0. 2.1 Installing the Scanner 18 2.2 Connecting the Scanner to Microsoft® ... Millennium Edition operating system. Windows® 98 Refers to Microsoft® Windows® 95 operating system. INSTALLATION OF A SCANNER Windows® 95 Refers to Microsoft® Windows® 98 operating system. Windows® 2000Refers to Microsoft...

Operator Manual
Page 47
For details on the scanner's dimensions and required installation space, see "9.2 Installation Specifications." 2. Place the scanner at its installation site. The carrier unit inside the scanner is fixed in place by the shipping lock to prevent the scanner from becoming damaged during transportation from the factory. After transporting and placing the scanner, tilt the scanner (approx. 30 degrees) and release...
For details on the scanner's dimensions and required installation space, see "9.2 Installation Specifications." 2. Place the scanner at its installation site. The carrier unit inside the scanner is fixed in place by the shipping lock to prevent the scanner from becoming damaged during transportation from the factory. After transporting and placing the scanner, tilt the scanner (approx. 30 degrees) and release...
Operator Manual
Page 48
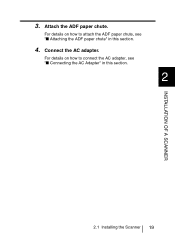
Attach the ADF paper chute. Connect the AC adapter. For details on how to connect the AC adapter, see "I Connecting the AC Adapter" in this section. 2 2.1 Installing the Scanner 19 For details on how to attach the ADF paper chute, see "I Attaching the ADF paper chute" in this section. 4. INSTALLATION OF A SCANNER 3.
Attach the ADF paper chute. Connect the AC adapter. For details on how to connect the AC adapter, see "I Connecting the AC Adapter" in this section. 2 2.1 Installing the Scanner 19 For details on how to attach the ADF paper chute, see "I Attaching the ADF paper chute" in this section. 4. INSTALLATION OF A SCANNER 3.

Operator Manual
Page 49
ADF paper chute tab Side guide 20 2.1 Installing the Scanner Hold the ADF paper chute and insert its tabs into the counterpart holes on the scanner as shown in the figure below. I Attaching the ADF paper chute The following shows the procedure for attaching the ADF paper chute. 1. The Side guide of the ADF paper chute has to face up.
ADF paper chute tab Side guide 20 2.1 Installing the Scanner Hold the ADF paper chute and insert its tabs into the counterpart holes on the scanner as shown in the figure below. I Attaching the ADF paper chute The following shows the procedure for attaching the ADF paper chute. 1. The Side guide of the ADF paper chute has to face up.
Operator Manual
Page 50
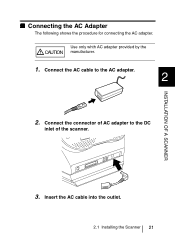
Connect the AC cable to the DC inlet of AC adapter to the AC adapter. 2 2. Insert the AC cable into the outlet. 2.1 Installing the Scanner 21 Use only whth AC adapter provided by the CAUTION manufacturer. 1. INSTALLATION OF A SCANNER I Connecting the AC Adapter The following shows the procedure for connecting the AC adapter. Connect the connector of the scanner. 3.
Connect the AC cable to the DC inlet of AC adapter to the AC adapter. 2 2. Insert the AC cable into the outlet. 2.1 Installing the Scanner 21 Use only whth AC adapter provided by the CAUTION manufacturer. 1. INSTALLATION OF A SCANNER I Connecting the AC Adapter The following shows the procedure for connecting the AC adapter. Connect the connector of the scanner. 3.

Operator Manual
Page 52
Connect the other end of the USB interface cable to a PC 23 INSTALLATION OF A SCANNER I Connecting the USB Interface Cable The following shows the procedure for connecting the USB interface cable. 1. display to turn on the Function No. Press down the scanner power button on the scanner. 2.2 Connecting the Scanner to the PC. 3. Connect the USB interface cable to the USB interface connector. 2 2.
Connect the other end of the USB interface cable to a PC 23 INSTALLATION OF A SCANNER I Connecting the USB Interface Cable The following shows the procedure for connecting the USB interface cable. 1. display to turn on the Function No. Press down the scanner power button on the scanner. 2.2 Connecting the Scanner to the PC. 3. Connect the USB interface cable to the USB interface connector. 2 2.

Operator Manual
Page 54
INSTALLATION OF A SCANNER 2.2 Connecting the Scanner to be sure to first connect the SCSI interface cable then turn on the power of the scanner and the personal computer. • Connect the scanner so that it is the terminal device on the SCSI daisy chain. • The SCSI card and SCSI interface cable has to a PC 25... Contact Shielded High-Density SCSI Device Connector is used. • SCSI card The recommended SCSI card is noted on the following home page. 2 http://imagescanner.fujitsu.com/ ATTENTION • When connecting the SCSI interface cable, be purchased separately.
INSTALLATION OF A SCANNER 2.2 Connecting the Scanner to be sure to first connect the SCSI interface cable then turn on the power of the scanner and the personal computer. • Connect the scanner so that it is the terminal device on the SCSI daisy chain. • The SCSI card and SCSI interface cable has to a PC 25... Contact Shielded High-Density SCSI Device Connector is used. • SCSI card The recommended SCSI card is noted on the following home page. 2 http://imagescanner.fujitsu.com/ ATTENTION • When connecting the SCSI interface cable, be purchased separately.

Operator Manual
Page 56
... ID or change the SCSI ID of the other SCSI device. Scanner can be used simultaneously. Press down the scanner power button on how to change the SCSI ID, see "I Setting the SCSI ID" in this scanner, each of another SCSI device is controlled exclusively, so both interfaces cannot be only connected to... "ID 5". HINT The factory default setting for SCSI ID is provided with two interfaces: SCSI-2 and USB1.1. INSTALLATION OF A SCANNER 2.2 Connecting the Scanner to the same ID, either USB or SCSI interface. If the SCSI ID of the SCSI and USB interfaces is set to a PC 27 On ...
... ID or change the SCSI ID of the other SCSI device. Scanner can be used simultaneously. Press down the scanner power button on how to change the SCSI ID, see "I Setting the SCSI ID" in this scanner, each of another SCSI device is controlled exclusively, so both interfaces cannot be only connected to... "ID 5". HINT The factory default setting for SCSI ID is provided with two interfaces: SCSI-2 and USB1.1. INSTALLATION OF A SCANNER 2.2 Connecting the Scanner to the same ID, either USB or SCSI interface. If the SCSI ID of the SCSI and USB interfaces is set to a PC 27 On ...


