

S7220 User's Guide
Page 9
.../SD Cards 75 ExpressCards™/Smart Cards 76 Inserting ExpressCards 77 Removing ExpressCards 78 Smart Card Reader 78 Memory Upgrade Module 79 Installing Memory Upgrade Modules 79 Removing a Memory Upgrade Module 80 Checking the Memory Capacity 81 Device Ports 82 Modem (RJ-11) Telephone Jack 82 Internal LAN (RJ-45) Jack 83 Headphone Jack 84 Universal Serial...
.../SD Cards 75 ExpressCards™/Smart Cards 76 Inserting ExpressCards 77 Removing ExpressCards 78 Smart Card Reader 78 Memory Upgrade Module 79 Installing Memory Upgrade Modules 79 Removing a Memory Upgrade Module 80 Checking the Memory Capacity 81 Device Ports 82 Modem (RJ-11) Telephone Jack 82 Internal LAN (RJ-45) Jack 83 Headphone Jack 84 Universal Serial...

S7220 User's Guide
Page 26
... 79. Under normal circumstances, it should not be necessary to expand the system memory capacity of your notebook, thus improving overall performance. LifeBook notebook bottom panel Bottom Components The following is a brief description of your LifeBook notebook's bottom panel components. Memory Upgrade Compartment Hard Disk Drive Compartment Air Vents (various locations) Dust Filter Battery Bay...
... 79. Under normal circumstances, it should not be necessary to expand the system memory capacity of your notebook, thus improving overall performance. LifeBook notebook bottom panel Bottom Components The following is a brief description of your LifeBook notebook's bottom panel components. Memory Upgrade Compartment Hard Disk Drive Compartment Air Vents (various locations) Dust Filter Battery Bay...
S7220 User's Guide
Page 84
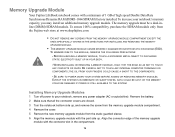
... SPECIFICALLY SHOWN IN THE DIRECTIONS FOR INSTALLING AND REMOVING THE MEMORY UPGRADE MODULE. • THE MEMORY UPGRADE MODULE CAN BE SEVERELY DAMAGED BY ELECTROSTATIC DISCHARGE (ESD). The memory upgrade must be a dual-inline (DIMM) SDRAM module. Memory Upgrade Module Your Fujitsu LifeBook notebook comes with a minimum of 1 GB of the memory upgrade module with the part side up. WHEN INSTALLING OR REMOVING...
... SPECIFICALLY SHOWN IN THE DIRECTIONS FOR INSTALLING AND REMOVING THE MEMORY UPGRADE MODULE. • THE MEMORY UPGRADE MODULE CAN BE SEVERELY DAMAGED BY ELECTROSTATIC DISCHARGE (ESD). The memory upgrade must be a dual-inline (DIMM) SDRAM module. Memory Upgrade Module Your Fujitsu LifeBook notebook comes with a minimum of 1 GB of the memory upgrade module with the part side up. WHEN INSTALLING OR REMOVING...

S7220 User's Guide
Page 85
...YOUR NOTEBOOK. ONCE IT IS INSTALLED, YOU CAN LEAVE IT IN PLACE UNLESS YOU WANT TO CHANGE SYSTEM MEMORY CAPACITY. Removing a Memory Upgrade Module 1 Perform steps 1 through 4 of Installing a Memory Upgrade Module. 2 Pull the clips sideways away from each side of the module firmly down and into the ...connector until it is properly in place. 8 Replace the cover and reinstall the screws. Opening Memory Compartment Figure 23. You'll hear a click when it lodges under the retaining clip. Installing a 2nd Memory Module 7 Insert the memory upgrade module at the same time. 80
...YOUR NOTEBOOK. ONCE IT IS INSTALLED, YOU CAN LEAVE IT IN PLACE UNLESS YOU WANT TO CHANGE SYSTEM MEMORY CAPACITY. Removing a Memory Upgrade Module 1 Perform steps 1 through 4 of Installing a Memory Upgrade Module. 2 Pull the clips sideways away from each side of the module firmly down and into the ...connector until it is properly in place. 8 Replace the cover and reinstall the screws. Opening Memory Compartment Figure 23. You'll hear a click when it lodges under the retaining clip. Installing a 2nd Memory Module 7 Insert the memory upgrade module at the same time. 80

S7220 User's Guide
Page 86
... the clips out, remove the module from the slot by lifting it up and pulling it away from your notebook. 4 Store the memory upgrade module in Classic View, access the System icon directly from the Control Panel.) There may be sure to check that your system is ...configured with a larger one, be a variation between the actual memory size and what is displayed. Removing a Memory Upgrade Module Checking the Memory Capacity Once you are in a static guarded sleeve. 5 Replace the cover and reinstall the screws. 3 2 Retaining Clip 1...
... the clips out, remove the module from the slot by lifting it up and pulling it away from your notebook. 4 Store the memory upgrade module in Classic View, access the System icon directly from the Control Panel.) There may be sure to check that your system is ...configured with a larger one, be a variation between the actual memory size and what is displayed. Removing a Memory Upgrade Module Checking the Memory Capacity Once you are in a static guarded sleeve. 5 Replace the cover and reinstall the screws. 3 2 Retaining Clip 1...
S7220 User's Guide
Page 96
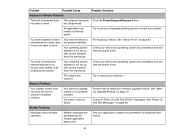
...device and operating system documentation and activate the proper driver. into Sleep mode. See "Device Ports" on page 99. Check your memory upgrade module. Try to restart your application software documentation for that device. You have installed an external keyboard or mouse, and it ...button. An application has locked out the keyboard. The system has crashed. Your memory upgrade module is not properly installed. Your operating system software is not set up the system. See "Memory Upgrade Module" on page 79. Modem messages are generated by the modem application being...
...device and operating system documentation and activate the proper driver. into Sleep mode. See "Device Ports" on page 99. Check your memory upgrade module. Try to restart your application software documentation for that device. You have installed an external keyboard or mouse, and it ...button. An application has locked out the keyboard. The system has crashed. Your memory upgrade module is not properly installed. Your operating system software is not set up the system. See "Memory Upgrade Module" on page 79. Modem messages are generated by the modem application being...
S7220 User's Guide
Page 104
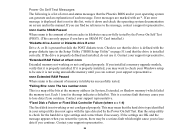
... Test. nnnn Cache SRAM Passed Where nnnn is the amount of the bits at offset: nnnn Extended memory not working or not configured properly. If you installed a memory upgrade module, verify that it is properly installed, you can contact your operating system can only appear if you... continue. This is properly installed. Contact your Windows setup to be a serious fault which failed the memory test. If it is a ...
... Test. nnnn Cache SRAM Passed Where nnnn is the amount of the bits at offset: nnnn Extended memory not working or not configured properly. If you installed a memory upgrade module, verify that it is properly installed, you can contact your operating system can only appear if you... continue. This is properly installed. Contact your Windows setup to be a serious fault which failed the memory test. If it is a ...

S7220 User's Guide
Page 126
...for hardware usage. Note that when 4 MB of memory is installed in color flat-panel TFT active matrix LCD display with I/O Controller Hub 9 Mobile (ICH9-M) Memory System Memory • DDR3-1066 MHz SDRAM dual-channel memory module. • Two DIMM slots; Video Color and...: 1600 x 1200 pixel resolution, 16M colors • Simultaneous Resolution: 1280 x 768, 16M colors 121 the upper memory is addressable memory; Microprocessor Intel® Core™ 2 Duo processors (Refer to the system label to 4 GB of your processor). Chipset Intel GM45 with simultaneous display capability...
...for hardware usage. Note that when 4 MB of memory is installed in color flat-panel TFT active matrix LCD display with I/O Controller Hub 9 Mobile (ICH9-M) Memory System Memory • DDR3-1066 MHz SDRAM dual-channel memory module. • Two DIMM slots; Video Color and...: 1600 x 1200 pixel resolution, 16M colors • Simultaneous Resolution: 1280 x 768, 16M colors 121 the upper memory is addressable memory; Microprocessor Intel® Core™ 2 Duo processors (Refer to the system label to 4 GB of your processor). Chipset Intel GM45 with simultaneous display capability...

S7220 User's Guide
Page 192
M Media Player care 118 Control Panel 72 loading 69 removing 71 Software 69, 72 using 72 Memory capacity 81 compartment 21, 79 installing 79 problems 91 removing 80, 81 upgrade module 79 Memory Stick installing 75 removing 75 Microphone Jack 15, 85 Modem 18, 91 Modem Jack 82 Modem Result Codes 103 Modular Devices...
M Media Player care 118 Control Panel 72 loading 69 removing 71 Software 69, 72 using 72 Memory capacity 81 compartment 21, 79 installing 79 problems 91 removing 80, 81 upgrade module 79 Memory Stick installing 75 removing 75 Microphone Jack 15, 85 Modem 18, 91 Modem Jack 82 Modem Result Codes 103 Modular Devices...
S7220 Getting Started Guide
Page 1
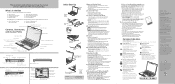
...to convert to the full product now, and then click Next to activate your hard drive in the table. • Restart your new Fujitsu LifeBook notebook, it works by following items are done, complete the last three bulleted steps. • In the Activation Wizard, click the Activate...USB 2.0 Ports Air Vents Gigabit LAN (RJ-45) Jack BOTTOM PANEL Air Vents (various locations) * Removable Dust Filter Hard Disk Drive Compartment Memory Upgrade Compartment Battery Bay Lock * Should be set -up your new computer. Following are installed. This indicator will need to the Wireless LAN or ...
...to convert to the full product now, and then click Next to activate your hard drive in the table. • Restart your new Fujitsu LifeBook notebook, it works by following items are done, complete the last three bulleted steps. • In the Activation Wizard, click the Activate...USB 2.0 Ports Air Vents Gigabit LAN (RJ-45) Jack BOTTOM PANEL Air Vents (various locations) * Removable Dust Filter Hard Disk Drive Compartment Memory Upgrade Compartment Battery Bay Lock * Should be set -up your new computer. Following are installed. This indicator will need to the Wireless LAN or ...
