
Owner's Manual
Page 1
..., Inc. Homelink® and Car2U® compatible For Answers and Assistance: 1.800.354.3643 or visit www.geniecompany.com SAVE THIS MANUAL FOR FUTURE REFERENCE d/b/a The Genie Company PN# 37026500123, 5/15/2009 ALWAYS AT YOUR COMMAND Models 2022/2024/2042 GARAGE DOOR OPENERS Includes: 2-Bulb Light System Wall Console Includes INTELLICODE® Remote Control Safe...
..., Inc. Homelink® and Car2U® compatible For Answers and Assistance: 1.800.354.3643 or visit www.geniecompany.com SAVE THIS MANUAL FOR FUTURE REFERENCE d/b/a The Genie Company PN# 37026500123, 5/15/2009 ALWAYS AT YOUR COMMAND Models 2022/2024/2042 GARAGE DOOR OPENERS Includes: 2-Bulb Light System Wall Console Includes INTELLICODE® Remote Control Safe...

Owner's Manual
Page 2
...Genie® Dealer. WARNING: CoourldSererisouultsinInDjueryath Do NOT try to remove, install, repair or adjust springs or anything to read, understand and implement the information in death or serious injury. PN# 37026500123 05/15/2009 SAFETY INFORMATION OVERVIEW OF POTENTIAL HAZARDS READ THIS SAFETY INFORMATION Garage doors...INSTRUCTIONS READ AND FOLLOW ALL INSTRUCTIONS SAVE THESE INSTRUCTIONS POTENTIAL HAZARD MOVING DOOR EFFECT WARNING: CoourldSererisouultsinInDjueryath PREVENTION Keep people clear of opening while door is placed next to signal words and messages to and identify ...
...Genie® Dealer. WARNING: CoourldSererisouultsinInDjueryath Do NOT try to remove, install, repair or adjust springs or anything to read, understand and implement the information in death or serious injury. PN# 37026500123 05/15/2009 SAFETY INFORMATION OVERVIEW OF POTENTIAL HAZARDS READ THIS SAFETY INFORMATION Garage doors...INSTRUCTIONS READ AND FOLLOW ALL INSTRUCTIONS SAVE THESE INSTRUCTIONS POTENTIAL HAZARD MOVING DOOR EFFECT WARNING: CoourldSererisouultsinInDjueryath PREVENTION Keep people clear of opening while door is placed next to signal words and messages to and identify ...

Owner's Manual
Page 3
...a closing relay malfunctions. Twin bulb lighting supplies up to 120 watts of door. (Refer to Section 6.) Safe-T-Stop® Timed Reversed System. Lighted Wall Control* Operates door opener from inside garage. (Refer to Section 10.) Safe-T-Reverse® Contact Reversing System. Automatically ...stops and reverses a closing door if the closing door if the Safe-T-Beam® System** notes an operational problem...
...a closing relay malfunctions. Twin bulb lighting supplies up to 120 watts of door. (Refer to Section 6.) Safe-T-Stop® Timed Reversed System. Lighted Wall Control* Operates door opener from inside garage. (Refer to Section 10.) Safe-T-Reverse® Contact Reversing System. Automatically ...stops and reverses a closing door if the closing door if the Safe-T-Beam® System** notes an operational problem...

Owner's Manual
Page 4
...This opener is mounted. (Refer to the garage door opener. Insure that the structure will be directed to The Genie Company or an authorized Genie® Dealer. (The issue numbers below refer to the circled numbers in the position needed with your door is the case, please contact the door ...door and/or opener, make sure you disable and/or remove any door locks, ropes, and/or cables (NOT door lift cables) prior to installing your opener. (Refer to Section 1.) Remove Remove 7 Insure that your new door opener kit). (Refer to these type doors. PRE-INSTALLATION CHECK LIST FOR HELP-1.800...
...This opener is mounted. (Refer to the garage door opener. Insure that the structure will be directed to The Genie Company or an authorized Genie® Dealer. (The issue numbers below refer to the circled numbers in the position needed with your door is the case, please contact the door ...door and/or opener, make sure you disable and/or remove any door locks, ropes, and/or cables (NOT door lift cables) prior to installing your opener. (Refer to Section 1.) Remove Remove 7 Insure that your new door opener kit). (Refer to these type doors. PRE-INSTALLATION CHECK LIST FOR HELP-1.800...
Owner's Manual
Page 6
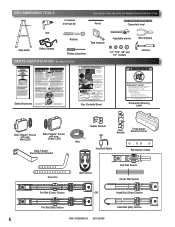
... RECOMMENDED TOOLS FOR HELP-1.800.354.3643 OR WWW.GENIECOMPANY.COM 3/16" Drill Bit Pencil Carpenter's level Drill Step ladder Safety Glasses Ratchet Tape measure Phillips screwdriver PARTS IDENTIFICATION - Remove rail sections not connected to reverse on contact, adjust opener. Quite las secciones de... wrench Wire strippers 1/4", 7/16", 3/8" and 1/2" Sockets Hammer Child can result. • Never let child walk or run under automatic garage door. Disponga los rieles en línea y estire la camisa de plástico fuera de la cadena o lazo plástico de...
... RECOMMENDED TOOLS FOR HELP-1.800.354.3643 OR WWW.GENIECOMPANY.COM 3/16" Drill Bit Pencil Carpenter's level Drill Step ladder Safety Glasses Ratchet Tape measure Phillips screwdriver PARTS IDENTIFICATION - Remove rail sections not connected to reverse on contact, adjust opener. Quite las secciones de... wrench Wire strippers 1/4", 7/16", 3/8" and 1/2" Sockets Hammer Child can result. • Never let child walk or run under automatic garage door. Disponga los rieles en línea y estire la camisa de plástico fuera de la cadena o lazo plástico de...
Owner's Manual
Page 9
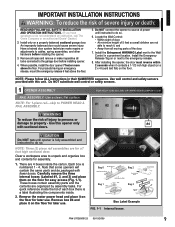
... balanced door could cause severe injury. Install the Entrapment WARNING Label next to do not understand an instruction, call The Genie Company or an authorized Genie® Dealer.) 2. Do NOT substitute wall control or safety sensors. 1 OPENER ASSEMBLY FOR HELP-1.800.354.3643...ropes and remove or make repairs or adjustments to the garage door before installing the opener. 3. NOTE: For 1-piece rail-skip to the emergency release. 8. Install the Emergency Release Tag on a properly balanced sectional garage door. WARNING To reduce the risk of 5 feet so small...
... balanced door could cause severe injury. Install the Entrapment WARNING Label next to do not understand an instruction, call The Genie Company or an authorized Genie® Dealer.) 2. Do NOT substitute wall control or safety sensors. 1 OPENER ASSEMBLY FOR HELP-1.800.354.3643...ropes and remove or make repairs or adjustments to the garage door before installing the opener. 3. NOTE: For 1-piece rail-skip to the emergency release. 8. Install the Emergency Release Tag on a properly balanced sectional garage door. WARNING To reduce the risk of 5 feet so small...
Owner's Manual
Page 11
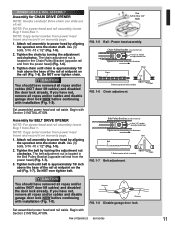
...the Chain Pulley Bracket (opposite rail end from Box 1. Begin with Section 2 INSTALLATION. Remove Remove FIG. 1-8 Disable garage door lock. Assembly for CHAIN DRIVE OPENER NOTE: Handle carefully! NOTE: Copy serial number from Box 1. If you have not, remove all ropes and/or cables... and disable garage door lock NOW before continuing with installation (Fig. 1-8). Begin with Section 2 INSTALLATION. POWER HEAD & RAIL ASSEMBLY Assembly for BELT DRIVE OPENER NOTE: For power head and rail assembly locate Bag 1 from the power...
...the Chain Pulley Bracket (opposite rail end from Box 1. Begin with Section 2 INSTALLATION. Remove Remove FIG. 1-8 Disable garage door lock. Assembly for CHAIN DRIVE OPENER NOTE: Handle carefully! NOTE: Copy serial number from Box 1. If you have not, remove all ropes and/or cables... and disable garage door lock NOW before continuing with installation (Fig. 1-8). Begin with Section 2 INSTALLATION. POWER HEAD & RAIL ASSEMBLY Assembly for BELT DRIVE OPENER NOTE: For power head and rail assembly locate Bag 1 from the power...
Owner's Manual
Page 12
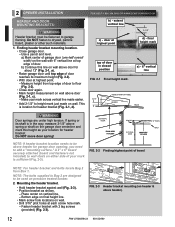
Use a pencil and level. FOR HELP-1.800.354.3643 OR WWW.GENIECOMPANY.COM b) - a) - 6" vertical line 2-1/2" HIGHEST POINT OF TRAVEL HEADER TRACK WARNING Door springs are designed to be above door (Fig. 2-1, c). - Do NOT move door spring! A 2" x 6" board securely attached (board and fasteners not ... mark is location for garage door opening, you need to add a "mounting surface." a) Mark center of door. SECTIONAL DOOR FROM HERE TO FLOOR HEADER HIGHEST POINT OF TRAVEL SECTIONAL DOOR FROM HERE TO FLOOR TRACK FIG. 2-2 Finding highest point of door to height mark just ...
Use a pencil and level. FOR HELP-1.800.354.3643 OR WWW.GENIECOMPANY.COM b) - a) - 6" vertical line 2-1/2" HIGHEST POINT OF TRAVEL HEADER TRACK WARNING Door springs are designed to be above door (Fig. 2-1, c). - Do NOT move door spring! A 2" x 6" board securely attached (board and fasteners not ... mark is location for garage door opening, you need to add a "mounting surface." a) Mark center of door. SECTIONAL DOOR FROM HERE TO FLOOR HEADER HIGHEST POINT OF TRAVEL SECTIONAL DOOR FROM HERE TO FLOOR TRACK FIG. 2-2 Finding highest point of door to height mark just ...
Owner's Manual
Page 13
... bolts and nuts. • Carefully raise and lower door manually. Ensure door does not contact any section of power head or rail. • Check that assembly is in proper alignment (Fig. 2-4). Place material on the garage construction, extra framing material (not provided) which may attach...joists or trusses through finish material using (provided) lag screws (Fig. 2-6). • On unfinished ceilings or open ceilings, straps may be required should be level or at door's highest point of power head to joists or trusses. Mounting the assembly. • Attach rail to header ...
... bolts and nuts. • Carefully raise and lower door manually. Ensure door does not contact any section of power head or rail. • Check that assembly is in proper alignment (Fig. 2-4). Place material on the garage construction, extra framing material (not provided) which may attach...joists or trusses through finish material using (provided) lag screws (Fig. 2-6). • On unfinished ceilings or open ceilings, straps may be required should be level or at door's highest point of power head to joists or trusses. Mounting the assembly. • Attach rail to header ...
Owner's Manual
Page 15
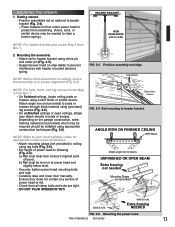
...wires can cause the Wall Control to reach the garage door while standing at least five feet (5') above floor to prevent small children from operating door. • It must be away from power...+ (plus ) terminal. - Striped wire to the - (minus) terminal. 2b. FOR HELP-1.800.354.3643 OR WWW.GENIECOMPANY.COM Wire from any other wall control can cut or pinch wires. ...minus) terminal. This is NO power to the + (plus ) terminal. - Striped wire to the opener before installing Wall Control wires and Wall Control. 3 WALL CONTROL INSTALLATION WARNING Verify there is an example ...
...wires can cause the Wall Control to reach the garage door while standing at least five feet (5') above floor to prevent small children from operating door. • It must be away from power...+ (plus ) terminal. - Striped wire to the - (minus) terminal. 2b. FOR HELP-1.800.354.3643 OR WWW.GENIECOMPANY.COM Wire from any other wall control can cut or pinch wires. ...minus) terminal. This is NO power to the + (plus ) terminal. - Striped wire to the opener before installing Wall Control wires and Wall Control. 3 WALL CONTROL INSTALLATION WARNING Verify there is an example ...
Owner's Manual
Page 16
..." label is attached to power head, Insulated Staple remove it. • On power head: - Controls door opener lights from 2 inside garage - FIG. 3-5 DCehailAeNNItdfhmleewpcTovveeaeaeerrsIIRPrnyffMgsrrtlesodasobofedopcllueeeeeoenonnrektrrnttto1ecwoeif1i/parccoarys2eyil-llDoshhioiuspncntrpupoiiioctlsellrlo'nnehiddnmftnolrarnooeeioweintnwuoleblvsnadrojeereesvPejutasruolmctrdmaeisu'tleoncesrork,ef(eno.vgoydcmonvpenhrodeneoaix2tuldcordrtnchesoxr'tosousaeo4lrrprynarhwoundleatl:a.aaoaaoirnlincclcdorpuhcttir,ooef,unoe(ltnaaarvnstonetdrnteos)lpjtueldrmue.roaiastgolneishrtrttaihlfro...
..." label is attached to power head, Insulated Staple remove it. • On power head: - Controls door opener lights from 2 inside garage - FIG. 3-5 DCehailAeNNItdfhmleewpcTovveeaeaeerrsIIRPrnyffMgsrrtlesodasobofedopcllueeeeeoenonnrektrrnttto1ecwoeif1i/parccoarys2eyil-llDoshhioiuspncntrpupoiiioctlsellrlo'nnehiddnmftnolrarnooeeioweintnwuoleblvsnadrojeereesvPejutasruolmctrdmaeisu'tleoncesrork,ef(eno.vgoydcmonvpenhrodeneoaix2tuldcordrtnchesoxr'tosousaeo4lrrprynarhwoundleatl:a.aaoaaoirnlincclcdorpuhcttir,ooef,unoe(ltnaaarvnstonetdrnteos)lpjtueldrmue.roaiastgolneishrtrttaihlfro...

Owner's Manual
Page 17
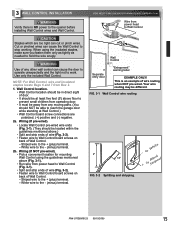
.... 4-2). If not: a) Mounting bracket extensions are available through an authorized Genie® Dealer. Preventing crossed signals is beyond door, tracks or any door hardware. - mark slide center of garage receives most direct sunlight (Fig. 4-4). - Use insulated staples. - Staples...DOOR GARAGE FIG. 4-4 Safe-T-Beam® source and sensor locations. 4 SAFE-T-BEAM® SYSTEM INSTALLATION FOR HELP-1.800.354.3643 OR WWW.GENIECOMPANY.COM WARNING There should be snug only. If you go (Fig. 4-6 on sunny side whenever possible (Fig. 4-4). • For multiple doors. - NOTE: The opener...
.... 4-2). If not: a) Mounting bracket extensions are available through an authorized Genie® Dealer. Preventing crossed signals is beyond door, tracks or any door hardware. - mark slide center of garage receives most direct sunlight (Fig. 4-4). - Use insulated staples. - Staples...DOOR GARAGE FIG. 4-4 Safe-T-Beam® source and sensor locations. 4 SAFE-T-BEAM® SYSTEM INSTALLATION FOR HELP-1.800.354.3643 OR WWW.GENIECOMPANY.COM WARNING There should be snug only. If you go (Fig. 4-6 on sunny side whenever possible (Fig. 4-4). • For multiple doors. - NOTE: The opener...
Owner's Manual
Page 19
5 CONNECTING TO POWER FOR HELP-1.800.354.3643 OR WWW.GENIECOMPANY.COM WARNING ... Genie Company is obstructed. 2. WITH POWER SUPPLIED: Check Safe-T-Beam® alignment (Fig. 5-4). • Insure that no part of door or its fully opened position. INFRARED PROTECTION FUNCTION 1. All work performed by people or obstacle, the garage door ...Electrican ONLY) Power cord strain relief. White to white/black to black/ground to inform you do not have your garage door opener permanently wired, with permanent wiring. CAUTION • Do NOT use an extension cord. • Do NOT use...
5 CONNECTING TO POWER FOR HELP-1.800.354.3643 OR WWW.GENIECOMPANY.COM WARNING ... Genie Company is obstructed. 2. WITH POWER SUPPLIED: Check Safe-T-Beam® alignment (Fig. 5-4). • Insure that no part of door or its fully opened position. INFRARED PROTECTION FUNCTION 1. All work performed by people or obstacle, the garage door ...Electrican ONLY) Power cord strain relief. White to white/black to black/ground to inform you do not have your garage door opener permanently wired, with permanent wiring. CAUTION • Do NOT use an extension cord. • Do NOT use...

Owner's Manual
Page 20
... release the "Close SET Limit" SET button. The LED indicator light will blink green once. LED Indicator Light Open Open Set Limit Travel Limit Button Up Force OPEN Control Adjustment To Garage Door SET LEARN MANUAL LIMIT FORCE SET A) ENGAGE CHAIN/BELT CONNECTOR TO CARRIAGE 1. Press and hold the...in the UP direction. 2. Press and hold the "Close Travel Limit" button until the door is in the UP direction. 3. This stores the opened position in Section 10. 6 DOOR LIMITS FOR HELP-1.800.354.3643 OR WWW.GENIECOMPANY.COM WARNING • Severe injury or death can result if ...
... release the "Close SET Limit" SET button. The LED indicator light will blink green once. LED Indicator Light Open Open Set Limit Travel Limit Button Up Force OPEN Control Adjustment To Garage Door SET LEARN MANUAL LIMIT FORCE SET A) ENGAGE CHAIN/BELT CONNECTOR TO CARRIAGE 1. Press and hold the...in the UP direction. 2. Press and hold the "Close Travel Limit" button until the door is in the UP direction. 3. This stores the opened position in Section 10. 6 DOOR LIMITS FOR HELP-1.800.354.3643 OR WWW.GENIECOMPANY.COM WARNING • Severe injury or death can result if ...

Owner's Manual
Page 22
... board. - Repeat as necessary until the green indicator light blinks (about 5 seconds). 2. OPEN/CLOSE TRAVEL LIMIT 1. Press and hold both of door opening (FIG. 6-5). • Close door using Wall Control. - Adjustment. • If the door does not properly reverse. - FIG. 6-5 2 x 4 under center of garage door opening . 22 PN# 37026500123 05/15/2009 It should not have reached its...
... board. - Repeat as necessary until the green indicator light blinks (about 5 seconds). 2. OPEN/CLOSE TRAVEL LIMIT 1. Press and hold both of door opening (FIG. 6-5). • Close door using Wall Control. - Adjustment. • If the door does not properly reverse. - FIG. 6-5 2 x 4 under center of garage door opening . 22 PN# 37026500123 05/15/2009 It should not have reached its...

Owner's Manual
Page 23
... comply with the limits for use with FCC Part 15 and RSS 210 of the FCC Rules. To Garage Door SET LOST OR STOLEN REMOTE 1. Your door opener will go out. Indicator LED will erase programmed memory and limits must be determined by turning the equipment OFF... two buttons on a multi-button remote is no longer recognize any signal received from that interference will stop automatically at a rate of opening while door is connected. • Consult your car owner's manual. NOTE: Each button on power head simultaneously will stop blinking and stay ON....
... comply with the limits for use with FCC Part 15 and RSS 210 of the FCC Rules. To Garage Door SET LOST OR STOLEN REMOTE 1. Your door opener will go out. Indicator LED will erase programmed memory and limits must be determined by turning the equipment OFF... two buttons on a multi-button remote is no longer recognize any signal received from that interference will stop automatically at a rate of opening while door is connected. • Consult your car owner's manual. NOTE: Each button on power head simultaneously will stop blinking and stay ON....

Owner's Manual
Page 24
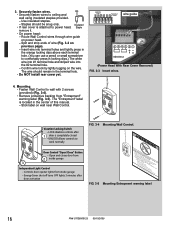
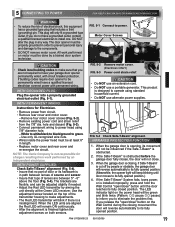
...into each lens onto motor cover. NOTE: For lens covers locate Box 4. 1. Light bulb. • Recommendations. - Battery replacement. • To open, gently push straight out on power head. • Plug power cord back into electrical outlet. • Test lamp operation. Remove old battery. ...bulb for rear lens on battery cover lock tab as shown. (Fig. 8-1). • Slide open battery cover. - Lens. • Select a white (lamp) cover. • On the power head end nearest the garage door, line up lamp lens tabs on power head with symbols inside battery housing) (Fig. 8-2)....
...into each lens onto motor cover. NOTE: For lens covers locate Box 4. 1. Light bulb. • Recommendations. - Battery replacement. • To open, gently push straight out on power head. • Plug power cord back into electrical outlet. • Test lamp operation. Remove old battery. ...bulb for rear lens on battery cover lock tab as shown. (Fig. 8-1). • Slide open battery cover. - Lens. • Select a white (lamp) cover. • On the power head end nearest the garage door, line up lamp lens tabs on power head with symbols inside battery housing) (Fig. 8-2)....

Owner's Manual
Page 25
...opener. See your garage door Owner's Manual. Have a trained door system technician make repairs to repair or adjust door springs or any questions, please do not hesitate to contact Genie...garage door opening. • Close door by using remote. - If door moves quickly, CONTACT A TRAINED DOOR SYSTEM TECHNICIAN. • Close the door. • Pull emergency release knob towards the opener to carriage assembly. Test opener monthly. Safe-T-Beam® System. • Red LED blinks. - Never let children operate or play with a 1-1/2" high object (or a 2" x 4" board laid flat) at : 1.800...
...opener. See your garage door Owner's Manual. Have a trained door system technician make repairs to repair or adjust door springs or any questions, please do not hesitate to contact Genie...garage door opening. • Close door by using remote. - If door moves quickly, CONTACT A TRAINED DOOR SYSTEM TECHNICIAN. • Close the door. • Pull emergency release knob towards the opener to carriage assembly. Test opener monthly. Safe-T-Beam® System. • Red LED blinks. - Never let children operate or play with a 1-1/2" high object (or a 2" x 4" board laid flat) at : 1.800...

Owner's Manual
Page 27
... contact The Genie Company at 1-800-35-GENIE. • Check door balance, condition, and door spring. • Check "OPEN FORCE" adjustment (See section 6 ). • WARNING: If you suspect a problem with the garage door hardware or springs, contact an authorized Genie® Dealer or a trained door system technician, or contact The Genie Company at garage door. • Replace battery (See section 8 ). • Reposition door opener antenna...
... contact The Genie Company at 1-800-35-GENIE. • Check door balance, condition, and door spring. • Check "OPEN FORCE" adjustment (See section 6 ). • WARNING: If you suspect a problem with the garage door hardware or springs, contact an authorized Genie® Dealer or a trained door system technician, or contact The Genie Company at garage door. • Replace battery (See section 8 ). • Reposition door opener antenna...


