
User Manual
Page 1
GA-4MXSV Pentium Prescott 1066 Motherboard USER'S MANUAL Pentium®Prescott Processor Motherboard Rev. 1002 12ME-4MXSV-1002
GA-4MXSV Pentium Prescott 1066 Motherboard USER'S MANUAL Pentium®Prescott Processor Motherboard Rev. 1002 12ME-4MXSV-1002

User Manual
Page 2
... of Content Item Checklist 4 WARNING 4 Chapter 1 Introduction 5 Features Summary 5 GA-4MXSV Motherboard Layout 7 Chapter 2 Hardware Installation Process 9 Step 1: Installing Processor and CPU Haet Sink 10 Step1-1: Installing CPU 10 Step1-2: Installing Heat Sink 11 Step 2: Install memory ...
... of Content Item Checklist 4 WARNING 4 Chapter 1 Introduction 5 Features Summary 5 GA-4MXSV Motherboard Layout 7 Chapter 2 Hardware Installation Process 9 Step 1: Installing Processor and CPU Haet Sink 10 Step1-1: Installing CPU 10 Step1-2: Installing Heat Sink 11 Step 2: Install memory ...

User Manual
Page 4
..., touch both of the spacers (the spacer may damage the board or cause board malfunctioning. 4 Hold components by the hole. If the motherboard has mounting holes, but they don't line up with the holes on the bag that the ATX power supply is switched off , so... are near by the edges and try not touch the IC chips, leads or connectors, or other components. 4. English GA-4MXSV Motherboard Item Checklist The GA-4MXSV motherboard IDE (ATA100 ) cable x 1 / Floppy cable x 1 CD for motherboard driver & utility GA-4MXSV user's manual Serial ATA cable x 4 I/O Shield Kit WARNING!
..., touch both of the spacers (the spacer may damage the board or cause board malfunctioning. 4 Hold components by the hole. If the motherboard has mounting holes, but they don't line up with the holes on the bag that the ATX power supply is switched off , so... are near by the edges and try not touch the IC chips, leads or connectors, or other components. 4. English GA-4MXSV Motherboard Item Checklist The GA-4MXSV motherboard IDE (ATA100 ) cable x 1 / Floppy cable x 1 CD for motherboard driver & utility GA-4MXSV user's manual Serial ATA cable x 4 I/O Shield Kit WARNING!

User Manual
Page 6
English GA-4MXSV Motherboard On-Board Graphic On-Board LAN ATI ES1000 with 16Mb DDR SDRAM Dual Intel 82573V Gigabit Ethernet controllers Hardware Monitor BIOS Additional Features Winbond 83792D ...
English GA-4MXSV Motherboard On-Board Graphic On-Board LAN ATI ES1000 with 16Mb DDR SDRAM Dual Intel 82573V Gigabit Ethernet controllers Hardware Monitor BIOS Additional Features Winbond 83792D ...

User Manual
Page 7
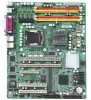
GA-4MXSV Motherboard Layout Introduction 5 P OO M UV L WX Y 6 E J 3D 4 K Z 7 C N FG H I A Q 2 R S T B 1 8 9 7
GA-4MXSV Motherboard Layout Introduction 5 P OO M UV L WX Y 6 E J 3D 4 K Z 7 C N FG H I A Q 2 R S T B 1 8 9 7

User Manual
Page 8
SATA2 H. COM2 N. ATI RN50 Q. DDRII B1 T. DDRII B2 U. PCI_B V PCI_A W. BAT (Battery) 1. ATX12V 3. UF2 (System FAN) 7. UF4 (System FAN) 9. Intel Mukilteo C. ITE IT8712F F. IDE L. Intel 82573V GbE P. PCI-X_2 Y. ATX 2. UF1 (CPU FAN) 6. SATA1 G. PCI-E x8 X. PCI-X_1 Z. WOR 4. SATA3 I. Intel 6702 PXH-V D. Intel ICH7R E. SATA4 J. DDRII A1 R. UF3 (System FAN) 8. English GA-4MXSV Motherboard A. DDRII A2 S. UF5 (System FAN) 8 FDC K. WOL 5. USB2 O. F_Panel M. CPU B.
SATA2 H. COM2 N. ATI RN50 Q. DDRII B1 T. DDRII B2 U. PCI_B V PCI_A W. BAT (Battery) 1. ATX12V 3. UF2 (System FAN) 7. UF4 (System FAN) 9. Intel Mukilteo C. ITE IT8712F F. IDE L. Intel 82573V GbE P. PCI-X_2 Y. ATX 2. UF1 (CPU FAN) 6. SATA1 G. PCI-E x8 X. PCI-X_1 Z. WOR 4. SATA3 I. Intel 6702 PXH-V D. Intel ICH7R E. SATA4 J. DDRII A1 R. UF3 (System FAN) 8. English GA-4MXSV Motherboard A. DDRII A2 S. UF5 (System FAN) 8 FDC K. WOL 5. USB2 O. F_Panel M. CPU B.

User Manual
Page 10
...2 Remove the plastic covering on the processor before placing cooling fan. 4. Never force the processor into the socket in permanent irreparable damage. 2. English GA-4MXSV Motherboard Step 1: Installing Processor and CPU Haet Sink Before installing the processor and cooling fan, adhere to the upper-right position. The processor will cause improper... twisting or bending motions that might cause damage to the CPU during installation.) Step 4 Once the CPU is supported by the motherboard. 5. If you do not match the CPU socket Pin 1 and CPU cut edge well, it into the socket. 3.
...2 Remove the plastic covering on the processor before placing cooling fan. 4. Never force the processor into the socket in permanent irreparable damage. 2. English GA-4MXSV Motherboard Step 1: Installing Processor and CPU Haet Sink Before installing the processor and cooling fan, adhere to the upper-right position. The processor will cause improper... twisting or bending motions that might cause damage to the CPU during installation.) Step 4 Once the CPU is supported by the motherboard. 5. If you do not match the CPU socket Pin 1 and CPU cut edge well, it into the socket. 3.

User Manual
Page 11
...Installing Heat Sink Hardware Installation Process Male Push Pin The top of Female Push Pin Female Push Pin Fig.1 Please apply heatsink paste on the motherboard. 11 Make sure the push pin is only for Intel boxed fan) Fig. 3 Place the heatsink on top the CPU and make sure the ...Male and Female push pin are brought together. (for detailed installation instructions, please refer to the pin hole on the motherboard.Push down the push pins diagonally. and reverse the previous step to install the heat sink.) Please note the direction of arrow; Installation completed....
...Installing Heat Sink Hardware Installation Process Male Push Pin The top of Female Push Pin Female Push Pin Fig.1 Please apply heatsink paste on the motherboard. 11 Make sure the push pin is only for Intel boxed fan) Fig. 3 Place the heatsink on top the CPU and make sure the ...Male and Female push pin are brought together. (for detailed installation instructions, please refer to the pin hole on the motherboard.Push down the push pins diagonally. and reverse the previous step to install the heat sink.) Please note the direction of arrow; Installation completed....

User Manual
Page 12
It supports the Dual Channel Technology. The BIOS will automatically detects memory type and size during system boot. Channel B Channel A 12 For detail DIMM installation, please refer to the following instructions. GA-4MXSV has 4 dual inline memory module (DIMM) socets. English GA-4MXSV Motherboard Step 2: Install memory modules Before installing the processor and heatsink, adhere to the following warning: When DIMM LED is ON, do not install/remove DIMM from socket.
It supports the Dual Channel Technology. The BIOS will automatically detects memory type and size during system boot. Channel B Channel A 12 For detail DIMM installation, please refer to the following instructions. GA-4MXSV has 4 dual inline memory module (DIMM) socets. English GA-4MXSV Motherboard Step 2: Install memory modules Before installing the processor and heatsink, adhere to the following warning: When DIMM LED is ON, do not install/remove DIMM from socket.

User Manual
Page 14
English GA-4MXSV Motherboard Step 3: Install expansion cards 1. Be sure the metal contacts on the computer, if necessary, setup BIOS utility of the expansion card. 6. Replace the screw to secure the slot bracket of expansion card from BIOS. 8. Install related driver from the computer. 3. Power on the card are indeed seated in motherboard. 4. Remove your...
English GA-4MXSV Motherboard Step 3: Install expansion cards 1. Be sure the metal contacts on the computer, if necessary, setup BIOS utility of the expansion card. 6. Replace the screw to secure the slot bracket of expansion card from BIOS. 8. Install related driver from the computer. 3. Power on the card are indeed seated in motherboard. 4. Remove your...

User Manual
Page 16
... more information please contact your OS supports USB controller. LAN LED Description Name Color LAN Green Link/Activity Green - 10/100 LAN Green Speed - English GA-4MXSV Motherboard PS/2 Keyboard and PS/2 Mouse Connector To install a PS/2 port keyboard and mouse, plug the mouse to the upper port (green) and the keyboard to...
... more information please contact your OS supports USB controller. LAN LED Description Name Color LAN Green Link/Activity Green - 10/100 LAN Green Speed - English GA-4MXSV Motherboard PS/2 Keyboard and PS/2 Mouse Connector To install a PS/2 port keyboard and mouse, plug the mouse to the upper port (green) and the keyboard to...

User Manual
Page 18
English GA-4MXSV Motherboard A) ATX (ATX Power Connector) AC power cord should only be connected to your power supply unit after ATX power cable and other related devices are ...
English GA-4MXSV Motherboard A) ATX (ATX Power Connector) AC power cord should only be connected to your power supply unit after ATX power cable and other related devices are ...

User Manual
Page 20
English GA-4MXSV Motherboard E ) F_Panel1 (2X9 Pins Front Panel connector) Please connect the power LED, PC speaker, reset switch and power switch of your chassis front panel to the ...
English GA-4MXSV Motherboard E ) F_Panel1 (2X9 Pins Front Panel connector) Please connect the power LED, PC speaker, reset switch and power switch of your chassis front panel to the ...

User Manual
Page 22
Pin No. Definition 1 +5V SB 2 GND 3 Wake on LAN) This connector allows the remove servers to this mainboard via your network adapter which also supports WOL. Definition 1 GND 2 TXP 3 TXN 4 GND 5 RXN 7 6 RXP 7 GND S_ATA1 S_ATA3 S_ATA4 S_ATA2 L ) WOL1 (Wake on Lan Signal 1 22 English GA-4MXSV Motherboard H / I / J / K ) S_ATA1/ 2/ 3/ 4 (Serial ATA Connectors) You can connect the Serial ATA device to manage the system that installed this connector, it provides you high speed transfer rates (150MB/sec). 1 Pin No.
Pin No. Definition 1 +5V SB 2 GND 3 Wake on LAN) This connector allows the remove servers to this mainboard via your network adapter which also supports WOL. Definition 1 GND 2 TXP 3 TXN 4 GND 5 RXN 7 6 RXP 7 GND S_ATA1 S_ATA3 S_ATA4 S_ATA2 L ) WOL1 (Wake on Lan Signal 1 22 English GA-4MXSV Motherboard H / I / J / K ) S_ATA1/ 2/ 3/ 4 (Serial ATA Connectors) You can connect the Serial ATA device to manage the system that installed this connector, it provides you high speed transfer rates (150MB/sec). 1 Pin No.

User Manual
Page 24
... improper use only. To clear CMOS, temporarily short 1-2 pin. 1 1-2 close: Clear CMOS 1 2-3 close: Normal (Default) 24 These connectors are for system use this jumper. English GA-4MXSV Motherboard O / P / Q / R ) UF2/3/4/5 (System Fan Connectors) This connector allows you to link with the cooling fan on the system case to lower the system temperature.
... improper use only. To clear CMOS, temporarily short 1-2 pin. 1 1-2 close: Clear CMOS 1 2-3 close: Normal (Default) 24 These connectors are for system use this jumper. English GA-4MXSV Motherboard O / P / Q / R ) UF2/3/4/5 (System Fan Connectors) This connector allows you to link with the cooling fan on the system case to lower the system temperature.

User Manual
Page 26
Dispose of explosion if battery is incorrectly replaced. English GA-4MXSV Motherboard V ) BAT1 (Battery) CAUTION Danger of used batteries according to erase CMOS... 1.Turn OFF the computer and unplug the power cord. 2.Remove the battery, wait for 30 second. 3.Re-install the battery. 4.Plug the power cord and turn ON the computer. 26 Replace only with the same or equivalent type recommended by the manufacturer. If you want to the manufacturer's instructions.
Dispose of explosion if battery is incorrectly replaced. English GA-4MXSV Motherboard V ) BAT1 (Battery) CAUTION Danger of used batteries according to erase CMOS... 1.Turn OFF the computer and unplug the power cord. 2.Remove the battery, wait for 30 second. 3.Re-install the battery. 4.Plug the power cord and turn ON the computer. 26 Replace only with the same or equivalent type recommended by the manufacturer. If you want to the manufacturer's instructions.

User Manual
Page 28
... temperature status, automatically configure hard disk parameters.) z Security Change, set, or disable password. z Advanced This setup page includes all the items in standard compatible BIOS. GA-4MXSV Motherboard GETTINGHELP Main Menu The on-line description of the highlighted setup function is displayed at the bottom of first boot function features. z Boot This setup...
... temperature status, automatically configure hard disk parameters.) z Security Change, set, or disable password. z Advanced This setup page includes all the items in standard compatible BIOS. GA-4MXSV Motherboard GETTINGHELP Main Menu The on-line description of the highlighted setup function is displayed at the bottom of first boot function features. z Boot This setup...

User Manual
Page 30
... of hard disk from the keyboard and press . There are two types: auto type, and manual type. The hard disk will automatically detect HDD type. GA-4MXSV Motherboard Legacy Diskette A/B This category identifies the type of your hard disk vendor or the system manufacturer. 30 The delay ensures the hard disk initialized after...
... of hard disk from the keyboard and press . There are two types: auto type, and manual type. The hard disk will automatically detect HDD type. GA-4MXSV Motherboard Legacy Diskette A/B This category identifies the type of your hard disk vendor or the system manufacturer. 30 The delay ensures the hard disk initialized after...

User Manual
Page 32
Processor Reset Yes No Select 'Yes' BIOS will clear historical processor status and reset all processors on next boot. GA-4MXSV Motherboard Advanced Processor Options Figure 1-1: Advanced Processor Option Advanced Processor Option This category includes the information of CPU Speed, Processor ID, Processor L2 Cache. Disables Processor Reset function. (Default value) 32 And setup menu for C1 Enhanced Mode, No Execute Mode Memory Protection, and Processor Power Management.
Processor Reset Yes No Select 'Yes' BIOS will clear historical processor status and reset all processors on next boot. GA-4MXSV Motherboard Advanced Processor Options Figure 1-1: Advanced Processor Option Advanced Processor Option This category includes the information of CPU Speed, Processor ID, Processor L2 Cache. Disables Processor Reset function. (Default value) 32 And setup menu for C1 Enhanced Mode, No Execute Mode Memory Protection, and Processor Power Management.

User Manual
Page 34
Figure 2: Advanced 34 User can change the processor options, chipset configuration, PCI configuration and chipset control. GA-4MXSV Motherboard Advanced About This Section: Advanced With this section, allowing user to configure your system for basic operation.
Figure 2: Advanced 34 User can change the processor options, chipset configuration, PCI configuration and chipset control. GA-4MXSV Motherboard Advanced About This Section: Advanced With this section, allowing user to configure your system for basic operation.


