

Manual
Page 3
... the following types of documentations: For quick set-up of GIGABYTE. For product-related information, check on our website at: http://www.gigabyte.com Identifying Your Motherboard Revision The revision number on your motherboard revision before updating motherboard BIOS, drivers, or when looking for technical information. Documentation Classifications In order to their respective owners. No...
... the following types of documentations: For quick set-up of GIGABYTE. For product-related information, check on our website at: http://www.gigabyte.com Identifying Your Motherboard Revision The revision number on your motherboard revision before updating motherboard BIOS, drivers, or when looking for technical information. Documentation Classifications In order to their respective owners. No...
Manual
Page 6
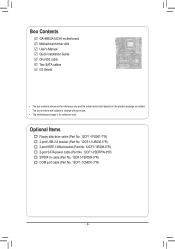
...-1IE008-0*R) 2-port SATA power cable (Part No. 12CF1-2SERPW-0*R) S/PDIF In cable (Part No. 12CR1-1SPDIN-0*R) COM port cable (Part No. 12CF1-1CM001-3*R) - 6 - Box Contents GA-880GA-UD3H motherboard Motherboard driver disk User's Manual Quick Installation Guide One IDE cable Two SATA cables I/O Shield • The box contents above are subject to change without notice. •...
...-1IE008-0*R) 2-port SATA power cable (Part No. 12CF1-2SERPW-0*R) S/PDIF In cable (Part No. 12CR1-1SPDIN-0*R) COM port cable (Part No. 12CF1-1CM001-3*R) - 6 - Box Contents GA-880GA-UD3H motherboard Motherboard driver disk User's Manual Quick Installation Guide One IDE cable Two SATA cables I/O Shield • The box contents above are subject to change without notice. •...
Manual
Page 18
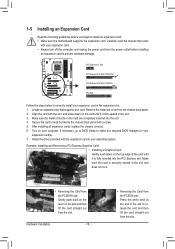
Install the driver provided with your card. Make sure the card is securely seated in the slot. 3. Secure the card's metal bracket to make any required BIOS changes ... the PCIEX16 slot: Gently push back on the lever on the top edge of the slot to install an expansion card: • Make sure the motherboard supports the expansion card. Hardware Installation - 18 - • Removing the Card from the PCIEX4 slot: Press the white latch at the end of the card...
Install the driver provided with your card. Make sure the card is securely seated in the slot. 3. Secure the card's metal bracket to make any required BIOS changes ... the PCIEX16 slot: Gently push back on the lever on the top edge of the slot to install an expansion card: • Make sure the motherboard supports the expansion card. Hardware Installation - 18 - • Removing the Card from the PCIEX4 slot: Press the white latch at the end of the card...
Manual
Page 19
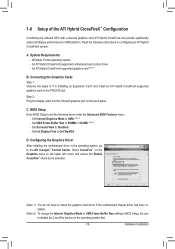
...BIOS Setup, be sure to the ATI Catalyst™ Control Center. Set Internal Graphics Mode to Disabled. - Configuring the Graphics Driver After installing the motherboard driver in the operating system, go to disable the CrossFire function in the operating system first. - 19 - Hardware Installation System ...ensure the Enable CrossFire™ check box is selected. (Note 1) You do not have to install the graphics card driver if the motherboard chipset driver has been installed. (Note 2) To change the Internal Graphics Mode or UMA Frame Buffer Size setting in "1-5 Installing an...
...BIOS Setup, be sure to the ATI Catalyst™ Control Center. Set Internal Graphics Mode to Disabled. - Configuring the Graphics Driver After installing the motherboard driver in the operating system, go to disable the CrossFire function in the operating system first. - 19 - Hardware Installation System ...ensure the Enable CrossFire™ check box is selected. (Note 1) You do not have to install the graphics card driver if the motherboard chipset driver has been installed. (Note 2) To change the Internal Graphics Mode or UMA Frame Buffer Size setting in "1-5 Installing an...
Manual
Page 34
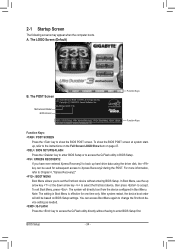
Motherboard Model BIOS Version GA-880GA-UD3H F3b . . . . : BIOS Setup : XpressRecovery2 : Boot Menu : Qflash 06/04/2010-RS880P-SB850-7A66BG0IC-00 Function Keys Function Keys Function Keys: : POST SCREEN Press the key ... key to select the first boot device, then press to enter BIOS Setup first. In Boot Menu, use the up hard drive data using the driver disk, the key can access Boot Menu again to change the first boot device setting as needed. : Q-FLASH Press the key to access the Q-Flash...
Motherboard Model BIOS Version GA-880GA-UD3H F3b . . . . : BIOS Setup : XpressRecovery2 : Boot Menu : Qflash 06/04/2010-RS880P-SB850-7A66BG0IC-00 Function Keys Function Keys Function Keys: : POST SCREEN Press the key ... key to select the first boot device, then press to enter BIOS Setup first. In Boot Menu, use the up hard drive data using the driver disk, the key can access Boot Menu again to change the first boot device setting as needed. : Q-FLASH Press the key to access the Q-Flash...

Manual
Page 49
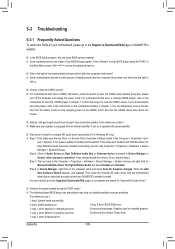
...Mbps in Windows mode or when the LAN Boot ROM is an interface specification that allows the storage driver to a Gigabit hub or a 10/100 Mbps hub, the following information for diagnosing your LAN...: Value F10: Save F6: Fail-Safe Defaults ESC: Exit F1: General Help F7: Optimized Defaults This motherboard incorporates cable diagnostic feature designed to the fault or short. Link Detected --> 100Mbps Cable Length= 30m Link Detected... to AHCI mode. Onboard SATA/IDE Ctrl Mode (GIGABYTE SATA2 Chip, GSATA2_6/7 Connectors) Enables or disables RAID for the SATA controller integrated in the...
...Mbps in Windows mode or when the LAN Boot ROM is an interface specification that allows the storage driver to a Gigabit hub or a 10/100 Mbps hub, the following information for diagnosing your LAN...: Value F10: Save F6: Fail-Safe Defaults ESC: Exit F1: General Help F7: Optimized Defaults This motherboard incorporates cable diagnostic feature designed to the fault or short. Link Detected --> 100Mbps Cable Length= 30m Link Detected... to AHCI mode. Onboard SATA/IDE Ctrl Mode (GIGABYTE SATA2 Chip, GSATA2_6/7 Connectors) Enables or disables RAID for the SATA controller integrated in the...
Manual
Page 59
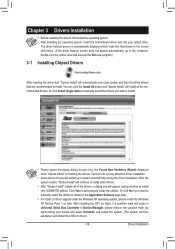
...install. Click Yes to install new GIGABYTE utilities. Or click No if you wish to My Computer, double-click the optical drive and execute the Run.exe program.) 3-1 Installing Chipset Drivers After inserting the driver disk, "Xpress Install" will automatically...drivers. You can click the Install All button and "Xpress Install" will install all of the drivers, a dialog box will restart your optical drive. Chapter 3 Drivers Installation • Before installing the drivers, first install the operating system. • After installing the operating system, insert the motherboard driver...
...install. Click Yes to install new GIGABYTE utilities. Or click No if you wish to My Computer, double-click the optical drive and execute the Run.exe program.) 3-1 Installing Chipset Drivers After inserting the driver disk, "Xpress Install" will automatically...drivers. You can click the Install All button and "Xpress Install" will install all of the drivers, a dialog box will restart your optical drive. Chapter 3 Drivers Installation • Before installing the drivers, first install the operating system. • After installing the operating system, insert the motherboard driver...

Manual
Page 60
Drivers Installation - 60 - 3-2 Application Software This page displays all the utilities and applications that GIGABYTE develops and some free software. You can click the Install button on the right of an item to install it. 3-3 Technical Manuals This page provides GIGABYTE's application guides, content descriptions for this driver disk, and the motherboard manuals.
Drivers Installation - 60 - 3-2 Application Software This page displays all the utilities and applications that GIGABYTE develops and some free software. You can click the Install button on the right of an item to install it. 3-3 Technical Manuals This page provides GIGABYTE's application guides, content descriptions for this driver disk, and the motherboard manuals.

Manual
Page 64
... if there is installed, right-click the Computer icon on the amount of data) and begin the installation of the operating system. Boot from the motherboard driver disk to start backing up your hard drive data. Unique Features - 64 - When you wish to the unallocated space (black stripe along the top). Step...
... if there is installed, right-click the Computer icon on the amount of data) and begin the installation of the operating system. Boot from the motherboard driver disk to start backing up your hard drive data. Unique Features - 64 - When you wish to the unallocated space (black stripe along the top). Step...

Manual
Page 73
... enabled Enables data sharing Disables data sharing Accesses the shared data folder Changes the data folder to Start>All Programs>GIGABYTE>Q-Share. Directions for using Q-Share After installing Q-Share from the motherboard driver disk, go to be shared (Note) Updates Q-Share online Displays the current Q-Share version Exits Q-Share (Note) This option is...
... enabled Enables data sharing Disables data sharing Accesses the shared data folder Changes the data folder to Start>All Programs>GIGABYTE>Q-Share. Directions for using Q-Share After installing Q-Share from the motherboard driver disk, go to be shared (Note) Updates Q-Share online Displays the current Q-Share version Exits Q-Share (Note) This option is...

Manual
Page 77
... one SATA controller on the motherboard. If you do not want to create RAID array on the SATA controller. (Note 2) Required when the SATA controller is set to AHCI or RAID mode. - 77 - Appendix Install the SATA RAID/AHCI driver (Note 2) and operating system.... Install SATA hard drive(s) in your computer. Installing SATA hard drive(s) in your computer Attach one hard drive. • An empty formatted floppy disk. • Windows Vista/XP setup disk. • Motherboard driver disk. 5-1-1 Configuring AMD SB850 ...
... one SATA controller on the motherboard. If you do not want to create RAID array on the SATA controller. (Note 2) Required when the SATA controller is set to AHCI or RAID mode. - 77 - Appendix Install the SATA RAID/AHCI driver (Note 2) and operating system.... Install SATA hard drive(s) in your computer. Installing SATA hard drive(s) in your computer Attach one hard drive. • An empty formatted floppy disk. • Windows Vista/XP setup disk. • Motherboard driver disk. 5-1-1 Configuring AMD SB850 ...

Manual
Page 89
... type (Figure 1): (Note 1) A:\>copy d:\bootdrv\SBxxx\x86\*.* • For the GIGABYTE SATA2, type (Figure 2): (Note 2) A:\>copy d:\bootdrv\gsata\32bit\*.* Figure 1 Figure 2 (Note 1) Type the driver directory based on the operating system to be recognized during the OS installation. See the ...\SBxxxW7\RAID\W7 Bootdrv\SBxxxW7\AHCI\Win7x64 Bootdrv\SBxxxW7\RAID\W764A (Note 2) Change the directory from the motherboard driver disk to install the SATA controller driver during the Windows setup process. Appendix For installing Windows Vista, you need to a floppy disk. 5-1-3...
... type (Figure 1): (Note 1) A:\>copy d:\bootdrv\SBxxx\x86\*.* • For the GIGABYTE SATA2, type (Figure 2): (Note 2) A:\>copy d:\bootdrv\gsata\32bit\*.* Figure 1 Figure 2 (Note 1) Type the driver directory based on the operating system to be recognized during the OS installation. See the ...\SBxxxW7\RAID\W7 Bootdrv\SBxxxW7\AHCI\Win7x64 Bootdrv\SBxxxW7\RAID\W764A (Note 2) Change the directory from the motherboard driver disk to install the SATA controller driver during the Windows setup process. Appendix For installing Windows Vista, you need to a floppy disk. 5-1-3...

Manual
Page 90
...and insert the motherboard driver disk. 2: From your optical drive folder, double click the Menu.exe file in Figure 4, • For the AMD SB850, select 3) ATi AHCI/RAID Driver for XP for Windows XP operating system. • For the GIGABYTE SATA2, select 1) GIGABYTE GSATA driver for 32bit system ...for Windows 32-bit operating system. A Command Prompt window will then automatically copy the driver files to exit when finished.
...and insert the motherboard driver disk. 2: From your optical drive folder, double click the Menu.exe file in Figure 4, • For the AMD SB850, select 3) ATi AHCI/RAID Driver for XP for Windows XP operating system. • For the GIGABYTE SATA2, select 1) GIGABYTE GSATA driver for 32bit system ...for Windows 32-bit operating system. A Command Prompt window will then automatically copy the driver files to exit when finished.

Manual
Page 93
...the LH (for Windows Vista 32-bit) or LH64A (for Windows Vista 64-bit) folder. Method A: Insert the motherboard driver disk into your system to boot from the motherboard driver disk to a USB flash drive before installing Windows Vista (go to the BootDrv folder and save the whole SBxxxV folder...directory: \BootDrv\SBxxxV\RAID\LH For Windows Vista 64-bit, browse to copy the driver files from the Windows Vista setup disk and perform standard OS installation steps. Step 2: Figure 4 Insert the motherboard driver disk (Method A) or the removable storage device such as USB flash drive that ...
...the LH (for Windows Vista 32-bit) or LH64A (for Windows Vista 64-bit) folder. Method A: Insert the motherboard driver disk into your system to boot from the motherboard driver disk to a USB flash drive before installing Windows Vista (go to the BootDrv folder and save the whole SBxxxV folder...directory: \BootDrv\SBxxxV\RAID\LH For Windows Vista 64-bit, browse to copy the driver files from the Windows Vista setup disk and perform standard OS installation steps. Step 2: Figure 4 Insert the motherboard driver disk (Method A) or the removable storage device such as USB flash drive that ...

Manual
Page 95
... optical drive, be detected at this stage), select Load Driver (Figure 8). Appendix Then use Method B to the 64Bit folder. Figure 9 - 95 - Method A: Insert the motherboard driver disk into your system to boot from the motherboard driver disk to a USB flash drive before installing Windows Vista ...perform standard OS installation steps. When a screen similar to that contains the SATA RAID/ AHCI driver (Method B), then specify the location of the driver (Figure 9). For the GIGABYTE SATA2: Step 1: Restart your system and browse to the following directory: \BootDrv\GSATA\32Bit...
... optical drive, be detected at this stage), select Load Driver (Figure 8). Appendix Then use Method B to the 64Bit folder. Figure 9 - 95 - Method A: Insert the motherboard driver disk into your system to boot from the motherboard driver disk to a USB flash drive before installing Windows Vista ...perform standard OS installation steps. When a screen similar to that contains the SATA RAID/ AHCI driver (Method B), then specify the location of the driver (Figure 9). For the GIGABYTE SATA2: Step 1: Restart your system and browse to the following directory: \BootDrv\GSATA\32Bit...

Manual
Page 97
... to be rebuilt under Logical Drive View and click the Rebuild tab in the array. Step 2: Select the RAID array to a hard drive from the motherboard driver disk. Step 4: The rebuilding progress is displayed on the Information page in the Start Menu. To replace the old drive, make sure the chipset...
... to be rebuilt under Logical Drive View and click the Rebuild tab in the array. Step 2: Select the RAID array to a hard drive from the motherboard driver disk. Step 4: The rebuilding progress is displayed on the Information page in the Start Menu. To replace the old drive, make sure the chipset...

Manual
Page 99
.... Select Rebuild Raid. (Or click the Rebuild icon in the tool bar.) Step 2: When the Rebuilding RAID Wizard appears, click Next. Launch the GIGABYTE RAID CONFIGURER from the motherboard driver disk. Step 6: When finished, restart your system. - 99 - Step 4: Click Finish to start the RAID rebuilding process. Appendix Step 5: The rebuilding progress is...
.... Select Rebuild Raid. (Or click the Rebuild icon in the tool bar.) Step 2: When the Rebuilding RAID Wizard appears, click Next. Launch the GIGABYTE RAID CONFIGURER from the motherboard driver disk. Step 6: When finished, restart your system. - 99 - Step 4: Click Finish to start the RAID rebuilding process. Appendix Step 5: The rebuilding progress is...

Manual
Page 100
...(in and out) to the following instructions use Windows Vista as the example operating system.) Step 1: After installing the audio driver, the HD Audio Manager icon will be present on both of the front and back panel audio connections simultaneously. For example, ... multistreaming capabilities that support 44.1KHz/48KHz/ 96KHz/192KHz sampling rate. 5-2 Configuring Audio Input and Output 5-2-1 Configuring 2/4/5.1/7.1-Channel Audio The motherboard provides six audio jacks on the next page. Double-click the icon to access the HD Audio Manager. (Note) 2/4/5.1/7.1-Channel Audio ...
...(in and out) to the following instructions use Windows Vista as the example operating system.) Step 1: After installing the audio driver, the HD Audio Manager icon will be present on both of the front and back panel audio connections simultaneously. For example, ... multistreaming capabilities that support 44.1KHz/48KHz/ 96KHz/192KHz sampling rate. 5-2 Configuring Audio Input and Output 5-2-1 Configuring 2/4/5.1/7.1-Channel Audio The motherboard provides six audio jacks on the next page. Double-click the icon to access the HD Audio Manager. (Note) 2/4/5.1/7.1-Channel Audio ...

Manual
Page 104
... environment . (Note) Install the Dolby GUI Software driver from analog speakers or headphone. channel audio effects. You must play 4-, 5.1-, or 7.1- Click the Start icon Programs, Dolby Control Center to All 1. : Click Dolby Pro Logic IIx. With Dolby Home Theater enabled, 2-channel stereo content will not hear any sound from the motherboard driver disk.
... environment . (Note) Install the Dolby GUI Software driver from analog speakers or headphone. channel audio effects. You must play 4-, 5.1-, or 7.1- Click the Start icon Programs, Dolby Control Center to All 1. : Click Dolby Pro Logic IIx. With Dolby Home Theater enabled, 2-channel stereo content will not hear any sound from the motherboard driver disk.
Manual
Page 108
...Device Manager or Sound, video, and game controllers. For more FAQs for "onboard HD audio driver." In the Main Menu, press + to the Support & Downloads\FAQ page on the motherboard battery in Chapter 1 to short the jumper to the CMOS, which will clear the CMOS ... driver from the motherboard driver disk or download the audio driver from Microsoft's website. A: For motherboards that have this step.) Step 3: Then go back to the instructions on our website and search for your speaker is present in My Computer > Properties > Gen- Step 4: In Device Manager, right-click on GIGABYTE's...
...Device Manager or Sound, video, and game controllers. For more FAQs for "onboard HD audio driver." In the Main Menu, press + to the Support & Downloads\FAQ page on the motherboard battery in Chapter 1 to short the jumper to the CMOS, which will clear the CMOS ... driver from the motherboard driver disk or download the audio driver from Microsoft's website. A: For motherboards that have this step.) Step 3: Then go back to the instructions on our website and search for your speaker is present in My Computer > Properties > Gen- Step 4: In Device Manager, right-click on GIGABYTE's...


