
Manual
Page 12
... Xpress Recovery2 Support for EasyTune (Note 6) Norton Internet Security (OEM version) Operating System w Support for Microsoft® Windows® 7/Vista/XP Form Factor w Micro ATX Form Factor; 24.4cm x 22.0cm (Note 1) Due to Windows Vista/XP 32-bit operating system limitation, when more than 4 GB of physical memory is installed, the...
... Xpress Recovery2 Support for EasyTune (Note 6) Norton Internet Security (OEM version) Operating System w Support for Microsoft® Windows® 7/Vista/XP Form Factor w Micro ATX Form Factor; 24.4cm x 22.0cm (Note 1) Due to Windows Vista/XP 32-bit operating system limitation, when more than 4 GB of physical memory is installed, the...

Manual
Page 19
... port to this port. D-Sub Port The D-Sub port supports a 15-pin D-Sub connector. j Only for GA-MA78LMT-S2H (Note 1) The DVI-D port does not support D-Sub connection by adapter. (Note 2) Simultaneous output for decoding.) In Windows Vista, select Start>Control Panel>Sound, select Realtek HDMI Output and then click Set Default. 1-6 Back...
... port to this port. D-Sub Port The D-Sub port supports a 15-pin D-Sub connector. j Only for GA-MA78LMT-S2H (Note 1) The DVI-D port does not support D-Sub connection by adapter. (Note 2) Simultaneous output for decoding.) In Windows Vista, select Start>Control Panel>Sound, select Realtek HDMI Output and then click Set Default. 1-6 Back...

Manual
Page 31
... Optimized Defaults" section in this chapter or introductions of the battery/ clearing CMOS jumper in the CMOS. To upgrade the BIOS, use either the GIGABYTE Q-Flash or @BIOS utility. • Q-Flash allows the user to clear the CMOS values.) - 31 - To see more advanced BIOS Setup... + in system's failure to Chapter 4, "BIOS Update Utilities." • Because BIOS flashing is potentially risky, if you do it is a Windows-based utility that you not alter the default settings (unless you not flash the BIOS. For instructions on . Inadequately altering the settings may result ...
... Optimized Defaults" section in this chapter or introductions of the battery/ clearing CMOS jumper in the CMOS. To upgrade the BIOS, use either the GIGABYTE Q-Flash or @BIOS utility. • Q-Flash allows the user to clear the CMOS values.) - 31 - To see more advanced BIOS Setup... + in system's failure to Chapter 4, "BIOS Update Utilities." • Because BIOS flashing is potentially risky, if you do it is a Windows-based utility that you not alter the default settings (unless you not flash the BIOS. For instructions on . Inadequately altering the settings may result ...

Manual
Page 46
After configuring this item, set the password(s) under the Set Supervisor/User Password item in Windows XP Media Center operating system. Setup A password is only required for entering the BIOS Setup program. (Default) System A password is required every time the system ...
After configuring this item, set the password(s) under the Set Supervisor/User Password item in Windows XP Media Center operating system. Setup A password is only required for entering the BIOS Setup program. (Default) System A password is required every time the system ...

Manual
Page 48
... (LAN Cable Diagnostic Function) CMOS Setup Utility-Copyright (C) 1984-2009 Award Software SMART LAN Start detecting at a normal speed of 10/100/1000 Mbps in Windows mode or when the LAN Boot ROM is activated. If no cable problem is detected on a specified pair of wires, the Status field will be...
... (LAN Cable Diagnostic Function) CMOS Setup Utility-Copyright (C) 1984-2009 Award Software SMART LAN Start detecting at a normal speed of 10/100/1000 Mbps in Windows mode or when the LAN Boot ROM is activated. If no cable problem is detected on a specified pair of wires, the Status field will be...

Manual
Page 50
... from an ACPI sleep state by a wake-up function. (Default: Disabled) PME Event Wake Up Allows the system to enter the ACPI S1 (Power on Windows Vista operating system only. Note: To use this function, you need an ATX power supply providing at any time. 2-7 Power Management Setup CMOS Setup Utility...
... from an ACPI sleep state by a wake-up function. (Default: Disabled) PME Event Wake Up Allows the system to enter the ACPI S1 (Power on Windows Vista operating system only. Note: To use this function, you need an ATX power supply providing at any time. 2-7 Power Management Setup CMOS Setup Utility...

Manual
Page 51
... and press . KB Power ON Password Set the password when Power On by keyboard, and wake on LAN. (Note) Supported on Windows Vista operating system only. - 51 - When prompted for Windows Vista operating system. (Default: Enabled) Power On By Mouse Allows the system to be powered on automatically. Soft-Off The system...
... and press . KB Power ON Password Set the password when Power On by keyboard, and wake on LAN. (Note) Supported on Windows Vista operating system only. - 51 - When prompted for Windows Vista operating system. (Default: Enabled) Power On By Mouse Allows the system to be powered on automatically. Soft-Off The system...
Manual
Page 59
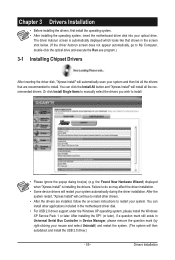
... system. (The system will install all the drivers that shown in the motherboard driver disk. • For USB 2.0 driver support under the Windows XP operating system, please install the Windows XP Service Pack 1 or later. Drivers Installation The driver Autorun screen is installing the drivers. You can install other applications included in...
... system. (The system will install all the drivers that shown in the motherboard driver disk. • For USB 2.0 driver support under the Windows XP operating system, please install the Windows XP Service Pack 1 or later. Drivers Installation The driver Autorun screen is installing the drivers. You can install other applications included in...

Manual
Page 63
...Step 2: Click New. (Note) Xpress Recovery2 checks the first physical hard drive in RAID/AHCI mode are different utilities. Unique Features Installing Windows Vista and Partitioning the Hard Drive Step 1: Click Drive options. For example, when hard drives are installed. • The amount of data...than to quickly compress and back up your system data and perform restoration of system memory • VESA compatible graphics card • Windows XP with Xpress Recovery cannot be restored using Xpress Recovery2. • USB hard drives are not supported. • Hard drives in...
...Step 2: Click New. (Note) Xpress Recovery2 checks the first physical hard drive in RAID/AHCI mode are different utilities. Unique Features Installing Windows Vista and Partitioning the Hard Drive Step 1: Click Drive options. For example, when hard drives are installed. • The amount of data...than to quickly compress and back up your system data and perform restoration of system memory • VESA compatible graphics card • Windows XP with Xpress Recovery cannot be restored using Xpress Recovery2. • USB hard drives are not supported. • Hard drives in...
Manual
Page 66
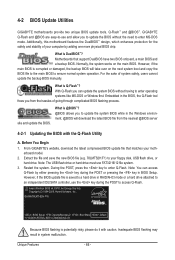
... or pressing the key in RAID/AHCI mode or a hard drive attached to enter operating systems like MS-DOS or Window first. What is DualBIOS™? From GIGABYTE's website, download the latest compressed BIOS update file that support DualBIOS have two BIOS onboard, a main BIOS and a...potentially risky, please do it with the Q-Flash Utility A. Extract the file and save the new BIOS file (e.g. 78LMTS2H.F1) to ensure normal system operation. GA-MA78LMT-S2H F1b . . . . : BIOS Setup : XpressRecovery2 : Boot Menu : Qflash 11/13/2009-RS780L-SB710-7A66AG0UC-00 Because BIOS flashing is Q-Flash...
... or pressing the key in RAID/AHCI mode or a hard drive attached to enter operating systems like MS-DOS or Window first. What is DualBIOS™? From GIGABYTE's website, download the latest compressed BIOS update file that support DualBIOS have two BIOS onboard, a main BIOS and a...potentially risky, please do it with the Q-Flash Utility A. Extract the file and save the new BIOS file (e.g. 78LMTS2H.F1) to ensure normal system operation. GA-MA78LMT-S2H F1b . . . . : BIOS Setup : XpressRecovery2 : Boot Menu : Qflash 11/13/2009-RS780L-SB710-7A66AG0UC-00 Because BIOS flashing is Q-Flash...

Manual
Page 69
... the Internet connection (for your motherboard is not present on the @BIOS server site, please manually download the BIOS update file from GIGABYTE's website and follow the instructions in a corrupted BIOS or a system that matches your motherboard model. Using @BIOS 1. Update the ... using @BIOS. 4. After Updating the BIOS Restart your system after the system restarts. Updating the BIOS with the @BIOS Utility A. In Windows, close all applications and TSR (Terminate and Stay Resident) programs. This helps prevent unexpected failures when performing a BIOS update. 2. Unique Features...
... the Internet connection (for your motherboard is not present on the @BIOS server site, please manually download the BIOS update file from GIGABYTE's website and follow the instructions in a corrupted BIOS or a system that matches your motherboard model. Using @BIOS 1. Update the ... using @BIOS. 4. After Updating the BIOS Restart your system after the system restarts. Updating the BIOS with the @BIOS Utility A. In Windows, close all applications and TSR (Terminate and Stay Resident) programs. This helps prevent unexpected failures when performing a BIOS update. 2. Unique Features...

Manual
Page 70
... and memory and reduce the useful life of these changes to take effect or click Default to restore to default values. 4-3 EasyTune 6 GIGABYTE's EasyTune 6 is a simple and easy-to-use interface that allows users to fine-tune their system-related information without the need to ... level and a Smart Fan mode. After restart, the system will operate with the optimum overclocking configuration after restart. After making changes in Windows environment. The Tuner tab allows you to change system clock settings and voltages Easy mode allows you to adjust the CPU FSB only. •...
... and memory and reduce the useful life of these changes to take effect or click Default to restore to default values. 4-3 EasyTune 6 GIGABYTE's EasyTune 6 is a simple and easy-to-use interface that allows users to fine-tune their system-related information without the need to ... level and a Smart Fan mode. After restart, the system will operate with the optimum overclocking configuration after restart. After making changes in Windows environment. The Tuner tab allows you to change system clock settings and voltages Easy mode allows you to adjust the CPU FSB only. •...

Manual
Page 72
... this limit is reached, the old- est shadow copy will be deleted and unable to quickly back up and restore your system data in the Windows Vista operating system. 4-5 Time Repair Based on the right or at the bottom of the screen to view the system data backed up at different...
... this limit is reached, the old- est shadow copy will be deleted and unable to quickly back up and restore your system data in the Windows Vista operating system. 4-5 Time Repair Based on the right or at the bottom of the screen to view the system data backed up at different...

Manual
Page 73
...Note 2) and operating system. Installing SATA hard drive(s) in your computer Attach one hard drive. • An empty formatted floppy disk. • Windows Vista/XP setup disk. • Motherboard driver disk. 5-1-1 Configuring the Onboard SATA Controller A. Configure SATA controller mode in RAID BIOS. (Note 1)...SATA Hard Drive(s) To configure SATA hard drive(s), follow the steps below: A. Make a floppy disk containing the SATA RAID/AHCI driver for Windows XP. (Note 2) E. Before you begin Please prepare: • At least two SATA hard drives (to ensure optimal performance, it ...
...Note 2) and operating system. Installing SATA hard drive(s) in your computer Attach one hard drive. • An empty formatted floppy disk. • Windows Vista/XP setup disk. • Motherboard driver disk. 5-1-1 Configuring the Onboard SATA Controller A. Configure SATA controller mode in RAID BIOS. (Note 1)...SATA Hard Drive(s) To configure SATA hard drive(s), follow the steps below: A. Make a floppy disk containing the SATA RAID/AHCI driver for Windows XP. (Note 2) E. Before you begin Please prepare: • At least two SATA hard drives (to ensure optimal performance, it ...

Manual
Page 75
... 3 [ESC] Exit - 75 - To delete an array, press to enter the View Drive Assignments window. All rights reserved. To view the disk drives assigned to arrays, press to enter the Delete LD window. Option ROM Utility (c) 2008 Advanced Micro Devices, Inc. [ Main Menu ] View Drive Assignments 1...the BIOS RAID Setup utility. (Figure 3). To create an array, press to enter the Controller Configuration window. To view controller settings, press to enter the Define LD window. Figure 2 Step 2: Main Menu This is defined.. Configuring RAID set in RAID BIOS Enter the ...
... 3 [ESC] Exit - 75 - To delete an array, press to enter the View Drive Assignments window. All rights reserved. To view the disk drives assigned to arrays, press to enter the Delete LD window. Option ROM Utility (c) 2008 Advanced Micro Devices, Inc. [ Main Menu ] View Drive Assignments 1...the BIOS RAID Setup utility. (Figure 3). To create an array, press to enter the Controller Configuration window. To view controller settings, press to enter the Define LD window. Figure 2 Step 2: Main Menu This is defined.. Configuring RAID set in RAID BIOS Enter the ...

Manual
Page 76
...RAID configuration menu (Figure 5). LD 5 ---- LD 9 ---- Create Arrays Manually To create a new array, press to enter the Define LD Menu window (Figure 4). Option ROM Utility (c) 2008 Advanced Micro Devices, Inc. [ Define LD Menu ] LD No RAID Mode LD 1 ---- LD 8... ---- LD No RAID Mode [ Define LD Menu ] Total Drv LD 1 RAID 0 0 Stripe Block: 64 KB Gigabyte Boundary: ON [ Drives Assignments ] Channel:ID Drive Model 1:Mas WDC WD800JD-22LSA0 2:Mas WDC WD800JD-22LSA0 Capabilities SATA 3G SATA 3G Fast Init...
...RAID configuration menu (Figure 5). LD 5 ---- LD 9 ---- Create Arrays Manually To create a new array, press to enter the Define LD Menu window (Figure 4). Option ROM Utility (c) 2008 Advanced Micro Devices, Inc. [ Define LD Menu ] LD No RAID Mode LD 1 ---- LD 8... ---- LD No RAID Mode [ Define LD Menu ] Total Drv LD 1 RAID 0 0 Stripe Block: 64 KB Gigabyte Boundary: ON [ Drives Assignments ] Channel:ID Drive Model 1:Mas WDC WD800JD-22LSA0 2:Mas WDC WD800JD-22LSA0 Capabilities SATA 3G SATA 3G Fast Init...

Manual
Page 77
... shown as an example. 1. Press to return to Main Menu and press again if you will appear. Under the Assignment column, drives are unassigned. The window below will appear. Figure 6 6. Figure 7 7. Press + to ignore this option. Set the Stripe Block size. 64 KB is complete, the screen will ...use maximum capacity... Press the key or to change the Assignment option to the disk array. This action adds the drive to Y. Then, the window below will see the newlycreated array. 9. The Total Drv section will erase the MBR data of the disk. Appendix Press + to clear the MBR...
... shown as an example. 1. Press to return to Main Menu and press again if you will appear. Under the Assignment column, drives are unassigned. The window below will appear. Figure 6 6. Figure 7 7. Press + to ignore this option. Set the Stripe Block size. 64 KB is complete, the screen will ...use maximum capacity... Press the key or to change the Assignment option to the disk array. This action adds the drive to Y. Then, the window below will see the newlycreated array. 9. The Total Drv section will erase the MBR data of the disk. Appendix Press + to clear the MBR...
Manual
Page 79
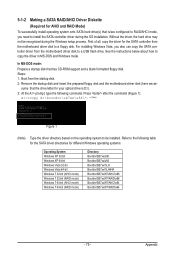
... table for the SATA driver directories for different Windows operating systems. Operating System Windows XP 32-bit Windows XP 64-bit Windows Vista 32-bit Windows Vista 64-bit Windows 7 32-bit (AHCI mode) Windows 7 32-bit (RAID mode) Windows 7 64-bit (AHCI mode) Windows 7 64-bit (RAID mode) Directory Bootdrv\SB7xx...AHCI mode, you also can copy the SATA controller driver from the motherboard driver disk to copy the driver in MS-DOS and Windows mode. Refer to the following command. See the instructions below about how to a USB flash drive. sume that has CD-ROM...
... table for the SATA driver directories for different Windows operating systems. Operating System Windows XP 32-bit Windows XP 64-bit Windows Vista 32-bit Windows Vista 64-bit Windows 7 32-bit (AHCI mode) Windows 7 32-bit (RAID mode) Windows 7 64-bit (AHCI mode) Windows 7 64-bit (RAID mode) Directory Bootdrv\SB7xx...AHCI mode, you also can copy the SATA controller driver from the motherboard driver disk to copy the driver in MS-DOS and Windows mode. Refer to the following command. See the instructions below about how to a USB flash drive. sume that has CD-ROM...

Manual
Page 80
... Figure 3. 3: Insert the blank formatted disk. Figure 2 Figure 3 Appendix - 80 - Press any key to that in the BootDrv folder (Figure 2). A Command Prompt window will then automatically copy the driver files to the RAID/ AHCI hard drives, select 3) SB7xx AHCI/RAID Driver for XP. Select the controller driver by... pressing the corresponding letter from the menu in Figure 3, to install Windows XP to the floppy disk. For example, from the menu and press . Your system will open similar to exit when finished.
... Figure 3. 3: Insert the blank formatted disk. Figure 2 Figure 3 Appendix - 80 - Press any key to that in the BootDrv folder (Figure 2). A Command Prompt window will then automatically copy the driver files to the RAID/ AHCI hard drives, select 3) SB7xx AHCI/RAID Driver for XP. Select the controller driver by... pressing the corresponding letter from the menu in Figure 3, to install Windows XP to the floppy disk. For example, from the menu and press . Your system will open similar to exit when finished.
Manual
Page 81
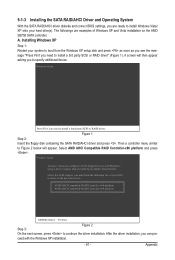
... F3=Exit Step 3: Figure 2 On the next screen, press to install a 3rd party SCSI or RAID driver" (Figure 1). ceed with Windows, using a device support disk provided by an adapter manufacturer. Select AMD AHCI Compatible RAID Controller-x86 platform and press . After the driver installation...system to boot from the following list, or press ESC to return to configure a SCSI Adapter for use with the Windows XP installation. - 81 - Windows Setup Press F6 if you need to continue the driver installation. Appendix 5-1-3 Installing the SATA RAID/AHCI Driver and Operating...
... F3=Exit Step 3: Figure 2 On the next screen, press to install a 3rd party SCSI or RAID driver" (Figure 1). ceed with Windows, using a device support disk provided by an adapter manufacturer. Select AMD AHCI Compatible RAID Controller-x86 platform and press . After the driver installation...system to boot from the following list, or press ESC to return to configure a SCSI Adapter for use with the Windows XP installation. - 81 - Windows Setup Press F6 if you need to continue the driver installation. Appendix 5-1-3 Installing the SATA RAID/AHCI Driver and Operating...


