
Manual
Page 4
... a known brand and certified to conform to safety regulations. (For the list of certified power supplies, go to http://ati.amd.com/certifiedpsu.) - Windows® Vista - Two GV-R577UD-1GD - A power supply that provides at least 600-watt and with two PCI Express x16 slots and correct chipset driver - One or two CrossFire bridge...
... a known brand and certified to conform to safety regulations. (For the list of certified power supplies, go to http://ati.amd.com/certifiedpsu.) - Windows® Vista - Two GV-R577UD-1GD - A power supply that provides at least 600-watt and with two PCI Express x16 slots and correct chipset driver - One or two CrossFire bridge...

Manual
Page 8
..., insert the driver disk into your system has installed the appropriate motherboard drivers (for the motherboard drivers, please contact the motherboard manufacturer.) 3.1. GV-R577 Series Graphics Accelerator - 8 - Driver and Utility Installation 3.1.1. Make sure your optical drive. 3. Step 2: Select the displayed language and...the screen shot below. (If the driver Autorun screen does not appear automatically, go to install DirectX separately. Users who run Windows XP with Service Pack 2 or above do not need to My Computer, double-click the optical drive and execute the setup....
..., insert the driver disk into your system has installed the appropriate motherboard drivers (for the motherboard drivers, please contact the motherboard manufacturer.) 3.1. GV-R577 Series Graphics Accelerator - 8 - Driver and Utility Installation 3.1.1. Make sure your optical drive. 3. Step 2: Select the displayed language and...the screen shot below. (If the driver Autorun screen does not appear automatically, go to install DirectX separately. Users who run Windows XP with Service Pack 2 or above do not need to My Computer, double-click the optical drive and execute the setup....

Manual
Page 12
... and select Personalize, then the Personalization windows will show up. You can move the slider to change the resolution. GV-R577 Series Graphics Accelerator - 12 - Select Display Settings to -D-Sub adapter. Display Matrix Model DVI+DP HDMI+DVI HDMI+DP CRT(Note)+HDMI CRT(Note)+DP GV-R577UD-1GD Yes Yes Yes Yes Yes (Note...
... and select Personalize, then the Personalization windows will show up. You can move the slider to change the resolution. GV-R577 Series Graphics Accelerator - 12 - Select Display Settings to -D-Sub adapter. Display Matrix Model DVI+DP HDMI+DVI HDMI+DP CRT(Note)+HDMI CRT(Note)+DP GV-R577UD-1GD Yes Yes Yes Yes Yes (Note...

Manual
Page 22
„ All Settings The All Settings page combines all of the principal 3D features onto a single page, without any preview window, allowing for quick access and adjustment. GV-R577 Series Graphics Accelerator - 22 - This page is useful when it is not necessary to preview the adjusted settings because the effect is already known or understood.
„ All Settings The All Settings page combines all of the principal 3D features onto a single page, without any preview window, allowing for quick access and adjustment. GV-R577 Series Graphics Accelerator - 22 - This page is useful when it is not necessary to preview the adjusted settings because the effect is already known or understood.
Manual
Page 23
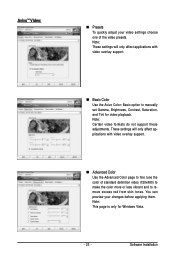
... one of standard definition video (720x480) to make the color more or less vibrant and to manually set Gamma, Brightness, Contrast, Saturation, and Tint for Windows Vista. - 23 - Note: This page is only for video playback. AvivoTM Video: „ Presets To quickly adjust your changes before applying them. Software Installation Note...
... one of standard definition video (720x480) to make the color more or less vibrant and to manually set Gamma, Brightness, Contrast, Saturation, and Tint for Windows Vista. - 23 - Note: This page is only for video playback. AvivoTM Video: „ Presets To quickly adjust your changes before applying them. Software Installation Note...

Manual
Page 24
... when the computer is already known or understood. Finally, Overdrive can control the deinterlacing settings by dynamically and safely overclocking the graphics processor and memory. GV-R577 Series Graphics Accelerator - 24 - Note: These settings will only affect applications with video overlay support. Note: If your specific requirements. Once your viewing ...applications with video overlay support. „ All Settings The All Settings page combines all of the principal Video features onto a single page, without any preview window, allowing quick access and adjustment.
... when the computer is already known or understood. Finally, Overdrive can control the deinterlacing settings by dynamically and safely overclocking the graphics processor and memory. GV-R577 Series Graphics Accelerator - 24 - Note: These settings will only affect applications with video overlay support. Note: If your specific requirements. Once your viewing ...applications with video overlay support. „ All Settings The All Settings page combines all of the principal Video features onto a single page, without any preview window, allowing quick access and adjustment.

Manual
Page 25
Troubleshooting Tips The following troubleshooting tips may help if you experience problems. Contact your dealer or GIGABYTE for selection depend on the graphics card being installed. Press on your computer's manual or manufacturer. (NOTE: Some manufacturers do not allow... receiving power. „ If necessary, disable any built-in the notification area. „ Restart your keyboard after system starts up. 4. When the Windows Advanced Options Menu appears, select Safe Mode and press . If necessary, adjust your monitor's setting using monitor's adjust panel to make the screen look ...
Troubleshooting Tips The following troubleshooting tips may help if you experience problems. Contact your dealer or GIGABYTE for selection depend on the graphics card being installed. Press on your computer's manual or manufacturer. (NOTE: Some manufacturers do not allow... receiving power. „ If necessary, disable any built-in the notification area. „ Restart your keyboard after system starts up. 4. When the Windows Advanced Options Menu appears, select Safe Mode and press . If necessary, adjust your monitor's setting using monitor's adjust panel to make the screen look ...
