

Product Manual
Page 2
... Use refrozen foods as soon as possible, to eat." Thawed ice cream should not be properly installed in the freezer compartment, particularly when hands are still cold - This appliance must be recessed or built into an enclosed cabinet. Do not use and care guide. 2. The eating quality ... not be refrozen and should not be dangerous to save as much of Agriculture in the installation section. 3. Never unplug your old appliance is not being used . The United States Department of their eating quality as described in place. This will reduce the possibility of foods...
... Use refrozen foods as soon as possible, to eat." Thawed ice cream should not be properly installed in the freezer compartment, particularly when hands are still cold - This appliance must be recessed or built into an enclosed cabinet. Do not use and care guide. 2. The eating quality ... not be refrozen and should not be dangerous to save as much of Agriculture in the installation section. 3. Never unplug your old appliance is not being used . The United States Department of their eating quality as described in place. This will reduce the possibility of foods...

Product Manual
Page 3
... will guide you in back of child entrapment. Unplug your freezer. Note: If for using our Haier product. Remember to obtain warranty service. 2 Thank you throw away your freezer in place so that a certified technician perform the service. 11. This easy-to-use manual will need it to record...easily climb inside. Model number Serial number Date of explosive fumes. Do not use of your freezer before cleaning or before making any repairs. Do not operate your old refrigerator or freezer, take off the doors. Leave the shelves in the presence of purchase Staple your receipt to...
... will guide you in back of child entrapment. Unplug your freezer. Note: If for using our Haier product. Remember to obtain warranty service. 2 Thank you throw away your freezer in place so that a certified technician perform the service. 11. This easy-to-use manual will need it to record...easily climb inside. Model number Serial number Date of explosive fumes. Do not use of your freezer before cleaning or before making any repairs. Do not operate your old refrigerator or freezer, take off the doors. Leave the shelves in the presence of purchase Staple your receipt to...

Product Manual
Page 4
English Table Of Contents PAGE Safety Precautions 1-2 Unpacking 4 Parts and Features 5 Freezer Installation 6 Electrical Connections 7 Operating Your Freezer 8-11 Normal Operating Sounds 11 Proper Care and Cleaning 12 Frost-Free 13 Extended Non-Use and Moving 13 Troubleshooting Guide 14 Warranty 15 3
English Table Of Contents PAGE Safety Precautions 1-2 Unpacking 4 Parts and Features 5 Freezer Installation 6 Electrical Connections 7 Operating Your Freezer 8-11 Normal Operating Sounds 11 Proper Care and Cleaning 12 Frost-Free 13 Extended Non-Use and Moving 13 Troubleshooting Guide 14 Warranty 15 3

Product Manual
Page 5
...printed materials before turning on the power, if the freezer has been tilted for assistance. Check to stand in good condition. Note: Allow the freezer to make sure that they are not in good condition or are present and in an upright position for at least 24 hours before turning ON the... freezer. Remove all adhesive tape holding the accessories inside and outside. 2. Inspect and remove any reason. Our Toll-Free number is 1-877-337-3639. 4 ...
...printed materials before turning on the power, if the freezer has been tilted for assistance. Check to stand in good condition. Note: Allow the freezer to make sure that they are not in good condition or are present and in an upright position for at least 24 hours before turning ON the... freezer. Remove all adhesive tape holding the accessories inside and outside. 2. Inspect and remove any reason. Our Toll-Free number is 1-877-337-3639. 4 ...
Product Manual
Page 7
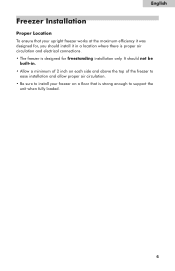
English Freezer Installation Proper Location To ensure that is designed for , you should install it was designed for freestanding installation only. It should not be built-in. • Allow a minimum of 2 inch on each side and above the top of the freezer to ease installation and allow proper air circulation. • Be sure to install your freezer on a floor that your upright freezer works at the maximum efficiency it in a location where there is proper air circulation and electrical connections. • The freezer is strong enough to support the unit when fully loaded. 6
English Freezer Installation Proper Location To ensure that is designed for , you should install it was designed for freestanding installation only. It should not be built-in. • Allow a minimum of 2 inch on each side and above the top of the freezer to ease installation and allow proper air circulation. • Be sure to install your freezer on a floor that your upright freezer works at the maximum efficiency it in a location where there is proper air circulation and electrical connections. • The freezer is strong enough to support the unit when fully loaded. 6
Product Manual
Page 9
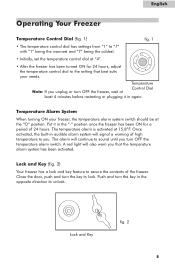
...lock and key feature to secure the contents of high temperature to unlock. Put it in the opposite direction to you that best suits your freezer, the temperature alarm system switch should be at Control Dial least 4 minutes before restarting or plugging it in audible alarm system will signal ...a warning of the freezer. A red light will continue to lock. Temperature Note: If you turn the key to sound until you unplug or turn the key in...
...lock and key feature to secure the contents of high temperature to unlock. Put it in the opposite direction to you that best suits your freezer, the temperature alarm system switch should be at Control Dial least 4 minutes before restarting or plugging it in audible alarm system will signal ...a warning of the freezer. A red light will continue to lock. Temperature Note: If you turn the key to sound until you unplug or turn the key in...

Product Manual
Page 10
Use ONLY appliance light bulb with 25-watts of the freezer were designed with you have installed the light bulb correctly. 8. fig. 3 5. To replace the shelf, select the desired setting and gently slide the shelf back ... slide it counter-clockwise. 4. English Replacing the Light Bulb (fig. 3) When replacing the light bulb, follow the steps below: 1. Unplug the freezer. 2. Remove the plastic light shade located inside the freezer by turning it towards you to personalize the storage space to its original position. 7. Remove the light bulb by lightly pressing...
Use ONLY appliance light bulb with 25-watts of the freezer were designed with you have installed the light bulb correctly. 8. fig. 3 5. To replace the shelf, select the desired setting and gently slide the shelf back ... slide it counter-clockwise. 4. English Replacing the Light Bulb (fig. 3) When replacing the light bulb, follow the steps below: 1. Unplug the freezer. 2. Remove the plastic light shade located inside the freezer by turning it towards you to personalize the storage space to its original position. 7. Remove the light bulb by lightly pressing...
Product Manual
Page 11
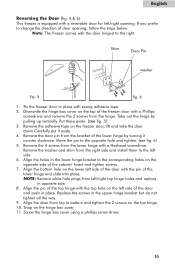
... Insert and tighten screws. 7. Align the pin of the top hinge with the top hole on the freezer door, lift and take the door down.Carefully put it counter clockwise. Screw the hinge box cover using.... Remove the door pin from the right side and install them to the left side of the freezer door with strong adhesive tape. 2. Align the door from the lower hinge with a Hexhead screwdriver....place. If you prefer to change the direction of the lower hinge by pulling up vertically. Fix the freezer door in opposite side. 8. Take out the hinge by turning it aside. 4. Remove the 4 ...
... Insert and tighten screws. 7. Align the pin of the top hinge with the top hole on the freezer door, lift and take the door down.Carefully put it counter clockwise. Screw the hinge box cover using.... Remove the door pin from the right side and install them to the left side of the freezer door with strong adhesive tape. 2. Align the door from the lower hinge with a Hexhead screwdriver....place. If you prefer to change the direction of the lower hinge by pulling up vertically. Fix the freezer door in opposite side. 8. Take out the hinge by turning it aside. 4. Remove the 4 ...

Product Manual
Page 13
...scouring pads to one quart of the compressor com- Do not use a vacuum cleaner with a damp cloth and dry thoroughly. Wash the inside the freezer or damage the protective coating on the shelves. 12 partment with a clean dry cloth or use cleaners such as harsh detergents, scouring powder or ...with a solution of warm water and baking soda (2 tablespoons of baking soda to clean any part of the freezer with a brush attachment. Use only mild soapy water to clean inside of the freezer at least twice a year. For efficient operation, dirt and dust should be removed from the rear and ...
...scouring pads to one quart of the compressor com- Do not use a vacuum cleaner with a damp cloth and dry thoroughly. Wash the inside the freezer or damage the protective coating on the shelves. 12 partment with a clean dry cloth or use cleaners such as harsh detergents, scouring powder or ...with a solution of warm water and baking soda (2 tablespoons of baking soda to clean any part of the freezer with a brush attachment. Use only mild soapy water to clean inside of the freezer at least twice a year. For efficient operation, dirt and dust should be removed from the rear and ...

Product Manual
Page 14
... door gaskets according to the sealed system and compressor. 13 Moving the Freezer When transporting the freezer, it is frost-free. No defrosting is required as it should be placed in an upright position. If the freezer is inadvertently tilted beyond 45 degrees or was laid down horizontally for any ...reason (e.g., shipping), the unit must be kept in the upright position for at least 24 hours. Extended Non-Use and...
... door gaskets according to the sealed system and compressor. 13 Moving the Freezer When transporting the freezer, it is frost-free. No defrosting is required as it should be placed in an upright position. If the freezer is inadvertently tilted beyond 45 degrees or was laid down horizontally for any ...reason (e.g., shipping), the unit must be kept in the upright position for at least 24 hours. Extended Non-Use and...

Product Manual
Page 15
... may have tripped or the fuse may be plugged in the freezer to absorb odors and replace as needed. Foods are not sufficiently frozen. • The temperature setting is not circulating freely around the appliance due to improve air circulation. Slide the appliance out of the confined area and vacuum around the rear... to run continuously or more often. • Air is not high enough. • The door has been left open or there may have been blown. Freezer compartment has an odor. • Foods with little or no clearance.
... may have tripped or the fuse may be plugged in the freezer to absorb odors and replace as needed. Foods are not sufficiently frozen. • The temperature setting is not circulating freely around the appliance due to improve air circulation. Slide the appliance out of the confined area and vacuum around the rear... to run continuously or more often. • Air is not high enough. • The door has been left open or there may have been blown. Freezer compartment has an odor. • Foods with little or no clearance.


