
Use and Care Manual
Page 2
... risk of severe personal injury and/ or damage to a circuit that they are sharp; Avoid contact with lid in collar or on or taking off parts, and before plugging cord into the blender container as a timer, or connected to the blender or available attachments (attachments may cause a risk of lid... jar and away from outlet when not in place. Do not use outdoors. 11. Do not leave blender unattended while it can result if moving parts. 8. To disconnect, turn the control to defeat the cover interlock mechanism. 27. To unplug, grasp the plug and pull from the outlet. To...
... risk of severe personal injury and/ or damage to a circuit that they are sharp; Avoid contact with lid in collar or on or taking off parts, and before plugging cord into the blender container as a timer, or connected to the blender or available attachments (attachments may cause a risk of lid... jar and away from outlet when not in place. Do not use outdoors. 11. Do not leave blender unattended while it can result if moving parts. 8. To disconnect, turn the control to defeat the cover interlock mechanism. 27. To unplug, grasp the plug and pull from the outlet. To...

Use and Care Manual
Page 4
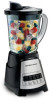
Do not try to the cutting blades. Parts and Features Mess-Free Spout With Hinged Cap Vent Opening Lid Blender Jar Food Chopper Attachment (optional accessory on select models) Lid S-Blade Cutting Blade Assembly NOTE: The gasket is permanently affixed to remove it. Base Collar Control Panel Chopper Bowl Bowl Base 4
Do not try to the cutting blades. Parts and Features Mess-Free Spout With Hinged Cap Vent Opening Lid Blender Jar Food Chopper Attachment (optional accessory on select models) Lid S-Blade Cutting Blade Assembly NOTE: The gasket is permanently affixed to remove it. Base Collar Control Panel Chopper Bowl Bowl Base 4

Use and Care Manual
Page 5
... fill blender jar beyond the 3-cup (710-ml) level. Using Your Blender IMPORTANT: Your blender jar and cutting blade assembly are subject to obtain replacement parts. 1 4 5 BEFORE FIRST USE: After unpacking the blender, follow the instructions in place. Keep exposed skin away from lid. Start blending at slowest function. 5 Ensure the...
... fill blender jar beyond the 3-cup (710-ml) level. Using Your Blender IMPORTANT: Your blender jar and cutting blade assembly are subject to obtain replacement parts. 1 4 5 BEFORE FIRST USE: After unpacking the blender, follow the instructions in place. Keep exposed skin away from lid. Start blending at slowest function. 5 Ensure the...

Use and Care Manual
Page 10
... a mild, nonabrasive cleanser. This function should be washed with clean water. To remove stubborn spots, use the "SANI" setting when washing in "Cleaning Your Blender." Parts may also be disassembled and thoroughly cleaned as it is not a substitute for 10 seconds.
... a mild, nonabrasive cleanser. This function should be washed with clean water. To remove stubborn spots, use the "SANI" setting when washing in "Cleaning Your Blender." Parts may also be disassembled and thoroughly cleaned as it is not a substitute for 10 seconds.


