
User Manual
Page 2
... the receiver is subject to radio communications. Consult the dealer or an experienced radio/TV technician for future reference. Trademark Notice: Hannspree products incorporate High-Definition Multimedia Interface (HDMI TM) technology. Operation is connected. Connect the equipment into an outlet on , the... equipment and shall be retained for help. If this manual thoroughly. User's Manual Before operating the monitor, please read this equipment does cause harmful interference to provide reasonable protection against harmful interference in a residential installation.
... the receiver is subject to radio communications. Consult the dealer or an experienced radio/TV technician for future reference. Trademark Notice: Hannspree products incorporate High-Definition Multimedia Interface (HDMI TM) technology. Operation is connected. Connect the equipment into an outlet on , the... equipment and shall be retained for help. If this manual thoroughly. User's Manual Before operating the monitor, please read this equipment does cause harmful interference to provide reasonable protection against harmful interference in a residential installation.
User Manual
Page 4
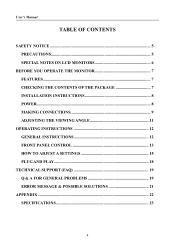
User's Manual TABLE OF CONTENTS SAFETY NOTICE 5 PRECAUTIONS 5 SPECIAL NOTES ON LCD MONITORS 6 BEFORE YOU OPERATE THE MONITOR 7 FEATURES...7 CHECKING THE CONTENTS OF THE PACKAGE 7 INSTALLATION INSTRUCTIONS 8 POWER...8 MAKING CONNECTIONS 9 ADJUSTING THE VIEWING ANGLE 11 OPERATING INSTRUCTIONS 12 GENERAL INSTRUCTIONS 12 FRONT PANEL CONTROL 13 HOW TO ADJUST A SETTINGS 15 PLUG AND PLAY 18 TECHNICAL SUPPORT (FAQ 19 Q & A FOR GENERAL PROBLEMS 19 ERROR MESSAGE & POSSIBLE SOLUTIONS 21 APPENDIX ...22 SPECIFICATIONS 23 4
User's Manual TABLE OF CONTENTS SAFETY NOTICE 5 PRECAUTIONS 5 SPECIAL NOTES ON LCD MONITORS 6 BEFORE YOU OPERATE THE MONITOR 7 FEATURES...7 CHECKING THE CONTENTS OF THE PACKAGE 7 INSTALLATION INSTRUCTIONS 8 POWER...8 MAKING CONNECTIONS 9 ADJUSTING THE VIEWING ANGLE 11 OPERATING INSTRUCTIONS 12 GENERAL INSTRUCTIONS 12 FRONT PANEL CONTROL 13 HOW TO ADJUST A SETTINGS 15 PLUG AND PLAY 18 TECHNICAL SUPPORT (FAQ 19 Q & A FOR GENERAL PROBLEMS 19 ERROR MESSAGE & POSSIBLE SOLUTIONS 21 APPENDIX ...22 SPECIFICATIONS 23 4
User Manual
Page 5
...sure these openings are provided for compliance could short circuit parts causing a fire or electric shock. near water, e.g. Do not place the monitor near the equipment and shall be used in fire or electric shock. • Never push any radio or TV interference caused by unauthorized ... openings in a bookcase or cabinet unless proper ventilation is not responsible for long period of power source indicated on the monitor cabinet. Do not place the monitor in the back and bottom of power supplied to qualified service personnel. • The wall socket shall be operated only...
...sure these openings are provided for compliance could short circuit parts causing a fire or electric shock. near water, e.g. Do not place the monitor near the equipment and shall be used in fire or electric shock. • Never push any radio or TV interference caused by unauthorized ... openings in a bookcase or cabinet unless proper ventilation is not responsible for long period of power source indicated on the monitor cabinet. Do not place the monitor in the back and bottom of power supplied to qualified service personnel. • The wall socket shall be operated only...
User Manual
Page 6
... or service center for hours. FOR LAMP SPECIFIC DISPOSAL INFORMATION CHECK WWW.LAMPRECYCLE.ORG. 6 User's Manual SPECIAL NOTES ON LCD MONITORS The following symptoms are normal with LCD monitor and do not indicate a problem. • Due to the nature of the fluorescent light, the screen may flicker during initial... include blemishes of 0.01% or less such as a missing pixel or a pixel lit all of the time. • Due to repair the monitor yourself. Lamp Disposal LAMP(S) INSIDE THIS PRODUCT CONTAIN MERCURY AND MUST BE RECYCLED OR DISPOSED OF ACCORDING TO LOCAL, STATE OR FEDERAL LAWS.
... or service center for hours. FOR LAMP SPECIFIC DISPOSAL INFORMATION CHECK WWW.LAMPRECYCLE.ORG. 6 User's Manual SPECIAL NOTES ON LCD MONITORS The following symptoms are normal with LCD monitor and do not indicate a problem. • Due to the nature of the fluorescent light, the screen may flicker during initial... include blemishes of 0.01% or less such as a missing pixel or a pixel lit all of the time. • Due to repair the monitor yourself. Lamp Disposal LAMP(S) INSIDE THIS PRODUCT CONTAIN MERCURY AND MUST BE RECYCLED OR DISPOSED OF ACCORDING TO LOCAL, STATE OR FEDERAL LAWS.

User Manual
Page 7
User's Manual BEFORE YOU OPERATE THE MONITOR FEATURES • 20" Wide screen TFT Color LCD Monitor • Crisp, Clear Display for Windows • Recommended Resolutions: 1600 X 900 @60Hz • EPA ENERGY STAR® • GP Green Product • Ergonomic Design • Space Saving, Compact Case Design CHECKING THE CONTENTS OF THE PACKAGE The product package should include the following items: LCD Monitor Cables and User manual Power Cord Warranty card Quick Start Guide User's manual Audio Cable VGA Cable HDMI Cable (optional) HDMI-DVI Cable (optional) 7
User's Manual BEFORE YOU OPERATE THE MONITOR FEATURES • 20" Wide screen TFT Color LCD Monitor • Crisp, Clear Display for Windows • Recommended Resolutions: 1600 X 900 @60Hz • EPA ENERGY STAR® • GP Green Product • Ergonomic Design • Space Saving, Compact Case Design CHECKING THE CONTENTS OF THE PACKAGE The product package should include the following items: LCD Monitor Cables and User manual Power Cord Warranty card Quick Start Guide User's manual Audio Cable VGA Cable HDMI Cable (optional) HDMI-DVI Cable (optional) 7

User Manual
Page 8
...or 220/240V AC voltage area (No user adjustment is upside down. 2. Gently press and hold the 2 clips while pulling the base from the monitor unit they are fully engaged in the base. POWER POWER SOURCE: 1. Make sure that the base is securely attached to wall-outlet. 8 Press... the 2 clips on the base that the longer section of the base and making sure that the monitor is connected correctly. 4. REMOVAL: 1. Connect the AC-power cord one end to your area. 2. User's Manual INSTALLATION INSTRUCTIONS INSTALL REMOVE Figure.1. ...
...or 220/240V AC voltage area (No user adjustment is upside down. 2. Gently press and hold the 2 clips while pulling the base from the monitor unit they are fully engaged in the base. POWER POWER SOURCE: 1. Make sure that the base is securely attached to wall-outlet. 8 Press... the 2 clips on the base that the longer section of the base and making sure that the monitor is connected correctly. 4. REMOVAL: 1. Connect the AC-power cord one end to your area. 2. User's Manual INSTALLATION INSTRUCTIONS INSTALL REMOVE Figure.1. ...

User Manual
Page 9
Connect one end of the monitor and connect the other end to Wall outlet. 4. Turn on your computer before performing the procedure below. 1. Figure.2. Connecting to the computer's VGA port. 2. Plug one end of the VGA cable to the back of the AC power cord to the LCD monitor's AC input socket, and the other end to a PC (HF207A) 1 Power AC Input 3 VGA Input 2 Audio Input 9 User's Manual MAKING CONNECTIONS CONNECTING TO A PC (HF207A) Turn off your monitor and computer. Connect the audio cable between the monitor's audio input and the PC's audio output (green port). 3.
Connect one end of the monitor and connect the other end to Wall outlet. 4. Turn on your computer before performing the procedure below. 1. Figure.2. Connecting to the computer's VGA port. 2. Plug one end of the VGA cable to the back of the AC power cord to the LCD monitor's AC input socket, and the other end to a PC (HF207A) 1 Power AC Input 3 VGA Input 2 Audio Input 9 User's Manual MAKING CONNECTIONS CONNECTING TO A PC (HF207A) Turn off your monitor and computer. Connect the audio cable between the monitor's audio input and the PC's audio output (green port). 3.
User Manual
Page 10
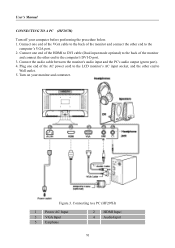
... to Wall outlet. 5. User's Manual CONNECTING TO A PC (HF207H) Turn off your monitor and computer. Connect one end of the HDMI to DVI cable (Dual input mode optional) to the back of the monitor and connect the other end to the computer's DVI-D port. 3. Turn on your computer... before performing the procedure below. 1. Figure.3. Connect the audio cable between the monitor's audio input and the PC's audio output (green port). 4. Connect one end of the monitor and connect the other end to the computer's VGA port. 2. Plug one end of the VGA cable ...
... to Wall outlet. 5. User's Manual CONNECTING TO A PC (HF207H) Turn off your monitor and computer. Connect one end of the HDMI to DVI cable (Dual input mode optional) to the back of the monitor and connect the other end to the computer's DVI-D port. 3. Turn on your computer... before performing the procedure below. 1. Figure.3. Connect the audio cable between the monitor's audio input and the PC's audio output (green port). 4. Connect one end of the monitor and connect the other end to the computer's VGA port. 2. Plug one end of the VGA cable ...

User Manual
Page 11
...angle. It may cause damage or break the LCD screen. • Be careful not to place fingers or hands near the hinges when tilting the monitor, otherwise pinching can result. 11 User's Manual ADJUSTING THE VIEWING ANGLE • For optimal viewing it is recommended to look at the full face ...of the monitor, then adjust the monitor's angle to your own preference. • Hold the stand so you do not topple the monitor when you change the monitor's angle. • You are able to adjust the monitor's angle from -5° to 15°.
...angle. It may cause damage or break the LCD screen. • Be careful not to place fingers or hands near the hinges when tilting the monitor, otherwise pinching can result. 11 User's Manual ADJUSTING THE VIEWING ANGLE • For optimal viewing it is recommended to look at the full face ...of the monitor, then adjust the monitor's angle to your own preference. • Hold the stand so you do not topple the monitor when you change the monitor's angle. • You are able to adjust the monitor's angle from -5° to 15°.
User Manual
Page 12
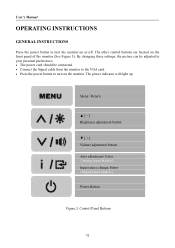
... Panel Buttons 12 The power indicator will light up. User's Manual OPERATING INSTRUCTIONS GENERAL INSTRUCTIONS Press the power button to turn the monitor on the front panel of the monitor (See Figure 5). By changing these settings, the picture can be adjusted to your personal preferences. • The power cord should be connected...
... Panel Buttons 12 The power indicator will light up. User's Manual OPERATING INSTRUCTIONS GENERAL INSTRUCTIONS Press the power button to turn the monitor on the front panel of the monitor (See Figure 5). By changing these settings, the picture can be adjusted to your personal preferences. • The power cord should be connected...
User Manual
Page 13
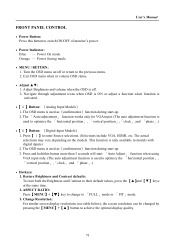
...: For similar screen display resolutions (see table below), the screen resolution can be changed by pressing the【MENU button to switch ON/OFF of monitor's power. • Power Indicator: Blue - Navigate through adjustment icons when OSD is ON or adjust a function when function is only available in volume OSD status...
...: For similar screen display resolutions (see table below), the screen resolution can be changed by pressing the【MENU button to switch ON/OFF of monitor's power. • Power Indicator: Blue - Navigate through adjustment icons when OSD is ON or adjust a function when function is only available in volume OSD status...

User Manual
Page 14
... Save the original shipping box and packing materials, as they will come in handy if you ever have to ship your monitor. • For maximum protection, repackage your monitor as thinner, benzene, or abrasive cleaners, since these will depend on the purchased model. Never use strong solvents such as... it was originally packed at the factory. • To keep the monitor looking new, periodically clean it . 14 Stubborn stains may be removed with a cloth lightly dampened with a soft cloth. As a safety precaution,...
... Save the original shipping box and packing materials, as they will come in handy if you ever have to ship your monitor. • For maximum protection, repackage your monitor as thinner, benzene, or abrasive cleaners, since these will depend on the purchased model. Never use strong solvents such as... it was originally packed at the factory. • To keep the monitor looking new, periodically clean it . 14 Stubborn stains may be removed with a cloth lightly dampened with a soft cloth. As a safety precaution,...
User Manual
Page 17
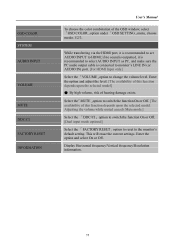
... the color combination of hearing damage exists. if no sound is outputted, it is connected to monitor's LINE IN (or AUDIO IN) port. [For HDMI Input only] Select the 「VOLUME」option to the monitor's default setting. This will erase the current settings. Select the「MUTE」option to HDMI...
... the color combination of hearing damage exists. if no sound is outputted, it is connected to monitor's LINE IN (or AUDIO IN) port. [For HDMI Input only] Select the 「VOLUME」option to the monitor's default setting. This will erase the current settings. Select the「MUTE」option to HDMI...
User Manual
Page 18
... its identity and, depending on the level of DDC used, communicate additional information about its display capabilities. It allows the monitor to the VESA DDC STANDARD. THIS MONITOR WILL APPEAR TO BE NON-FUNCTIONAL IF THERE IS NO VIDEO INPUT SIGNAL. This feature is designed to conserve electrical energy... Saver" feature except the display is similar to power saving mode. The display is no video-input signal present. IN ORDER FOR THIS MONITOR TO OPERATE PROPERLY, THERE MUST BE A VIDEO INPUT SIGNAL. When there is restored by pressing a key on the I²C protocol. This reduces the...
... its identity and, depending on the level of DDC used, communicate additional information about its display capabilities. It allows the monitor to the VESA DDC STANDARD. THIS MONITOR WILL APPEAR TO BE NON-FUNCTIONAL IF THERE IS NO VIDEO INPUT SIGNAL. This feature is designed to conserve electrical energy... Saver" feature except the display is similar to power saving mode. The display is no video-input signal present. IN ORDER FOR THIS MONITOR TO OPERATE PROPERLY, THERE MUST BE A VIDEO INPUT SIGNAL. When there is restored by pressing a key on the I²C protocol. This reduces the...
User Manual
Page 19
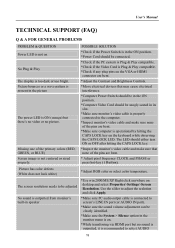
...& QUESTION Power LED is not on the keyboard while observing the CAPS LOCK LED. Picture bounces or a wave pattern is present in the monitor menu is on desktop and select Properties>Settings>Screen Resolution. Picture has color defects (White does not look white) *Adjust RGB color or ...pins are bent. * Adjust pixel frequency CLOCK and PHASE or press hot-key ( i Button). The screen resolution needs to the computer. *Inspect monitor's video cable and make sure that may cause electrical interference. *Computer Power Switch should be in the ON position. *Computer Video Card should be ...
...& QUESTION Power LED is not on the keyboard while observing the CAPS LOCK LED. Picture bounces or a wave pattern is present in the monitor menu is on desktop and select Properties>Settings>Screen Resolution. Picture has color defects (White does not look white) *Adjust RGB color or ...pins are bent. * Adjust pixel frequency CLOCK and PHASE or press hot-key ( i Button). The screen resolution needs to the computer. *Inspect monitor's video cable and make sure that may cause electrical interference. *Computer Power Switch should be in the ON position. *Computer Video Card should be ...

User Manual
Page 20
User's Manual INPUT as a PC option, and make sure PC audio output cable is connected to monitor's LINE IN port(or AUDIO IN port). [For HDMI Input only] 20
User's Manual INPUT as a PC option, and make sure PC audio output cable is connected to monitor's LINE IN port(or AUDIO IN port). [For HDMI Input only] 20

User Manual
Page 22
User's Manual 27 1280×960 @75Hz 28 1280×1024 @72Hz SXGA 74.592 76.02 74.443 71.448 29 1360×768 @60Hz SXGA 47.712 60.015 30 1400×1050@60Hz WXGA + 64.744 59.948 31 1440×900 @60Hz SXGA 32 1440×900 @75Hz SXGA 55.469 70.635 59.901 74.984 33 1600x900 @60Hz HD+ 55.54 59.978 ** We ensure that the monitor can be lighted under interlace signal mode, but we can not guarantee the image quality. 22
User's Manual 27 1280×960 @75Hz 28 1280×1024 @72Hz SXGA 74.592 76.02 74.443 71.448 29 1360×768 @60Hz SXGA 47.712 60.015 30 1400×1050@60Hz WXGA + 64.744 59.948 31 1440×900 @60Hz SXGA 32 1440×900 @75Hz SXGA 55.469 70.635 59.901 74.984 33 1600x900 @60Hz HD+ 55.54 59.978 ** We ensure that the monitor can be lighted under interlace signal mode, but we can not guarantee the image quality. 22


