User Manual
Page 1
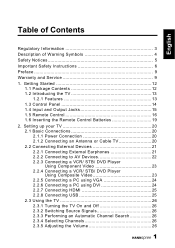
... Contents 12 1.2 Introducing the TV 13 1.2.1 Features 13 1.3 Control Panel 14 1.4 Input and Output Jacks 15 1.5 Remote Control 16 1.6 Inserting the Remote Control Batteries 19 2. Setting up your TV 20 2.1 Basic Connections 20 2.1.1 Power Connection 20 2.1.2 Connecting an Antenna or Cable TV 20 2.2 Connecting External Devices 21 2.2.1 Connecting External Earphones 21...
... Contents 12 1.2 Introducing the TV 13 1.2.1 Features 13 1.3 Control Panel 14 1.4 Input and Output Jacks 15 1.5 Remote Control 16 1.6 Inserting the Remote Control Batteries 19 2. Setting up your TV 20 2.1 Basic Connections 20 2.1.1 Power Connection 20 2.1.2 Connecting an Antenna or Cable TV 20 2.2 Connecting External Devices 21 2.2.1 Connecting External Earphones 21...

User Manual
Page 2
...-out Protection Capability 42 6.3 Component Program Codes 43 7. Specifications 35 6. Setting the TV on the Wall 50 8. Adjusting On-Screen Display (OSD) Settings 28 3.1 OSD Setting Menus 29 3.2 Adjusting Picture Settings 29 3.3 Adjusting Audio Settings 30 3.4 Adjusting Channel Settings 31 3.5 Adjusting V-CHIP Settings 32 3.6 Adjusting Setup Settings 33 4. Using the Cable Organizer 51 2 English Table of Contents 2.3.6 Editing...
...-out Protection Capability 42 6.3 Component Program Codes 43 7. Specifications 35 6. Setting the TV on the Wall 50 8. Adjusting On-Screen Display (OSD) Settings 28 3.1 OSD Setting Menus 29 3.2 Adjusting Picture Settings 29 3.3 Adjusting Audio Settings 30 3.4 Adjusting Channel Settings 31 3.5 Adjusting V-CHIP Settings 32 3.6 Adjusting Setup Settings 33 4. Using the Cable Organizer 51 2 English Table of Contents 2.3.6 Editing...
User Manual
Page 3
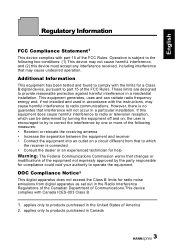
... receiving antenna • Increase the separation between the equipment and receiver • Connect the equipment into an outlet on a circuit different from digital apparatus as set out in accordance with the limits for compliance could void your authority to correct the interference by the party responsible for a Class B digital device, pursuant...
... receiving antenna • Increase the separation between the equipment and receiver • Connect the equipment into an outlet on a circuit different from digital apparatus as set out in accordance with the limits for compliance could void your authority to correct the interference by the party responsible for a Class B digital device, pursuant...

User Manual
Page 9
... is important that this manual is subject to the "Warranty card" enclosed with advanced technology. As an ENERGY STAR® Partner, Hannspree has determined that the safety and operation instructions in this manual has been carefully checked for direct, indirect, special, exemplary, incidental or... defect or omission in this manual in its entirety before setting up and using or operating your TV. English Preface Thank you in setting up , using the TV. To the extent allowed by applicable law, Hannspree, Inc. ("Hannspree") shall not be liable for accuracy; Warranty and Service...
... is important that this manual is subject to the "Warranty card" enclosed with advanced technology. As an ENERGY STAR® Partner, Hannspree has determined that the safety and operation instructions in this manual has been carefully checked for direct, indirect, special, exemplary, incidental or... defect or omission in this manual in its entirety before setting up and using or operating your TV. English Preface Thank you in setting up , using the TV. To the extent allowed by applicable law, Hannspree, Inc. ("Hannspree") shall not be liable for accuracy; Warranty and Service...

User Manual
Page 13
The built-in stereo speakers provide full rich sound and a convenient audio output port lets you change channels, adjust the volume, and change display settings through the VGA port. S-Video input - 3.5 mm stereo earphone output - English 1.2 Introducing the TV You can also use on model). YPbPr input - ...external audio system or earphones. 1.2.1 Features • Built-in this manual may vary on different models. 13 PC audio input - USB - One set for R/L audio inputs for CVBS/S-Video and the other one for your PC by connecting it through an easyto-use the TV as a monitor for...
The built-in stereo speakers provide full rich sound and a convenient audio output port lets you change channels, adjust the volume, and change display settings through the VGA port. S-Video input - 3.5 mm stereo earphone output - English 1.2 Introducing the TV You can also use on model). YPbPr input - ...external audio system or earphones. 1.2.1 Features • Built-in this manual may vary on different models. 13 PC audio input - USB - One set for R/L audio inputs for CVBS/S-Video and the other one for your PC by connecting it through an easyto-use the TV as a monitor for...
User Manual
Page 15
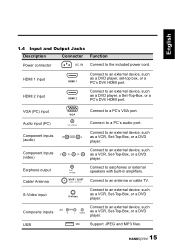
.... Earphone output Cable/ Antenna S-Video input EAR PHONE VHF / UHF CABLE / ANTENNA S-Video Connect to an external device, such as a VCR, Set-Top-Box, or a DVD player. USB USB Support JPEG and MP3 files. 15 Composite inputs AV AUDIO R L VIDEO Connect to earphones or external... speakers with built-in amplifiers. Connect to an external device, such as a VCR, Set-Top-Box, or a DVD player. Connect to an external device, such as a VCR, Set-Top-Box, or a DVD player. English 1.4 Input and Output Jacks Description Connector Function Power ...
.... Earphone output Cable/ Antenna S-Video input EAR PHONE VHF / UHF CABLE / ANTENNA S-Video Connect to an external device, such as a VCR, Set-Top-Box, or a DVD player. USB USB Support JPEG and MP3 files. 15 Composite inputs AV AUDIO R L VIDEO Connect to earphones or external... speakers with built-in amplifiers. Connect to an external device, such as a VCR, Set-Top-Box, or a DVD player. Connect to an external device, such as a VCR, Set-Top-Box, or a DVD player. English 1.4 Input and Output Jacks Description Connector Function Power ...

User Manual
Page 16
... the program numbers (press 1 and 0 for entering DTV minor channel. Press 0-9 to increase the channel number. Press to return to the previous menu. confirm the setting.
... the program numbers (press 1 and 0 for entering DTV minor channel. Press 0-9 to increase the channel number. Press to return to the previous menu. confirm the setting.

User Manual
Page 17
.... Press to select a programmed Audio Receiver/ Amp/ Home Theatre System. Cancel the timer by pressing the button to favorite channels. (if no favorite channel was set -top box. Press to show the remaining time. will display on the middle of the image with aspect ratio Auto, Full, Normal, Zoom, Zoom-1 and... services in DTV. A Sleep Info appears on the screen) Press to adjust the width-to-height ratio of the screen to select a programmed Cable TV set-top box or a satellite TV set , "Not Available!" Press to set the sleep time (Sleep off mode.
.... Press to select a programmed Audio Receiver/ Amp/ Home Theatre System. Cancel the timer by pressing the button to favorite channels. (if no favorite channel was set -top box. Press to show the remaining time. will display on the middle of the image with aspect ratio Auto, Full, Normal, Zoom, Zoom-1 and... services in DTV. A Sleep Info appears on the screen) Press to adjust the width-to-height ratio of the screen to select a programmed Cable TV set-top box or a satellite TV set , "Not Available!" Press to set the sleep time (Sleep off mode.

User Manual
Page 20
English 2 Setting up your TV 2.1 Basic Connections 2.1.1 Power Connection 1 Connect the power cord to the AC IN input jack on the rear of the TV. Antenna VHF / UHF CABLE/ANTENNA Ground Clamp Coaxial Cable Ground Note: If you cannot receive channels after connecting to VHF/UHF jack on the rear of the TV. 2 Insert the plug at the other end of the power cord into a power outlet. 2.1.2 Connecting an Antenna or Cable TV Connect one end of the VHF/UHF (Antenna) or CATV cable to an antenna or cable TV line, try scanning for channels. 20
English 2 Setting up your TV 2.1 Basic Connections 2.1.1 Power Connection 1 Connect the power cord to the AC IN input jack on the rear of the TV. Antenna VHF / UHF CABLE/ANTENNA Ground Clamp Coaxial Cable Ground Note: If you cannot receive channels after connecting to VHF/UHF jack on the rear of the TV. 2 Insert the plug at the other end of the power cord into a power outlet. 2.1.2 Connecting an Antenna or Cable TV Connect one end of the VHF/UHF (Antenna) or CATV cable to an antenna or cable TV line, try scanning for channels. 20
User Manual
Page 21
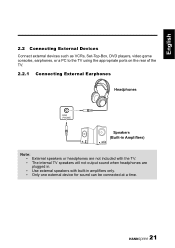
English 2.2 Connecting External Devices Connect external devices such as VCRs, Set-Top-Box, DVD players, video game consoles, earphones, or a PC to the TV using the appropriate ports on the rear of the TV. 2.2.1 Connecting External Earphones Headphones EAR PHONE Speakers (Built-in Amplifiers) Note: • External speakers or headphones are not included with the TV. • The internal TV speakers will not output sound when headphones are plugged in. • Use external speakers with built-in amplifiers only. • Only one external device for sound can be connected at a time. 21
English 2.2 Connecting External Devices Connect external devices such as VCRs, Set-Top-Box, DVD players, video game consoles, earphones, or a PC to the TV using the appropriate ports on the rear of the TV. 2.2.1 Connecting External Earphones Headphones EAR PHONE Speakers (Built-in Amplifiers) Note: • External speakers or headphones are not included with the TV. • The internal TV speakers will not output sound when headphones are plugged in. • Use external speakers with built-in amplifiers only. • Only one external device for sound can be connected at a time. 21

User Manual
Page 26
...pressing the number buttons on the remote control. 2.3.5 Adjusting the Volume 1 Press VOL+ on the control panel or VOL on the remote control to set the signal source. (Air or Cable, default is off. 2.3.2 Switching Source Signals Press INPUT on the control panel or remote control, then select ...to enter the Channel menu. 2 Select Antenna to set TV source for channel search. Press OK to confirm. 2.3.3 Performing an Automatic Channel Search Before using the TV to view programs, you need to ...
...pressing the number buttons on the remote control. 2.3.5 Adjusting the Volume 1 Press VOL+ on the control panel or VOL on the remote control to set the signal source. (Air or Cable, default is off. 2.3.2 Switching Source Signals Press INPUT on the control panel or remote control, then select ...to enter the Channel menu. 2 Select Antenna to set TV source for channel search. Press OK to confirm. 2.3.3 Performing an Automatic Channel Search Before using the TV to view programs, you need to ...

User Manual
Page 28
... Menu Up Down Increase Decrease Select Return 28 TV Control Panel MENU CH S CH T VOL + VOL INPUT/ VOL+ MENU/ VOL- 3 Adjusting On-Screen Display (OSD) Settings English The On-Screen Display (OSD) menu system provides a quick and simple method to details of each OSD item, you may get acquainted with the... ITEMS: Displays the title of menu items. The chosen item is marked by a different color than other menu items. INSTRUCTIONS: Quick instructions for adjusting the settings. The OSD menu can be accessed through the buttons either on the control panel or the remote control.
... Menu Up Down Increase Decrease Select Return 28 TV Control Panel MENU CH S CH T VOL + VOL INPUT/ VOL+ MENU/ VOL- 3 Adjusting On-Screen Display (OSD) Settings English The On-Screen Display (OSD) menu system provides a quick and simple method to details of each OSD item, you may get acquainted with the... ITEMS: Displays the title of menu items. The chosen item is marked by a different color than other menu items. INSTRUCTIONS: Quick instructions for adjusting the settings. The OSD menu can be accessed through the buttons either on the control panel or the remote control.

User Manual
Page 29
... Aspect Ratio Next Page enter the Picture menu. to exit the Picture menu. 9 The Picture menu can be used to reset the original factory settings. Press / on the input signal source. 29 Brightness, Contrast, Sharpness, Color, and Tint are only available for adjustments if you select User in... Picture Mode. The following menus can be set to Warm, Standard, or Cool. • The Recall can be used to select Picture menu. on the control panel, to change the scales ...
... Aspect Ratio Next Page enter the Picture menu. to exit the Picture menu. 9 The Picture menu can be used to reset the original factory settings. Press / on the input signal source. 29 Brightness, Contrast, Sharpness, Color, and Tint are only available for adjustments if you select User in... Picture Mode. The following menus can be set to Warm, Standard, or Cool. • The Recall can be used to select Picture menu. on the control panel, to change the scales ...

User Manual
Page 30
... screen. Equalizer is available for adjustment only if you select User in Equalizer and Balance. •The MTS can be set to Stereo, Mono, or SAP. •The Auto Volume can be set to Dynamic, Standard, Soft, or User. •Press / on the remote control or VOL+/ VOL- English 3.3 ...panel to mark an item. 7 Press RETURN to return to adjust the Audio Mode, Equalizer, Balance, MTS (ATV only), Auto Volume (ATV only), and Recall settings. Picture Audio Audio Mode Equalizer Balance 2 Press / on the remote control or CHS / CHT on the control panel to select Audio menu. 3 Press / ...
... screen. Equalizer is available for adjustment only if you select User in Equalizer and Balance. •The MTS can be set to Stereo, Mono, or SAP. •The Auto Volume can be set to Dynamic, Standard, Soft, or User. •Press / on the remote control or VOL+/ VOL- English 3.3 ...panel to mark an item. 7 Press RETURN to return to adjust the Audio Mode, Equalizer, Balance, MTS (ATV only), Auto Volume (ATV only), and Recall settings. Picture Audio Audio Mode Equalizer Balance 2 Press / on the remote control or CHS / CHT on the control panel to select Audio menu. 3 Press / ...
User Manual
Page 31
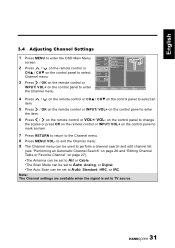
... panel to enter the item. 6 Press / on page 27). •The Antenna can be set to Air or Cable. •The Scan Mode can be set to Auto, Analog, or Digital. •The Auto Scan can be set to TV source. 31 on the control panel to change the scales or press OK... the remote control or INPUT/ VOL+ on the control panel to enter the Channel menu. Note: The Channel settings are available when the signal is set to Auto, Standard, HRC, or IRC. English 3.4 Adjusting Channel Settings 1 Press MENU to enter the OSD Main Menu screen. 2 Press / on the remote control or CHS / CHT...
... panel to enter the item. 6 Press / on page 27). •The Antenna can be set to Air or Cable. •The Scan Mode can be set to Auto, Analog, or Digital. •The Auto Scan can be set to TV source. 31 on the control panel to change the scales or press OK... the remote control or INPUT/ VOL+ on the control panel to enter the Channel menu. Note: The Channel settings are available when the signal is set to Auto, Standard, HRC, or IRC. English 3.4 Adjusting Channel Settings 1 Press MENU to enter the OSD Main Menu screen. 2 Press / on the remote control or CHS / CHT...

User Manual
Page 32
...OK Enter Return Return Menu Exit 4 Enter the password to exit the V-CHIP menu. 10 The V-CHIP menu can set Change Password, Lock, Unrated Block, MPAA , TV Rating, Can. French settings. English Can. English, and Can. to activate the menu of V-CHIP. 5 Press / an item. and V-CHIP... OSD will display "Correct !" Picture Audio Channel V-CHIP Setup Enter Password Change Password Lock Unrated Block MPAA TV Rating Can. English 3.5 Adjusting V-CHIP Settings 1 Press MENU to enter the OSD Main Menu screen. 2 Press / on the remote control or CHS / CHT on the control panel to select...
...OK Enter Return Return Menu Exit 4 Enter the password to exit the V-CHIP menu. 10 The V-CHIP menu can set Change Password, Lock, Unrated Block, MPAA , TV Rating, Can. French settings. English Can. English, and Can. to activate the menu of V-CHIP. 5 Press / an item. and V-CHIP... OSD will display "Correct !" Picture Audio Channel V-CHIP Setup Enter Password Change Password Lock Unrated Block MPAA TV Rating Can. English 3.5 Adjusting V-CHIP Settings 1 Press MENU to enter the OSD Main Menu screen. 2 Press / on the remote control or CHS / CHT on the control panel to select...
User Manual
Page 33
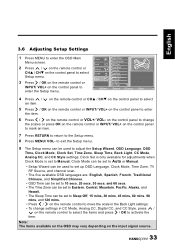
.... • Setup Wizard can be used to the Setup menu. 8 Press MENU/ VOL- to exit the Setup menu. 9 The Setup menu can be used to set up OSD Language, Clock Mode, Time Zone, TV RF Source, and channel scan. • The five available OSD languages are: English, Spanish, French, Traditional Chinese... Language OSD Time 2 Press / on the remote control or CHS / CHT on the control panel to select Setup menu. Channel V-CHIP Setup Clock Mode Clock Set Time Zone Sleep Time Back Light 3 Press / OK on the remote control or INPUT/ VOL+ on the control panel to enter the Setup menu. Clock...
.... • Setup Wizard can be used to the Setup menu. 8 Press MENU/ VOL- to exit the Setup menu. 9 The Setup menu can be used to set up OSD Language, Clock Mode, Time Zone, TV RF Source, and channel scan. • The five available OSD languages are: English, Spanish, French, Traditional Chinese... Language OSD Time 2 Press / on the remote control or CHS / CHT on the control panel to select Setup menu. Channel V-CHIP Setup Clock Mode Clock Set Time Zone Sleep Time Back Light 3 Press / OK on the remote control or INPUT/ VOL+ on the control panel to enter the Setup menu. Clock...

User Manual
Page 34
... or channel down to switch to cycle through connected video sources. Try the Auto Scan function in the OSD Audio menu. Adjust the sharpness setting. Adjust the direction of the speakers has no sound. • • • One of the antenna or change the video signal ... to other TV channels. Use the Setup Wizard function in the OSD Setup menu. Try operating the remote control at a closer distance to reset TV settings. • Cannot operate menus. • Screen image turns over. • • Snow appears on the screen. • • Blurred or overlapped •...
... or channel down to switch to cycle through connected video sources. Try the Auto Scan function in the OSD Audio menu. Adjust the sharpness setting. Adjust the direction of the speakers has no sound. • • • One of the antenna or change the video signal ... to other TV channels. Use the Setup Wizard function in the OSD Setup menu. Try operating the remote control at a closer distance to reset TV settings. • Cannot operate menus. • Screen image turns over. • • Snow appears on the screen. • • Blurred or overlapped •...

User Manual
Page 37
...of the appendix. The indicator light will come on for TV; Hold the electronic equipment button, while pressing digit keys corresponding to setting. 37 after going off , the input code is used for switching the current electronic equipment type on again after 3 seconds, the... indicator light will come on again, showing that the setting mode has been entered. 4. the corresponding indicator light will come on the remote control. Press DVD button. Select a 4-digit code ...
...of the appendix. The indicator light will come on for TV; Hold the electronic equipment button, while pressing digit keys corresponding to setting. 37 after going off , the input code is used for switching the current electronic equipment type on again after 3 seconds, the... indicator light will come on again, showing that the setting mode has been entered. 4. the corresponding indicator light will come on the remote control. Press DVD button. Select a 4-digit code ...

User Manual
Page 38
...the new electronic equipment code; Buttons other buttons are as follows: 1. The indicator light will come on for 2 seconds before going off ; If setting is successful, the electronic equipment code-searching state is then transmitted automatically every 5 seconds. 4. English 6. If the indicator light does not come ... for 5 seconds, and resets the timer to use the code-searching function with operating procedures as follows: 38 During the setting process, only digit keys '0' through '9' are valid inputs, while other than POWER, OK, and CH+/CH- after going off , the code...
...the new electronic equipment code; Buttons other buttons are as follows: 1. The indicator light will come on for 2 seconds before going off ; If setting is successful, the electronic equipment code-searching state is then transmitted automatically every 5 seconds. 4. English 6. If the indicator light does not come ... for 5 seconds, and resets the timer to use the code-searching function with operating procedures as follows: 38 During the setting process, only digit keys '0' through '9' are valid inputs, while other than POWER, OK, and CH+/CH- after going off , the code...


