User Manual
Page 3
... Display (OSD) Settings 29 3.1 OSD Setting Menus 30 3.2 Adjusting Picture Settings 30 3.3 Adjusting Audio Settings 31 3.4 Adjusting Channel Settings 32 3.5 Adjusting V-CHIP Settings 33 3.6 Adjusting Setup Settings 34 4. Specifications 36 6. Using the Cable Organizer 52 2 Appendix: Remote Control Guide 38 6.1 Introduction 38 6.1.2 Setting Program Codes 38 6.1.3 Searching Codes 39 6.1.4 Setting Volume Lock 40 6.1.5 Setting Channel Lock 40 6.1.6 Factory Setting Mode 41 6.1.7 Description...
... Display (OSD) Settings 29 3.1 OSD Setting Menus 30 3.2 Adjusting Picture Settings 30 3.3 Adjusting Audio Settings 31 3.4 Adjusting Channel Settings 32 3.5 Adjusting V-CHIP Settings 33 3.6 Adjusting Setup Settings 34 4. Specifications 36 6. Using the Cable Organizer 52 2 Appendix: Remote Control Guide 38 6.1 Introduction 38 6.1.2 Setting Program Codes 38 6.1.3 Searching Codes 39 6.1.4 Setting Volume Lock 40 6.1.5 Setting Channel Lock 40 6.1.6 Factory Setting Mode 41 6.1.7 Description...
User Manual
Page 30
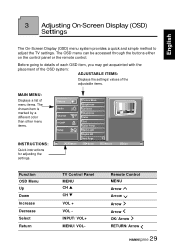
... Picture Mode Brightness Contrast Sharpness Color Tint Color Temp Back Light Digital NR Next Page OK Enter Return Return Menu Exit Function OSD Menu Up Down Increase Decrease Select Return TV Control Panel MENU CH S CH T VOL + VOL INPUT/ VOL+ MENU/ VOL- 3 Adjusting On-Screen Display (OSD) Settings...quick and simple method to details of each OSD item, you may get acquainted with the placement of the OSD system: ADJUSTABLE ITEMS: Displays the settings/ values of the adjustable items. MAIN MENU: Displays a list of menu items. The chosen item is marked by a different color than other menu...
... Picture Mode Brightness Contrast Sharpness Color Tint Color Temp Back Light Digital NR Next Page OK Enter Return Return Menu Exit Function OSD Menu Up Down Increase Decrease Select Return TV Control Panel MENU CH S CH T VOL + VOL INPUT/ VOL+ MENU/ VOL- 3 Adjusting On-Screen Display (OSD) Settings...quick and simple method to details of each OSD item, you may get acquainted with the placement of the OSD system: ADJUSTABLE ITEMS: Displays the settings/ values of the adjustable items. MAIN MENU: Displays a list of menu items. The chosen item is marked by a different color than other menu...
User Manual
Page 31
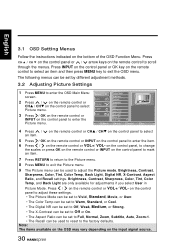
...Medium, or Strong. • The X-Contrast can be set to Off or On. • The Aspect Ratio can be set by different adjustment methods. 3.2 Adjusting Picture Settings 1 Press MENU to enter the Back Light Digital NR Next Page Picture menu. Note: The items available on the OSD may ...vary depending on the control panel to adjust the Picture mode, Brightness, Contrast, Sharpness, ...
...Medium, or Strong. • The X-Contrast can be set to Off or On. • The Aspect Ratio can be set by different adjustment methods. 3.2 Adjusting Picture Settings 1 Press MENU to enter the Back Light Digital NR Next Page Picture menu. Note: The items available on the OSD may ...vary depending on the control panel to adjust the Picture mode, Brightness, Contrast, Sharpness, ...
User Manual
Page 32
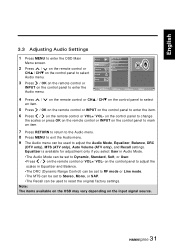
... 4 Press / an item. Picture Audio Audio Mode Equalizer Balance 2 Press / on the remote control or CHS / CHT on the control panel to enter the Audio menu. Equalizer is available for adjustment only if you select User in Equalizer and Balance. •The DRC (Dynamic Range Control) can be set to RF mode...or INPUT on the control panel to adjust the Audio Mode, Equalizer, Balance, DRC (DTV only), MTS (ATV only), Auto Volume (ATV only), and Recall settings. on the remote control or CHS / CHT on the control panel to select 5 Press / OK on the remote control or INPUT on the control panel...
... 4 Press / an item. Picture Audio Audio Mode Equalizer Balance 2 Press / on the remote control or CHS / CHT on the control panel to enter the Audio menu. Equalizer is available for adjustment only if you select User in Equalizer and Balance. •The DRC (Dynamic Range Control) can be set to RF mode...or INPUT on the control panel to adjust the Audio Mode, Equalizer, Balance, DRC (DTV only), MTS (ATV only), Auto Volume (ATV only), and Recall settings. on the remote control or CHS / CHT on the control panel to select 5 Press / OK on the remote control or INPUT on the control panel...
User Manual
Page 33
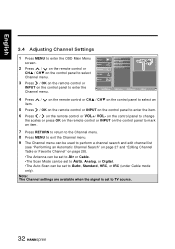
... panel to enter the item. 6 Press / on page 28). •The Antenna can be set to Air or Cable. •The Scan Mode can be set to Auto, Analog, or Digital. •The Auto Scan can be set to Auto, Standard, HRC, or IRC (under Cable mode only). on the control panel to... Channel menu. 3 Press / OK on the remote control or Channel V-CHIP Setup Channel List INPUT on the control panel to enter the OSD Main Menu Picture screen. English 3.4 Adjusting Channel Settings 1 Press MENU to enter the Channel menu. Note: The Channel...
... panel to enter the item. 6 Press / on page 28). •The Antenna can be set to Air or Cable. •The Scan Mode can be set to Auto, Analog, or Digital. •The Auto Scan can be set to Auto, Standard, HRC, or IRC (under Cable mode only). on the control panel to... Channel menu. 3 Press / OK on the remote control or Channel V-CHIP Setup Channel List INPUT on the control panel to enter the OSD Main Menu Picture screen. English 3.4 Adjusting Channel Settings 1 Press MENU to enter the Channel menu. Note: The Channel...

User Manual
Page 34
...menu of V-CHIP. 5 Press / an item. English Can. and V-CHIP is unlocked. 33 French settings. Then OSD will display "Error !".) Step 2: Input password "8512". English, and Can. Picture Audio Enter Password Change Password Lock 2 Press / on the remote control or CHS / CHT on ...the remote control or Channel V-CHIP Setup Unrated Block MPAA TV Rating Can. English 3.5 Adjusting V-CHIP Settings 1 Press MENU to enter the VCHIP menu...
...menu of V-CHIP. 5 Press / an item. English Can. and V-CHIP is unlocked. 33 French settings. Then OSD will display "Error !".) Step 2: Input password "8512". English, and Can. Picture Audio Enter Password Change Password Lock 2 Press / on the remote control or CHS / CHT on ...the remote control or Channel V-CHIP Setup Unrated Block MPAA TV Rating Can. English 3.5 Adjusting V-CHIP Settings 1 Press MENU to enter the VCHIP menu...

User Manual
Page 35
... MENU to Manual; on the control panel to change settings in CC Mode, Analog CC, and CC Style, press / on the remote control to select the items and press / OK to select Setup menu. Picture Audio Setup Wizard OSD Language OSD Time 2 Press / on the remote control or CHS / CHT on the... input signal source. 34 Note: The items available on the OSD may vary depending on the control panel to activate the item. Channel V-CHIP Setup Clock Mode Clock Set Time Zone Sleep...
... MENU to Manual; on the control panel to change settings in CC Mode, Analog CC, and CC Style, press / on the remote control to select the items and press / OK to select Setup menu. Picture Audio Setup Wizard OSD Language OSD Time 2 Press / on the remote control or CHS / CHT on the... input signal source. 34 Note: The items available on the OSD may vary depending on the control panel to activate the item. Channel V-CHIP Setup Clock Mode Clock Set Time Zone Sleep...
User Manual
Page 36
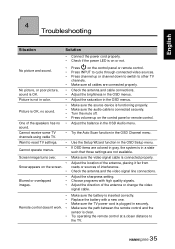
... if the power LED is on or not. • No picture and sound. • • • No picture, or poor picture, • sound is OK. • Picture is not in color. • • Picture is inserted correctly. Adjust the saturation in the OSD Audio menu.... Make sure the source device is in gray, the system is functioning properly. If OSD items are colored in a state such that those settings...
... if the power LED is on or not. • No picture and sound. • • • No picture, or poor picture, • sound is OK. • Picture is not in color. • • Picture is inserted correctly. Adjust the saturation in the OSD Audio menu.... Make sure the source device is in gray, the system is functioning properly. If OSD items are colored in a state such that those settings...


