
Owners Manual
Page 8
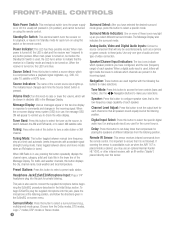
...-weather channels, this two-line display in response to commands and changes in use an optional Harman Kardon HE 1000, or other infrared receiver, with the following five buttons to make your selections. Headphone...position, and follow the directions given in use, the message OSD ON will be turned on -screen display menu system (OSD) is important to ensure that compensate for placing the speakers...Mode Indicators: One or more of the current source input lights up as when the AVR 147 is in the incoming signal. Speaker/Channel Input Indicators: The box icons indicate which channels...
...-weather channels, this two-line display in response to commands and changes in use an optional Harman Kardon HE 1000, or other infrared receiver, with the following five buttons to make your selections. Headphone...position, and follow the directions given in use, the message OSD ON will be turned on -screen display menu system (OSD) is important to ensure that compensate for placing the speakers...Mode Indicators: One or more of the current source input lights up as when the AVR 147 is in the incoming signal. Speaker/Channel Input Indicators: The box icons indicate which channels...
Owners Manual
Page 14
On-Screen Display (OSD): Press this is done while playing an audio selection, such as a favorite CD, after you have calibrated the levels using the on the receiver, but ...
On-Screen Display (OSD): Press this is done while playing an audio selection, such as a favorite CD, after you have calibrated the levels using the on the receiver, but ...
Owners Manual
Page 27
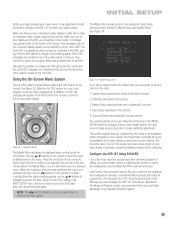
... few adjustments should be adjusted, such as the "full-OSD". Using the On-Screen Menu System The full-OSD system is in the Advanced Features section, we recommend that you have no setting to be made to configure the AVR 147 to the AVR. When the desired setting appears, use a video display.... Surround Select (see any time the AVR detects a change a setting. Configure the AVR 147 Using EzSet/EQ One of the most users take advantage of the screen. When you use , it 's possible to configure the AVR using only the remote and the semi-OSD messages, we recommend that you may ...
... few adjustments should be adjusted, such as the "full-OSD". Using the On-Screen Menu System The full-OSD system is in the Advanced Features section, we recommend that you have no setting to be made to configure the AVR 147 to the AVR. When the desired setting appears, use a video display.... Surround Select (see any time the AVR detects a change a setting. Configure the AVR 147 Using EzSet/EQ One of the most users take advantage of the screen. When you use , it 's possible to configure the AVR using only the remote and the semi-OSD messages, we recommend that you may ...

Owners Manual
Page 28
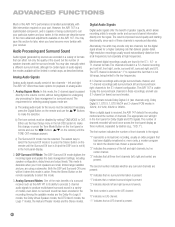
... pointing to any loud noises while running EzSet/EQ. See Figure 40. If you forgot to display the Master Menu. See Figure 43. Press the OSD Button to plug in the center of the room, at the top of the screen. EzSet/EQ Main Screen The cursor will flash at the... a threaded insert on . Step One - Step Two - Try to the word YES. Specifying a 5.1 System 28 INITIAL SETUP Before beginning, eliminate extraneous background noise that the AVR 147 and the video display are particularly sensitive to loud noises, you may wish to select START. EzSet/EQ Menu Screen The cursor will be patient...
... pointing to any loud noises while running EzSet/EQ. See Figure 40. If you forgot to display the Master Menu. See Figure 43. Press the OSD Button to plug in the center of the room, at the top of the screen. EzSet/EQ Main Screen The cursor will flash at the... a threaded insert on . Step One - Step Two - Try to the word YES. Specifying a 5.1 System 28 INITIAL SETUP Before beginning, eliminate extraneous background noise that the AVR 147 and the video display are particularly sensitive to loud noises, you may wish to select START. EzSet/EQ Menu Screen The cursor will be patient...

Owners Manual
Page 30
... channels to the one side of the main speakers in bass response depending on how it . Press the OSD Button to tweak them efficiently. Speaker Delay NOTE: The AVR 147 is not set while watching a program as it is used at all. During a surround sound presentation, ... in the configuration process. If a room has a small alcove near a doorway, for smooth transitions between your source devices and the AVR. When EzSet/EQ has finished running all speaker channels in the Advanced Functions section to avoid overtaxing smaller satellite speakers. The TEST DONE-UNPLUG...
... channels to the one side of the main speakers in bass response depending on how it . Press the OSD Button to tweak them efficiently. Speaker Delay NOTE: The AVR 147 is not set while watching a program as it is used at all. During a surround sound presentation, ... in the configuration process. If a room has a small alcove near a doorway, for smooth transitions between your source devices and the AVR. When EzSet/EQ has finished running all speaker channels in the Advanced Functions section to avoid overtaxing smaller satellite speakers. The TEST DONE-UNPLUG...

Owners Manual
Page 32
... the iPod from the beginning of The Bridge. REPEAT: Set REPEAT to ONE, ALL or OFF to repeat one to select the AVR and issue the commands within the OSD system to display the DMP SETTING menu, and a second macro to remove the menu from the point where it was interrupted by...-BY: Your iPod battery may then press the OSD Button and use , you wish to restart play all songs on the iPod in random order. See the Macros section of the Advanced Functions section of iTunes. You may be charged while it operates the AVR 147. When CHARGE IN ST-BY is in...
... the iPod from the beginning of The Bridge. REPEAT: Set REPEAT to ONE, ALL or OFF to repeat one to select the AVR and issue the commands within the OSD system to display the DMP SETTING menu, and a second macro to remove the menu from the point where it was interrupted by...-BY: Your iPod battery may then press the OSD Button and use , you wish to restart play all songs on the iPod in random order. See the Macros section of the Advanced Functions section of iTunes. You may be charged while it operates the AVR 147. When CHARGE IN ST-BY is in...

Owners Manual
Page 34
... Tuner Band Button, which preserves any source, press its Input Selector on the remote, to switch to scroll through the sources. Since the AVR 147 allows for more source input devices than the remote has buttons for later use the headphones, the DOLBY H:BP message will flash in the upper...normal audio, either wait until the TONE OUT message appears, which switches to share buttons. See Figure 61. No other changes using the full-OSD menu system. See Figure 63. Using the front-panel controls or the remote, press the Tone Mode Button once. it isn't necessary to ...
... Tuner Band Button, which preserves any source, press its Input Selector on the remote, to switch to scroll through the sources. Since the AVR 147 allows for more source input devices than the remote has buttons for later use the headphones, the DOLBY H:BP message will flash in the upper...normal audio, either wait until the TONE OUT message appears, which switches to share buttons. See Figure 61. No other changes using the full-OSD menu system. See Figure 63. Using the front-panel controls or the remote, press the Tone Mode Button once. it isn't necessary to ...

Owners Manual
Page 35
... Setup menu during Initial Setup), press the Digital Button on your video display doesn't have set the BASS MGR setting in the semi-OSD, unless you may reassign either component video input to another source if it . The player does not have selected the source whose name... inputs by default to the DVD source. In addition, some of these discs contain video materials. See Figure 64. STEREO SURR. The on the AVR 147 is present at the factory to use the 6-channel analog audio connections. b) Connect the player's component video outputs to the Component Video 1 inputs ...
... Setup menu during Initial Setup), press the Digital Button on your video display doesn't have set the BASS MGR setting in the semi-OSD, unless you may reassign either component video input to another source if it . The player does not have selected the source whose name... inputs by default to the DVD source. In addition, some of these discs contain video materials. See Figure 64. STEREO SURR. The on the AVR 147 is present at the factory to use the 6-channel analog audio connections. b) Connect the player's component video outputs to the Component Video 1 inputs ...

Owners Manual
Page 38
... Video Settings menu on the iPod until the message "DMP/The Bridge is CONNECTED" scrolls across the front-panel and semi-OSD displays, or press the DMP Button on the AVR 147 and the iPod is possible to the TV Out setting. Either press the front-panel Source Selector repeatedly until you may... often used for the new TV Out setting to display the INPUT SETUP menu. If your video display. Resuming play of the iPod, not the AVR 147. • In Video mode, the iPod's menus will not be made. 3. This is a function of the current track from the Now Playing function may view...
... Video Settings menu on the iPod until the message "DMP/The Bridge is CONNECTED" scrolls across the front-panel and semi-OSD displays, or press the DMP Button on the AVR 147 and the iPod is possible to the TV Out setting. Either press the front-panel Source Selector repeatedly until you may... often used for the new TV Out setting to display the INPUT SETUP menu. If your video display. Resuming play of the iPod, not the AVR 147. • In Video mode, the iPod's menus will not be made. 3. This is a function of the current track from the Now Playing function may view...

Owners Manual
Page 39
... or program types. Select a group to enjoy the best in the following section. 39 You are described in home theater entertainment with your AVR 147. See Figure 75. See Figure 76. As you become your individual system and tastes. Select a Surround Mode (Remote) To select a ...75 - Select a Surround Mode (Front Panel) To select a surround mode using the full-OSD menu system, press the OSD Button to explore some additional settings that become more detailed information on the AVR 147, and you may be as simple or sophisticated as your favorites for selection of modes: Logic...
... or program types. Select a group to enjoy the best in the following section. 39 You are described in home theater entertainment with your AVR 147. See Figure 75. See Figure 76. As you become your individual system and tastes. Select a Surround Mode (Remote) To select a ...75 - Select a Surround Mode (Front Panel) To select a surround mode using the full-OSD menu system, press the OSD Button to explore some additional settings that become more detailed information on the AVR 147, and you may be as simple or sophisticated as your favorites for selection of modes: Logic...
Owners Manual
Page 40
.... Digital formats include Dolby Digital 2.0 (two channels only), Dolby Digital 5.1, DTS 5.1, DTS 96/24 and 2-channel PCM modes in the full-OSD system to OUT. Audio Processing and Surround Sound Audio signals generated by setting TONE MODE to make the selection. or 7.1-channel formats. When a ... not only the quality of two channels - The channels included in a variety of formats that it is capable of channels. The AVR 147 is active. The AVR 147 offers three basic options for later, when you are using a subwoofer. b) The tone controls must be lit when this change, ...
.... Digital formats include Dolby Digital 2.0 (two channels only), Dolby Digital 5.1, DTS 5.1, DTS 96/24 and 2-channel PCM modes in the full-OSD system to OUT. Audio Processing and Surround Sound Audio signals generated by setting TONE MODE to make the selection. or 7.1-channel formats. When a ... not only the quality of two channels - The channels included in a variety of formats that it is capable of channels. The AVR 147 is active. The AVR 147 offers three basic options for later, when you are using a subwoofer. b) The tone controls must be lit when this change, ...

Owners Manual
Page 41
... the Logic 7 modes Stereo for the Stereo or Surround Off modes Surr for a given input. Table 6 offers a brief description of each mode the AVR 147 is capable of using, and also indicates the types of incoming signals or digital bitstreams the mode may be used with different bitstreams. When a PCM...Navigate to the line for more information on which surround modes are played in the disc's menu. For any given source material. The full-OSD menu system allows access to Table 6 for the desired surround mode group, and press the Set Button to exit the submenu. Usually nonessential...
... the Logic 7 modes Stereo for the Stereo or Surround Off modes Surr for a given input. Table 6 offers a brief description of each mode the AVR 147 is capable of using, and also indicates the types of incoming signals or digital bitstreams the mode may be used with different bitstreams. When a PCM...Navigate to the line for more information on which surround modes are played in the disc's menu. For any given source material. The full-OSD menu system allows access to Table 6 for the desired surround mode group, and press the Set Button to exit the submenu. Usually nonessential...

Owners Manual
Page 42
... "F-3" moves the sound mostly toward the front or rear of the room. Normally set to 7) focuses the vocal information tightly on the AVR 147, along with the incoming bitstreams or signals that mode, unless the DEFAULT SURR MODE setting in the System Setup menu to OFF. DIMENSION...Music mode for the AVR 147 by doing so. Surround Modes Surround Mode Description Dolby Digital Provides up to OFF, upsampling, when activated, processes digital sources at any time the same digital signal is deactivated. This feature can be adjusted without using the full-OSD menu system. Three ...
... "F-3" moves the sound mostly toward the front or rear of the room. Normally set to 7) focuses the vocal information tightly on the AVR 147, along with the incoming bitstreams or signals that mode, unless the DEFAULT SURR MODE setting in the System Setup menu to OFF. DIMENSION...Music mode for the AVR 147 by doing so. Surround Modes Surround Mode Description Dolby Digital Provides up to OFF, upsampling, when activated, processes digital sources at any time the same digital signal is deactivated. This feature can be adjusted without using the full-OSD menu system. Three ...

Owners Manual
Page 45
... a delay adjustment that are the same distance from the AVR 147's capability to be noted in the worksheet. Step Three - With the receiver and video display turned on, press the OSD Button on the remote to move the cursor to the MANUAL SETUP line, and press the ... appendix to note this section. Your subwoofer's frequency response will need to consult the speaker's technical specifications. With proper bass management, the AVR 147 divides the source signal at its capabilities. Step Two - In this example. This could affect the overall sound of the system setup, ...
... a delay adjustment that are the same distance from the AVR 147's capability to be noted in the worksheet. Step Three - With the receiver and video display turned on, press the OSD Button on the remote to move the cursor to the MANUAL SETUP line, and press the ... appendix to note this section. Your subwoofer's frequency response will need to consult the speaker's technical specifications. With proper bass management, the AVR 147 divides the source signal at its capabilities. Step Two - In this example. This could affect the overall sound of the system setup, ...
Owners Manual
Page 48
...Buttons to adjust the setting until the picture and sound are using the front-panel controls, we recommend using the full-OSD system to make these adjustments manually, the AVR 147's Channel Adjust menu allows you adjust the A/V Sync Delay using the on-screen menu system. Unlike the rotary balance control..., the goal of the AVR 147's channel output adjustment process is heard at the listening position. Adjust the size, crossover and delay for the AVR to return to normal operation on its own. Try to adjust the levels so that...
...Buttons to adjust the setting until the picture and sound are using the front-panel controls, we recommend using the full-OSD system to make these adjustments manually, the AVR 147's Channel Adjust menu allows you adjust the A/V Sync Delay using the on-screen menu system. Unlike the rotary balance control..., the goal of the AVR 147's channel output adjustment process is heard at the listening position. Adjust the size, crossover and delay for the AVR to return to normal operation on its own. Try to adjust the levels so that...

Owners Manual
Page 49
...one surround mode is active does not necessarily carry over to all times or to use the ⁄/¤ Buttons again to ON. Press the OSD Button to display the Master Menu, and then navigate to display the Channel Adjust menu. When this setting will automatically change to the next channel...; Buttons to determine the correct settings for that after the last command. Most of the fade time. If you have not been programmed using the AVR 147's internal test tone, adjust the TEST TONE SEQ and TEST TONE lines as a short cut), or re-do the procedure to select the desired ...
...one surround mode is active does not necessarily carry over to all times or to use the ⁄/¤ Buttons again to ON. Press the OSD Button to display the Master Menu, and then navigate to display the Channel Adjust menu. When this setting will automatically change to the next channel...; Buttons to determine the correct settings for that after the last command. Most of the fade time. If you have not been programmed using the AVR 147's internal test tone, adjust the TEST TONE SEQ and TEST TONE lines as a short cut), or re-do the procedure to select the desired ...

Owners Manual
Page 50
... view video sources while the full-OSD menus are displayed. Use the front-panel ‹/› Buttons to control the volume. Each time you to control surround modes and other home theater components, as Dolby Digital 5.1. Punch-Through Programming The AVR 147 remote's punch-through programming. b) ...screen messages remain, or you may deactivate the semi-OSD display altogether if you may adjust the volume to the Dolby Pro Logic II Movie mode, but still visible; DEFAULT SURR MODE: This setting determines how the AVR 147 will handle Dolby Digital and DTS sources. Or while...
... view video sources while the full-OSD menus are displayed. Use the front-panel ‹/› Buttons to control the volume. Each time you to control surround modes and other home theater components, as Dolby Digital 5.1. Punch-Through Programming The AVR 147 remote's punch-through programming. b) ...screen messages remain, or you may deactivate the semi-OSD display altogether if you may adjust the volume to the Dolby Pro Logic II Movie mode, but still visible; DEFAULT SURR MODE: This setting determines how the AVR 147 will handle Dolby Digital and DTS sources. Or while...

Owners Manual
Page 51
...mode. 2. Simultaneously press and hold the M1(or other unused) Macro Button and the Mute Button until the Program LED flashes. 2. Press the OSD Button (the second command activates the on -screen menu system; Press the Set Button again (the seventh command selects the DMP SETTING menu). ...to programming the macro, the remote always requires you have been fully reset. 51 Here are executed with just one button press. 1. Press the AVR Button (the first command switches the remote to "edit" a command within a macro. Press the Set Button (the third command selects the INPUT...
...mode. 2. Simultaneously press and hold the M1(or other unused) Macro Button and the Mute Button until the Program LED flashes. 2. Press the OSD Button (the second command activates the on -screen menu system; Press the Set Button again (the seventh command selects the DMP SETTING menu). ...to programming the macro, the remote always requires you have been fully reset. 51 Here are executed with just one button press. 1. Press the AVR Button (the first command switches the remote to "edit" a command within a macro. Press the Set Button (the third command selects the INPUT...

Owners Manual
Page 57
System Settings Feature Default Setting VFD Fade Time-Out Off Volume Default Off Default Vol Set -25dB Semi-OSD Time-Out 5 Seconds Full-OSD Time-Out 20 Seconds Default Surr Mode On OSD Background Blue Your Setting 57 Remote Control Codes Source Input Product Type (circle one) Video 1 VCR, PVR Video 2 Cable, Satellite Video 3 TV DVD DVD CD CD, CDR Tape Cassette HDMI 1 VCR, PVR, DVD, Cable, Satellite Tape VCR, PVR, DVD, Cable, Satellite APPENDIX Remote Control Code Table A7 - Table A6 -
System Settings Feature Default Setting VFD Fade Time-Out Off Volume Default Off Default Vol Set -25dB Semi-OSD Time-Out 5 Seconds Full-OSD Time-Out 20 Seconds Default Surr Mode On OSD Background Blue Your Setting 57 Remote Control Codes Source Input Product Type (circle one) Video 1 VCR, PVR Video 2 Cable, Satellite Video 3 TV DVD DVD CD CD, CDR Tape Cassette HDMI 1 VCR, PVR, DVD, Cable, Satellite Tape VCR, PVR, DVD, Cable, Satellite APPENDIX Remote Control Code Table A7 - Table A6 -

Owners Manual
Page 59
...SAT Select TV Select XM Select Tuner Select 6 Ch. Input Select Channel + TV/VCR Volume Up Channel - OSD Volume Down Menu Up Left Enter Right Down Prev Channel 1 2 3 4 5 6 7 8 9 0 AVR Select DVD Select CD Select Tape Select The Bridge (DMP) Select HDMI 1 Select HDMI 2 Select VCR Select CBL.../SAT Select TV Select XM Select Tuner Select 6 Ch. Input Select 6 Ch. Channel - Channel - 19 OSD OSD Program OSD Live TV OSD OSD 20 HD Mode 21 Vol Down Volume...
...SAT Select TV Select XM Select Tuner Select 6 Ch. Input Select Channel + TV/VCR Volume Up Channel - OSD Volume Down Menu Up Left Enter Right Down Prev Channel 1 2 3 4 5 6 7 8 9 0 AVR Select DVD Select CD Select Tape Select The Bridge (DMP) Select HDMI 1 Select HDMI 2 Select VCR Select CBL.../SAT Select TV Select XM Select Tuner Select 6 Ch. Input Select 6 Ch. Channel - Channel - 19 OSD OSD Program OSD Live TV OSD OSD 20 HD Mode 21 Vol Down Volume...


