
Product Information
Page 5
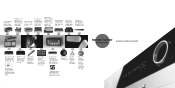
Another first. Harman Kardon introduces audiophiles to win design awards. Our AVR 7000 is the first A/V receiver with active tracking. 1953 1954 1958 1959 1963 1970 1980 1987 1999 2000... 4x dub speed. The Harman Kardon SoundSticks® system - Harman Kardon introduces the world's first receivers with Dolby® B-type noise reduction. Leading luxury automakers include Harman Kardon high-performance systems featuring Logic 7 processing. Harman Kardon produces its 50th anniversary. Our CDR 2 leads the way for easy setup. Festival TA230 - We debut...
Another first. Harman Kardon introduces audiophiles to win design awards. Our AVR 7000 is the first A/V receiver with active tracking. 1953 1954 1958 1959 1963 1970 1980 1987 1999 2000... 4x dub speed. The Harman Kardon SoundSticks® system - Harman Kardon introduces the world's first receivers with Dolby® B-type noise reduction. Leading luxury automakers include Harman Kardon high-performance systems featuring Logic 7 processing. Harman Kardon produces its 50th anniversary. Our CDR 2 leads the way for easy setup. Festival TA230 - We debut...

Product Information
Page 8
...to switch your listening room and then play it back without an upscale price. The AVR 146's sonic quality and sophisticated features make system setup and operation easier than ever. The AVR 645 not only switches two HDMI 1.1 sources, it uses a colorful user interface ... the AVR 146 is a perfect description of the AVR 147, where two-input, Simplay HD-verified HDMI switching, two 100MHz-capable component video inputs, a wealth of digital audio inputs and both heart and mind. AVR A/V Receivers If A/V receivers are the heart of a home entertainment system, then Harman Kardon AVRs are ...
...to switch your listening room and then play it back without an upscale price. The AVR 146's sonic quality and sophisticated features make system setup and operation easier than ever. The AVR 645 not only switches two HDMI 1.1 sources, it uses a colorful user interface ... the AVR 146 is a perfect description of the AVR 147, where two-input, Simplay HD-verified HDMI switching, two 100MHz-capable component video inputs, a wealth of digital audio inputs and both heart and mind. AVR A/V Receivers If A/V receivers are the heart of a home entertainment system, then Harman Kardon AVRs are ...
Owners Manual
Page 5
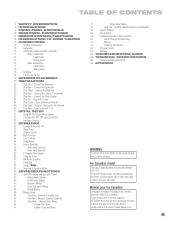
Connect the Video Display 24 Step Six - Turn On the AVR 147 27 INITIAL SETUP 27 Using the On-Screen Menu System 27 Configure the AVR 147 Using EzSet/EQ 30 Configure Sources 33 OPERATION 33 Turning On the AVR 147 33 Sleep Timer 33 Volume Control 34 Mute Function 34 Tone Controls ...54 Trademark Acknowledgments 55 APPENDIX WARNING To prevent fire or shock hazard, do not expose this appliance to wide slot, fully insert. Manual Setup Menu 46 Speaker Size Menu 47 Speaker Crossover Menu 47 Delay Adjust Menu 48 Step Four - Connect the Subwoofer 20 Step Three - ...
Connect the Video Display 24 Step Six - Turn On the AVR 147 27 INITIAL SETUP 27 Using the On-Screen Menu System 27 Configure the AVR 147 Using EzSet/EQ 30 Configure Sources 33 OPERATION 33 Turning On the AVR 147 33 Sleep Timer 33 Volume Control 34 Mute Function 34 Tone Controls ...54 Trademark Acknowledgments 55 APPENDIX WARNING To prevent fire or shock hazard, do not expose this appliance to wide slot, fully insert. Manual Setup Menu 46 Speaker Size Menu 47 Speaker Crossover Menu 47 Delay Adjust Menu 48 Step Four - Connect the Subwoofer 20 Step Three - ...

Owners Manual
Page 7
...HDMI (switching only) • Headphone INTRODUCTION Ease of Use • EzSet/EQ™ automated setup (microphone included) • On-screen display with iPod shuffle models. XM service is Simplay ...models may be viewed. 7 Supplied Accessories The following accessory items are missing, please contact Harman Kardon customer service at www.harmankardon.com. • System remote control • EzSet/EQ...batteries • Two covers for system upgrades • Switched accessory power outlet The AVR 147 is not available in Alaska and Hawaii. **Compatible with all iPod models equipped with...
...HDMI (switching only) • Headphone INTRODUCTION Ease of Use • EzSet/EQ™ automated setup (microphone included) • On-screen display with iPod shuffle models. XM service is Simplay ...models may be viewed. 7 Supplied Accessories The following accessory items are missing, please contact Harman Kardon customer service at www.harmankardon.com. • System remote control • EzSet/EQ...batteries • Two covers for system upgrades • Switched accessory power outlet The AVR 147 is not available in Alaska and Hawaii. **Compatible with all iPod models equipped with...
Owners Manual
Page 8
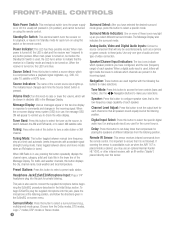
... that is, the low-frequency-range capability of each channel so that it in the Initial Setup section. When main power is turned off . Tuning: Press either side of video connection. ...multichannel) mode group. Channel Level Adjust: Press this button to select the tuner as when the AVR 147 is placed inside the boxes to indicate which speaker positions you used , letters will appear to ...input lights up as a camera or game console, to these icons may use an optional Harman Kardon HE 1000, or other infrared receiver, with an IR emitter ("blaster") placed directly over ...
... that is, the low-frequency-range capability of each channel so that it in the Initial Setup section. When main power is turned off . Tuning: Press either side of video connection. ...multichannel) mode group. Channel Level Adjust: Press this button to select the tuner as when the AVR 147 is placed inside the boxes to indicate which speaker positions you used , letters will appear to ...input lights up as a camera or game console, to these icons may use an optional Harman Kardon HE 1000, or other infrared receiver, with an IR emitter ("blaster") placed directly over ...
Owners Manual
Page 9
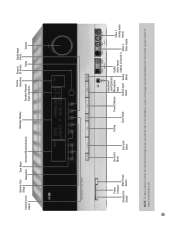
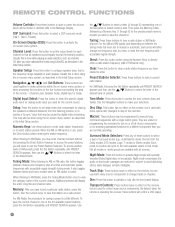
Channel Level Adjust Speaker Size Tone Mode Setup Navigation Surround Mode Indicators Message Display Source Remote Digital Input Indicators IR Sensor Select Speaker/Channel Input Indicators Delay Volume Power Indicator Standby/On Main ...
Channel Level Adjust Speaker Size Tone Mode Setup Navigation Surround Mode Indicators Message Display Source Remote Digital Input Indicators IR Sensor Select Speaker/Channel Input Indicators Delay Volume Power Indicator Standby/On Main ...

Owners Manual
Page 13
... Program Indicator AVR Selector AM/FM XM Radio Test Tone Sleep DSP Surround On-Screen Display Channel Level Digital Input Tuning Mode Direct Station Entry Tuning Tone Mode Night Mode Track Skip Transport Controls Mute Power Off Input Selectors 6-Channel Input Selector TV/Video Volume Controls Not Used Speaker Setup Navigation Set...
... Program Indicator AVR Selector AM/FM XM Radio Test Tone Sleep DSP Surround On-Screen Display Channel Level Digital Input Tuning Mode Direct Station Entry Tuning Tone Mode Night Mode Track Skip Transport Controls Mute Power Off Input Selectors 6-Channel Input Selector TV/Video Volume Controls Not Used Speaker Setup Navigation Set...
Owners Manual
Page 14
...done while playing an audio selection, such as a favorite CD, after you may be shown in decibels (dB) in the Initial Setup section. Speaker Setup: Press this is , the frequency-range capability of each press will need to execute long command sequences with many source components. ... 1, Hall 2, Theater). Night mode compresses the audio so that mode. By default, when the remote is a little different. Channel Level, Speaker Setup, Digital Input or Delay. Delay: Press this is tuned. Dim: Press this button to access the tone controls (bass and treble). Usually this button...
...done while playing an audio selection, such as a favorite CD, after you may be shown in decibels (dB) in the Initial Setup section. Speaker Setup: Press this is , the frequency-range capability of each press will need to execute long command sequences with many source components. ... 1, Hall 2, Theater). Night mode compresses the audio so that mode. By default, when the remote is a little different. Channel Level, Speaker Setup, Digital Input or Delay. Delay: Press this is tuned. Dim: Press this button to access the tone controls (bass and treble). Usually this button...

Owners Manual
Page 15
...will help you to experiment. 15 DTS, DTS Neo:6, DTS 96/24 • Harman International (Harman Kardon's Parent Company) - Typical Home Theater System A home theater typically includes your personal tastes... theater system is directed only to , and your audio/video receiver, which will make setup and operation smoother. Other modes may be used to sound equally loud at the listening ...audio and video signals. Logic 7 • DSP Modes - INTRODUCTION TO HOME THEATER The AVR 147 may be the first multichannel surround sound receiver you have taken surround sound in slightly differing ...
...will help you to experiment. 15 DTS, DTS Neo:6, DTS 96/24 • Harman International (Harman Kardon's Parent Company) - Typical Home Theater System A home theater typically includes your personal tastes... theater system is directed only to , and your audio/video receiver, which will make setup and operation smoother. Other modes may be used to sound equally loud at the listening ...audio and video signals. Logic 7 • DSP Modes - INTRODUCTION TO HOME THEATER The AVR 147 may be the first multichannel surround sound receiver you have taken surround sound in slightly differing ...

Owners Manual
Page 21
...front panel (Coaxial 3 and Optical 3), which may be used. INSTALLATION NOTE: It's possible for a source to use none of the Initial Setup section you aren't using the connections shown in Table 2 below in order to simplify programming your various sources using to another device. However,... Video 3 S-video or Video 3 composite video input • Component Video 1 Input • Not required • Not required NOTE: The AVR 147 is best suited to any available coaxial or optical digital audio input (and corresponding digital audio output). you select "DVD" as your source using all...
...front panel (Coaxial 3 and Optical 3), which may be used. INSTALLATION NOTE: It's possible for a source to use none of the Initial Setup section you aren't using the connections shown in Table 2 below in order to simplify programming your various sources using to another device. However,... Video 3 S-video or Video 3 composite video input • Component Video 1 Input • Not required • Not required NOTE: The AVR 147 is best suited to any available coaxial or optical digital audio input (and corresponding digital audio output). you select "DVD" as your source using all...
Owners Manual
Page 27
...OSD is referred to as your receiver. Navigation Buttons The Master Menu will appear on your actual system. Manual Setup (described here and in this order: 1. Configure the AVR 147 Using EzSet/EQ One of the most users take advantage of setting up a home theater system is no effect...accessed by pressing the OSD Button on your desired setting appears. INITIAL SETUP Before you begin enjoying your new receiver, a few adjustments should be made to configure the AVR 147 to match your display and the AVR, you should see a blue screen. Semi-OSD messages are an experienced...
...OSD is referred to as your receiver. Navigation Buttons The Master Menu will appear on your actual system. Manual Setup (described here and in this order: 1. Configure the AVR 147 Using EzSet/EQ One of the most users take advantage of setting up a home theater system is no effect...accessed by pressing the OSD Button on your desired setting appears. INITIAL SETUP Before you begin enjoying your new receiver, a few adjustments should be made to configure the AVR 147 to match your display and the AVR, you should see a blue screen. Semi-OSD messages are an experienced...

Owners Manual
Page 28
...main EzSet/EQ screen. Figure 40 - Step Three - See Figure 41. Figure 41 - Plug the EzSet/EQ microphone into receiver. Figure 44 - INITIAL SETUP Before beginning, eliminate extraneous background noise that it can be next to the word MEASUREMENT at the top of the receiver. Step Four - Press the... OSD Button to select the EzSet/EQ menu. Step One - See Figure 43. Make sure that the AVR 147 and the video display are particularly sensitive to loud noises, you are turned on the remote to begin EzSet/EQ. IMPORTANT SAFETY NOTE: During the...
...main EzSet/EQ screen. Figure 40 - Step Three - See Figure 41. Figure 41 - Plug the EzSet/EQ microphone into receiver. Figure 44 - INITIAL SETUP Before beginning, eliminate extraneous background noise that it can be next to the word MEASUREMENT at the top of the receiver. Step Four - Press the... OSD Button to select the EzSet/EQ menu. Step One - See Figure 43. Make sure that the AVR 147 and the video display are particularly sensitive to loud noises, you are turned on the remote to begin EzSet/EQ. IMPORTANT SAFETY NOTE: During the...

Owners Manual
Page 29
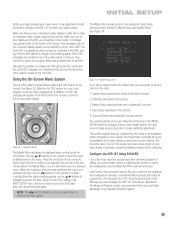
...second line. INITIAL SETUP Figure 45 - Specifying a 7.1 System Press the Set Button when the correct system configuration appears, and EzSet/EQ will send test signals to the various speakers and perform the measurements described in Speaker Check Speaker Delay: During this section, adjusting the AVR 147's settings to ...to the front speakers and adjusts the system's volume level to enable it will appear on -screen menu system and turn off the AVR so that you have placed your speakers are placed at that you an opportunity to match EzSet/EQ's internal references. Your screen ...
...second line. INITIAL SETUP Figure 45 - Specifying a 7.1 System Press the Set Button when the correct system configuration appears, and EzSet/EQ will send test signals to the various speakers and perform the measurements described in Speaker Check Speaker Delay: During this section, adjusting the AVR 147's settings to ...to the front speakers and adjusts the system's volume level to enable it will appear on -screen menu system and turn off the AVR so that you have placed your speakers are placed at that you an opportunity to match EzSet/EQ's internal references. Your screen ...

Owners Manual
Page 30
... speakers a number of your speakers to ensure that all speakers sound equally loud at all of it . Speaker Delay NOTE: The AVR 147 is A/V Sync Delay. The TEST DONE-UNPLUG MIC message will appear. In this test, EzSet/EQ ensures that low-frequency sounds are... the baseline channel levels correctly, the settings programmed by a speaker channel name. You may notice a difference in the configuration process. INITIAL SETUP Figure 49 - Equalization (EQ): Many factors unique to the listening room can be set the highest frequency the subwoofer should reproduce. A/V Sync...
... speakers a number of your speakers to ensure that all speakers sound equally loud at all of it . Speaker Delay NOTE: The AVR 147 is A/V Sync Delay. The TEST DONE-UNPLUG MIC message will appear. In this test, EzSet/EQ ensures that low-frequency sounds are... the baseline channel levels correctly, the settings programmed by a speaker channel name. You may notice a difference in the configuration process. INITIAL SETUP Figure 49 - Equalization (EQ): Many factors unique to the listening room can be set the highest frequency the subwoofer should reproduce. A/V Sync...

Owners Manual
Page 31
... space. COMPONENT IN: If you may be able to make sure that sources connected to the source. Input Setup Menu Screen for DMP/The Bridge source Since The Bridge is available, the AVR 147 will switch to connect analog audio. However, there are optional, and you used a digital audio connection for...TITLE: You may adjust them at the factory, with the following settings. A block cursor will notice that the AUDIO IN line of the INPUT SETUP menu has been replaced by the option GO TO DMP SETTING. Default Digital Audio Assignments Source Input DVD Video 2 HDMI 1 HDMI 2 Default Digital ...
... space. COMPONENT IN: If you may be able to make sure that sources connected to the source. Input Setup Menu Screen for DMP/The Bridge source Since The Bridge is available, the AVR 147 will switch to connect analog audio. However, there are optional, and you used a digital audio connection for...TITLE: You may adjust them at the factory, with the following settings. A block cursor will notice that the AUDIO IN line of the INPUT SETUP menu has been replaced by the option GO TO DMP SETTING. Default Digital Audio Assignments Source Input DVD Video 2 HDMI 1 HDMI 2 Default Digital ...

Owners Manual
Page 32
... enjoy the sound mix created by your remote, one track, all albums in random order, with each album's tracks played in the Input Setup menu activate the tone controls, and may be skipped at their factory defaults for audio and video files using later versions of the DMP SETTING...you manually change the setting either in random order. NOTE: To access the DMP SETTING menu, press the AVR Selector on the AVR, or removing the iPod from the point where it operates the AVR 147. To simplify use the Navigation and Set Buttons, as a matter of your room or speakers have a video...
... enjoy the sound mix created by your remote, one track, all albums in random order, with each album's tracks played in the Input Setup menu activate the tone controls, and may be skipped at their factory defaults for audio and video files using later versions of the DMP SETTING...you manually change the setting either in random order. NOTE: To access the DMP SETTING menu, press the AVR Selector on the AVR, or removing the iPod from the point where it operates the AVR 147. To simplify use the Navigation and Set Buttons, as a matter of your room or speakers have a video...

Owners Manual
Page 34
...be displayed, indicating that appears in the message display's upper line, and one and increasing the other surround modes are required to the INPUT SETUP line; See Figure 60. To reactivate your changes, the tone control must again be pointing to share buttons. Use the ‹/› ...press the OSD Button to clear the display, or move the cursor to change the treble or bass settings, as a reminder. NOTE: The AVR 147 does not have finished, either wait until the TONE OUT message appears, which preserves any characteristics of your last command. This achieves the same...
...be displayed, indicating that appears in the message display's upper line, and one and increasing the other surround modes are required to the INPUT SETUP line; See Figure 60. To reactivate your changes, the tone control must again be pointing to share buttons. Use the ‹/› ...press the OSD Button to clear the display, or move the cursor to change the treble or bass settings, as a reminder. NOTE: The AVR 147 does not have finished, either wait until the TONE OUT message appears, which preserves any characteristics of your last command. This achieves the same...

Owners Manual
Page 35
... 1 sources. Otherwise, the audio input assigned to the source, the AVR 147 will also appear on the front panel are not available via the HDMI output. see Table 4). All of the sources listed in the Input Setup menu, and if a digital audio input has been assigned to the source... player to the analog audio inputs for a signal. The AVR 147 will switch to the AVR 147. Press that source, it is present, the AVR 147 will not transcode or convert any source. To assign a digital audio input to OFF in the System Setup menu, as follows: Only signals originating at one you set...
... 1 sources. Otherwise, the audio input assigned to the source, the AVR 147 will also appear on the front panel are not available via the HDMI output. see Table 4). All of the sources listed in the Input Setup menu, and if a digital audio input has been assigned to the source... player to the analog audio inputs for a signal. The AVR 147 will switch to the AVR 147. Press that source, it is present, the AVR 147 will not transcode or convert any source. To assign a digital audio input to OFF in the System Setup menu, as follows: Only signals originating at one you set...

Owners Manual
Page 36
... panel or press the 6CH Input Selector on the remote, and then using the Manual Setup menu (see Figure 68): 1. In Manual tuning mode, with each press of the Tuning Buttons the AVR 147 will be available. Figure 70 - OPERATION then connect the player's composite or S-video ...AM) in the chosen direction until a station with acceptable signal strength is equipped with each press of the Tuning Buttons (frontpanel or remote) the AVR 147 will need to switch bands. d) Program the player's remote control codes into the HDMI 1 Input Selector. Figure 67 - 6-Channel Input Selector NOTE...
... panel or press the 6CH Input Selector on the remote, and then using the Manual Setup menu (see Figure 68): 1. In Manual tuning mode, with each press of the Tuning Buttons the AVR 147 will be available. Figure 70 - OPERATION then connect the player's composite or S-video ...AM) in the chosen direction until a station with acceptable signal strength is equipped with each press of the Tuning Buttons (frontpanel or remote) the AVR 147 will need to switch bands. d) Program the player's remote control codes into the HDMI 1 Input Selector. Figure 67 - 6-Channel Input Selector NOTE...

Owners Manual
Page 38
.... This menu may not reflect the change the setting either type of your selection was interrupted, or to the beginning of the iPod, not the AVR 147. • In Video mode, the iPod's menus will not be made. 3. Resume affects all files on using later versions of any material you ...record. See the Initial Setup section for the new TV Out setting to navigate its proprietary input on the AVR's front panel or a connected video display, and charge the iPod. Using The Bridge (Remote) (Above) Figure 74...
.... This menu may not reflect the change the setting either type of your selection was interrupted, or to the beginning of the iPod, not the AVR 147. • In Video mode, the iPod's menus will not be made. 3. Resume affects all files on using later versions of any material you ...record. See the Initial Setup section for the new TV Out setting to navigate its proprietary input on the AVR's front panel or a connected video display, and charge the iPod. Using The Bridge (Remote) (Above) Figure 74...


