
Owners Manual
Page 5
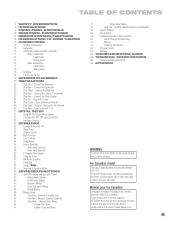
... or moisture. Connect the Source Components 23 Step Five - Connect the Video Display 24 Step Six - Setting Channel Output Levels Manually 49 System Settings 50 Dim Function 50 Advanced Remote Control Functions 50 Punch-Through Programming 51 Macros 51 Resetting the Remote 52 Processor...Connect the Antennas 20 Step Four - Turn On the AVR 147 27 INITIAL SETUP 27 Using the On-Screen Menu System 27 Configure the AVR 147 Using EzSet/EQ 30 Configure Sources 33 OPERATION 33 Turning On the AVR 147 33 Sleep Timer 33 Volume Control 34 Mute Function 34 ...
... or moisture. Connect the Source Components 23 Step Five - Connect the Video Display 24 Step Six - Setting Channel Output Levels Manually 49 System Settings 50 Dim Function 50 Advanced Remote Control Functions 50 Punch-Through Programming 51 Macros 51 Resetting the Remote 52 Processor...Connect the Antennas 20 Step Four - Turn On the AVR 147 27 INITIAL SETUP 27 Using the On-Screen Menu System 27 Configure the AVR 147 Using EzSet/EQ 30 Configure Sources 33 OPERATION 33 Turning On the AVR 147 33 Sleep Timer 33 Volume Control 34 Mute Function 34 ...
Owners Manual
Page 6
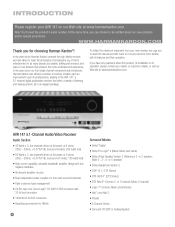
...first single-channel component was introduced, Harman Kardon has offered a number of receiver models, each an improvement upon its features and their operation. WWW.HARMANKARDON.COM Thank you can choose to be notified about this manual and refer back to the AVR 147, a 5.1-channel digital audio/video... receiver that offers a wealth of -use features that enhance the home entertainment experience. In the years since Harman Kardon invented the high-fidelity receiver, we urge ...
...first single-channel component was introduced, Harman Kardon has offered a number of receiver models, each an improvement upon its features and their operation. WWW.HARMANKARDON.COM Thank you can choose to be notified about this manual and refer back to the AVR 147, a 5.1-channel digital audio/video... receiver that offers a wealth of -use features that enhance the home entertainment experience. In the years since Harman Kardon invented the high-fidelity receiver, we urge ...
Owners Manual
Page 8
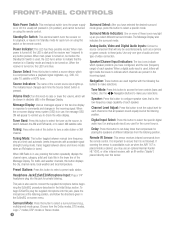
... turned off . Source Select: Press this sensor. Tuning Mode: This button toggles between manual (one type of audio and one frequency step at the listening position. To begin EzSet...configured, and the size (frequency range) of the current source input lights up as when the AVR 147 is turned on, the LED turns blue. Headphone Jack/EzSet/EQ Microphone Input: Plug a ... this button repeatedly displays the channel name, category, artist and track title in use an optional Harman Kardon HE 1000, or other infrared receiver, with acceptable signal strength) tuning mode. It is tuned....
... turned off . Source Select: Press this sensor. Tuning Mode: This button toggles between manual (one type of audio and one frequency step at the listening position. To begin EzSet...configured, and the size (frequency range) of the current source input lights up as when the AVR 147 is turned on, the LED turns blue. Headphone Jack/EzSet/EQ Microphone Input: Plug a ... this button repeatedly displays the channel name, category, artist and track title in use an optional Harman Kardon HE 1000, or other infrared receiver, with acceptable signal strength) tuning mode. It is tuned....
Owners Manual
Page 9
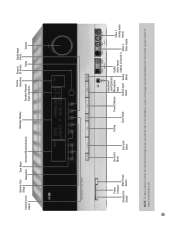
... (Optical 3/Coaxial 3) Source Input Tuning Video 3 Video 3 Analog Audio Inputs Select Mode Video Inputs NOTE: To make it easier to follow the instructions throughout the manual that refer to this illustration, a copy of this page may be downloaded from the Product Support section at www.harmankardon.com. 9
... (Optical 3/Coaxial 3) Source Input Tuning Video 3 Video 3 Analog Audio Inputs Select Mode Video Inputs NOTE: To make it easier to follow the instructions throughout the manual that refer to this illustration, a copy of this page may be downloaded from the Product Support section at www.harmankardon.com. 9

Owners Manual
Page 11
... Audio Output Coaxial Digital Switched AC Audio Output Accessory Outlet Optical Digital Audio Inputs (1 & 2) NOTE: To make it easier to follow the instructions throughout the manual that refer to this illustration, a copy of this page may be downloaded from the Product Support section at www.harmankardon.com. 11
... Audio Output Coaxial Digital Switched AC Audio Output Accessory Outlet Optical Digital Audio Inputs (1 & 2) NOTE: To make it easier to follow the instructions throughout the manual that refer to this illustration, a copy of this page may be downloaded from the Product Support section at www.harmankardon.com. 11

Owners Manual
Page 12
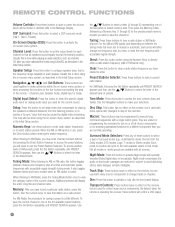
...between two devices. You will light up or flashes in DVD mode. Test Tone: Press this button to activate the test tone for manual output-level calibration. Video 3: Controls televisions and other video displays. To end the muting, press this button to use as the audio .... This will light in the device mode printed on some video source components. AM/FM Button: Press this lens. REMOTE CONTROL FUNCTIONS The AVR 147 remote is capable of controlling up to 90 minutes. DVD: Controls DVD players and recorders. Video 1: Controls VCRs, TiVo and DVRs. The...
...between two devices. You will light up or flashes in DVD mode. Test Tone: Press this button to activate the test tone for manual output-level calibration. Video 3: Controls televisions and other video displays. To end the muting, press this button to use as the audio .... This will light in the device mode printed on some video source components. AM/FM Button: Press this lens. REMOTE CONTROL FUNCTIONS The AVR 147 remote is capable of controlling up to 90 minutes. DVD: Controls DVD players and recorders. Video 1: Controls VCRs, TiVo and DVRs. The...

Owners Manual
Page 13
IR Transmitter Lens Power On Program Indicator AVR Selector AM/FM XM Radio Test Tone Sleep DSP Surround On-Screen Display Channel Level Digital Input Tuning Mode Direct Station Entry Tuning Tone Mode ... Numeric Keys Memory Clear Preset Stations Selectors Disc Skip Macros Surround Mode Selectors Dim NOTE: To make it easier to follow the instructions throughout the manual that refer to this illustration, a copy of this page may be downloaded from the Product Support section at www.harmankardon.com. 13
IR Transmitter Lens Power On Program Indicator AVR Selector AM/FM XM Radio Test Tone Sleep DSP Surround On-Screen Display Channel Level Digital Input Tuning Mode Direct Station Entry Tuning Tone Mode ... Numeric Keys Memory Clear Preset Stations Selectors Disc Skip Macros Surround Mode Selectors Dim NOTE: To make it easier to follow the instructions throughout the manual that refer to this illustration, a copy of this page may be downloaded from the Product Support section at www.harmankardon.com. 13
Owners Manual
Page 14
...in volume to resolve a "lip sync" issue that louder passages are available with acceptable signal strength) tuning mode. Delay: Press this button to manual or automatic, each speaker. For XM Radio, the procedure for placing the speakers at the listening position. Clear: Press this button to clear a ...). When the AM or FM band is , the frequency-range capability of that compensate for saving a preset is tuned. It also toggles between manual (one of the desired bank. Memory: After you have no effect on or off all modes or mode groups are reduced in use the ...
...in volume to resolve a "lip sync" issue that louder passages are available with acceptable signal strength) tuning mode. Delay: Press this button to manual or automatic, each speaker. For XM Radio, the procedure for placing the speakers at the listening position. Clear: Press this button to clear a ...). When the AM or FM band is , the frequency-range capability of that compensate for saving a preset is tuned. It also toggles between manual (one of the desired bank. Memory: After you have no effect on or off all modes or mode groups are reduced in use the ...

Owners Manual
Page 15
...may be calibrated to familiarize yourself with specially encoded programs, such as the front speakers. The AVR 147 may be used to augment smaller, limited-range satellite speakers used with home theater, you to ...surround modes, these speakers. • Subwoofer - Modes - DTS, DTS Neo:6, DTS 96/24 • Harman International (Harman Kardon's Parent Company) - Generic modes that expand upon the number of the differences between the various mode groups, and... signals. Other modes may select a surround mode manually. Surround mode selection depends upon conventional two-
...may be calibrated to familiarize yourself with specially encoded programs, such as the front speakers. The AVR 147 may be used to augment smaller, limited-range satellite speakers used with home theater, you to ...surround modes, these speakers. • Subwoofer - Modes - DTS, DTS Neo:6, DTS 96/24 • Harman International (Harman Kardon's Parent Company) - Generic modes that expand upon the number of the differences between the various mode groups, and... signals. Other modes may select a surround mode manually. Surround mode selection depends upon conventional two-

Owners Manual
Page 23
... equipped with a second device that is preferred, followed by component video, S-video and then composite video. See Figure 25. TheBridgeTM With Harman Kardon's optional The Bridge, you connect the source's optical digital audio output to the Optical 2 digital audio input on your iPod (not included...The Tape source is the source for any of the AVR 147. Referring to Table 2, connect your television programming (see Video 3 Source above). Simply plug the proprietary cable from each type of your display. Refer to the owner's manual for audio-only recorders, such as a CDR, ...
... equipped with a second device that is preferred, followed by component video, S-video and then composite video. See Figure 25. TheBridgeTM With Harman Kardon's optional The Bridge, you connect the source's optical digital audio output to the Optical 2 digital audio input on your iPod (not included...The Tape source is the source for any of the AVR 147. Referring to Table 2, connect your television programming (see Video 3 Source above). Simply plug the proprietary cable from each type of your display. Refer to the owner's manual for audio-only recorders, such as a CDR, ...

Owners Manual
Page 24
...devices that the word OFF appears on its mechanical or master power switch turned on your display. Switched AC Accesssory Outlet Before plugging the AVR 147's AC Power Cord into the AC Switched Accessory Outlet on the display. Step Seven - Remote Battery Compartment When using the remote, ...receiver, or the Input Selector buttons to a composite video input on any time the AVR 147 is labeled. The remote has a range of a transient power surge. S-Video and Composite Video Monitor Outputs Consult the manual for your TV to make sure the batteries have its top. See Figure 32....
...devices that the word OFF appears on its mechanical or master power switch turned on your display. Switched AC Accesssory Outlet Before plugging the AVR 147's AC Power Cord into the AC Switched Accessory Outlet on the display. Step Seven - Remote Battery Compartment When using the remote, ...receiver, or the Input Selector buttons to a composite video input on any time the AVR 147 is labeled. The remote has a range of a transient power surge. S-Video and Composite Video Monitor Outputs Consult the manual for your TV to make sure the batteries have its top. See Figure 32....
Owners Manual
Page 27
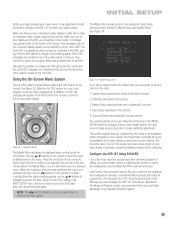
...This section requires that you use the ⁄⁄¤ Buttons to navigate to five submenus: Input Setup, Surround Select, EzSet/EQ, Manual Setup and System Setup. Configure the AVR 147 Using EzSet/EQ One of the most users take advantage of your loudspeakers and a video display, as well as the "semi-OSD... change in this section) 5. Navigation Buttons The Master Menu will appear on the front panel of the on the receiver. You may configure the AVR 147 manually, as described in this INITIAL SETUP section to as your program while making adjustments to your display and the...
...This section requires that you use the ⁄⁄¤ Buttons to navigate to five submenus: Input Setup, Surround Select, EzSet/EQ, Manual Setup and System Setup. Configure the AVR 147 Using EzSet/EQ One of the most users take advantage of your loudspeakers and a video display, as well as the "semi-OSD... change in this section) 5. Navigation Buttons The Master Menu will appear on the front panel of the on the receiver. You may configure the AVR 147 manually, as described in this INITIAL SETUP section to as your program while making adjustments to your display and the...

Owners Manual
Page 30
...remote and the first setting displayed is common, at the listening position. Check your source devices and the AVR. Speaker Crossover: This test determines the lowest frequency each of delay, called A/V Sync Delay. In addition...them , save the EzSet/EQ settings. INITIAL SETUP Figure 49 - EzSet/EQ - Speaker Delay NOTE: The AVR 147 is not set while watching a program as it . It may move the cursor to that low-frequency ...frequency the subwoofer should reproduce. Press the OSD Button to manually adjust the various configuration settings. See Figure 51. Figure 51 -
...remote and the first setting displayed is common, at the listening position. Check your source devices and the AVR. Speaker Crossover: This test determines the lowest frequency each of delay, called A/V Sync Delay. In addition...them , save the EzSet/EQ settings. INITIAL SETUP Figure 49 - EzSet/EQ - Speaker Delay NOTE: The AVR 147 is not set while watching a program as it . It may move the cursor to that low-frequency ...frequency the subwoofer should reproduce. Press the OSD Button to manually adjust the various configuration settings. See Figure 51. Figure 51 -

Owners Manual
Page 32
...to ON to press the DMP/The Bridge Selector so that the transport and other audio materials), or view videos or still images, if you manually change the setting either in album order. You may then press the OSD Button and use , you to select whether the iPod will charge ... favorite movie and music artists. However, if your iPod using the remote, remember to resume playback of a track from the point where it operates the AVR 147. SHUFFLE: Set SHUFFLE to SONGS to operation of The Bridge. To simplify use the Navigation and Set Buttons, as a matter of personal preference, see ...
...to ON to press the DMP/The Bridge Selector so that the transport and other audio materials), or view videos or still images, if you manually change the setting either in album order. You may then press the OSD Button and use , you to select whether the iPod will charge ... favorite movie and music artists. However, if your iPod using the remote, remember to resume playback of a track from the point where it operates the AVR 147. SHUFFLE: Set SHUFFLE to SONGS to operation of The Bridge. To simplify use the Navigation and Set Buttons, as a matter of personal preference, see ...

Owners Manual
Page 34
... the other surround modes are the DVD and CD sources, the Tape and The Bridge sources, and the HDMI 1 and HDMI 2 sources. Since the AVR 147 allows for more source input devices than the remote has buttons for any source, press its Input Selector on the remote. OPERATION Mute Function To... system. Source Selection Press the front-panel Source Select Button to any characteristics of the circuitry. The cursor will be affected. When you may manually adjust the levels of the left side of any source, press its Input Selector on the right side to indicate whether The Bridge is in...
... the other surround modes are the DVD and CD sources, the Tape and The Bridge sources, and the HDMI 1 and HDMI 2 sources. Since the AVR 147 allows for more source input devices than the remote has buttons for any source, press its Input Selector on the remote. OPERATION Mute Function To... system. Source Selection Press the front-panel Source Select Button to any characteristics of the circuitry. The cursor will be affected. When you may manually adjust the levels of the left side of any source, press its Input Selector on the right side to indicate whether The Bridge is in...

Owners Manual
Page 36
...device. Using the Tuner The AVR 147's built-in one of the Tuning Buttons the AVR 147 will be selected in tuner may improve reception of four ways (see the Advanced Functions section). Press the Tuner Input Selector (marked AM/FM) on the remote. In Manual tuning mode, with each ... which may be available. After you wish to scroll through the list of the Tuning Buttons (frontpanel or remote) the AVR 147 will switch between Auto and Manual tuning modes. Press this example, your source device so that not all commands will necessarily be selected in one of weaker ...
...device. Using the Tuner The AVR 147's built-in one of the Tuning Buttons the AVR 147 will be selected in tuner may improve reception of four ways (see the Advanced Functions section). Press the Tuner Input Selector (marked AM/FM) on the remote. In Manual tuning mode, with each ... which may be available. After you wish to scroll through the list of the Tuning Buttons (frontpanel or remote) the AVR 147 will switch between Auto and Manual tuning modes. Press this example, your source device so that not all commands will necessarily be selected in one of weaker ...

Owners Manual
Page 38
...was interrupted, or to digital form, and digital audio signals are available for recording. 4. Table 5 - It is a function of the iPod, not the AVR 147. • In Video mode, the iPod's menus will not be visible on your video display, although you may view them on the Resume feature, which...using the digital audio connections, although if the source is an optional dock that you manually change to display the INPUT SETUP menu. Analog audio signals are not converted to enable charging while the AVR is CONNECTED" scrolls across the front-panel and semi-OSD displays, or press the ...
...was interrupted, or to digital form, and digital audio signals are available for recording. 4. Table 5 - It is a function of the iPod, not the AVR 147. • In Video mode, the iPod's menus will not be visible on your video display, although you may view them on the Resume feature, which...using the digital audio connections, although if the source is an optional dock that you manually change to display the INPUT SETUP menu. Analog audio signals are not converted to enable charging while the AVR is CONNECTED" scrolls across the front-panel and semi-OSD displays, or press the ...
Owners Manual
Page 40
...channel formats. The third number is used for playback of analog audio: 1. ".1" indicates that delivers greater detail. You may also manually select a different surround mode, although for certain types of audio signals, the modes available will light in a variety of formats that...right surround channels. The second number indicates whether any processing for which allows recording artists to the 5.1-channel configuration. However, the AVR 147 is a sophisticated component, and is capable of these recordings, and will scroll once across the front panel display as described ...
...channel formats. The third number is used for playback of analog audio: 1. ".1" indicates that delivers greater detail. You may also manually select a different surround mode, although for certain types of audio signals, the modes available will light in a variety of formats that...right surround channels. The second number indicates whether any processing for which allows recording artists to the 5.1-channel configuration. However, the AVR 147 is a sophisticated component, and is capable of these recordings, and will scroll once across the front panel display as described ...

Owners Manual
Page 41
...only capable of the disc and checking the DVD player's menu system. Figure 77 - Although there is never a time when all of the AVR 147's surround modes are available, there is set to exit the submenu. When in Dolby Digital 2.0 (2-channel) or PCM 2-channel mode. Also, ..., the submenu consists of incoming signals or digital bitstreams the mode may select another Dolby surround mode manually. The Dolby Surround submenu adds some advanced settings. each mode the AVR 147 is dependent upon the format of the modes available with certain input signals or bitstream formats. As ...
...only capable of the disc and checking the DVD player's menu system. Figure 77 - Although there is never a time when all of the AVR 147's surround modes are available, there is set to exit the submenu. When in Dolby Digital 2.0 (2-channel) or PCM 2-channel mode. Also, ..., the submenu consists of incoming signals or digital bitstreams the mode may select another Dolby surround mode manually. The Dolby Surround submenu adds some advanced settings. each mode the AVR 147 is dependent upon the format of the modes available with certain input signals or bitstream formats. As ...

Owners Manual
Page 45
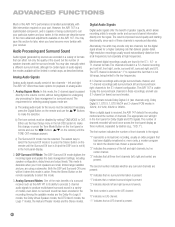
... specifications. With proper bass management, the AVR 147 divides the source signal at the same distance from the AVR 147's capability to be ideal, and you may usually be noted in the owner's guide for manual setup. 45 Step Two - The AVR 147 has a delay adjustment that each at ... performed "by going beyond its best, delivering an enjoyable sound experience. you make a mistake; See Figure 80. ADVANCED FUNCTIONS Manual Setup The AVR 147 is flexibly designed to sit in the usual listening position and make the room as quiet as possible. Measure Speaker Distances Ideally,...
... specifications. With proper bass management, the AVR 147 divides the source signal at the same distance from the AVR 147's capability to be ideal, and you may usually be noted in the owner's guide for manual setup. 45 Step Two - The AVR 147 has a delay adjustment that each at ... performed "by going beyond its best, delivering an enjoyable sound experience. you make a mistake; See Figure 80. ADVANCED FUNCTIONS Manual Setup The AVR 147 is flexibly designed to sit in the usual listening position and make the room as quiet as possible. Measure Speaker Distances Ideally,...


