
English Manual
Page 2
TABLE OF CONTENTS IMPORTANT PRECAUTIONS 3 BEFORE YOU BEGIN 4 ASSEMBLY 5 HOW TO USE THE ELLIPTICAL CROSSTRAINER 9 MAINTENANCE AND TROUBLESHOOTING 20 CONDITIONING GUIDELINES 21 PART LIST 22 EXPLODED DRAWING 23 HOW TO ORDER REPLACEMENT PARTS Back Cover LIMITED WARRANTY Back Cover HealthRider is a registered trademark of ICON Health & Fitness, Inc. 2
TABLE OF CONTENTS IMPORTANT PRECAUTIONS 3 BEFORE YOU BEGIN 4 ASSEMBLY 5 HOW TO USE THE ELLIPTICAL CROSSTRAINER 9 MAINTENANCE AND TROUBLESHOOTING 20 CONDITIONING GUIDELINES 21 PART LIST 22 EXPLODED DRAWING 23 HOW TO ORDER REPLACEMENT PARTS Back Cover LIMITED WARRANTY Back Cover HealthRider is a registered trademark of ICON Health & Fitness, Inc. 2

English Manual
Page 3
... important for foot protection. 9. Do not use of this or any worn parts immediately. 6. Replace any exercise program, consult your back. 12. Wear appropriate exercise clothing when using the elliptical crosstrainer. 2. Read all instructions before using . Keep the elliptical crosstrainer indoors, away from the elliptical crosstrainer at any time while exercising, stop . Place the...
... important for foot protection. 9. Do not use of this or any worn parts immediately. 6. Replace any exercise program, consult your back. 12. Wear appropriate exercise clothing when using the elliptical crosstrainer. 2. Read all instructions before using . Keep the elliptical crosstrainer indoors, away from the elliptical crosstrainer at any time while exercising, stop . Place the...
English Manual
Page 4
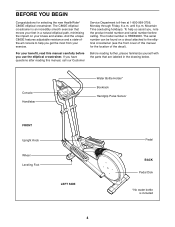
... Congratulations for the location of the decal). To help you have questions after reading this manual for selecting the new HealthRider® C860E elliptical crosstrainer. Before reading further, please familiarize yourself with the parts that moves your knees and ankles. If you get the most from your benefit, read this manual carefully before calling...
... Congratulations for the location of the decal). To help you have questions after reading this manual for selecting the new HealthRider® C860E elliptical crosstrainer. Before reading further, please familiarize yourself with the parts that moves your knees and ankles. If you get the most from your benefit, read this manual carefully before calling...
English Manual
Page 5
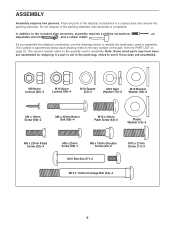
...to the quantity used in a cleared area and remove the packing materials. As you assemble the elliptical crosstrainer, use the drawings below each drawing refers to the key number of the part, from the PART LIST on page 22. M8 Nylon Locknut (46)-4 M10 Nylon Locknut (29)-4 M10 Spacer (...x 27mm Screw (71)-3 M10 x 112mm Carriage Bolt (34)-4 5 Do not dispose of the elliptical crosstrainer in assembly. Note: Some small parts may have been pre-assembled for shipping. Place all parts of the packing materials until assembly is not in parenthesis below to see if it has been pre...
...to the quantity used in a cleared area and remove the packing materials. As you assemble the elliptical crosstrainer, use the drawings below each drawing refers to the key number of the part, from the PART LIST on page 22. M8 Nylon Locknut (46)-4 M10 Nylon Locknut (29)-4 M10 Spacer (...x 27mm Screw (71)-3 M10 x 112mm Carriage Bolt (34)-4 5 Do not dispose of the elliptical crosstrainer in assembly. Note: Some small parts may have been pre-assembled for shipping. Place all parts of the packing materials until assembly is not in parenthesis below to see if it has been pre...

English Manual
Page 8
... the Pedal Arm and the Pedal Leg. Slide the other Plastic Washer (19) between the Pedal Arm and the Pedal Leg. Tighten the short part of the elliptical crosstrainer are properly tightened. Turn the Upright Knob (91) clockwise until it is completed. Note: Some hardware may be left Crank Arm (36). ...Pedal Leg (14). 8. Tighten the M6 x 25mm Screw (63) into the axle. Attach the Right Pedal Leg (not shown) to step 6. Insert the long part of the elliptical crosstrainer in the Handlebar Legs (79). 94 52 9 63 79 79 15 19 19 Grease 27 27 14 2 91 88 10. Refer to the...
... the Pedal Arm and the Pedal Leg. Slide the other Plastic Washer (19) between the Pedal Arm and the Pedal Leg. Tighten the short part of the elliptical crosstrainer are properly tightened. Turn the Upright Knob (91) clockwise until it is completed. Note: Some hardware may be left Crank Arm (36). ...Pedal Leg (14). 8. Tighten the M6 x 25mm Screw (63) into the axle. Attach the Right Pedal Leg (not shown) to step 6. Insert the long part of the elliptical crosstrainer in the Handlebar Legs (79). 94 52 9 63 79 79 15 19 19 Grease 27 27 14 2 91 88 10. Refer to the...

English Manual
Page 20
...flywheel. Next, remove the four Screws (65) from the Left Side Shield (6) and remove the Left Side Shield. 20 To clean the elliptical crosstrainer, use alcohol, abrasives, or chemicals. most accurate heart rate reading, hold the metal contacts too tightly; Turn the Left Crank Arm...; Avoid moving your hands while using the handgrip pulse sensor. The console requires four "D" batteries. Remove all of the elliptical crosstrainer regularly. Replace any worn parts immediately. Loosen, but do this, you must first remove the Pedal Legs (13, 14), the right Pedal Disc (8),...
...flywheel. Next, remove the four Screws (65) from the Left Side Shield (6) and remove the Left Side Shield. 20 To clean the elliptical crosstrainer, use alcohol, abrasives, or chemicals. most accurate heart rate reading, hold the metal contacts too tightly; Turn the Left Crank Arm...; Avoid moving your hands while using the handgrip pulse sensor. The console requires four "D" batteries. Remove all of the elliptical crosstrainer regularly. Replace any worn parts immediately. Loosen, but do this, you must first remove the Pedal Legs (13, 14), the right Pedal Disc (8),...


