
English Manual
Page 2
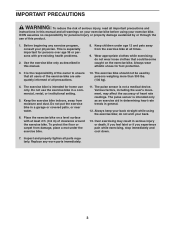
...HEALTHRIDER is missing or illegible, see the front cover of this manual and request a free replacement decal. TABLE OF CONTENTS WARNING DECAL PLACEMENT 2 IMPORTANT PRECAUTIONS 3 BEFORE YOU BEGIN 4 ASSEMBLY 5 HOW TO USE THE EXERCISE BIKE 13 MAINTENANCE AND TROUBLESHOOTING 21 EXERCISE GUIDELINES 22 PART... LIST 24 EXPLODED DRAWING 26 ORDERING REPLACEMENT PARTS Back Cover LIMITED WARRANTY Back Cover WARNING DECAL PLACEMENT This drawing shows the ...
...HEALTHRIDER is missing or illegible, see the front cover of this manual and request a free replacement decal. TABLE OF CONTENTS WARNING DECAL PLACEMENT 2 IMPORTANT PRECAUTIONS 3 BEFORE YOU BEGIN 4 ASSEMBLY 5 HOW TO USE THE EXERCISE BIKE 13 MAINTENANCE AND TROUBLESHOOTING 21 EXERCISE GUIDELINES 22 PART... LIST 24 EXPLODED DRAWING 26 ORDERING REPLACEMENT PARTS Back Cover LIMITED WARRANTY Back Cover WARNING DECAL PLACEMENT This drawing shows the ...
English Manual
Page 3
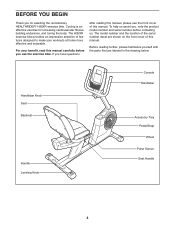
...this product. 1. Do not put the exercise bike in general. 12. Always keep your physician. Inspect and properly tighten all parts regularly. The exercise bike should not be used by or through the use the exercise bike in serious injury or death. The pulse sensor ..., or near water. 6. The exercise bike is not a medical device. Keep children under the exercise bike. 11. Keep the exercise bike indoors, away from the exercise bike at least 2 ft. (0.6 m) of clearance around the exercise bike. Before beginning any worn parts immediately. 3 IMPORTANT PRECAUTIONS WARNING: To ...
...this product. 1. Do not put the exercise bike in general. 12. Always keep your physician. Inspect and properly tighten all parts regularly. The exercise bike should not be used by or through the use the exercise bike in serious injury or death. The pulse sensor ..., or near water. 6. The exercise bike is not a medical device. Keep children under the exercise bike. 11. Keep the exercise bike indoors, away from the exercise bike at least 2 ft. (0.6 m) of clearance around the exercise bike. Before beginning any worn parts immediately. 3 IMPORTANT PRECAUTIONS WARNING: To ...
English Manual
Page 4
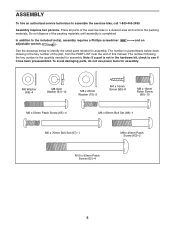
...model number and serial number before you use the exercise bike. The model number and the location of this manual carefully before contacting us. Before reading further, please familiarize yourself with the parts that are shown on the front cover of features ...Thank you for increasing cardiovascular fitness, building endurance, and toning the body. The H35XR exercise bike provides an impressive selection of this manual. Cycling is an effective exercise for selecting the revolutionary HEALTHRIDER® H35XR exercise bike. For your workouts at home more effective and enjoyable.
...model number and serial number before you use the exercise bike. The model number and the location of this manual carefully before contacting us. Before reading further, please familiarize yourself with the parts that are shown on the front cover of features ...Thank you for increasing cardiovascular fitness, building endurance, and toning the body. The H35XR exercise bike provides an impressive selection of this manual. Cycling is an effective exercise for selecting the revolutionary HEALTHRIDER® H35XR exercise bike. For your workouts at home more effective and enjoyable.
English Manual
Page 5
Do not dispose of the exercise bike in a cleared area and remove the packing materials. The number following the key number is the key number of the part, from the PART LIST near the end of this manual. Assembly requires two persons. and an See the drawings below ...included tool(s), assembly requires a Phillips screwdriver adjustable wrench . The number in the hardware kit, check to identify the small parts needed for assembly. Place all parts of the packing materials until assembly is not in parentheses below to see if it has been preassembled. In addition to...
Do not dispose of the exercise bike in a cleared area and remove the packing materials. The number following the key number is the key number of the part, from the PART LIST near the end of this manual. Assembly requires two persons. and an See the drawings below ...included tool(s), assembly requires a Phillips screwdriver adjustable wrench . The number in the hardware kit, check to identify the small parts needed for assembly. Place all parts of the packing materials until assembly is not in parentheses below to see if it has been preassembled. In addition to...
English Manual
Page 12
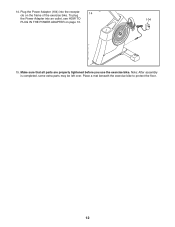
Note: After assembly is completed, some extra parts may be left over. To plug 14 the Power Adapter into the receptacle on page 13. 15. Make sure that all parts are properly tightened before you use the exercise bike. 14. Plug the Power Adapter (104) into an outlet, see HOW TO 104 PLUG IN THE POWER ADAPTER on the frame of the exercise bike. Place a mat beneath the exercise bike to protect the floor. 12
Note: After assembly is completed, some extra parts may be left over. To plug 14 the Power Adapter into the receptacle on page 13. 15. Make sure that all parts are properly tightened before you use the exercise bike. 14. Plug the Power Adapter (104) into an outlet, see HOW TO 104 PLUG IN THE POWER ADAPTER on the frame of the exercise bike. Place a mat beneath the exercise bike to protect the floor. 12
English Manual
Page 21
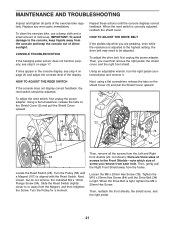
...until a Magnet (107) is aligned with the Reed Switch. Turn the Pulley (58) until the console displays correct feedback. Then, remove all parts of the exercise bike regularly. there are pedaling, even while the resistance is tight. Then, reattach the front shields, the shield cover, and the right pedal. ... not function properly, see step 4 on page 17. When the Drive Belt is correctly adjusted, reattach the shield cover. To clean the exercise bike, use a damp cloth and a small amount of mild soap. If lines appear in the Front Shields-note which size of screw you remove ...
...until a Magnet (107) is aligned with the Reed Switch. Turn the Pulley (58) until the console displays correct feedback. Then, remove all parts of the exercise bike regularly. there are pedaling, even while the resistance is tight. Then, reattach the front shields, the shield cover, and the right pedal. ... not function properly, see step 4 on page 17. When the Drive Belt is correctly adjusted, reattach the shield cover. To clean the exercise bike, use a damp cloth and a small amount of mild soap. If lines appear in the Front Shields-note which size of screw you remove ...


