

English Manual
Page 3
... treadmill is capable of 450 joules. Do not attempt to raise, lower, or move the on/off switch to raise, lower, or move the walking belt while the power is turned off position when the treadmill is not in sandals. 10. Use the treadmill only as an exercise aid in determining.... 17. The pulse sensor is running. Keep the power cord and the surge protector away from moisture and dust. Place the treadmill on the walking belt. Always wear athletic shoes. When connecting the power cord (see your ability to avoid sudden jumps in speed. 16. Do not operate the treadmill if...
... treadmill is capable of 450 joules. Do not attempt to raise, lower, or move the on/off switch to raise, lower, or move the walking belt while the power is turned off position when the treadmill is not in sandals. 10. Use the treadmill only as an exercise aid in determining.... 17. The pulse sensor is running. Keep the power cord and the surge protector away from moisture and dust. Place the treadmill on the walking belt. Always wear athletic shoes. When connecting the power cord (see your ability to avoid sudden jumps in speed. 16. Do not operate the treadmill if...
English Manual
Page 5
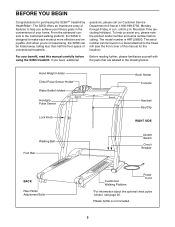
...product model number and serial number before using the S250i treadmill. From the advanced console to make each workout more effective and enjoyable. For your benefit, read this manual for purchasing the S250iª treadmill by HealthRider¨. Hand Weight Holder Chest Pulse Sensor Holder*... Water Bottle Holder Handgrip Pulse Sensor Lock Knob Book Holder Console Handrail Key/Clip RIGHT SIDE Walking Belt Foot Rail On/Off Switch Circuit Breaker...
...product model number and serial number before using the S250i treadmill. From the advanced console to make each workout more effective and enjoyable. For your benefit, read this manual for purchasing the S250iª treadmill by HealthRider¨. Hand Weight Holder Chest Pulse Sensor Holder*... Water Bottle Holder Handgrip Pulse Sensor Lock Knob Book Holder Console Handrail Key/Clip RIGHT SIDE Walking Belt Foot Rail On/Off Switch Circuit Breaker...
English Manual
Page 6
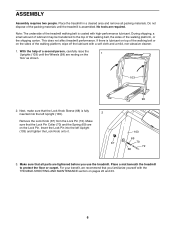
... sides of the walking platform, or the shipping carton. ASSEMBLY Assembly requires two people. Do not dispose of the treadmill walking belt is assembled. For your benefit, we recommend that all packing materials. No tools are resting on pages 22 and 23. 6 Note: The underside of the ... MAINTENANCE section on the 1 floor as shown. 103 2. Place the treadmill in a cleared area and remove all parts are on the sides of the walking belt or on the Lock Pin. If there is fully inserted into the left Upright (103). 2 Remove the Lock Knob (67) from the Lock Pin (72...
... sides of the walking platform, or the shipping carton. ASSEMBLY Assembly requires two people. Do not dispose of the treadmill walking belt is assembled. For your benefit, we recommend that all packing materials. No tools are resting on pages 22 and 23. 6 Note: The underside of the ... MAINTENANCE section on the 1 floor as shown. 103 2. Place the treadmill in a cleared area and remove all parts are on the sides of the walking belt or on the Lock Pin. If there is fully inserted into the left Upright (103). 2 Remove the Lock Knob (67) from the Lock Pin (72...

English Manual
Page 7
...conditions or from the adapter must be used only until a properly grounded outlet (drawing 1) can result in accordance with your local HEALTHRIDER dealer or call toll-free 1-800-9993756 and order part number 146148. The surge suppressor must be seriously damaged by a qualified ... The treadmill is equipped with a cord having an equipment-grounding conductor and a grounding plug. Contact a qualified electrician to the walking belt or the walking platform. Check with GFCI-equipped outlets. If it should be electrically rated for use a surge suppressor with all local ...
...conditions or from the adapter must be used only until a properly grounded outlet (drawing 1) can result in accordance with your local HEALTHRIDER dealer or call toll-free 1-800-9993756 and order part number 146148. The surge suppressor must be seriously damaged by a qualified ... The treadmill is equipped with a cord having an equipment-grounding conductor and a grounding plug. Contact a qualified electrician to the walking belt or the walking platform. Check with GFCI-equipped outlets. If it should be electrically rated for use a surge suppressor with all local ...
English Manual
Page 8
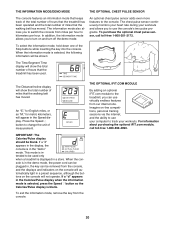
... speed and incline of the treadmill as a personal trainer guides you have walked, the incline level of the treadmill, and the speed of the walking belt. With the treadmill connected to your home stereo, portable stereo, or computer and play iFIT.com video programs (videocassettes are available separately). To purchase iFIT...
... speed and incline of the treadmill as a personal trainer guides you have walked, the incline level of the treadmill, and the speed of the walking belt. With the treadmill connected to your home stereo, portable stereo, or computer and play iFIT.com video programs (videocassettes are available separately). To purchase iFIT...

English Manual
Page 9
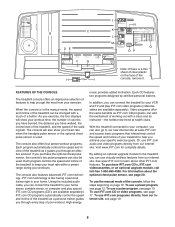
... alternate between one number and the other every seven seconds. When the optional chest pulse sensor is pulled from the console, the walking belt will stop . O. J. The display will show your hands are on the waistband of the program. For simplicity, all instructions in... either button will automatically stop the walking belt. Hand weight holderÑThese compartments hold the hand weights. E. Stop buttonsÑThese buttons are used , the display will be worn ...
... alternate between one number and the other every seven seconds. When the optional chest pulse sensor is pulled from the console, the walking belt will stop . O. J. The display will show your hands are on the waistband of the program. For simplicity, all instructions in... either button will automatically stop the walking belt. Hand weight holderÑThese compartments hold the hand weights. E. Stop buttonsÑThese buttons are used , the display will be worn ...

English Manual
Page 10
...Select Workout button repeatedly to select the manual mode. 3 Press the Start button or the Speed v button to move at 1.0 mph. To stop the walking belt, press either of the Stop buttons. Stand on the treadmill near the power cord. Then, remove the key from the console and place only a sealed...not pulled from the console. When the key is held down, the speed will begin walking. If one of your clothes. To restart the walking belt, press the Start button or the Speed v button. To vary the intensity of the buttons is inserted, the manual mode will be selected and the...
...Select Workout button repeatedly to select the manual mode. 3 Press the Start button or the Speed v button to move at 1.0 mph. To stop the walking belt, press either of the Stop buttons. Stand on the treadmill near the power cord. Then, remove the key from the console and place only a sealed...not pulled from the console. When the key is held down, the speed will begin walking. If one of your clothes. To restart the walking belt, press the Start button or the Speed v button. To vary the intensity of the buttons is inserted, the manual mode will be selected and the...
English Manual
Page 11
... key into the console. Press the Speed v button to show your heart rate. Note: Each time the Incline buttons are finished exercising, stop the walking belt and remove the key. tactsÑavoid moving your hands on the metal contacts on the foot rails and place your hands. Note: If the... then reinsert the key. 6 When you are on the upper contacts, and your progress with the four displays. When the desired unit of the walking belt. Next, remove the key from the console and put it in either miles per hour (mph) or kilometers per hour (kph). 5 Follow your fingers must...
... key into the console. Press the Speed v button to show your heart rate. Note: Each time the Incline buttons are finished exercising, stop the walking belt and remove the key. tactsÑavoid moving your hands on the metal contacts on the foot rails and place your hands. Note: If the... then reinsert the key. 6 When you are on the upper contacts, and your progress with the four displays. When the desired unit of the walking belt. Next, remove the key from the console and put it in either miles per hour (mph) or kilometers per hour (kph). 5 Follow your fingers must...

English Manual
Page 12
... settings and the green lines show how the speed and incline of the treadmill will change during the Healthwalk program, the speed of the walking belt will be from 2 mph to 4 mph and the incline will be from the console and put it in a safe place. Note: If the displays and... indicators on page 10. 2 Select one of the Stop buttons. When only three seconds remain in the ÒdemoÓ mode. The walking belt will automatically adjust to a stop the program temporarily, press one of the four preset programs. When the key is inserted, the manual mode will be...
... settings and the green lines show how the speed and incline of the treadmill will change during the Healthwalk program, the speed of the walking belt will be from 2 mph to 4 mph and the incline will be from the console and put it in a safe place. Note: If the displays and... indicators on page 10. 2 Select one of the Stop buttons. When only three seconds remain in the ÒdemoÓ mode. The walking belt will automatically adjust to a stop the program temporarily, press one of the four preset programs. When the key is inserted, the manual mode will be...

English Manual
Page 13
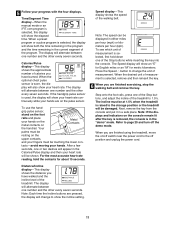
... treadmill will light. Therefore, if Pulse program 1 is selected, the maximum heart rate setting can be held down to keep your age quickly. The walking belt will automatically change during the programs. The Time/Segment Time display will last. 4 Enter your maximum possible heart rate is divided into the console. To...
... treadmill will light. Therefore, if Pulse program 1 is selected, the maximum heart rate setting can be held down to keep your age quickly. The walking belt will automatically change during the programs. The Time/Segment Time display will last. 4 Enter your maximum possible heart rate is divided into the console. To...

English Manual
Page 18
... that it is fully plugged in, and that the Time/Segment Time display is completed, the walking belt will stop button on your CD player or VCR. CAUTION: Always remove iFIT.com CDÕs and...See step 5 on page 12. To restart the program, press the Start button. To stop the walking belt at any time, press a Stop button on the console. If the speed or incline settings are too high...buttons on the console. The Time/Segment Time display will begin to flash. After a moment, the walking belt will begin to step 1 on page 17. The program can manually override the settings at any time ...
... that it is fully plugged in, and that the Time/Segment Time display is completed, the walking belt will stop button on your CD player or VCR. CAUTION: Always remove iFIT.com CDÕs and...See step 5 on page 12. To restart the program, press the Start button. To stop the walking belt at any time, press a Stop button on the console. If the speed or incline settings are too high...buttons on the console. The Time/Segment Time display will begin to flash. After a moment, the walking belt will begin to step 1 on page 17. The program can manually override the settings at any time ...

English Manual
Page 19
...Read and follow the on page 16. However, when the next ÒchirpÓ is inserted, the manual mode will light. After a moment, the walking belt will begin to move . Note: To use a program from our internet site. 1 Insert the key into the console. A list of the program. When the... and be connected to your treadmill to help you start the program, an on -screen countdown ends, the program will begin and the walking belt will begin to flash. To stop and the Time/Segment Time display will change to the next settings of the treadmill does not change . ...
...Read and follow the on page 16. However, when the next ÒchirpÓ is inserted, the manual mode will light. After a moment, the walking belt will begin to move . Note: To use a program from our internet site. 1 Insert the key into the console. A list of the program. When the... and be connected to your treadmill to help you start the program, an on -screen countdown ends, the program will begin and the walking belt will begin to flash. To stop and the Time/Segment Time display will change to the next settings of the treadmill does not change . ...
English Manual
Page 20
...console. An ÒE,Ó for English miles, or an ÒM,Ó for metric kilometers, will show the total number of hours that the walking belt has moved. For information about purchasing the optional iFIT.com module, call toll-free 1-800-201-2172. To exit the information mode, remove the ...automatically light in the Speed display. When the information mode is selected, the following information will show the total number of miles that the walking belt has moved. When the console is in the demo mode, the power cord can be plugged in a store. THE INFORMATION MODE/DEMO MODE ...
...console. An ÒE,Ó for English miles, or an ÒM,Ó for metric kilometers, will show the total number of hours that the walking belt has moved. For information about purchasing the optional iFIT.com module, call toll-free 1-800-201-2172. To exit the information mode, remove the ...automatically light in the Speed display. When the information mode is selected, the following information will show the total number of miles that the walking belt has moved. When the console is in the demo mode, the power cord can be plugged in a store. THE INFORMATION MODE/DEMO MODE ...

English Manual
Page 22
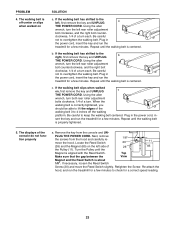
...switch must be able to lift the edges of the Rear Roller Adjustment Bolts walking belt 3 to keep the walking belt centered. Check the circuit breaker located on a. b. above ). b. When the walking belt is needed, please call our Customer Service Department toll-free at 15 amps, ... instructions below. Plug in . b. above ). 3. Make sure that the power cord is plugged in length. d. If the walking belt is fully inserted into the console. c TTriippedd Reesseett d. The power turns off switch located on position. Remove the key from the console...
...switch must be able to lift the edges of the Rear Roller Adjustment Bolts walking belt 3 to keep the walking belt centered. Check the circuit breaker located on a. b. above ). b. When the walking belt is needed, please call our Customer Service Department toll-free at 15 amps, ... instructions below. Plug in . b. above ). 3. Make sure that the power cord is plugged in length. d. If the walking belt is fully inserted into the console. c TTriippedd Reesseett d. The power turns off switch located on position. Remove the key from the console...
English Manual
Page 23
... gap between the View Magnet and the Reed Switch is off the walking platform. Plug in - Using the allen wrench, turn . Repeat until the walking belt is centered. Using the allen wrench, turn each . PLUG THE POWER CORD. sert the key and run the treadmill for a correct speed reading. 23... Repeat until the walking belt is properly tightened. 5. Next, remove the screws from the console and UN- Re-attach the hood, and run the treadmill for a few minutes. If...
... gap between the View Magnet and the Reed Switch is off the walking platform. Plug in - Using the allen wrench, turn . Repeat until the walking belt is centered. Using the allen wrench, turn each . PLUG THE POWER CORD. sert the key and run the treadmill for a correct speed reading. 23... Repeat until the walking belt is properly tightened. 5. Next, remove the screws from the console and UN- Re-attach the hood, and run the treadmill for a few minutes. If...

English Manual
Page 26
... Switch Power Cord Power Cord Grommet Outlet Bracket Controller Power Supply Plastic Stand-Off Electronics Bracket Belly Pan Upright Wire Harness Right Foot Grip Walking Belt 51 1 52 2 53 2 54 2 55 2 56 1 57 1 58 2 59 2 60 1 61 1 62 1 63 2 64 1 65 2 66 2 67 1 68 1 69 1 70 1 71 1 72 1 73 1 ... 1 47 1 48 1 49 1 50 1 Motor Hood Hood Screw Platform Screw Platform Washer Latch Catch Latch Catch Screw/Hand Grip Screw Isolator Power Bracket Washer Belt Guide Frame Pivot Bolt Front Roller/Pulley Incline Motor Spacer Incline Motor Bolt Incline Motor Nut Incline Motor Front Roller Adj. Bolt Side Hood Tab...
... Switch Power Cord Power Cord Grommet Outlet Bracket Controller Power Supply Plastic Stand-Off Electronics Bracket Belly Pan Upright Wire Harness Right Foot Grip Walking Belt 51 1 52 2 53 2 54 2 55 2 56 1 57 1 58 2 59 2 60 1 61 1 62 1 63 2 64 1 65 2 66 2 67 1 68 1 69 1 70 1 71 1 72 1 73 1 ... 1 47 1 48 1 49 1 50 1 Motor Hood Hood Screw Platform Screw Platform Washer Latch Catch Latch Catch Screw/Hand Grip Screw Isolator Power Bracket Washer Belt Guide Frame Pivot Bolt Front Roller/Pulley Incline Motor Spacer Incline Motor Bolt Incline Motor Nut Incline Motor Front Roller Adj. Bolt Side Hood Tab...


