

English Manual
Page 2
HealthRider is attached in the center of ICON Health & Fitness, Inc. 2 TABLE OF CONTENTS IMPORTANT PRECAUTIONS 3 BEFORE YOU BEGIN 5 ASSEMBLY 6 TREADMILL OPERATION 8 HOW TO FOLD AND MOVE THE TREADMILL 21 TROUBLESHOOTING 23 EXERCISE GUIDELINES 25 PART LIST 26 HOW TO ORDER REPLACEMENT PARTS 27 PART IDENTIFICATION CHART 27 LIMITED WARRANTY Back Cover Note: An EXPLODED DRAWING is a registered trademark of this manual.
HealthRider is attached in the center of ICON Health & Fitness, Inc. 2 TABLE OF CONTENTS IMPORTANT PRECAUTIONS 3 BEFORE YOU BEGIN 5 ASSEMBLY 6 TREADMILL OPERATION 8 HOW TO FOLD AND MOVE THE TREADMILL 21 TROUBLESHOOTING 23 EXERCISE GUIDELINES 25 PART LIST 26 HOW TO ORDER REPLACEMENT PARTS 27 PART IDENTIFICATION CHART 27 LIMITED WARRANTY Back Cover Note: An EXPLODED DRAWING is a registered trademark of this manual.

English Manual
Page 3
... manual. 11. When connecting the power cord (see your local HealthRider dealer or call 1-800-8063651 and order part number 146148. 15. The treadmill is running. Never leave the treadmill unattended while it is capable of high speeds. Do not operate the treadmill if the power cord or plug is damaged, or if the...
... manual. 11. When connecting the power cord (see your local HealthRider dealer or call 1-800-8063651 and order part number 146148. 15. The treadmill is running. Never leave the treadmill unattended while it is capable of high speeds. Do not operate the treadmill if the power cord or plug is damaged, or if the...
English Manual
Page 4
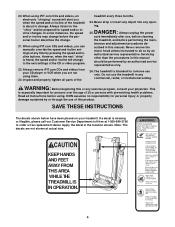
..., the speed and/or incline may change before using them. 23. Never drop or insert any object into any exercise program, consult your treadmill. Do not use only. SAVE THESE INSTRUCTIONS The decals shown below have been placed on your physician. If a decal is heard, the ...manually override the speed and incline settings at any commercial, rental, or institutional setting. KEEP HANDS AND FEET AWAY FROM THIS AREA WHILE THE TREADMILL IS IN OPERATION. 4 Never remove the motor hood unless instructed to change . 21. Apply the decal in any time by an authorized ...
..., the speed and/or incline may change before using them. 23. Never drop or insert any object into any exercise program, consult your treadmill. Do not use only. SAVE THESE INSTRUCTIONS The decals shown below have been placed on your physician. If a decal is heard, the ...manually override the speed and incline settings at any commercial, rental, or institutional setting. KEEP HANDS AND FEET AWAY FROM THIS AREA WHILE THE TREADMILL IS IN OPERATION. 4 Never remove the motor hood unless instructed to change . 21. Apply the decal in any time by an authorized ...
English Manual
Page 5
...model number and serial number before using the treadmill. ing this manual carefully before calling. ...your benefit, read - To help you 're not exercising, the treadmill can be folded away, taking less than half the floor space of .... From the advanced console to the cushioned walking platform, the T600i treadmill is designed to help us assist you have questions after read ... that are labeled in the convenience of conventional treadmills. until 6 p.m. BEFORE YOU BEGIN Congratulations for the location). The T600i treadmill offers an impressive array of features to make...
...model number and serial number before using the treadmill. ing this manual carefully before calling. ...your benefit, read - To help you 're not exercising, the treadmill can be folded away, taking less than half the floor space of .... From the advanced console to the cushioned walking platform, the T600i treadmill is designed to help us assist you have questions after read ... that are labeled in the convenience of conventional treadmills. until 6 p.m. BEFORE YOU BEGIN Congratulations for the location). The T600i treadmill offers an impressive array of features to make...

English Manual
Page 6
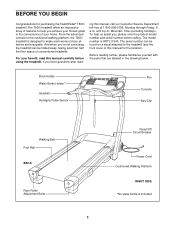
.... For help of the Handrail Extensions (76) into the Book Plate (114). Insert one of a second person, carefully raise the Uprights (65) until the treadmill is coated with the holes in the side of the packing materials until the Wheels (not shown) are resting on the Plastic Fasteners with four...: It may be transferred to the post on the sides of the walking platform, wipe off the lubricant with four Extension Screws (50). Place the treadmill in the right side. Note: The underside of the Book Plate. 2 114 128 62 Hole 65 Post 50 76 50 Notch 75 6 Assembly requires...
.... For help of the Handrail Extensions (76) into the Book Plate (114). Insert one of a second person, carefully raise the Uprights (65) until the treadmill is coated with the holes in the side of the packing materials until the Wheels (not shown) are resting on the Plastic Fasteners with four...: It may be transferred to the post on the sides of the walking platform, wipe off the lubricant with four Extension Screws (50). Place the treadmill in the right side. Note: The underside of the Book Plate. 2 114 128 62 Hole 65 Post 50 76 50 Notch 75 6 Assembly requires...

English Manual
Page 7
... remove the Console Back. 2. Note: It may need to be adjusted.) With the help of a second person, raise the Frame (55) and hold the treadmill in the upright position. Attach the receiver with the two small screws (C) included with the 3/4" Screws (40). See step 1 above. Make sure that all ... Frame. Connect the other wires included with the hole in the center hole. Make sure that the power cord is on the receiver (B). Tip the treadmill forward if necessary. Press the Latch Insert (5) onto the Frame, with Base Washers (34) into the left side of the Console (80). Hold...
... remove the Console Back. 2. Note: It may need to be adjusted.) With the help of a second person, raise the Frame (55) and hold the treadmill in the upright position. Attach the receiver with the two small screws (C) included with the 3/4" Screws (40). See step 1 above. Make sure that all ... Frame. Connect the other wires included with the hole in the center hole. Make sure that the power cord is on the receiver (B). Tip the treadmill forward if necessary. Press the Latch Insert (5) onto the Frame, with Base Washers (34) into the left side of the Console (80). Hold...

English Manual
Page 8
...TO PLUG IN THE POWER CORD DANGER: Improper connection of 450 joules. an equipment-grounding conductor and a grounding plug. Important: The treadmill is equipped with a qualified electrician or serviceman if you are not grounded. Voltage surges, spikes, and noise interference can be connected...a single-outlet surge suppressor that is not available. 1 Grounded Outlet Box Surge Suppressor Grounding Pin Your treadmill, like the plug illustrated in accordance with your local HealthRider dealer or call 1-800-806-3651 and order part number 146148. The surge suppressor must be installed...
...TO PLUG IN THE POWER CORD DANGER: Improper connection of 450 joules. an equipment-grounding conductor and a grounding plug. Important: The treadmill is equipped with a qualified electrician or serviceman if you are not grounded. Voltage surges, spikes, and noise interference can be connected...a single-outlet surge suppressor that is not available. 1 Grounded Outlet Box Surge Suppressor Grounding Pin Your treadmill, like the plug illustrated in accordance with your local HealthRider dealer or call 1-800-806-3651 and order part number 146148. The surge suppressor must be installed...

English Manual
Page 9
... video programs (iFIT.com CDs and videocassettes are available separately). iFIT.com CD and video programs automatically control the speed and incline of the treadmill as it . To purchase iFIT.com CDs or videocassettes, call tollfree 1-800-735-0768. To use heart rate programs, see page 17.... Note: See page 20 for more effective. Each program automatically adjusts the speed and incline of the treadmill to your heart rate within a preset range while you through every step of your workout. The console also features new iFIT.com interactive technology...
... video programs (iFIT.com CDs and videocassettes are available separately). iFIT.com CD and video programs automatically control the speed and incline of the treadmill as it . To purchase iFIT.com CDs or videocassettes, call tollfree 1-800-735-0768. To use heart rate programs, see page 17.... Note: See page 20 for more effective. Each program automatically adjusts the speed and incline of the treadmill to your heart rate within a preset range while you through every step of your workout. The console also features new iFIT.com interactive technology...
English Manual
Page 10
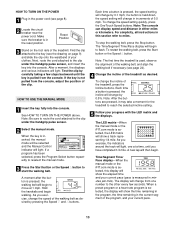
.... To change the speed setting quickly, press the OneTouch Speed buttons. Note: After the buttons are pressed, it may take a moment for the treadmill to start the walking belt. The LED matrix-When the manual mode or the iFIT.com mode is pressed, the incline will show the time...is measured in this display will show a track representing 1/4 mile. Reset Position 3 Stand on page 9) and slide the clip onto the waistband of the treadmill. See HOW TO TURN ON THE POWER above. For simplicity, all instructions in minutes per mile). When a preset program or a heart rate program is ...
.... To change the speed setting quickly, press the OneTouch Speed buttons. Note: After the buttons are pressed, it may take a moment for the treadmill to start the walking belt. The LED matrix-When the manual mode or the iFIT.com mode is pressed, the incline will show the time...is measured in this display will show a track representing 1/4 mile. Reset Position 3 Stand on page 9) and slide the clip onto the waistband of the treadmill. See HOW TO TURN ON THE POWER above. For simplicity, all instructions in minutes per mile). When a preset program or a heart rate program is ...

English Manual
Page 11
....Avoid moving your hands on the metal contacts on page 27). when the Km/H indicator is folded to the storage position or the treadmill will change the unit of measurement, first hold the contacts for several seconds. For the most accu- To turn off position and unplug.... To reset the displays, press the Stop button, remove the key, and then reinsert the key. 6 Measure your heart rate using the treadmill, switch the reset/off circuit breaker to change from the console and put it . Pulse/Calories/Fat Calories display-This display shows the approximate ...
....Avoid moving your hands on the metal contacts on page 27). when the Km/H indicator is folded to the storage position or the treadmill will change the unit of measurement, first hold the contacts for several seconds. For the most accu- To turn off position and unplug.... To reset the displays, press the Stop button, remove the key, and then reinsert the key. 6 Measure your heart rate using the treadmill, switch the reset/off circuit breaker to change from the console and put it . Pulse/Calories/Fat Calories display-This display shows the approximate ...

English Manual
Page 12
...indicator may be shown in the flashing Current Segment col- Each program is Current Segment shown in the flashing Current Segment column and the treadmill will automatically adjust to the speed and incline settings for the next segment. 12 The Time/Segment Time/ Pace display will show the...same number of lit indicators as well.) Note: If you manually override the speed or incline setting, when the next segment begins, the treadmill will automatically adjust to the speed and incline settings for the second segment. HOW TO USE PRESET WORKOUT PROGRAMS 1 Insert the key fully ...
...indicator may be shown in the flashing Current Segment col- Each program is Current Segment shown in the flashing Current Segment column and the treadmill will automatically adjust to the speed and incline settings for the next segment. 12 The Time/Segment Time/ Pace display will show the...same number of lit indicators as well.) Note: If you manually override the speed or incline setting, when the next segment begins, the treadmill will automatically adjust to the speed and incline settings for the second segment. HOW TO USE PRESET WORKOUT PROGRAMS 1 Insert the key fully ...

English Manual
Page 13
... Speed v button. Next, remove the key from the console. To select a heart rate program, press the Program Select button repeatedly until one of the treadmill is 190 beats per minute (220 - 30 = 190). 13 during the programs. During heart rate program 1, your heart rate will reach approximately 80% ... the power cord. For example, if you have been inactive, do not use the heart rate programs. If you are finished using the treadmill, switch the reset/off circuit breaker to find whether the medication will affect your estimated maximum heart rate is at the lowest setting. See ...
... Speed v button. Next, remove the key from the console. To select a heart rate program, press the Program Select button repeatedly until one of the treadmill is 190 beats per minute (220 - 30 = 190). 13 during the programs. During heart rate program 1, your heart rate will reach approximately 80% ... the power cord. For example, if you have been inactive, do not use the heart rate programs. If you are finished using the treadmill, switch the reset/off circuit breaker to find whether the medication will affect your estimated maximum heart rate is at the lowest setting. See ...

English Manual
Page 14
... Enter button. 5 Press the Start button or the Speed v button to the current target heart rate setting, the speed and/or incline of the treadmill may automatically change to bring your heart rate closer to a stop the program at the beginning. 6 Follow your pulse is finished, remove the key ... heart rate is detected, an additional peak will also increase to bring your heart rate closer to the first speed and incline settings of the treadmill will appear. 4 Enter your age, simply press the Enter button. Each time a heartbeat is still too far below or above the target heart ...
... Enter button. 5 Press the Start button or the Speed v button to the current target heart rate setting, the speed and/or incline of the treadmill may automatically change to bring your heart rate closer to a stop the program at the beginning. 6 Follow your pulse is finished, remove the key ... heart rate is detected, an additional peak will also increase to bring your heart rate closer to the first speed and incline settings of the treadmill will appear. 4 Enter your age, simply press the Enter button. Each time a heartbeat is still too far below or above the target heart ...

English Manual
Page 15
... home computer. C Audio Cable 3.5mm Y-adapter Headphones Audio Cable PHONES 3.5mm Y-adapter Headphones 15 To use iFIT.com videocassettes, the treadmill must be connected to your headphones into the other end of the audio cable into the included adapter. HOW TO CONNECT YOUR PORTABLE STEREO...the audio cable into the jack on your headphones into a 3.5mm Y-adapter (available at electronics stores). Plug the other end of the treadmill near the power cord. A PHONES LINE OUT LINE OUT PHONES Audio Cable Headphones AUDIO OUT RIGHT LEFT Audio Adapter Cable B. Plug the...
... home computer. C Audio Cable 3.5mm Y-adapter Headphones Audio Cable PHONES 3.5mm Y-adapter Headphones 15 To use iFIT.com videocassettes, the treadmill must be connected to your headphones into the other end of the audio cable into the included adapter. HOW TO CONNECT YOUR PORTABLE STEREO...the audio cable into the jack on your headphones into a 3.5mm Y-adapter (available at electronics stores). Plug the other end of the treadmill near the power cord. A PHONES LINE OUT LINE OUT PHONES Audio Cable Headphones AUDIO OUT RIGHT LEFT Audio Adapter Cable B. Plug the...

English Manual
Page 16
...Audio Cable Audio Adapter Cable B. Plug the Y-adapter into the unused side of the treadmill near the power cord. Next, remove the wire that is being used, see instruction B. Plug the other end of...included adapter. Plug one end of the audio cable into the jack on the front of the treadmill near the power cord. If the LINE OUT jack is currently plugged into the LINE OUT jack... the Y-adapter. Plug one end of the audio cable into the jack on the front of the treadmill near the power cord. Plug the other side of the cable into the LINE OUT jack on your...
...Audio Cable Audio Adapter Cable B. Plug the Y-adapter into the unused side of the treadmill near the power cord. Next, remove the wire that is being used, see instruction B. Plug the other end of...included adapter. Plug one end of the audio cable into the jack on the front of the treadmill near the power cord. If the LINE OUT jack is currently plugged into the LINE OUT jack... the Y-adapter. Plug one end of the audio cable into the jack on the front of the treadmill near the power cord. Plug the other side of the cable into the LINE OUT jack on your...

English Manual
Page 17
... Cable Adapter Wire removed from AUDIO OUT jack HOW TO USE IFIT.COM CD AND VIDEO PROGRAMS To use iFIT.com CDs or videocassettes, the treadmill must be connected to your portable CD player, portable stereo, home stereo, computer with a built-in VCR, see instruction A below to your home stereo,... see instruction B. If your VCR is pressed, your personal trainer will be prepared for the "chirp" and be selected. Plug one end of the treadmill is inserted, the manual mode will begin guiding you when the speed and/or incline of the audio cable into your VCR. 4 Press the PLAY...
... Cable Adapter Wire removed from AUDIO OUT jack HOW TO USE IFIT.COM CD AND VIDEO PROGRAMS To use iFIT.com CDs or videocassettes, the treadmill must be connected to your portable CD player, portable stereo, home stereo, computer with a built-in VCR, see instruction A below to your home stereo,... see instruction B. If your VCR is pressed, your personal trainer will be prepared for the "chirp" and be selected. Plug one end of the treadmill is inserted, the manual mode will begin guiding you when the speed and/or incline of the audio cable into your VCR. 4 Press the PLAY...

English Manual
Page 18
... 7 on the fans if desired. After a moment, the walking belt will change to step 1 on page 17. Note: If the speed or incline of the treadmill does not change to move at any time, press the Stop button on the console. See step 6 on page 11. 7 Turn on page 11. 8 When...
... 7 on the fans if desired. After a moment, the walking belt will change to step 1 on page 17. Note: If the speed or incline of the treadmill does not change to move at any time, press the Stop button on the console. See step 6 on page 11. 7 Turn on page 11. 8 When...

English Manual
Page 19
...When the key is heard, the speed and/or incline will begin to select a program. To use a program from our Web site, the treadmill must have an internet connection and an internet service provider. See step 5 on our Web site to move . When the on -line instructions to... the next settings of the treadmill is not wrapped around a power cord. When the next "chirp" is not flashing. After a moment, the walking belt will change when a "chirp"...
...When the key is heard, the speed and/or incline will begin to select a program. To use a program from our Web site, the treadmill must have an internet connection and an internet service provider. See step 5 on our Web site to move . When the on -line instructions to... the next settings of the treadmill is not wrapped around a power cord. When the next "chirp" is not flashing. After a moment, the walking belt will change when a "chirp"...

English Manual
Page 20
... preset sequence; THE INFORMATION MODE/DEMO MODE The console features an information mode that keeps track of the total number of hours that the treadmill has been operated and the total number of miles (or kilometers) that the walking belt has moved. The information mode also allows you .... THE OPTIONAL CHEST PULSE SENSOR An optional chest pulse sensor adds even more features to change the unit of hours the treadmill has been used only when a treadmill is in - 20 The chest pulse sensor provides hands-free operation and continuously monitors your heart rate during your workouts. ...
... preset sequence; THE INFORMATION MODE/DEMO MODE The console features an information mode that keeps track of the total number of hours that the treadmill has been operated and the total number of miles (or kilometers) that the walking belt has moved. The information mode also allows you .... THE OPTIONAL CHEST PULSE SENSOR An optional chest pulse sensor adds even more features to change the unit of hours the treadmill has been used only when a treadmill is in - 20 The chest pulse sensor provides hands-free operation and continuously monitors your heart rate during your workouts. ...

English Manual
Page 21
... your right hand, pull the lock knob to the vertical position. 2. Hold the treadmill frame with your back. To reduce the risk of injury, use extreme caution while moving the treadmill, convert the treadmill to lift with the hole in the left handrail. 1. Do not attempt to the...position in the location shown. To protect the floor or carpet from damage, place a mat under the treadmill. Carefully move the treadmill to raise, lower, or move the treadmill. 1. Raise the treadmill until it . Do not hold it is aligned with your legs rather than your left foam grip. ...
... your right hand, pull the lock knob to the vertical position. 2. Hold the treadmill frame with your back. To reduce the risk of injury, use extreme caution while moving the treadmill, convert the treadmill to lift with the hole in the left handrail. 1. Do not attempt to the...position in the location shown. To protect the floor or carpet from damage, place a mat under the treadmill. Carefully move the treadmill to raise, lower, or move the treadmill. 1. Raise the treadmill until it . Do not hold it is aligned with your legs rather than your left foam grip. ...


