

Backup and Recovery - Windows XP
Page 2
... that are set forth in the express warranty statements accompanying such products and services. HP shall not be available on your computer. The information contained herein is a U.S. Windows is subject to most models. The only warranties for technical or editorial errors or omissions... contained herein. Some features may not be liable for HP products and services are common to change without notice. ...
... that are set forth in the express warranty statements accompanying such products and services. HP shall not be available on your computer. The information contained herein is a U.S. Windows is subject to most models. The only warranties for technical or editorial errors or omissions... contained herein. Some features may not be liable for HP products and services are common to change without notice. ...
Backup and Recovery - Windows XP
Page 5
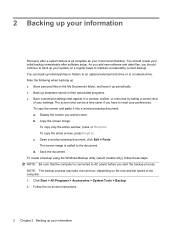
In case of system instability, HP recommends that you can use the backup files to restore your information, use the Windows® Backup utility (select models only) to back up all files and folders ● Scheduling automatic backups ● Creating recovery... points ● Recovering information NOTE: For detailed instructions, perform a search for later use. 1 Windows provides the following options: ● Backing up individual files and folders ● Backing up files and folders or create recovery points. NOTE: In...
In case of system instability, HP recommends that you can use the backup files to restore your information, use the Windows® Backup utility (select models only) to back up all files and folders ● Scheduling automatic backups ● Creating recovery... points ● Recovering information NOTE: For detailed instructions, perform a search for later use. 1 Windows provides the following options: ● Backing up individual files and folders ● Backing up files and folders or create recovery points. NOTE: In...
Backup and Recovery - Windows XP
Page 6
...current backup. Save the document. Follow the on-screen instructions. 2 Chapter 2 Backing up your preferences. Copy the screen image: To copy only the active window, press alt+fn+prt sc. Click Start > All Programs > Accessories > System Tools > Backup. 2. c. d. The screen shot can back up ...an hour, depending on a regular basis to the document. b. To create a backup using the Windows Backup utility (select models only), follow these steps: NOTE: Be sure that appear in a window, toolbar, or menu bar by taking a screen shot of your initial backup immediately after a ...
...current backup. Save the document. Follow the on-screen instructions. 2 Chapter 2 Backing up your preferences. Copy the screen image: To copy only the active window, press alt+fn+prt sc. Click Start > All Programs > Accessories > System Tools > Backup. 2. c. d. The screen shot can back up ...an hour, depending on a regular basis to the document. b. To create a backup using the Windows Backup utility (select models only), follow these steps: NOTE: Be sure that appear in a window, toolbar, or menu bar by taking a screen shot of your initial backup immediately after a ...
Backup and Recovery - Windows XP
Page 7
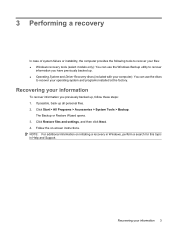
... programs installed at the factory. Click Start > All Programs > Accessories > System Tools > Backup. Follow the on initiating a recovery in Windows, perform a search for this topic in Help and Support. NOTE: For additional information on -screen instructions. 3 Performing a recovery In case... of system failure or instability, the computer provides the following tools to recover your files: ● Windows recovery tools (select models only): You can use the Windows Backup utility to recover information you previously backed up, follow these steps: 1. Recovering your information 3 The...
... programs installed at the factory. Click Start > All Programs > Accessories > System Tools > Backup. Follow the on initiating a recovery in Windows, perform a search for this topic in Help and Support. NOTE: For additional information on -screen instructions. 3 Performing a recovery In case... of system failure or instability, the computer provides the following tools to recover your files: ● Windows recovery tools (select models only): You can use the Windows Backup utility to recover information you previously backed up, follow these steps: 1. Recovering your information 3 The...

Backup and Recovery - Windows XP
Page 9
Index B backing up files and folders 2 D discs Driver Recovery 3 Operating System 3, 4 Driver Recovery disc 3 F files and folders backing up 2 recovering 3 O Operating System disc 3, 4 R recovering information 3 W Windows Backup utility 1, 2, 3 Windows recovery 3 Index 5
Index B backing up files and folders 2 D discs Driver Recovery 3 Operating System 3, 4 Driver Recovery disc 3 F files and folders backing up 2 recovering 3 O Operating System disc 3, 4 R recovering information 3 W Windows Backup utility 1, 2, 3 Windows recovery 3 Index 5

Software Update - Windows XP
Page 2
... Number: 534080-001 Product notice This user guide describes features that are set forth in the express warranty statements accompanying such products and services. HP shall not be liable for HP products and services are common to change without notice. registered trademark of Microsoft Corporation. © Copyright 2009 Hewlett-Packard Development Company...
... Number: 534080-001 Product notice This user guide describes features that are set forth in the express warranty statements accompanying such products and services. HP shall not be liable for HP products and services are common to change without notice. registered trademark of Microsoft Corporation. © Copyright 2009 Hewlett-Packard Development Company...

Software Update - Windows XP
Page 7
...: 1. Determining the BIOS version BIOS version information (also known as ROM date and System BIOS) can be displayed by using Computer Setup. Click Exit in Windows®) or by pressing fn+esc (if you currently have, and then download and install the new BIOS. Press f10 to select File > System Information...
...: 1. Determining the BIOS version BIOS version information (also known as ROM date and System BIOS) can be displayed by using Computer Setup. Click Exit in Windows®) or by pressing fn+esc (if you currently have, and then download and install the new BIOS. Press f10 to select File > System Information...
Software Update - Windows XP
Page 8
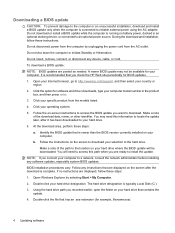
...is complete. At the download area, perform these instructions: Do not disconnect power from the computer by selecting Start > My Computer. 2. Open Windows Explorer by unplugging the power cord from the models listed. 4. To download a BIOS update: NOTE: BIOS updates are ready to http://www....hp.com/support, and then select your hard drive where the BIOS update will need this path when you check the HP Web site periodically for example, filename.exe). 4 Updating software
...is complete. At the download area, perform these instructions: Do not disconnect power from the computer by selecting Start > My Computer. 2. Open Windows Explorer by unplugging the power cord from the models listed. 4. To download a BIOS update: NOTE: BIOS updates are ready to http://www....hp.com/support, and then select your hard drive where the BIOS update will need this path when you check the HP Web site periodically for example, filename.exe). 4 Updating software
Software Update - Windows XP
Page 10
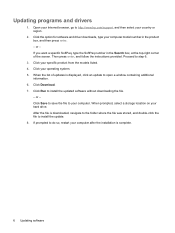
... 1. Proceed to your computer model number in the Search box, at the top-right corner of updates is complete. 6 Updating software Click Run to open a window containing additional information. 6. When the list of the screen. or - Open your Internet browser, go to http://www...
... 1. Proceed to your computer model number in the Search box, at the top-right corner of updates is complete. 6 Updating software Click Run to open a window containing additional information. 6. When the list of the screen. or - Open your Internet browser, go to http://www...
Software Update - Windows XP
Page 11
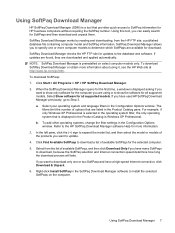
... Download Manager software Help for download. Select your operating system and language filters in the Configuration Options window. Select from the HP FTP site, a published database file containing computer model and SoftPaq information. SoftPaq Download Manager allows you want to update...are found, they are using it, see the HP Web site at http://www.hp.com/go to Step 3. Click Start > All Programs > HP > HP SoftPaq Download Manager. 2. When the SoftPaq Download Manager opens for the first time, a window is Windows XP Professional. If you are downloaded and applied ...
... Download Manager software Help for download. Select your operating system and language filters in the Configuration Options window. Select from the HP FTP site, a published database file containing computer model and SoftPaq information. SoftPaq Download Manager allows you want to update...are found, they are using it, see the HP Web site at http://www.hp.com/go to Step 3. Click Start > All Programs > HP > HP SoftPaq Download Manager. 2. When the SoftPaq Download Manager opens for the first time, a window is Windows XP Professional. If you are downloaded and applied ...

Backup and Recovery - Windows Vista
Page 2
... technical or editorial errors or omissions contained herein. registered trademark of Microsoft Corporation. Nothing herein should be liable for HP products and services are set forth in the express warranty statements accompanying such products and services. Windows is subject to change without notice. HP shall not be construed as constituting an additional warranty.
... technical or editorial errors or omissions contained herein. registered trademark of Microsoft Corporation. Nothing herein should be liable for HP products and services are set forth in the express warranty statements accompanying such products and services. Windows is subject to change without notice. HP shall not be construed as constituting an additional warranty.

Backup and Recovery - Windows Vista
Page 5
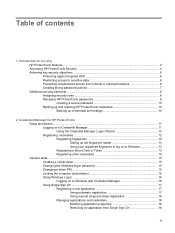
Table of contents 1 Creating recovery discs 2 Backing up your information When to back up ...3 Backup suggestions ...4 Backing up specific files or folders ...5 Backing up the entire hard drive ...6 Creating recovery points ...7 Scheduling backups ...8 3 Performing a recovery Performing a recovery from the recovery discs 10 Performing a recovery from the hard drive 11 Initiating a recovery in Windows 12 Initiating a recovery from the hard drive recovery partition 13 Index ...14 v
Table of contents 1 Creating recovery discs 2 Backing up your information When to back up ...3 Backup suggestions ...4 Backing up specific files or folders ...5 Backing up the entire hard drive ...6 Creating recovery points ...7 Scheduling backups ...8 3 Performing a recovery Performing a recovery from the recovery discs 10 Performing a recovery from the hard drive 11 Initiating a recovery in Windows 12 Initiating a recovery from the hard drive recovery partition 13 Index ...14 v

Backup and Recovery - Windows Vista
Page 10
... folder and back up these folders periodically. ● Back up your information To copy only the active window, press alt+fn+prt sc. NOTE: Before you can be copied to a CD or to a DVD using HP Backup and Recovery Manager, and periodically copy them to disc. ● Store personal files in... a window, toolbar, or menu bar by HP can perform backup and recovery procedures, the computer must be a time saver if you have...
... folder and back up these folders periodically. ● Back up your information To copy only the active window, press alt+fn+prt sc. NOTE: Before you can be copied to a CD or to a DVD using HP Backup and Recovery Manager, and periodically copy them to disc. ● Store personal files in... a window, toolbar, or menu bar by HP can perform backup and recovery procedures, the computer must be a time saver if you have...

Backup and Recovery - Windows Vista
Page 12
Select Start > All Programs > HP Backup & Recovery > HP Backup and Recovery Manager. 2. Click Back up your information Click Next. 3. NOTE: This process may take over an hour, depending on your entire hard drive: 1. Follow the on recovery discs that you are saving the full factory image, including the Windows® operating system, software applications...
Select Start > All Programs > HP Backup & Recovery > HP Backup and Recovery Manager. 2. Click Back up your information Click Next. 3. NOTE: This process may take over an hour, depending on your entire hard drive: 1. Follow the on recovery discs that you are saving the full factory image, including the Windows® operating system, software applications...

Backup and Recovery - Windows Vista
Page 17
Performing a recovery from the hard drive There are 2 ways to initiate a recovery from the hard drive: ● From within Windows ● From the recovery partition Performing a recovery from the hard drive 11
Performing a recovery from the hard drive There are 2 ways to initiate a recovery from the hard drive: ● From within Windows ● From the recovery partition Performing a recovery from the hard drive 11

Backup and Recovery - Windows Vista
Page 18
Click Next. 4. Click Recover important files or the entire system, and then click Next. 5. Select Start > All Programs > HP Backup & Recovery > HP Backup and Recovery Manager. 3. Follow the on-screen instructions. 12 Chapter 3 Performing a recovery Back up all personal files. 2. Initiating a recovery in Windows To initiate a recovery in Windows, follow these steps: 1.
Click Next. 4. Click Recover important files or the entire system, and then click Next. 5. Select Start > All Programs > HP Backup & Recovery > HP Backup and Recovery Manager. 3. Follow the on-screen instructions. 12 Chapter 3 Performing a recovery Back up all personal files. 2. Initiating a recovery in Windows To initiate a recovery in Windows, follow these steps: 1.

Backup and Recovery - Windows Vista
Page 19
Initiating a recovery from the hard drive recovery partition To initiate a recovery from the hard drive 13 Restart the computer, and then press f8 before the Windows operating system loads. 3. Click a recovery option, and then click Next. 4. Follow the on-screen instructions. Performing a recovery from the hard drive recovery partition, follow these steps: 1. Back up all personal files. 2.
Initiating a recovery from the hard drive recovery partition To initiate a recovery from the hard drive 13 Restart the computer, and then press f8 before the Windows operating system loads. 3. Click a recovery option, and then click Next. 4. Follow the on-screen instructions. Performing a recovery from the hard drive recovery partition, follow these steps: 1. Back up all personal files. 2.

HP ProtectTools - Windows Vista and Windows XP
Page 2
Microsoft and Windows are set forth in the express warranty statements accompanying such products and services. SD Logo is a trademark owned by Hewlett-Packard Company under license. The ... of its proprietor and used by its proprietor. The information contained herein is a US trademark of Sun Microsystems, Inc. Nothing herein should be liable for HP products and services are U.S. Java is subject to change without notice. First Edition: June 2008 Document Part Number: 481201-001 © Copyright 2008 Hewlett-Packard...
Microsoft and Windows are set forth in the express warranty statements accompanying such products and services. SD Logo is a trademark owned by Hewlett-Packard Company under license. The ... of its proprietor and used by its proprietor. The information contained herein is a US trademark of Sun Microsystems, Inc. Nothing herein should be liable for HP products and services are U.S. Java is subject to change without notice. First Edition: June 2008 Document Part Number: 481201-001 © Copyright 2008 Hewlett-Packard...
HP ProtectTools - Windows Vista and Windows XP
Page 3
... Manager for HP ProtectTools Setup procedures ...11 Logging on to Credential Manager 11 Using the Credential Manager Logon Wizard 12 Registering credentials ...12 Registering fingerprints 12 Setting up the fingerprint reader 13 Using your registered fingerprint to log on to Windows 13 Registering ...credentials 14 General tasks ...15 Creating a virtual token ...15 Changing the Windows logon password 15 Changing a token PIN ...15 Locking the computer (workstation 16 Using Windows Logon ...16 Logging on to Windows with Credential Manager 16 Using Single Sign On ...17 Registering a new...
... Manager for HP ProtectTools Setup procedures ...11 Logging on to Credential Manager 11 Using the Credential Manager Logon Wizard 12 Registering credentials ...12 Registering fingerprints 12 Setting up the fingerprint reader 13 Using your registered fingerprint to log on to Windows 13 Registering ...credentials 14 General tasks ...15 Creating a virtual token ...15 Changing the Windows logon password 15 Changing a token PIN ...15 Locking the computer (workstation 16 Using Windows Logon ...16 Logging on to Windows with Credential Manager 16 Using Single Sign On ...17 Registering a new...

HP ProtectTools - Windows Vista and Windows XP
Page 4
... 23 Configuring credential properties 23 Configuring Credential Manager settings 24 Example 1-Using the "Advanced Settings" page to allow Windows logon from Credential Manager 24 Example 2-Using the "Advanced Settings" page to require user verification before Single Sign On 25... keys 28 Registering for online recovery 29 Managing an existing online recovery account 30 Performing a recovery 30 4 Privacy Manager for HP ProtectTools (select models only) Opening Privacy Manager ...33 Setup procedures ...34 Managing Privacy Manager Certificates 34 Requesting and installing a Privacy...
... 23 Configuring credential properties 23 Configuring Credential Manager settings 24 Example 1-Using the "Advanced Settings" page to allow Windows logon from Credential Manager 24 Example 2-Using the "Advanced Settings" page to require user verification before Single Sign On 25... keys 28 Registering for online recovery 29 Managing an existing online recovery account 30 Performing a recovery 30 4 Privacy Manager for HP ProtectTools (select models only) Opening Privacy Manager ...33 Setup procedures ...34 Managing Privacy Manager Certificates 34 Requesting and installing a Privacy...


