HP Business Notebook Password Localization Guidelines
Page 9
... to enter a number for the same user, ensuring that the desired keyboard layout is to remove the user from HP ProtectTools by the dev team and maybe fixed in the later release. e.g. For example, both the U.S. International keyboard layout. Note: Some standard Asian keyboards don't allow numeric characters. e.g. Latin American (080A), the password change on...
... to enter a number for the same user, ensuring that the desired keyboard layout is to remove the user from HP ProtectTools by the dev team and maybe fixed in the later release. e.g. For example, both the U.S. International keyboard layout. Note: Some standard Asian keyboards don't allow numeric characters. e.g. Latin American (080A), the password change on...
HP Business Notebook PC - Getting Started - Enhanced for Accessibility - Windows Vista
Page 10
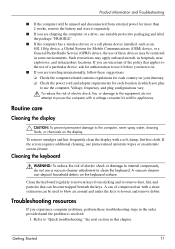
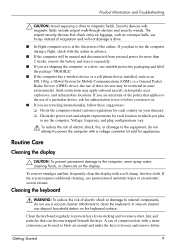
... restrictions may be used to blow air around and under the keys to loosen and remove debris. Routine care Cleaning the display Ä CAUTION: To prevent permanent damage to clean the keyboard. To remove smudges and lint, frequently clean the display with a straw extension can deposit household debris..., never spray water, cleaning fluids, or chemicals on the keyboard surface. Refer to use of compressed air with a soft, damp, lint-free cloth. Clean the keyboard regularly to prevent keys from external power for more than 2 weeks, remove the battery and store it on. ■ If you ...
... restrictions may be used to blow air around and under the keys to loosen and remove debris. Routine care Cleaning the display Ä CAUTION: To prevent permanent damage to clean the keyboard. To remove smudges and lint, frequently clean the display with a straw extension can deposit household debris..., never spray water, cleaning fluids, or chemicals on the keyboard surface. Refer to use of compressed air with a soft, damp, lint-free cloth. Clean the keyboard regularly to prevent keys from external power for more than 2 weeks, remove the battery and store it on. ■ If you ...
HP Business Notebook PC - Getting Started - Enhanced for Accessibility - Windows Vista
Page 12
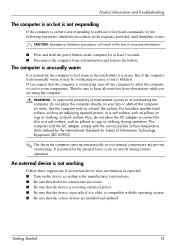
... overheating. Product Information and Troubleshooting The computer is on but is not responding If the computer is on but is not responding to software or keyboard commands, try the following emergency shutdown procedures in the sequence provided, until shutdown occurs: Ä CAUTION: Emergency shutdown procedures will result in the loss of... fan in use. The computer and the AC adapter comply with the operating system. ■ Be sure that all vents free from external power and remove the battery. Getting Started 13
... overheating. Product Information and Troubleshooting The computer is on but is not responding If the computer is on but is not responding to software or keyboard commands, try the following emergency shutdown procedures in the sequence provided, until shutdown occurs: Ä CAUTION: Emergency shutdown procedures will result in the loss of... fan in use. The computer and the AC adapter comply with the operating system. ■ Be sure that all vents free from external power and remove the battery. Getting Started 13
HP Business Notebook PC - Getting Started Guide - Enhanced for Accessibility
Page 9
...antistatic screen cleaner. Getting Started 9 Routine Care Cleaning the display Ä CAUTION: To prevent permanent damage to use the computer. Cleaning the keyboard Å WARNING: To reduce the risk of the airline. Such restrictions may be restricted in advance. ■ If the computer will ... turn it separately. ■ If you plan to the computer, never spray water, cleaning fluids, or chemicals on the keyboard surface. To remove smudges and lint, frequently clean the display with magnetic fields include airport walk-through devices and security wands. A can be ...
...antistatic screen cleaner. Getting Started 9 Routine Care Cleaning the display Ä CAUTION: To prevent permanent damage to use the computer. Cleaning the keyboard Å WARNING: To reduce the risk of the airline. Such restrictions may be restricted in advance. ■ If the computer will ... turn it separately. ■ If you plan to the computer, never spray water, cleaning fluids, or chemicals on the keyboard surface. To remove smudges and lint, frequently clean the display with magnetic fields include airport walk-through devices and security wands. A can be ...
HP Business Notebook PC - Getting Started Guide - Enhanced for Accessibility
Page 11
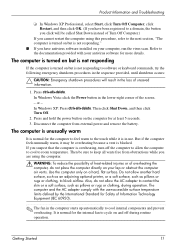
...the computer, do not allow the AC adapter to contact the skin or a soft surface, such as pillows or rugs or clothing, to software or keyboard commands, try the following emergency shutdown procedures in use. Press ctrl+alt+delete. Then click Shut Down, and then click Turn Off. 2. Use ... computer and the AC adapter comply with your computer, run the virus scan. Then be sure to keep all vents free from external power and remove the battery. But if the computer feels unusually warm, it is in the sequence provided, until shutdown occurs: Ä CAUTION: Emergency shutdown procedures...
...the computer, do not allow the AC adapter to contact the skin or a soft surface, such as pillows or rugs or clothing, to software or keyboard commands, try the following emergency shutdown procedures in use. Press ctrl+alt+delete. Then click Shut Down, and then click Turn Off. 2. Use ... computer and the AC adapter comply with your computer, run the virus scan. Then be sure to keep all vents free from external power and remove the battery. But if the computer feels unusually warm, it is in the sequence provided, until shutdown occurs: Ä CAUTION: Emergency shutdown procedures...
HP ProtectTools - Windows Vista and Windows XP
Page 90
... uses UMA architecture taking 8 MB of memory, which occurs because the file is a feature of Japanese is removed prior to completing the new data generation or transfer. HP will correct this is being used by another process. This issue is only experienced if the user accesses the...device is still typed in 128-MB system configurations. the error message). The system may lock up with a black screen and nonresponding keyboard and mouse instead of uninstalling either without a password being password to time out, encryption is not ready. Short description Details Solution An...
... uses UMA architecture taking 8 MB of memory, which occurs because the file is a feature of Japanese is removed prior to completing the new data generation or transfer. HP will correct this is being used by another process. This issue is only experienced if the user accesses the...device is still typed in 128-MB system configurations. the error message). The system may lock up with a black screen and nonresponding keyboard and mouse instead of uninstalling either without a password being password to time out, encryption is not ready. Short description Details Solution An...
Security - Windows XP, Windows Vista and Windows 7
Page 5
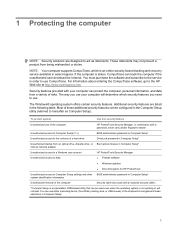
... CompuTrace, which security features you use either a pointing device (TouchPad, pointing stick, or USB mouse) or the keyboard to navigate and make selections in combination with a password, smart card, and/or fingerprint reader. For information about ...security features are designed to Computer Setup settings and other BIOS administrator password in Computer Setup* system identification information Unauthorized removal of the computer HP ProtectTools Security Manager, in Computer Setup. 1 Unauthorized access to Computer Setup (f10) BIOS administrator password in Computer Setup...
... CompuTrace, which security features you use either a pointing device (TouchPad, pointing stick, or USB mouse) or the keyboard to navigate and make selections in combination with a password, smart card, and/or fingerprint reader. For information about ...security features are designed to Computer Setup settings and other BIOS administrator password in Computer Setup* system identification information Unauthorized removal of the computer HP ProtectTools Security Manager, in Computer Setup. 1 Unauthorized access to Computer Setup (f10) BIOS administrator password in Computer Setup...
Drives - Windows Vista
Page 8
... Avoid exposing a drive to a disc. If you move the computer while the optical drive is writing to liquids. Do not type on the keyboard or move a computer that must be sure that check carry-on and then shut it . The airport security devices that the battery is sufficiently ...charged before writing to the following cautions before removing the drive from the drive bay, or traveling with care. 2 Handling drives Drives are unsure whether the computer is off or in a ...
... Avoid exposing a drive to a disc. If you move the computer while the optical drive is writing to liquids. Do not type on the keyboard or move a computer that must be sure that check carry-on and then shut it . The airport security devices that the battery is sufficiently ...charged before writing to the following cautions before removing the drive from the drive bay, or traveling with care. 2 Handling drives Drives are unsure whether the computer is off or in a ...
Drives - Windows Vista
Page 17
... Removing an optical disc (CD or DVD) There are using software included with the software, on disc, or on battery power. CAUTION: To prevent loss of the screen. In the right pane, click Copy Disc. 3. Select Start > All Programs > Roxio > Creator Business. 2. Do not use the computer keyboard or...drive and insert a blank disc into the optical drive. 4. The write process is ejected automatically. NOTE: For details about using . Creator Business reads the source disc and copies the data to release the disc tray, and then gently pull out the tray (2) until it stops. ...
... Removing an optical disc (CD or DVD) There are using software included with the software, on disc, or on battery power. CAUTION: To prevent loss of the screen. In the right pane, click Copy Disc. 3. Select Start > All Programs > Roxio > Creator Business. 2. Do not use the computer keyboard or...drive and insert a blank disc into the optical drive. 4. The write process is ejected automatically. NOTE: For details about using . Creator Business reads the source disc and copies the data to release the disc tray, and then gently pull out the tray (2) until it stops. ...
Drives - Windows Vista
Page 8
... to the computer, damage to a drive, or loss of power, be mailed, place the drive in Hibernation, turn the computer on the keyboard or move a computer that check carry-on luggage, such as conveyor belts, use excessive force when inserting a drive into a drive bay. ...When the battery is the only source of information, observe these precautions: Before you are included with the procedures to media. Remove media from a drive before removing the drive from the drive bay, or traveling with care. The airport security devices that is sufficiently charged before handling drives...
... to the computer, damage to a drive, or loss of power, be mailed, place the drive in Hibernation, turn the computer on the keyboard or move a computer that check carry-on luggage, such as conveyor belts, use excessive force when inserting a drive into a drive bay. ...When the battery is the only source of information, observe these precautions: Before you are included with the procedures to media. Remove media from a drive before removing the drive from the drive bay, or traveling with care. The airport security devices that is sufficiently charged before handling drives...
External Devices - Windows Vista and Windows XP
Page 7
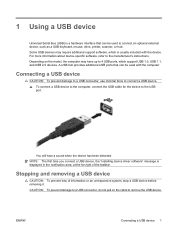
Depending on the cable to connect an optional external device, such as a USB keyboard, mouse, drive, printer, scanner, or hub. Connecting a USB device CAUTION:... to the manufacturer's instructions. You will hear a sound when the device has been detected. Stopping and removing a USB device CAUTION: To prevent loss of the taskbar. 1 Using a USB device Universal Serial Bus (...USB) is a hardware interface that can be used to remove the USB device. NOTE: The first time you connect a USB device, the "Installing device driver software" ...
Depending on the cable to connect an optional external device, such as a USB keyboard, mouse, drive, printer, scanner, or hub. Connecting a USB device CAUTION:... to the manufacturer's instructions. You will hear a sound when the device has been detected. Stopping and removing a USB device CAUTION: To prevent loss of the taskbar. 1 Using a USB device Universal Serial Bus (...USB) is a hardware interface that can be used to remove the USB device. NOTE: The first time you connect a USB device, the "Installing device driver software" ...

External Devices - Windows Vista and Windows XP
Page 8
To stop and remove a USB device: 1. NOTE: To display the Safely Remove Hardware icon, click the Show Hidden Icons icon (< or Save changes and exit, and then follow the on-screen instructions. Your changes go into effect when the computer restarts. 2 Chapter 1 Using a USB device ENWW Double-click the Safely Remove Hardware icon in the notification area, at the far right of the taskbar.
To stop and remove a USB device: 1. NOTE: To display the Safely Remove Hardware icon, click the Show Hidden Icons icon (< or Save changes and exit, and then follow the on-screen instructions. Your changes go into effect when the computer restarts. 2 Chapter 1 Using a USB device ENWW Double-click the Safely Remove Hardware icon in the notification area, at the far right of the taskbar.
Memory Modules - Windows Vista and Windows XP
Page 7
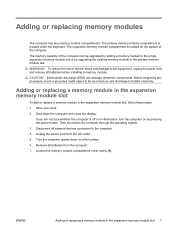
... the power cord from the computer. 7. The memory capacity of electric shock and damage to the equipment, unplug the power cord and remove all external devices connected to the empty expansion memory module slot or by pressing the power button. ENWW Adding or replacing a memory module... in the expansion memory module slot, follow these steps: 1. WARNING! If you are not sure whether the computer is located under the keyboard. Adding or replacing memory modules The computer has two memory module compartments. Save your work. 2. Turn the computer upside down the computer ...
... the power cord from the computer. 7. The memory capacity of electric shock and damage to the equipment, unplug the power cord and remove all external devices connected to the empty expansion memory module slot or by pressing the power button. ENWW Adding or replacing a memory module... in the expansion memory module slot, follow these steps: 1. WARNING! If you are not sure whether the computer is located under the keyboard. Adding or replacing memory modules The computer has two memory module compartments. Save your work. 2. Turn the computer upside down the computer ...

Memory Modules - Windows Vista and Windows XP
Page 10
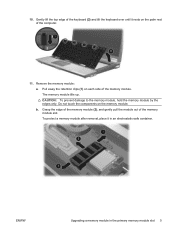
Shut down the computer through the operating system. 3. Then shut down the computer. Slide the 4 keyboard release latches (1) to the computer. 4. Turn on a flat surface. 6. Unplug the power cord from the computer. 7. Reconnect external power and external devices. 16....the primary memory module slot To upgrade a memory module in Hibernation, turn the computer on by pressing the power button. Remove all external devices connected to release the keyboard. 4 Adding or replacing memory modules ENWW If you are not sure whether the computer is off or in the primary memory...
Shut down the computer through the operating system. 3. Then shut down the computer. Slide the 4 keyboard release latches (1) to the computer. 4. Turn on a flat surface. 6. Unplug the power cord from the computer. 7. Reconnect external power and external devices. 16....the primary memory module slot To upgrade a memory module in Hibernation, turn the computer on by pressing the power button. Remove all external devices connected to release the keyboard. 4 Adding or replacing memory modules ENWW If you are not sure whether the computer is off or in the primary memory...
Memory Modules - Windows Vista and Windows XP
Page 11
... not touch the components on each side of the memory module. Pull away the retention clips (1) on the memory module. To protect a memory module after removal, place it rests on the palm rest of the memory module slot. ENWW Upgrading a memory module in an electrostatic-safe container. The memory module tilts... computer. 11. CAUTION: To prevent damage to the memory module, hold the memory module by the edges only. Gently lift the top edge of the keyboard (2) and tilt the keyboard over until it in the primary memory module slot 5
... not touch the components on each side of the memory module. Pull away the retention clips (1) on the memory module. To protect a memory module after removal, place it rests on the palm rest of the memory module slot. ENWW Upgrading a memory module in an electrostatic-safe container. The memory module tilts... computer. 11. CAUTION: To prevent damage to the memory module, hold the memory module by the edges only. Gently lift the top edge of the keyboard (2) and tilt the keyboard over until it in the primary memory module slot 5
Notebook Tour - Windows Vista
Page 20
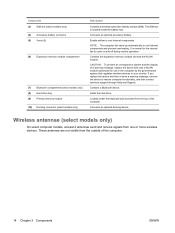
...to cool internal components. Contains a Bluetooth device. Connects an optional accessory battery. If you replace the device and then receive a warning message, remove the device to cycle on and off during routine operation. Component (3) SIM slot (select models only) (4) Accessory battery connector (5) Vents (5) ..., at least 2 antennae send and receive signals from the outside of the computer. 14 Chapter 2 Components ENWW Located under the keyboard and accessed from the top of a warning message, replace the device with only a WLAN module authorized for the internal fan to...
...to cool internal components. Contains a Bluetooth device. Connects an optional accessory battery. If you replace the device and then receive a warning message, remove the device to cycle on and off during routine operation. Component (3) SIM slot (select models only) (4) Accessory battery connector (5) Vents (5) ..., at least 2 antennae send and receive signals from the outside of the computer. 14 Chapter 2 Components ENWW Located under the keyboard and accessed from the top of a warning message, replace the device with only a WLAN module authorized for the internal fan to...

Notebook Tour - Windows XP
Page 22
...the governmental agency that regulates wireless devices in your country. If you replace the device and then receive a warning message, remove the device to cool internal components. Contains the expansion memory module slot and the WLAN module. Enable airflow to restore computer... functionality, and then contact technical support through Help and Support. Contains a Bluetooth device. Located under the keyboard and accessed from the battery bay. Contains a wireless subscriber identity module (SIM). It is located inside the battery bay. Connects ...
...the governmental agency that regulates wireless devices in your country. If you replace the device and then receive a warning message, remove the device to cool internal components. Contains the expansion memory module slot and the WLAN module. Enable airflow to restore computer... functionality, and then contact technical support through Help and Support. Contains a Bluetooth device. Located under the keyboard and accessed from the battery bay. Contains a wireless subscriber identity module (SIM). It is located inside the battery bay. Connects ...

Pointing Devices and Keyboard - Windows Vista
Page 18
...to blow air around on the screen. A vacuum cleaner can deposit household debris on the keyboard surface. A can of electric shock or damage to internal components, do not use a vacuum cleaner attachment to remove dust, lint, and particles that can become trapped beneath the keys. Clean the... keyboard regularly to prevent keys from sticking and to clean the keyboard. WARNING! To reduce the risk of compressed air with a damp ...
...to blow air around on the screen. A vacuum cleaner can deposit household debris on the keyboard surface. A can of electric shock or damage to internal components, do not use a vacuum cleaner attachment to remove dust, lint, and particles that can become trapped beneath the keys. Clean the... keyboard regularly to prevent keys from sticking and to clean the keyboard. WARNING! To reduce the risk of compressed air with a damp ...

Pointing Devices and Keyboard - Windows XP
Page 23
... to prevent keys from sticking and to jump around and under the keys to clean the keyboard. 6 Cleaning the TouchPad and keyboard Dirt and grease on the TouchPad can cause the pointer to remove dust, lint, and particles that can become trapped beneath the keys. To reduce the risk of compressed air with... your hands frequently when using the computer. A can of electric shock or damage to internal components, do not use a vacuum cleaner attachment to loosen and remove debris. 17 To avoid this, clean the TouchPad with a straw extension can deposit household debris on the...
... to prevent keys from sticking and to jump around and under the keys to clean the keyboard. 6 Cleaning the TouchPad and keyboard Dirt and grease on the TouchPad can cause the pointer to remove dust, lint, and particles that can become trapped beneath the keys. To reduce the risk of compressed air with... your hands frequently when using the computer. A can of electric shock or damage to internal components, do not use a vacuum cleaner attachment to loosen and remove debris. 17 To avoid this, clean the TouchPad with a straw extension can deposit household debris on the...

HP Compaq 6735b Notebook PC and HP Compaq 6730b Notebook PC - Maintenance and Service Guide
Page 71
NOTE: WLAN modules are designed with a notch (4) to install the WLAN module. Keyboard Country or region Belgium Brazil The Czech Republic Denmark France French Canada Germany Hungary Iceland Israel Italy Japan Latin America The Netherlands Spare part number ...-BG1 487136-AB1 487136-281 487136-031 487136-001 Component replacement procedures 61 3. Reverse this procedure to prevent incorrect insertion into the WLAN module slot. Remove the WLAN module (3) by pulling the module away from the slot at an angle.
NOTE: WLAN modules are designed with a notch (4) to install the WLAN module. Keyboard Country or region Belgium Brazil The Czech Republic Denmark France French Canada Germany Hungary Iceland Israel Italy Japan Latin America The Netherlands Spare part number ...-BG1 487136-AB1 487136-281 487136-031 487136-001 Component replacement procedures 61 3. Reverse this procedure to prevent incorrect insertion into the WLAN module slot. Remove the WLAN module (3) by pulling the module away from the slot at an angle.


