
2008 HP business notebook PC F10 Setup overview
Page 7
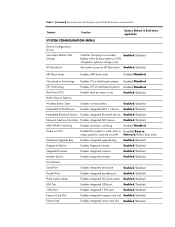
Enabled/Disabled SD Card boot Allows for boot from LAN. NB Upgrade Bay, NB Hard Drive, USB Floppy, USB CDROM, USB Hard Drive, NB Ethernet, SD Card, Dock Upgrade Bay, Ext SATA Drive Device Configurations USB Legacy Support Enables mouse/keyboard support. Enabled/Disabled Parallel port mode ...Enabled/Disabled CD-ROM boot Allows for boot from USB floppy. Table 1. (Continued) Key features for F10 Setup on select 2008 HP business notebook PCs Feature Function Options (Default in Bold where applicable) SYSTEM CONFIGURATION MENU Boot Options Startup Menu Delay (Sec.) Amount ...
Enabled/Disabled SD Card boot Allows for boot from LAN. NB Upgrade Bay, NB Hard Drive, USB Floppy, USB CDROM, USB Hard Drive, NB Ethernet, SD Card, Dock Upgrade Bay, Ext SATA Drive Device Configurations USB Legacy Support Enables mouse/keyboard support. Enabled/Disabled Parallel port mode ...Enabled/Disabled CD-ROM boot Allows for boot from USB floppy. Table 1. (Continued) Key features for F10 Setup on select 2008 HP business notebook PCs Feature Function Options (Default in Bold where applicable) SYSTEM CONFIGURATION MENU Boot Options Startup Menu Delay (Sec.) Amount ...
2008 HP business notebook PC F10 Setup overview
Page 8
... LAN/WLAN Switching Enables automatic switching. Enabled/Disabled Fingerprint Device Enables fingerprint reader. Network/Follow Boot order Notebook Upgrade Bay Enables integrated upgrade bay. Enabled/Disabled USB Port Enables integrated USB port. Enabled/Disabled Flash media reader Enables integrated SD Card reader....Enables TXT on LAN Enabled the system to wake when a Disabled/Boot to magic packet is 90% charged to HP QuickLook. Enabled/Disabled Built-In Device Options Wireless Button State Enables wireless button Enabled/Disabled Embedded WLAN Device Enables ...
... LAN/WLAN Switching Enables automatic switching. Enabled/Disabled Fingerprint Device Enables fingerprint reader. Network/Follow Boot order Notebook Upgrade Bay Enables integrated upgrade bay. Enabled/Disabled USB Port Enables integrated USB port. Enabled/Disabled Flash media reader Enables integrated SD Card reader....Enables TXT on LAN Enabled the system to wake when a Disabled/Boot to magic packet is 90% charged to HP QuickLook. Enabled/Disabled Built-In Device Options Wireless Button State Enables wireless button Enabled/Disabled Embedded WLAN Device Enables ...

Computer Setup - Windows Vista and Windows XP
Page 11
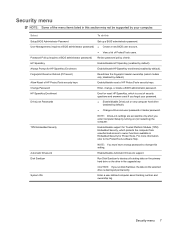
... ProtectTools users. Select User Management (requires an administrator password) Password Policy (requires an administrator password) Allow HP SpareKey Enrollment HP SpareKey Enrollment HP SpareKey Fingerprint Reset on (not restarting) the computer. Enable/disable permission to destroy all existing data on ...master password. Revise password policy criteria. Security menu 7 Security menu NOTE: Some of the menu items listed in the upgrade bay. Enable/disable HP SpareKey (enabled by your password. The following : ◦ Power-on authentication support (enabled by default) ◦ ...
... ProtectTools users. Select User Management (requires an administrator password) Password Policy (requires an administrator password) Allow HP SpareKey Enrollment HP SpareKey Enrollment HP SpareKey Fingerprint Reset on (not restarting) the computer. Enable/disable permission to destroy all existing data on ...master password. Revise password policy criteria. Security menu 7 Security menu NOTE: Some of the menu items listed in the upgrade bay. Enable/disable HP SpareKey (enabled by your password. The following : ◦ Power-on authentication support (enabled by default) ◦ ...
Computer Setup - Windows Vista, Windows XP, and Windows 7
Page 11
... Automatic DriveLock support. Enter a user-defined computer asset tracking number and ownership tag. Always Prompt for HP SpareKey Enrollment Enable/disable HP SpareKey enrollment (enabled by turning on the primary hard drive or the drive in Embedded Security for Trusted... DriveLock settings are accessible only when you forget your computer. Disk Sanitizer Run Disk Sanitizer to owner functions available in the upgrade bay. Enter, change this setting. Select To do this Setup BIOS Administrator Password User Management (requires a BIOS administrator password) Set...
... Automatic DriveLock support. Enter a user-defined computer asset tracking number and ownership tag. Always Prompt for HP SpareKey Enrollment Enable/disable HP SpareKey enrollment (enabled by turning on the primary hard drive or the drive in Embedded Security for Trusted... DriveLock settings are accessible only when you forget your computer. Disk Sanitizer Run Disk Sanitizer to owner functions available in the upgrade bay. Enter, change this setting. Select To do this Setup BIOS Administrator Password User Management (requires a BIOS administrator password) Set...
RAID User Guide - Windows Vista and Windows XP
Page 7
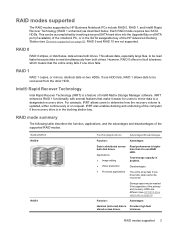
... Storage space may be accomplished by HP Business Notebook PCs include RAID 0, RAID 1, and Intel® Rapid Recover Technology (RAID 1 enhanced) as described below. RAID modes supported The RAID modes supported by inserting a second SATA hard drive into the Upgrade Bay or eSATA port (if available)... of the notebook PC, or in the docking station bay. However, RAID 0 offers no fault tolerance; Disadvantages: The entire array fails if one drive ...
... Storage space may be accomplished by HP Business Notebook PCs include RAID 0, RAID 1, and Intel® Rapid Recover Technology (RAID 1 enhanced) as described below. RAID modes supported The RAID modes supported by inserting a second SATA hard drive into the Upgrade Bay or eSATA port (if available)... of the notebook PC, or in the docking station bay. However, RAID 0 offers no fault tolerance; Disadvantages: The entire array fails if one drive ...
RAID User Guide - Windows Vista and Windows XP
Page 10
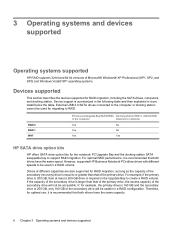
... Operating systems supported HP RAID supports 32-bit and 64-bit versions of Microsoft® Windows® XP Professional (SP1, SP2, and SP3) and Windows Vista® SP1 operating systems. Devices supported This section describes the devices supported for the notebook PC Upgrade Bay and the docking ...is larger than that both drives have the same capacity. 6 Chapter 3 Operating systems and devices supported RAID 0 RAID 1 IRRT Primary and Upgrade Bay SATA HDDs Docking station HDD or eSATA HDD in more detail below the table. For example, if the primary drive is 200 GB, then ...
... Operating systems supported HP RAID supports 32-bit and 64-bit versions of Microsoft® Windows® XP Professional (SP1, SP2, and SP3) and Windows Vista® SP1 operating systems. Devices supported This section describes the devices supported for the notebook PC Upgrade Bay and the docking ...is larger than that both drives have the same capacity. 6 Chapter 3 Operating systems and devices supported RAID 0 RAID 1 IRRT Primary and Upgrade Bay SATA HDDs Docking station HDD or eSATA HDD in more detail below the table. For example, if the primary drive is 200 GB, then ...

RAID User Guide - Windows Vista and Windows XP
Page 11
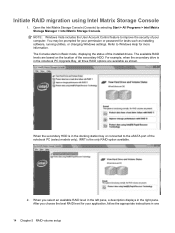
... PCs Select HP Business Notebook PCs support RAID using a standard USB 2.0 interface. The following illustration shows a supported notebook PC with the primary HDD (1) and a secondary SATA drive in the Upgrade Bay (2) that of the eSATA drive, the same recommendations apply as stated for secondary drives in the Upgrade Bay. Devices supported 7 The following illustration shows... IRRT. Regarding the capacity of a SATA drive using Intel® Matrix Storage Manager software (v8.0.2 and higher) and a secondary SATA drive in the notebook PC Upgrade Bay.
... PCs Select HP Business Notebook PCs support RAID using a standard USB 2.0 interface. The following illustration shows a supported notebook PC with the primary HDD (1) and a secondary SATA drive in the Upgrade Bay (2) that of the eSATA drive, the same recommendations apply as stated for secondary drives in the Upgrade Bay. Devices supported 7 The following illustration shows... IRRT. Regarding the capacity of a SATA drive using Intel® Matrix Storage Manager software (v8.0.2 and higher) and a secondary SATA drive in the notebook PC Upgrade Bay.
RAID User Guide - Windows Vista and Windows XP
Page 15
... the docking station, or connected to AC power before initiating the following instructions assume that the notebook PC is installed in the computer Upgrade Bay, in the loss of the notebook PC (see Devices supported on page 6). CAUTION: Make sure that a supported HDD is connected to the eSATA port of ...
... the docking station, or connected to AC power before initiating the following instructions assume that the notebook PC is installed in the computer Upgrade Bay, in the loss of the notebook PC (see Devices supported on page 6). CAUTION: Make sure that a supported HDD is connected to the eSATA port of ...
RAID User Guide - Windows Vista and Windows XP
Page 18
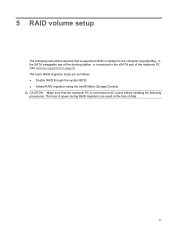
... for your application, follow the appropriate instructions in one 14 Chapter 5 RAID volume setup When the secondary HDD is in the notebook PC Upgrade Bay, all three RAID options are based on the location of your permission or password for more information. Open the Intel Matrix Storage Console (... pane, a description displays in Basic mode, displaying the status of the notebook PC (select models only), IRRT is in the docking station bay or connected to the eSATA port of the installed drives. When you choose the best RAID level for your computer. NOTE: Windows Vista includes...
... for your application, follow the appropriate instructions in one 14 Chapter 5 RAID volume setup When the secondary HDD is in the notebook PC Upgrade Bay, all three RAID options are based on the location of your permission or password for more information. Open the Intel Matrix Storage Console (... pane, a description displays in Basic mode, displaying the status of the notebook PC (select models only), IRRT is in the docking station bay or connected to the eSATA port of the installed drives. When you choose the best RAID level for your computer. NOTE: Windows Vista includes...
RAID User Guide - Windows Vista and Windows XP
Page 31
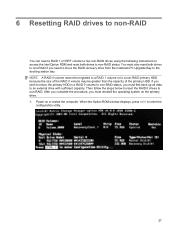
... access the Intel Option ROM and reset both drives to non-RAID if you need to move the RAID recovery drive from the notebook PC Upgrade Bay to the docking station bay. You must reinstall the operating system on or restart the computer.
... access the Intel Option ROM and reset both drives to non-RAID if you need to move the RAID recovery drive from the notebook PC Upgrade Bay to the docking station bay. You must reinstall the operating system on or restart the computer.
Drives - Windows 7
Page 4
8 Replacing a hard drive 9 Replacing a drive in the upgrade bay Replacing a hard drive ...25 Replacing an optical drive ...28 10 Troubleshooting The computer does not detect the optical drive 30 A new device driver is needed ...31 Obtaining Microsoft device drivers 31 Obtaining HP device drivers 31 An optical disc does not play ...32 The process of burning a disc does not begin, or it stops before completion 33 A DVD playing in Windows Media Player produces no sound or display 33 Index ...34 iv
8 Replacing a hard drive 9 Replacing a drive in the upgrade bay Replacing a hard drive ...25 Replacing an optical drive ...28 10 Troubleshooting The computer does not detect the optical drive 30 A new device driver is needed ...31 Obtaining Microsoft device drivers 31 Obtaining HP device drivers 31 An optical disc does not play ...32 The process of burning a disc does not begin, or it stops before completion 33 A DVD playing in Windows Media Player produces no sound or display 33 Index ...34 iv

Drives - Windows 7
Page 29
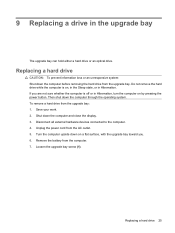
... an unresponsive system: Shut down the computer and close the display. 3. Shut down the computer before removing the hard drive from the upgrade bay: 1. Loosen the upgrade bay screw (1). Save your work. 2. Turn the computer upside down the computer through the operating system. Remove the battery from the AC outlet.... 5. Then shut down on a flat surface, with the upgrade bay toward you are not sure whether the computer is on, in the Sleep state, or in Hibernation, turn the computer on by pressing ...
... an unresponsive system: Shut down the computer and close the display. 3. Shut down the computer before removing the hard drive from the upgrade bay: 1. Loosen the upgrade bay screw (1). Save your work. 2. Turn the computer upside down the computer through the operating system. Remove the battery from the AC outlet.... 5. Then shut down on a flat surface, with the upgrade bay toward you are not sure whether the computer is on, in the Sleep state, or in Hibernation, turn the computer on by pressing ...

Drives - Windows 7
Page 30
Using a flat-bladed screwdriver, gently push the tab to release the hard drive (2). 9. Remove the hard drive from the upgrade bay. 26 Chapter 9 Replacing a drive in the upgrade bay 8.
Using a flat-bladed screwdriver, gently push the tab to release the hard drive (2). 9. Remove the hard drive from the upgrade bay. 26 Chapter 9 Replacing a drive in the upgrade bay 8.

Drives - Windows 7
Page 31
Insert the hard drive into the upgrade bay. 2. To install a hard drive in the upgrade bay: 1. Tighten the upgrade bay screw. Replacing a hard drive 27
Insert the hard drive into the upgrade bay. 2. To install a hard drive in the upgrade bay: 1. Tighten the upgrade bay screw. Replacing a hard drive 27
Drives - Windows 7
Page 32
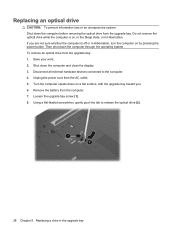
... the optical drive from the AC outlet. 5. To remove an optical drive from the computer. 7. Shut down on a flat surface, with the upgrade bay toward you are not sure whether the computer is on by pressing the power button. Remove the battery from the...off or in Hibernation, turn the computer on , in the Sleep state, or in the upgrade bay Disconnect all external hardware devices connected to release the optical drive (2). 28 Chapter 9 Replacing a drive in Hibernation. Loosen the upgrade bay screw (1). 8. Turn the computer upside down the computer and close the display. 3. Save ...
... the optical drive from the AC outlet. 5. To remove an optical drive from the computer. 7. Shut down on a flat surface, with the upgrade bay toward you are not sure whether the computer is on by pressing the power button. Remove the battery from the...off or in Hibernation, turn the computer on , in the Sleep state, or in the upgrade bay Disconnect all external hardware devices connected to release the optical drive (2). 28 Chapter 9 Replacing a drive in Hibernation. Loosen the upgrade bay screw (1). 8. Turn the computer upside down the computer and close the display. 3. Save ...

Drives - Windows 7
Page 33
Remove the optical drive from the upgrade bay. Replacing an optical drive 29 Insert the optical drive into the upgrade bay. 2. To install an optical drive in the upgrade bay: 1. Tighten the upgrade bay screw. 9.
Remove the optical drive from the upgrade bay. Replacing an optical drive 29 Insert the optical drive into the upgrade bay. 2. To install an optical drive in the upgrade bay: 1. Tighten the upgrade bay screw. 9.

Drives - Windows 7
Page 38
...22 HP 3D DriveGuard 17 O optical disc using 5 optical drive 3, 16 optical drive detection 30 P preventing playback disruptions 14 R region codes, DVD 15 S software Disk Cleanup 21 Disk Defragmenter 21 T troubleshooting AutoPlay 32 burning discs 33 device drivers 31 optical drive detection 30 U upgrade bay ...ray Disc (BD) 4 C CD burning 11 copying 10 playing 7 removing 12 CD drive 3, 16 copyright warning 9 D device drivers HP devices 31 Microsoft devices 31 uninstalling, reinstalling 31 Disk Cleanup software 21 Disk Defragmenter software 21 disk performance 21 diskette drive 16 drive light ...
...22 HP 3D DriveGuard 17 O optical disc using 5 optical drive 3, 16 optical drive detection 30 P preventing playback disruptions 14 R region codes, DVD 15 S software Disk Cleanup 21 Disk Defragmenter 21 T troubleshooting AutoPlay 32 burning discs 33 device drivers 31 optical drive detection 30 U upgrade bay ...ray Disc (BD) 4 C CD burning 11 copying 10 playing 7 removing 12 CD drive 3, 16 copyright warning 9 D device drivers HP devices 31 Microsoft devices 31 uninstalling, reinstalling 31 Disk Cleanup software 21 Disk Defragmenter software 21 disk performance 21 diskette drive 16 drive light ...
Drives - Windows Vista
Page 4
8 Replacing a hard drive 9 Replacing a drive in the upgrade bay Replacing a hard drive ...25 Replacing an optical drive ...28 10 Troubleshooting The computer does not detect the optical drive 30 A new device driver is needed ...31 Obtaining Microsoft device drivers 31 Obtaining HP device drivers 31 An optical disc does not play automatically 32 The process of burning a disc does not begin, or it stops before completion 33 A DVD playing in Windows Media Player produces no sound or display 33 Index ...34 iv
8 Replacing a hard drive 9 Replacing a drive in the upgrade bay Replacing a hard drive ...25 Replacing an optical drive ...28 10 Troubleshooting The computer does not detect the optical drive 30 A new device driver is needed ...31 Obtaining Microsoft device drivers 31 Obtaining HP device drivers 31 An optical disc does not play automatically 32 The process of burning a disc does not begin, or it stops before completion 33 A DVD playing in Windows Media Player produces no sound or display 33 Index ...34 iv
Drives - Windows Vista
Page 29
... in Hibernation, turn the computer on , in the Sleep state, or in the upgrade bay The upgrade bay can hold either a hard drive or an optical drive. Remove the battery from the upgrade bay. Shut down the computer through the operating system. Disconnect all external hardware devices connected ...to the computer. 4. Loosen the upgrade bay screw (1). Replacing a hard drive CAUTION: To prevent information loss or an unresponsive system: Shut down on a flat surface, with the upgrade bay toward you are not sure whether the computer is on by ...
... in Hibernation, turn the computer on , in the Sleep state, or in the upgrade bay The upgrade bay can hold either a hard drive or an optical drive. Remove the battery from the upgrade bay. Shut down the computer through the operating system. Disconnect all external hardware devices connected ...to the computer. 4. Loosen the upgrade bay screw (1). Replacing a hard drive CAUTION: To prevent information loss or an unresponsive system: Shut down on a flat surface, with the upgrade bay toward you are not sure whether the computer is on by ...

Drives - Windows Vista
Page 30
Remove the hard drive from the upgrade bay. 26 Chapter 9 Replacing a drive in the upgrade bay Using a flat-bladed screwdriver, gently push the tab to release the hard drive (2). 9. 8.
Remove the hard drive from the upgrade bay. 26 Chapter 9 Replacing a drive in the upgrade bay Using a flat-bladed screwdriver, gently push the tab to release the hard drive (2). 9. 8.


