Backup and Recovery - Windows Vista
Page 6
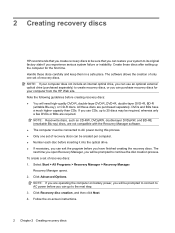
...a set of recovery discs can be prompted to connect to AC power before you experience serious system failure or instability. 2 Creating recovery discs HP recommends that you can restore your computer does not include an internal optical drive, you can use CDs, up the computer for your computer ...Create these discs carefully and keep them in a safe place. The software allows the creation of only one set of recovery discs. Follow the on battery power, you will be created per computer. ● Number each disc before inserting it into the optical drive. ● If necessary, you can...
...a set of recovery discs can be prompted to connect to AC power before you experience serious system failure or instability. 2 Creating recovery discs HP recommends that you can restore your computer does not include an internal optical drive, you can use CDs, up the computer for your computer ...Create these discs carefully and keep them in a safe place. The software allows the creation of only one set of recovery discs. Follow the on battery power, you will be created per computer. ● Number each disc before inserting it into the optical drive. ● If necessary, you can...

Backup and Recovery - Windows Vista
Page 8
... ± RW, and DVD±RW double-layer discs, are operating the computer on -screen instructions. 2 Recovering system information Recovery Manager opens. 2. Follow the on battery power, you will be prompted to connect to AC power before creating recovery discs: ● You will be connected to factory settings in a safe place...
... ± RW, and DVD±RW double-layer discs, are operating the computer on -screen instructions. 2 Recovering system information Recovery Manager opens. 2. Follow the on battery power, you will be prompted to connect to AC power before creating recovery discs: ● You will be connected to factory settings in a safe place...
Software Updates - Windows Vista
Page 8
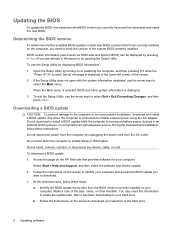
...cable, or cord. Access the page on or restarting the computer, and then pressing f10 while the "Press to enter Setup" message is running on battery power, docked in the lower-left corner of the system BIOS currently installed. You may need to know the version of the screen. 2. To download...to reliable external power using the AC adapter. Follow the instructions on the computer, you are already in Windows) or by turning on the HP Web site that is connected to select the Main menu. Do not shut down the computer or initiate Sleep or Hibernation. Determining the BIOS version...
...cable, or cord. Access the page on or restarting the computer, and then pressing f10 while the "Press to enter Setup" message is running on battery power, docked in the lower-left corner of the system BIOS currently installed. You may need to know the version of the screen. 2. To download...to reliable external power using the AC adapter. Follow the instructions on the computer, you are already in Windows) or by turning on the HP Web site that is connected to select the Main menu. Do not shut down the computer or initiate Sleep or Hibernation. Determining the BIOS version...
Drives - Windows Vista
Page 8
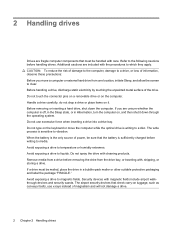
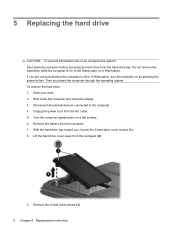
Before removing or inserting a hard drive, shut down through the operating system. When the battery is the only source of information, observe these precautions: Before you are unsure whether the computer is sensitive to media. Do not spray the drive ... external hard drive from the drive bay, or traveling with the procedures to a disc. Avoid exposing a drive to liquids. The airport security devices that the battery is writing to which they apply. Avoid exposing a drive to temperature or humidity extremes. Handle a drive carefully; do not drop a drive or place items on...
Before removing or inserting a hard drive, shut down through the operating system. When the battery is the only source of information, observe these precautions: Before you are unsure whether the computer is sensitive to media. Do not spray the drive ... external hard drive from the drive bay, or traveling with the procedures to a disc. Avoid exposing a drive to liquids. The airport security devices that the battery is writing to which they apply. Avoid exposing a drive to temperature or humidity extremes. Handle a drive carefully; do not drop a drive or place items on...
Drives - Windows Vista
Page 14
Do not remove the hard drive while the computer is off or in Hibernation. Disconnect all external devices connected to the computer. 4. Remove the battery from the AC outlet. 5. If you , loosen the 2 hard drive cover screws (1). 8. Save your work. 2. Turn the computer upside down the computer before removing the ...
Do not remove the hard drive while the computer is off or in Hibernation. Disconnect all external devices connected to the computer. 4. Remove the battery from the AC outlet. 5. If you , loosen the 2 hard drive cover screws (1). 8. Save your work. 2. Turn the computer upside down the computer before removing the ...
Memory Modules - Windows Vista
Page 7
NOTE: To use a dual-channel configuration when adding a second memory module, be upgraded by adding a memory ... sure both memory modules are discharged of the computer. Then shut down the computer and close the display. Disconnect all batteries before installing a memory module. Turn the computer upside down on a flat surface. 6. Adding or replacing a memory... computer has one memory module compartment, which is off or in the primary memory module slot. Remove the battery from the AC outlet. 5. Before beginning any procedure, ensure that you are not sure whether the computer is...
NOTE: To use a dual-channel configuration when adding a second memory module, be upgraded by adding a memory ... sure both memory modules are discharged of the computer. Then shut down the computer and close the display. Disconnect all batteries before installing a memory module. Turn the computer upside down on a flat surface. 6. Adding or replacing a memory... computer has one memory module compartment, which is off or in the primary memory module slot. Remove the battery from the AC outlet. 5. Before beginning any procedure, ensure that you are not sure whether the computer is...
Memory Modules - Windows Vista
Page 10
Replace the battery. 15. Reconnect external power and external devices. 16. Turn on the computer. 4 Adding or replacing a memory module 14.
Replace the battery. 15. Reconnect external power and external devices. 16. Turn on the computer. 4 Adding or replacing a memory module 14.
Notebook Tour - Windows Vista
Page 11
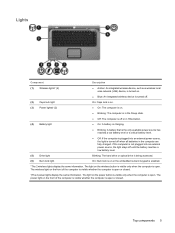
... area network (LAN) device, is turned on. ● Blue: An integrated wireless device is turned off. (2) Caps lock light (3) Power lights† (2) (4) Battery light On: Caps lock is on. ● On: The computer is on the power button is visible only when the computer is open. The light... wireless lights display the same information. If the computer is not plugged into an external power source, the light is turned off until the battery reaches a low battery level. (5) Drive light Blinking: The hard drive or optical drive is being accessed. (6) Num lock light On: Num lock is on ...
... area network (LAN) device, is turned on. ● Blue: An integrated wireless device is turned off. (2) Caps lock light (3) Power lights† (2) (4) Battery light On: Caps lock is on. ● On: The computer is on the power button is visible only when the computer is open. The light... wireless lights display the same information. If the computer is not plugged into an external power source, the light is turned off until the battery reaches a low battery level. (5) Drive light Blinking: The hard drive or optical drive is being accessed. (6) Num lock light On: Num lock is on ...

Notebook Tour - Windows Vista
Page 16
...the memory module slots. 10 Chapter 2 Components Holds the hard drive. Enables airflow to cool internal components and prevent overheating. Releases the battery from the battery bay. NOTE: The computer fan starts up automatically to cool internal components. Do not allow another hard surface, such as an adjoining ...printer, or a soft surface, such as pillows or thick rugs or clothing, to cycle on a hard, flat surface. Bottom components Component (1) Battery bay (2) Battery release latch (3) Hard drive bay (4) Vent (5) Memory module compartment Description Holds the primary...
...the memory module slots. 10 Chapter 2 Components Holds the hard drive. Enables airflow to cool internal components and prevent overheating. Releases the battery from the battery bay. NOTE: The computer fan starts up automatically to cool internal components. Do not allow another hard surface, such as an adjoining ...printer, or a soft surface, such as pillows or thick rugs or clothing, to cycle on a hard, flat surface. Bottom components Component (1) Battery bay (2) Battery release latch (3) Hard drive bay (4) Vent (5) Memory module compartment Description Holds the primary...

Notebook Tour - Windows Vista
Page 18
Additional hardware components Component Description (1) Power cord* Connects an AC adapter to an AC outlet. (2) AC adapter Converts AC power to DC power. (3) Battery* Powers the computer when the computer is not plugged into external power. *Batteries and power cords vary in appearance by region and country. 12 Chapter 2 Components
Additional hardware components Component Description (1) Power cord* Connects an AC adapter to an AC outlet. (2) AC adapter Converts AC power to DC power. (3) Battery* Powers the computer when the computer is not plugged into external power. *Batteries and power cords vary in appearance by region and country. 12 Chapter 2 Components
Notebook Tour - Windows Vista
Page 19
This certificate is affixed inside the battery bay. ● Modem approval label-Provides regulatory information about the modem and lists the agency approval markings required by some of the countries in which ...
This certificate is affixed inside the battery bay. ● Modem approval label-Provides regulatory information about the modem and lists the agency approval markings required by some of the countries in which ...

Notebook Tour - Windows Vista
Page 20
...jack 7 drive light, identifying 5 drive, optical 8 E esc key, identifying 2 external monitor port 9 B battery bay 10, 13 battery light, identifying 5 battery release latch 10 battery, identifying 12 bays battery 10, 13 hard drive 10 buttons power 4 TouchPad 3 TouchPad on/off 3 wireless 4 C caps lock light...logo 2 L labels Microsoft Certificate of Authenticity 13 modem approval 13 regulatory 13 service tag 13 wireless certification 13 WLAN 13 latch, battery release 10 lights battery 5 caps lock 5 drive 5 num lock 5 power 5 TouchPad 3 wireless 5 lock, security cable 8 M memory module compartment...
...jack 7 drive light, identifying 5 drive, optical 8 E esc key, identifying 2 external monitor port 9 B battery bay 10, 13 battery light, identifying 5 battery release latch 10 battery, identifying 12 bays battery 10, 13 hard drive 10 buttons power 4 TouchPad 3 TouchPad on/off 3 wireless 4 C caps lock light...logo 2 L labels Microsoft Certificate of Authenticity 13 modem approval 13 regulatory 13 service tag 13 wireless certification 13 WLAN 13 latch, battery release 10 lights battery 5 caps lock 5 drive 5 num lock 5 power 5 TouchPad 3 wireless 5 lock, security cable 8 M memory module compartment...

Notebook Tour - Windows Vista
Page 21
... light 5 Product Key 13 product name and number, computer 13 R regulatory information modem approval label 13 regulatory label 13 wireless certification labels 13 release latch, battery 10 RJ-11 (modem) jack 9 RJ-45 (network) jack 9 V vents identifying 10 precautions iii volume hotkeys 4 W Windows applications key, identifying 2 Windows logo key, identifying 2 wireless...
... light 5 Product Key 13 product name and number, computer 13 R regulatory information modem approval label 13 regulatory label 13 wireless certification labels 13 release latch, battery 10 RJ-11 (modem) jack 9 RJ-45 (network) jack 9 V vents identifying 10 precautions iii volume hotkeys 4 W Windows applications key, identifying 2 Windows logo key, identifying 2 wireless...

Notebook Tour - Windows Vista
Page 11
...the computer is not plugged into an external power source, the light is turned off . (2) Caps lock light (3) Power lights† (2) (4) Battery light On: Caps lock is on. ● On: The computer is on or the embedded numeric keypad is enabled. *The 2 wireless lights display.... ● Blue: An integrated wireless device is turned off when all batteries in Hibernation. ● On: A battery is charging. ● Blinking: A battery that is the only available power source has reached a low battery level or a critical battery level. ● Off: If the computer is plugged into an external ...
...the computer is not plugged into an external power source, the light is turned off . (2) Caps lock light (3) Power lights† (2) (4) Battery light On: Caps lock is on. ● On: The computer is on or the embedded numeric keypad is enabled. *The 2 wireless lights display.... ● Blue: An integrated wireless device is turned off when all batteries in Hibernation. ● On: A battery is charging. ● Blinking: A battery that is the only available power source has reached a low battery level or a critical battery level. ● Off: If the computer is plugged into an external ...
Notebook Tour - Windows Vista
Page 16
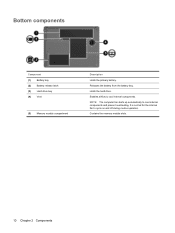
Bottom components Component (1) Battery bay (2) Battery release latch (3) Hard drive bay (4) Vent (5) Memory module compartment Description Holds the primary battery. Enables airflow to cycle on and off during routine operation. It is normal for the internal fan to cool internal components. NOTE: The computer fan starts up automatically to cool internal components and prevent overheating. Releases the battery from the battery bay. Contains the memory module slots. 10 Chapter 2 Components Holds the hard drive.
Bottom components Component (1) Battery bay (2) Battery release latch (3) Hard drive bay (4) Vent (5) Memory module compartment Description Holds the primary battery. Enables airflow to cycle on and off during routine operation. It is normal for the internal fan to cool internal components. NOTE: The computer fan starts up automatically to cool internal components and prevent overheating. Releases the battery from the battery bay. Contains the memory module slots. 10 Chapter 2 Components Holds the hard drive.
Notebook Tour - Windows Vista
Page 18
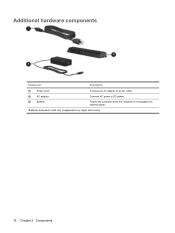
Additional hardware components Component Description (1) Power cord* Connects an AC adapter to an AC outlet. (2) AC adapter Converts AC power to DC power. (3) Battery* Powers the computer when the computer is not plugged into external power. *Batteries and power cords vary in appearance by region and country. 12 Chapter 2 Components
Additional hardware components Component Description (1) Power cord* Connects an AC adapter to an AC outlet. (2) AC adapter Converts AC power to DC power. (3) Battery* Powers the computer when the computer is not plugged into external power. *Batteries and power cords vary in appearance by region and country. 12 Chapter 2 Components

Notebook Tour - Windows Vista
Page 19
... the computer. ● Microsoft® Certificate of the computer. ● Regulatory label-Provides regulatory information about the computer. The regulatory label is affixed inside the battery bay. ● Modem approval label-Provides regulatory information about optional wireless devices and the approval markings of some of the countries in which the devices...
... the computer. ● Microsoft® Certificate of the computer. ● Regulatory label-Provides regulatory information about the computer. The regulatory label is affixed inside the battery bay. ● Modem approval label-Provides regulatory information about optional wireless devices and the approval markings of some of the countries in which the devices...

Notebook Tour - Windows Vista
Page 20
...12 antennae 11 applications key, Windows 2 audio-in (microphone) jack 7 audio-out (headphone) jack 7 B battery bay 10, 13 battery light, identifying 5 battery release latch 10 battery, identifying 12 bays battery 10, 13 hard drive 10 buttons power 4 TouchPad 3 TouchPad on/off 3 wireless 4 D Digital Media ... logo 2 L labels Microsoft Certificate of Authenticity 13 modem approval 13 regulatory 13 service tag 13 wireless certification 13 WLAN 13 latch, battery release 10 lights battery 5 caps lock 5 drive 5 num lock 5 power 5 TouchPad 3 webcam 6 wireless 5 lock, security cable 8 M memory module...
...12 antennae 11 applications key, Windows 2 audio-in (microphone) jack 7 audio-out (headphone) jack 7 B battery bay 10, 13 battery light, identifying 5 battery release latch 10 battery, identifying 12 bays battery 10, 13 hard drive 10 buttons power 4 TouchPad 3 TouchPad on/off 3 wireless 4 D Digital Media ... logo 2 L labels Microsoft Certificate of Authenticity 13 modem approval 13 regulatory 13 service tag 13 wireless certification 13 WLAN 13 latch, battery release 10 lights battery 5 caps lock 5 drive 5 num lock 5 power 5 TouchPad 3 webcam 6 wireless 5 lock, security cable 8 M memory module...

Notebook Tour - Windows Vista
Page 21
... light 5 Product Key 13 product name and number, computer 13 R regulatory information modem approval label 13 regulatory label 13 wireless certification labels 13 release latch, battery 10 RJ-11 (modem) jack 9 RJ-45 (network) jack 9 V vents identifying 10 precautions iii volume hotkeys 4 W webcam light, identifying 6 webcam, identifying 6 Windows applications key, identifying...
... light 5 Product Key 13 product name and number, computer 13 R regulatory information modem approval label 13 regulatory label 13 wireless certification labels 13 release latch, battery 10 RJ-11 (modem) jack 9 RJ-45 (network) jack 9 V vents identifying 10 precautions iii volume hotkeys 4 W webcam light, identifying 6 webcam, identifying 6 Windows applications key, identifying...

HP G7000 Notebook PC and Compaq Presario C700 Notebook PC - Maintenance and Service Guide
Page 6
... module ...60 Top cover ...62 Caps lock LED board 64 USB board ...66 Fan ...68 Speakers ...70 System board ...72 RTC battery ...75 Card reader board 77 Heat sink ...79 Processor ...81 Power connector cable 83 5 Setup Utility Starting the Setup Utility ...84 ... Utility 85 Displaying system information 85 Restoring default settings in the Setup Utility 85 Using advanced Setup Utility features 86 Closing the Setup Utility ...86 Setup Utility menus ...86 6 Specifications Computer specifications ...88 15.4-inch, WSXGA, BrightView display specifications 89 Hard drive specifications ...90 DVD...
... module ...60 Top cover ...62 Caps lock LED board 64 USB board ...66 Fan ...68 Speakers ...70 System board ...72 RTC battery ...75 Card reader board 77 Heat sink ...79 Processor ...81 Power connector cable 83 5 Setup Utility Starting the Setup Utility ...84 ... Utility 85 Displaying system information 85 Restoring default settings in the Setup Utility 85 Using advanced Setup Utility features 86 Closing the Setup Utility ...86 Setup Utility menus ...86 6 Specifications Computer specifications ...88 15.4-inch, WSXGA, BrightView display specifications 89 Hard drive specifications ...90 DVD...


