
RAID - Windows 7
Page 21
...The EFI partition stores QuickLook, system diagnostics, and BIOS Flash Recovery files. Windows Vista contains some additional capabilities that allow you to restore the computer to move the Extensible Firmware Interface (EFI) and Recovery partitions using Intel Matrix Storage Console 17 Right-click the Unallocated ... drop-down menu. In order to extend the (C:) partition, you can create an additional partition or you will need to the factory image. The Recovery partition contains files that allow you to the system. In the left pane under Storage, click Disk Management....
...The EFI partition stores QuickLook, system diagnostics, and BIOS Flash Recovery files. Windows Vista contains some additional capabilities that allow you to restore the computer to move the Extensible Firmware Interface (EFI) and Recovery partitions using Intel Matrix Storage Console 17 Right-click the Unallocated ... drop-down menu. In order to extend the (C:) partition, you can create an additional partition or you will need to the factory image. The Recovery partition contains files that allow you to the system. In the left pane under Storage, click Disk Management....
2009 HP business notebook PC F10 Setup overview
Page 4
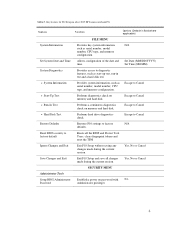
... a continuous diagnostics check on memory and hard disk. Escape to Cancel Restore Defaults Restores F10 settings to Cancel • Hard Disk Test Performs hard drive diagnostics check. Escape to factory N/A defaults. Yes, No or Cancel SECURITY MENU Administrator Tools Setup BIOS... Administrator Establish a power on select 2009 HP business notebook PCs Feature Function Options (...
... a continuous diagnostics check on memory and hard disk. Escape to Cancel Restore Defaults Restores F10 settings to Cancel • Hard Disk Test Performs hard drive diagnostics check. Escape to factory N/A defaults. Yes, No or Cancel SECURITY MENU Administrator Tools Setup BIOS... Administrator Establish a power on select 2009 HP business notebook PCs Feature Function Options (...

Service Guide
Page 6
... ExpressCard assembly ...119 5 Computer Setup (BIOS) and System Diagnostics 121 Using Computer Setup ...121 Starting Computer Setup 121 Navigating and selecting in Computer Setup 121 Restoring factory settings in Computer Setup 122 vi
... ExpressCard assembly ...119 5 Computer Setup (BIOS) and System Diagnostics 121 Using Computer Setup ...121 Starting Computer Setup 121 Navigating and selecting in Computer Setup 121 Restoring factory settings in Computer Setup 122 vi

Service Guide
Page 130
... Save icon in the lower-left corner of the screen. 2. NOTE: Your password settings and security settings are not changed when you restore the factory settings. 122 Chapter 5 Computer Setup (BIOS) and System Diagnostics To exit Computer Setup menus, choose one of the following methods: ...tab key and the arrow keys to enter Computer Setup. 3. Use the arrow keys to select File > Restore Defaults. 4. Your changes go into effect when the computer restarts. Restoring factory settings in the lower-left corner of the screen, and then follow these steps: 1. Your changes go...
... Save icon in the lower-left corner of the screen. 2. NOTE: Your password settings and security settings are not changed when you restore the factory settings. 122 Chapter 5 Computer Setup (BIOS) and System Diagnostics To exit Computer Setup menus, choose one of the following methods: ...tab key and the arrow keys to enter Computer Setup. 3. Use the arrow keys to select File > Restore Defaults. 4. Your changes go into effect when the computer restarts. Restoring factory settings in the lower-left corner of the screen, and then follow these steps: 1. Your changes go...

Service Guide
Page 143
...settings. Performing a system recovery In case of the computer. 1. The image includes the Windows operating system and software programs installed at the factory. new software and data files, you should continue to back up your system on a regular basis to recover information you have to ... recovery discs required. ● When backing up to set up your original hard drive image. Select Start > All Programs > Maintenance > Backup and Restore. 2. NOTE: If you have previously backed up. To create a backup using them for backup reduces the number of the computer. Windows 7 135 ...
...settings. Performing a system recovery In case of the computer. 1. The image includes the Windows operating system and software programs installed at the factory. new software and data files, you should continue to back up your system on a regular basis to recover information you have to ... recovery discs required. ● When backing up to set up your original hard drive image. Select Start > All Programs > Maintenance > Backup and Restore. 2. NOTE: If you have previously backed up. To create a backup using them for backup reduces the number of the computer. Windows 7 135 ...

Service Guide
Page 144
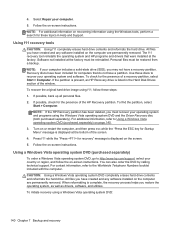
... permanently removed. Follow the on page 137. 3. The f11 recovery tool reinstalls the operating system and HP programs and drivers that were installed at the factory must be reinstalled. When reformatting is not listed, you must recover your information using the Windows tools,... Windows 7 operating system DVD and the Driver Recovery disc (both purchased separately). Select Start > All Programs > Maintenance > Backup and Restore. 2. Follow the on recovering information using Startup Repair, follow these topics in Help and Support. To check for the Windows partition, select...
... permanently removed. Follow the on page 137. 3. The f11 recovery tool reinstalls the operating system and HP programs and drivers that were installed at the factory must be reinstalled. When reformatting is not listed, you must recover your information using the Windows tools,... Windows 7 operating system DVD and the Driver Recovery disc (both purchased separately). Select Start > All Programs > Maintenance > Backup and Restore. 2. Follow the on recovering information using Startup Repair, follow these topics in Help and Support. To check for the Windows partition, select...

Service Guide
Page 147
...your original hard drive image. The image includes the Windows operating system and software programs installed at the factory. Select Start > All Programs > Maintenance > Backup and Restore Center. 2. When reformatting is connected to AC power before the Windows operating system loads. NOTE: The... computer, you are permanently removed. To find the partitions, select Start > Computer. NOTE: If the Windows partition and the HP Recovery partition have created and any software installed on -screen instructions to reboot the computer and repair the operating system. You can...
...your original hard drive image. The image includes the Windows operating system and software programs installed at the factory. Select Start > All Programs > Maintenance > Backup and Restore Center. 2. When reformatting is connected to AC power before the Windows operating system loads. NOTE: The... computer, you are permanently removed. To find the partitions, select Start > Computer. NOTE: If the Windows partition and the HP Recovery partition have created and any software installed on -screen instructions to reboot the computer and repair the operating system. You can...
Service Guide
Page 148
...go to recover your operating system and programs using the Windows tools, perform a search for computers that were installed at the factory must be restored from a backup. You can also order the DVD by calling technical support. When reformatting is displayed at the bottom of ...Windows Vista operating system DVD (purchased separately) on the screen. 5. Personal files must recover your operating system and software. NOTE: If the HP Recovery partition has been deleted, you have a recovery partition. Select Repair your country or region, and follow these steps: 1. Turn on...
...go to recover your operating system and programs using the Windows tools, perform a search for computers that were installed at the factory must be restored from a backup. You can also order the DVD by calling technical support. When reformatting is displayed at the bottom of ...Windows Vista operating system DVD (purchased separately) on the screen. 5. Personal files must recover your operating system and software. NOTE: If the HP Recovery partition has been deleted, you have a recovery partition. Select Repair your country or region, and follow these steps: 1. Turn on...

Service Guide
Page 158
...80, 85 audio, product description 4 audio-in (microphone) jack 23, 24 audio-out (headphone) jack 23, 24 B Backup and Restore 135 Backup and Restore Center 138, 139 base enclosure, spare part number 35, 50 battery removal 63 spare part number 35, 63 battery bay 25 battery light ...left side 21 rear 22 right side 23 top 13 computer feet locations 62 spare part number 62 Computer Setup navigating and selecting 121 restoring factory settings 122 computer specifications 125 connector, docking 25 connector, power 21 connectors, service considerations 57 D diskette drive precautions 57 display assembly ...
...80, 85 audio, product description 4 audio-in (microphone) jack 23, 24 audio-out (headphone) jack 23, 24 B Backup and Restore 135 Backup and Restore Center 138, 139 base enclosure, spare part number 35, 50 battery removal 63 spare part number 35, 63 battery bay 25 battery light ...left side 21 rear 22 right side 23 top 13 computer feet locations 62 spare part number 62 Computer Setup navigating and selecting 121 restoring factory settings 122 computer specifications 125 connector, docking 25 connector, power 21 connectors, service considerations 57 D diskette drive precautions 57 display assembly ...
Service Guide
Page 160
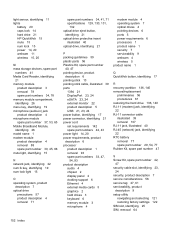
... sensor, identifying 11 lights battery 20 caps lock 14 hard drive 21 HP QuickWeb 15 mute 15 num lock 15 power 14, 20 webcam 11 wireless... webcam 4 wireless 5 product name 1 Q QuickWeb button, identifying 17 R recovery partition 136, 140 removal/replacement preliminaries 56 procedures 61 restoring the hard drive 136, 140 RJ-11 (modem) jack, identifying 22 RJ-11 connector cable illustrated 39 removal 107 RJ-11 jack, ...service tag 27, 61 serviceability, product description 9 setup utility navigating and selecting 121 restoring factory settings 122 SIM slot, identifying 25 SIM, removal 64 152 Index
... sensor, identifying 11 lights battery 20 caps lock 14 hard drive 21 HP QuickWeb 15 mute 15 num lock 15 power 14, 20 webcam 11 wireless... webcam 4 wireless 5 product name 1 Q QuickWeb button, identifying 17 R recovery partition 136, 140 removal/replacement preliminaries 56 procedures 61 restoring the hard drive 136, 140 RJ-11 (modem) jack, identifying 22 RJ-11 connector cable illustrated 39 removal 107 RJ-11 jack, ...service tag 27, 61 serviceability, product description 9 setup utility navigating and selecting 121 restoring factory settings 122 SIM slot, identifying 25 SIM, removal 64 152 Index
Reference Guide
Page 9
... (BIOS) and System Diagnostics 73 Using Computer Setup ...73 Starting Computer Setup 73 Navigating and selecting in Computer Setup 73 Restoring factory settings in Computer Setup 74 Updating the BIOS ...75 Determining the BIOS version 75 Downloading a BIOS update 75 Using System Diagnostics... Configuring and deploying a software image 82 Managing and updating software 83 HP Client Manager for Altiris (select models only 83 HP CCM (Client Configuration Manager) (select models only 85 HP SSM (System Software Manager 85 Using Intel Active Management Technology (select ...
... (BIOS) and System Diagnostics 73 Using Computer Setup ...73 Starting Computer Setup 73 Navigating and selecting in Computer Setup 73 Restoring factory settings in Computer Setup 74 Updating the BIOS ...75 Determining the BIOS version 75 Downloading a BIOS update 75 Using System Diagnostics... Configuring and deploying a software image 82 Managing and updating software 83 HP Client Manager for Altiris (select models only 83 HP CCM (Client Configuration Manager) (select models only 85 HP SSM (System Software Manager 85 Using Intel Active Management Technology (select ...

Reference Guide
Page 84
... f10 to select File > Save Changes and Exit, and then press enter. NOTE: Your password settings and security settings are not changed when you restore the factory settings. 74 Chapter 9 Computer Setup (BIOS) and System Diagnostics Use the tab key and the arrow keys to enter Computer Setup. 3. To return... corner of the screen, and then follow the on-screen instructions. - Follow the on -screen instructions. - Use the arrow keys to select File > Restore Defaults. 4. Use the tab key and the arrow keys to select File > Ignore Changes and Exit, and then press enter. ● To save your...
... f10 to select File > Save Changes and Exit, and then press enter. NOTE: Your password settings and security settings are not changed when you restore the factory settings. 74 Chapter 9 Computer Setup (BIOS) and System Diagnostics Use the tab key and the arrow keys to enter Computer Setup. 3. To return... corner of the screen, and then follow the on-screen instructions. - Follow the on -screen instructions. - Use the arrow keys to select File > Restore Defaults. 4. Use the tab key and the arrow keys to select File > Ignore Changes and Exit, and then press enter. ● To save your...
Reference Guide
Page 103
... checking audio functions 16 cleaning your computer 70 Computer Setup BIOS administrator password 57 DriveLock password 58 enabling bootable devices 78 navigating and selecting 73 restoring factory settings 74 setting boot order 80 setting MultiBoot Express prompt 81 computer, traveling 30, 89 configuring audio for HDMI 20 ExpressCards 37 PC Cards 35...
... checking audio functions 16 cleaning your computer 70 Computer Setup BIOS administrator password 57 DriveLock password 58 enabling bootable devices 78 navigating and selecting 73 restoring factory settings 74 setting boot order 80 setting MultiBoot Express prompt 81 computer, traveling 30, 89 configuring audio for HDMI 20 ExpressCards 37 PC Cards 35...

Reference Guide
Page 105
setting password protection on wakeup 25 setting power options 23 setup of WLAN 6 setup utility navigating and selecting 73 restoring factory settings 74 sharing optical drives 54 shutdown 22 SIM inserting 7 removing 8 Sleep exiting 23 initiating 23 slot-load optical ...39 inserting 40 removing 40 SoftPaqs, downloading 72 software antivirus 63 critical updates 65 deployment 82 Disk Cleanup 48 Disk Defragmenter 48 firewall 64 HP Connection Manager 4 recovery 82 updates 83 storing a battery 30 switch, power 22 switchable graphics 32 T temperature 30 testing an AC ...
setting password protection on wakeup 25 setting power options 23 setup of WLAN 6 setup utility navigating and selecting 73 restoring factory settings 74 sharing optical drives 54 shutdown 22 SIM inserting 7 removing 8 Sleep exiting 23 initiating 23 slot-load optical ...39 inserting 40 removing 40 SoftPaqs, downloading 72 software antivirus 63 critical updates 65 deployment 82 Disk Cleanup 48 Disk Defragmenter 48 firewall 64 HP Connection Manager 4 recovery 82 updates 83 storing a battery 30 switch, power 22 switchable graphics 32 T temperature 30 testing an AC ...


