
Reference Guide
Page 33
..., press that button. -or- • Press CTRL+ALT+DEL, then select Lock Computer. Windows 1. To unlock the notebook, follow your account. 2. For complete protection, set up password protection, which is available through Windows and through BIOS Setup. Select Start > Control Panel > User Accounts, then select your normal logon steps. 24 Reference Guide Select...
..., press that button. -or- • Press CTRL+ALT+DEL, then select Lock Computer. Windows 1. To unlock the notebook, follow your account. 2. For complete protection, set up password protection, which is available through Windows and through BIOS Setup. Select Start > Control Panel > User Accounts, then select your normal logon steps. 24 Reference Guide Select...

Reference Guide
Page 35
... computer, you can change the computer (and drive) password. After you match the drive password, you can 't access the drive until you enable hard drive lock, the current BIOS user password (or administrator password if that is encoded on the hard drive. Select...password. Hard drive lock does not protect a second hard drive installed in the module bay. CAUTION Basic Operation Securing Your Notebook To lock the hard drive The notebook enables you cannot recover your information secure. When you set ) is the only password set the user (or administrator) password to enter the BIOS...
... computer, you can change the computer (and drive) password. After you match the drive password, you can 't access the drive until you enable hard drive lock, the current BIOS user password (or administrator password if that is encoded on the hard drive. Select...password. Hard drive lock does not protect a second hard drive installed in the module bay. CAUTION Basic Operation Securing Your Notebook To lock the hard drive The notebook enables you cannot recover your information secure. When you set ) is the only password set the user (or administrator) password to enter the BIOS...

Reference Guide
Page 95
...change , or clear the user password. Press ENTER to set . Disables the internal pointing devices when an external pointing device is set , change , or clear the administrator password, which protects BIOS Setup settings. If this option is enabled, the notebook uses increased power while it is... required when the notebook boots. Sets whether a user password is shut down. Lets the notebook be turned on via the LAN port.
...change , or clear the user password. Press ENTER to set . Disables the internal pointing devices when an external pointing device is set , change , or clear the administrator password, which protects BIOS Setup settings. If this option is enabled, the notebook uses increased power while it is... required when the notebook boots. Sets whether a user password is shut down. Lets the notebook be turned on via the LAN port.

Reference Guide
Page 96
CD-ROM Drive 4. Does not affect password, date, or time changes. To change video memory settings using BIOS Setup utility The notebook comes with either 32MB or 16MB of memory settings. Move the down arrow key until UMA Video Memory is highlighted. Selections include ...up a list of video memory. Does not affect password, date, or time changes. Setting Hard Drive +Removable Devices CD-ROM Drive Built-in LAN Troubleshooting and Maintenance Configuring Your Notebook Boot Menu Description Shows the order of your notebook, depending on your selection. Press Enter to change the...
CD-ROM Drive 4. Does not affect password, date, or time changes. To change video memory settings using BIOS Setup utility The notebook comes with either 32MB or 16MB of memory settings. Move the down arrow key until UMA Video Memory is highlighted. Selections include ...up a list of video memory. Does not affect password, date, or time changes. Setting Hard Drive +Removable Devices CD-ROM Drive Built-in LAN Troubleshooting and Maintenance Configuring Your Notebook Boot Menu Description Shows the order of your notebook, depending on your selection. Press Enter to change the...

Reference Guide
Page 119
... power, 34 status lights, 32 troubleshooting, 77 BIOS password, 24 BIOS Setup utility Boot menu, 87 Exit menu, 87 external display settings, 86 Main menu, 85 Security menu, 86 using, 84 black list (modem), 37 blackout periods, modem, 37 Bluetooth business cards, 46 configuring, 45 sending files, 46 ...CDs copying/creating, 23 recommended media, 23 cleaning the notebook, 28 configuring BIOS settings, 84 modem, 38 connecting IEEE 1394 devices, 53 LAN, 39 wireless network, 40 D data protection, 28 DDR-266 RAM, 58, 73 default BIOS settings, 85 devices boot order, 87 temporary boot order...
... power, 34 status lights, 32 troubleshooting, 77 BIOS password, 24 BIOS Setup utility Boot menu, 87 Exit menu, 87 external display settings, 86 Main menu, 85 Security menu, 86 using, 84 black list (modem), 37 blackout periods, modem, 37 Bluetooth business cards, 46 configuring, 45 sending files, 46 ...CDs copying/creating, 23 recommended media, 23 cleaning the notebook, 28 configuring BIOS settings, 84 modem, 38 connecting IEEE 1394 devices, 53 LAN, 39 wireless network, 40 D data protection, 28 DDR-266 RAM, 58, 73 default BIOS settings, 85 devices boot order, 87 temporary boot order...
Reference Guide
Page 120
... location, 3 N network connecting to, 39 LAN, See LAN wireless, See wireless network Norton AntiVirus, 25 notebook caring for, 27 changing BIOS settings, 84 cleaning, 28 opening/closing, 2, 3 protecting, 27, 70 resetting, 17 timeouts, 31 turning on..., 13 Num Lock, 9 O off button location, 2, 3 status lights, 8 turning off, 16 112 Reference Guide on button, location, 2, 3 One-Touch buttons location, 2, 3 using, 20 overheating, 70 P parallel port location, 5 troubleshooting, 80 password...
... location, 3 N network connecting to, 39 LAN, See LAN wireless, See wireless network Norton AntiVirus, 25 notebook caring for, 27 changing BIOS settings, 84 cleaning, 28 opening/closing, 2, 3 protecting, 27, 70 resetting, 17 timeouts, 31 turning on..., 13 Num Lock, 9 O off button location, 2, 3 status lights, 8 turning off, 16 112 Reference Guide on button, location, 2, 3 One-Touch buttons location, 2, 3 using, 20 overheating, 70 P parallel port location, 5 troubleshooting, 80 password...
Reference Guide
Page 121
...53 security cable lock, 5 Cable lock, 25 Norton AntiVirus, 25 Security menu (BIOS), 86 serial port troubleshooting, 80 setting up, 10 Standby and display life, 28 ... 8 S-Video port, 5 T temperature, overheating, 70 1394 devices, connecting, 53 1394 port, 53 timeouts, notebook, 31 TouchPad location, 2, 3 troubleshooting, 71 troubleshooting audio, 66 battery, 77 CD/DVD drive, 67 display...voltage requirements, 97 volume adjusting, 19 troubleshooting, 66 volume control, 3 W Windows key, 21 password, 24 setting up, 13 wireless communication Bluetooth, 44 configuring (Bluetooth), 45 indicator light, 2, ...
...53 security cable lock, 5 Cable lock, 25 Norton AntiVirus, 25 Security menu (BIOS), 86 serial port troubleshooting, 80 setting up, 10 Standby and display life, 28 ... 8 S-Video port, 5 T temperature, overheating, 70 1394 devices, connecting, 53 1394 port, 53 timeouts, notebook, 31 TouchPad location, 2, 3 troubleshooting, 71 troubleshooting audio, 66 battery, 77 CD/DVD drive, 67 display...voltage requirements, 97 volume adjusting, 19 troubleshooting, 66 volume control, 3 W Windows key, 21 password, 24 setting up, 13 wireless communication Bluetooth, 44 configuring (Bluetooth), 45 indicator light, 2, ...

Maintenance and Service Guide
Page 3
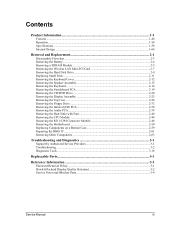
... Connector Module 2-48 Removing the Motherboard ...2-50 Replacing Components on a Bottom Case 2-59 Repairing the BIOS IC...2-61 Removing Other Components...2-63 Troubleshooting and Diagnostics 3-1 Support Service Partners...3-2 Troubleshooting ...3-3 Diagnostic Tools ...3-18 Replaceable Parts...4-1 Reference Information 5-1 Password Removal Policy...5-2 Hewlett-Packard Display Quality Statement 5-3 Service Notes and Obsolete Parts ...5-5 Service Manual iii
... Connector Module 2-48 Removing the Motherboard ...2-50 Replacing Components on a Bottom Case 2-59 Repairing the BIOS IC...2-61 Removing Other Components...2-63 Troubleshooting and Diagnostics 3-1 Support Service Partners...3-2 Troubleshooting ...3-3 Diagnostic Tools ...3-18 Replaceable Parts...4-1 Reference Information 5-1 Password Removal Policy...5-2 Hewlett-Packard Display Quality Statement 5-3 Service Notes and Obsolete Parts ...5-5 Service Manual iii

Maintenance and Service Guide
Page 89
...that appear. Select Start > Programs (or All Programs) > Hewlett-Packard > Notebook > HP e-DiagTools > e-DiagTools for all 3 methods. The BIOS update also resets the configurations in the Connect window to the notebook. 4. Connect any PCMCIA cards from it is docked, and remove any cables or... from the HP Business Support Web site http://www.hp.com/go/bizsupport. Repairing the BIOS IC (Service Partners Only) The notebook's BIOS IC cannot be able to the Internet. 5. In some cases, however, you cannot boot the notebook adequately, use e-DiagTools for BIOS passwords-so record ...
...that appear. Select Start > Programs (or All Programs) > Hewlett-Packard > Notebook > HP e-DiagTools > e-DiagTools for all 3 methods. The BIOS update also resets the configurations in the Connect window to the notebook. 4. Connect any PCMCIA cards from it is docked, and remove any cables or... from the HP Business Support Web site http://www.hp.com/go/bizsupport. Repairing the BIOS IC (Service Partners Only) The notebook's BIOS IC cannot be able to the Internet. 5. In some cases, however, you cannot boot the notebook adequately, use e-DiagTools for BIOS passwords-so record ...
Maintenance and Service Guide
Page 101
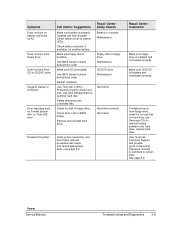
... sure floppy disk is installed and connected correctly. Use BIOS Setup to check default boot order. Delete temporary and unneeded files. CD/DVD drive Motherboard Hard drive Hard drive contacts Hard drive Password forgotten Verify proper ownership, and then follow removal procedure with...Suggestions Make sure battery is installed and connected correctly. Repair Center: Comments Make sure floppy drive is bootable. If notebook boots from CD in BIOS Setup. Password removal is bootable. Check battery level on hard drive, use Recovery CDs to reinstall factory software onto hard drive,...
... sure floppy disk is installed and connected correctly. Use BIOS Setup to check default boot order. Delete temporary and unneeded files. CD/DVD drive Motherboard Hard drive Hard drive contacts Hard drive Password forgotten Verify proper ownership, and then follow removal procedure with...Suggestions Make sure battery is installed and connected correctly. Repair Center: Comments Make sure floppy drive is bootable. If notebook boots from CD in BIOS Setup. Password removal is bootable. Check battery level on hard drive, use Recovery CDs to reinstall factory software onto hard drive,...

Maintenance and Service Guide
Page 117
... 3-3-3-3 3-3-4-1 3-3-4-3 3-4-1-1 3-4-1-2 3-4-1-3 3-4-2-2 3-4-2-3 3-4-2-4 3-4-3-2 3-4-3-3 3-4-3-4 3-4-4-1 3-4-4-2 3-4-4-3 Service Manual POST Description Enable Non-Maskable Interrupts (NMIs) Initialize Extended BIOS Data Area Test and initialize PS/2 mouse Initialize floppy controller Determine number of ATA drives (optional) Initialize hard-disk controllers Initialize local-bus hard-disk ... POST POST done-prepare to boot OS Terminate QuietBoot (optional) Check password (optional) Initialize ACPI BIOS Prepare Boot Initialize SMBIOS Initialize PnP Option ROMs Clear parity checkers Display MultiBoot ...
... 3-3-3-3 3-3-4-1 3-3-4-3 3-4-1-1 3-4-1-2 3-4-1-3 3-4-2-2 3-4-2-3 3-4-2-4 3-4-3-2 3-4-3-3 3-4-3-4 3-4-4-1 3-4-4-2 3-4-4-3 Service Manual POST Description Enable Non-Maskable Interrupts (NMIs) Initialize Extended BIOS Data Area Test and initialize PS/2 mouse Initialize floppy controller Determine number of ATA drives (optional) Initialize hard-disk controllers Initialize local-bus hard-disk ... POST POST done-prepare to boot OS Terminate QuietBoot (optional) Check password (optional) Initialize ACPI BIOS Prepare Boot Initialize SMBIOS Initialize PnP Option ROMs Clear parity checkers Display MultiBoot ...

Maintenance and Service Guide
Page 127
..., and remains in LAN provides diskless boot from time to time provide updates to the notebook's BIOS Use e-DiagTools for Windows to change the order Built-in Setup Does not affect password, date, or time changes Updating the Notebook's BIOS Hewlett-Packard might from a network server Default 1. System Devices Menu Video Display Device External Pointing...
..., and remains in LAN provides diskless boot from time to time provide updates to the notebook's BIOS Use e-DiagTools for Windows to change the order Built-in Setup Does not affect password, date, or time changes Updating the Notebook's BIOS Hewlett-Packard might from a network server Default 1. System Devices Menu Video Display Device External Pointing...
Service Manual
Page 3
... Module 2-48 Removing the Motherboard ...2-50 Replacing Components on a Bottom Case 2-59 Repairing the BIOS IC ...2-61 Removing Other Components ...2-63 Troubleshooting and Diagnostics 3-1 Support by Authorized Service Providers 3-1 Troubleshooting ...3-2 Diagnostic Tools ...3-18 Replaceable Parts...4-1 Reference Information 5-1 Password Removal Policy ...5-1 Hewlett-Packard Display Quality Statement 5-2 Service Notes and Obsolete Parts 5-4 Service Manual...
... Module 2-48 Removing the Motherboard ...2-50 Replacing Components on a Bottom Case 2-59 Repairing the BIOS IC ...2-61 Removing Other Components ...2-63 Troubleshooting and Diagnostics 3-1 Support by Authorized Service Providers 3-1 Troubleshooting ...3-2 Diagnostic Tools ...3-18 Replaceable Parts...4-1 Reference Information 5-1 Password Removal Policy ...5-1 Hewlett-Packard Display Quality Statement 5-2 Service Notes and Obsolete Parts 5-4 Service Manual...

Service Manual
Page 132
...Settings in the BIOS Setup utility-except for Windows Caution The BIOS update completely replaces the previous BIOS, so follow these before performing the update. If the notebook will boot sufficiently, use a Crisis Recovery floppy disk. Using e-DiagTools for BIOS passwords-so record these...the HP Business Support Web site (www.hp.com/go/bizsupport). Click Update, select Download New and click OK. Installation utilities and instructions for Windows or a BIOS floppy disk to reprogram the BIOS IC. Repairing the BIOS IC (Authorized Service Providers Only) The notebook's BIOS IC ...
...Settings in the BIOS Setup utility-except for Windows Caution The BIOS update completely replaces the previous BIOS, so follow these before performing the update. If the notebook will boot sufficiently, use a Crisis Recovery floppy disk. Using e-DiagTools for BIOS passwords-so record these...the HP Business Support Web site (www.hp.com/go/bizsupport). Click Update, select Download New and click OK. Installation utilities and instructions for Windows or a BIOS floppy disk to reprogram the BIOS IC. Repairing the BIOS IC (Authorized Service Providers Only) The notebook's BIOS IC ...

Service Manual
Page 142
...Service Manual Troubleshooting and Diagnostics 3-7 Use Disk Defragmenter to check hard disk. Password removal is installed or AC adapter connected. Password forgotten. Check boot order in floppy drive. Repair Center: Likely Causes Hard... drive. AC adapter. Hard drive contacts. Error message such as "Invalid system disk" or "Auto IDE error". Power No power. Remove and reinstall hard drive. Battery. Repair Center: Comments If notebook boots from floppy drive, check for disk in BIOS...
...Service Manual Troubleshooting and Diagnostics 3-7 Use Disk Defragmenter to check hard disk. Password removal is installed or AC adapter connected. Password forgotten. Check boot order in floppy drive. Repair Center: Likely Causes Hard... drive. AC adapter. Hard drive contacts. Error message such as "Invalid system disk" or "Auto IDE error". Power No power. Remove and reinstall hard drive. Battery. Repair Center: Comments If notebook boots from floppy drive, check for disk in BIOS...

Service Manual
Page 156
...up hardware interrupt vectors. Check for F2 keystroke. Disable onboard Super I /O ports. Initialize BIOS Data Area. Determine number of POST. Initialize local-bus hard-disk controllers. Check for ...3-3-3-1 3-3-3-3 3-3-4-1 3-3-4-3 3-4-1-1 3-4-1-2 3-4-1-3 3-4-2-2 3-4-2-3 3-4-2-4 3-4-3-2 3-4-3-3 3-4-3-4 POST Description Display BIOS copyright notice. Initialize MultiBoot. Test for SMART Drive (optional). Display prompt "Press F2 ... Initialize ACPI BIOS. Initialize SMBIOS. Initialize PnP Option ROMs. Service Manual Troubleshooting and Diagnostics 3-21
...up hardware interrupt vectors. Check for F2 keystroke. Disable onboard Super I /O ports. Initialize BIOS Data Area. Determine number of POST. Initialize local-bus hard-disk controllers. Check for ...3-3-3-1 3-3-3-3 3-3-4-1 3-3-4-3 3-4-1-1 3-4-1-2 3-4-1-3 3-4-2-2 3-4-2-3 3-4-2-4 3-4-3-2 3-4-3-3 3-4-3-4 POST Description Display BIOS copyright notice. Initialize MultiBoot. Test for SMART Drive (optional). Display prompt "Press F2 ... Initialize ACPI BIOS. Initialize SMBIOS. Initialize PnP Option ROMs. Service Manual Troubleshooting and Diagnostics 3-21

Service Manual
Page 163
...Description Shows the order of boot devices. Built-in LAN Updating the Notebook's BIOS Hewlett-Packard might from Power Off Security Menu User Password is Administrator Password is Set User Password Set Administrator Password Password Required to Boot Boot Menu Hard Disk Removable Device CD/DVD Built... On LAN from time to time provide updates to the notebook's BIOS. Shows if an administrator password is detected. Sets whether a user password is shut down. Does not affect password, date, or time changes. Enables BIOS support for changes. Restores default settings, and remains in...
...Description Shows the order of boot devices. Built-in LAN Updating the Notebook's BIOS Hewlett-Packard might from Power Off Security Menu User Password is Administrator Password is Set User Password Set Administrator Password Password Required to Boot Boot Menu Hard Disk Removable Device CD/DVD Built... On LAN from time to time provide updates to the notebook's BIOS. Shows if an administrator password is detected. Sets whether a user password is shut down. Does not affect password, date, or time changes. Enables BIOS support for changes. Restores default settings, and remains in...


