
Reference Guide
Page 20
If the battery has been removed, you should use of keyboards and other input devices has been associated with a full-sized keyboard, monitor, and mouse. Turn the notebook upside down. 2. If you will charge the battery, connect the AC adapter, turn on this CD included with the battery installed. For information about reducing ...
If the battery has been removed, you should use of keyboards and other input devices has been associated with a full-sized keyboard, monitor, and mouse. Turn the notebook upside down. 2. If you will charge the battery, connect the AC adapter, turn on this CD included with the battery installed. For information about reducing ...

Reference Guide
Page 77
...• Try adjusting the size of a double-sided DVD has a different format (standard or widescreen). One-Touch button at the top and bottom of the keyboard to switch to its default setting of 1024 × 768 or higher, depending on a CD/DVD RW combo drive, try using a different media brand. ... a DVD doesn't play the other side. This will wake the display if it is off. • If the notebook is difficult to read • Try setting the display resolution to one display. Remove the disc from the drive, then select Start > Turn Off Computer > Restart. • If you are using Extended...
...• Try adjusting the size of a double-sided DVD has a different format (standard or widescreen). One-Touch button at the top and bottom of the keyboard to switch to its default setting of 1024 × 768 or higher, depending on a CD/DVD RW combo drive, try using a different media brand. ... a DVD doesn't play the other side. This will wake the display if it is off. • If the notebook is difficult to read • Try setting the display resolution to one display. Remove the disc from the drive, then select Start > Turn Off Computer > Restart. • If you are using Extended...
Reference Guide
Page 121
rebooting boot device, 87 temporary boot device, 17 region code, 23 regulatory information, 101 removing CD, 20, 22 DVD, 20, 22 hard drive, 62 hard drive holder, 63 PC card, 49 reset button, 17 resetting, 17 S ...mode definition, 16 timeout, 16 startup, troubleshooting, 81 static electricity, 58, 60 status lights battery charge, 32 keyboard, 2, 3, 9 location, 2, 3 meanings, 8 S-Video port, 5 T temperature, overheating, 70 1394 devices, connecting, 53 1394 port, 53 timeouts, notebook, 31 TouchPad location, 2, 3 troubleshooting, 71 troubleshooting audio, 66 battery, 77 CD/DVD drive, 67 display...
rebooting boot device, 87 temporary boot device, 17 region code, 23 regulatory information, 101 removing CD, 20, 22 DVD, 20, 22 hard drive, 62 hard drive holder, 63 PC card, 49 reset button, 17 resetting, 17 S ...mode definition, 16 timeout, 16 startup, troubleshooting, 81 static electricity, 58, 60 status lights battery charge, 32 keyboard, 2, 3, 9 location, 2, 3 meanings, 8 S-Video port, 5 T temperature, overheating, 70 1394 devices, connecting, 53 1394 port, 53 timeouts, notebook, 31 TouchPad location, 2, 3 troubleshooting, 71 troubleshooting audio, 66 battery, 77 CD/DVD drive, 67 display...

Maintenance and Service Guide
Page 3
... Software...2-11 Replacing Small Parts ...2-12 Removing the Keyboard Cover...2-13 Removing the Speaker Assembly ...2-15 Removing the Keyboard ...2-16 Removing the Switchboard PCA ...2-19 Removing the CD/DVD Drive...2-20 Removing the Display Assembly...2-23 Removing the Top Case ...2-26 Removing the Floppy Drive...2-32 Removing the Infrared (I/R) PCA...2-36 Removing the Audio PCA ...2-38 Removing the Heat Sink (with Fan 2-40...
... Software...2-11 Replacing Small Parts ...2-12 Removing the Keyboard Cover...2-13 Removing the Speaker Assembly ...2-15 Removing the Keyboard ...2-16 Removing the Switchboard PCA ...2-19 Removing the CD/DVD Drive...2-20 Removing the Display Assembly...2-23 Removing the Top Case ...2-26 Removing the Floppy Drive...2-32 Removing the Infrared (I/R) PCA...2-36 Removing the Audio PCA ...2-38 Removing the Heat Sink (with Fan 2-40...

Maintenance and Service Guide
Page 4
... 2-47 Figure 2-30. Resetting the Notebook ...1-17 Figure 1-8. Removing an SDRAM Module 2-5 Figure 2-4. Removing the Hard Disk Drive Tray 2-10 Figure 2-9. Removing the Keyboard ...2-17 Figure 2-13. Removing the Audio PCA ...2-39 Figure 2-26. Removing the Motherboard 2-51 Figure 2-35. Removing the Hard Disk Drive 2-9 Figure 2-8. Removing the Switchboard PCA 2-19 Figure 2-15. Removing the RJ11/1394 Connector Module 2-49...
... 2-47 Figure 2-30. Resetting the Notebook ...1-17 Figure 1-8. Removing an SDRAM Module 2-5 Figure 2-4. Removing the Hard Disk Drive Tray 2-10 Figure 2-9. Removing the Keyboard ...2-17 Figure 2-13. Removing the Audio PCA ...2-39 Figure 2-26. Removing the Motherboard 2-51 Figure 2-35. Removing the Hard Disk Drive 2-9 Figure 2-8. Removing the Switchboard PCA 2-19 Figure 2-15. Removing the RJ11/1394 Connector Module 2-49...

Maintenance and Service Guide
Page 5
...notebook 1-15 Table 1-4. Main Status Lights (front of Serial Number Label 2-59 Figure 2-39. Accessories ...1-22 Table 1-8. Replacing Small Parts ...2-12 Table 2-5. Scope of Diagnostic Tools...3-7 Table 3-3. POST Messages ...3-24 Table 3-6. Replaceable Parts ...4-4 Table 4-2. LCD Guidelines ...5-4 Service Manual v Replacing the Antennas...2-60 Figure 2-37. Keyboard Status Lights...1-15 Table 1-5. Removal...BIOS Setup Menus and Parameters 3-28 Table 4-1. Boot-Block Jumper...2-62 Figure 3-1. Removing a PCMCIA Door 2-60 Figure 2-38. Recommended Screw Torque Values 2-2 Table ...
...notebook 1-15 Table 1-4. Main Status Lights (front of Serial Number Label 2-59 Figure 2-39. Accessories ...1-22 Table 1-8. Replacing Small Parts ...2-12 Table 2-5. Scope of Diagnostic Tools...3-7 Table 3-3. POST Messages ...3-24 Table 3-6. Replaceable Parts ...4-4 Table 4-2. LCD Guidelines ...5-4 Service Manual v Replacing the Antennas...2-60 Figure 2-37. Keyboard Status Lights...1-15 Table 1-5. Removal...BIOS Setup Menus and Parameters 3-28 Table 4-1. Boot-Block Jumper...2-62 Figure 3-1. Removing a PCMCIA Door 2-60 Figure 2-38. Recommended Screw Torque Values 2-2 Table ...

Maintenance and Service Guide
Page 26
...type QWERTY keyboard with Ultra-DMA 100 interface 1.44-MB floppy drive (certain models) 24x CD-ROM, 8x DVD, CD-RW, or CD-RW/DVD drive (or higher) At least 128 MB SDRAM preinstalled HP Pavilion ze5x00, ze4x00, HP Compaq nx9010, nx9008, nx9005, Compaq Evo N1050v, Compaq Presario 2500, and Compaq Presario 2100:...modules Compaq Evo N1010v and Presario 1100: 2 slots for PXE/BINL, NCP/IPX, DHCP 802.11b or 802.11g (54g) 1-20 Product Information Service Manual Mass Storage RAM Audio System Keyboard and Pointing Device LAN (certain models) Wireless LAN (certain models) 20- to 60-GB removable ...
...type QWERTY keyboard with Ultra-DMA 100 interface 1.44-MB floppy drive (certain models) 24x CD-ROM, 8x DVD, CD-RW, or CD-RW/DVD drive (or higher) At least 128 MB SDRAM preinstalled HP Pavilion ze5x00, ze4x00, HP Compaq nx9010, nx9008, nx9005, Compaq Evo N1050v, Compaq Presario 2500, and Compaq Presario 2100:...modules Compaq Evo N1010v and Presario 1100: 2 slots for PXE/BINL, NCP/IPX, DHCP 802.11b or 802.11g (54g) 1-20 Product Information Service Manual Mass Storage RAM Audio System Keyboard and Pointing Device LAN (certain models) Wireless LAN (certain models) 20- to 60-GB removable ...
Maintenance and Service Guide
Page 31
... and assemblies. You can use these are user-replaceable. Installing a wrong-size screw can damage the notebook and its components. 2 Removal and Replacement This chapter tells you install them. Removal Cross-Reference Assembly, display (page 2-23) • Assembly, speaker (page 2-15) • Battery, ..., floppy (page 2-32) • Drive, hard disk (page 2-9) • Feet, rubber (page 2-12) Heat sink (with fan) (page 2-40) • Keyboard (page 2-16) • Module, CPU (page 2-44) Module, RJ11/1394 (page 2-48) Module, SDRAM (page 2-5) PCA, antennas (page 2-60) PCA, audio...
... and assemblies. You can use these are user-replaceable. Installing a wrong-size screw can damage the notebook and its components. 2 Removal and Replacement This chapter tells you install them. Removal Cross-Reference Assembly, display (page 2-23) • Assembly, speaker (page 2-15) • Battery, ..., floppy (page 2-32) • Drive, hard disk (page 2-9) • Feet, rubber (page 2-12) Heat sink (with fan) (page 2-40) • Keyboard (page 2-16) • Module, CPU (page 2-44) Module, RJ11/1394 (page 2-48) Module, SDRAM (page 2-5) PCA, antennas (page 2-60) PCA, audio...

Maintenance and Service Guide
Page 43
...notebook. 3. Damaging either antenna PCA can degrade notebook performance. Removing the Keyboard Cover Required Equipment • 1 Phillips screwdriver • Small flat-blade screwdriver Removal Procedure 1. Unplug the AC adapter, if present, and then remove the battery. 2. Carefully insert a flat-blade screwdriver blade under the keyboard ...: Be careful not to damage the antenna PCA that secure the keyboard cover to damage the plastics or wireless antenna underneath. Service Manual Removal and Replacement 2-13 Remove the two M2.5×4.0mm hinge cover screws that is connected to...
...notebook. 3. Damaging either antenna PCA can degrade notebook performance. Removing the Keyboard Cover Required Equipment • 1 Phillips screwdriver • Small flat-blade screwdriver Removal Procedure 1. Unplug the AC adapter, if present, and then remove the battery. 2. Carefully insert a flat-blade screwdriver blade under the keyboard ...: Be careful not to damage the antenna PCA that secure the keyboard cover to damage the plastics or wireless antenna underneath. Service Manual Removal and Replacement 2-13 Remove the two M2.5×4.0mm hinge cover screws that is connected to...

Maintenance and Service Guide
Page 44
... the flat-blade screwdriver under the keyboard, and then press the panel into place. 2-14 Removal and Replacement Service Manual Disconnecting the Speaker Cable Reassembly Note Insert the tabs on the left side of display assembly hinge to be repeated on HP Pavilion 5300 and 5200, HP Compaq nx9010, and Compaq Presario 2500 models, disconnect the speaker...
... the flat-blade screwdriver under the keyboard, and then press the panel into place. 2-14 Removal and Replacement Service Manual Disconnecting the Speaker Cable Reassembly Note Insert the tabs on the left side of display assembly hinge to be repeated on HP Pavilion 5300 and 5200, HP Compaq nx9010, and Compaq Presario 2500 models, disconnect the speaker...

Maintenance and Service Guide
Page 45
Remove the keyboard cover (page 2-13). 3. Remove the M2.5×6.0mm screw that secures the speaker assembly to the "Removing the Top Case" section later in this chapter for procedures on removing the top case and speakers on the HP Pavilion 5x00, HP Compaq nx9010 and nx9008, and Compaq Presario 2500 Series notebooks. Figure 2-11. Removing the Speaker Assembly Service Manual Removal and Replacement...
Remove the keyboard cover (page 2-13). 3. Remove the M2.5×6.0mm screw that secures the speaker assembly to the "Removing the Top Case" section later in this chapter for procedures on removing the top case and speakers on the HP Pavilion 5x00, HP Compaq nx9010 and nx9008, and Compaq Presario 2500 Series notebooks. Figure 2-11. Removing the Speaker Assembly Service Manual Removal and Replacement...

Maintenance and Service Guide
Page 46
... the switchboard PCA end, and then pull it toward the display assembly to the top case. 4. Remove the keyboard. Remove the keyboard cover (page 2-13). 3. Turn the keyboard over, and then disconnect the motherboard cable. 6. Unplug the AC adapter, if present, and then remove the battery. 2. Reassembly Notes CAUTION: Do not excessively bend or fold the...
... the switchboard PCA end, and then pull it toward the display assembly to the top case. 4. Remove the keyboard. Remove the keyboard cover (page 2-13). 3. Turn the keyboard over, and then disconnect the motherboard cable. 6. Unplug the AC adapter, if present, and then remove the battery. 2. Reassembly Notes CAUTION: Do not excessively bend or fold the...

Maintenance and Service Guide
Page 47
Removing the Keyboard Service Manual Removal and Replacement 2-17 Figure 2-12.
Removing the Keyboard Service Manual Removal and Replacement 2-17 Figure 2-12.

Maintenance and Service Guide
Page 48
... 4-wire cables that secures the keyboard, and then switchboard PCA to HP Pavilion 4x00, HP Compaq nx9005 and nx9000, Compaq Evo Notebook N1050v and N1010v, and Compaq Presario 2100 and 1100 models. Removing the Switchboard PCA HP Pavilion 4x00, HP Compaq nx9005 and nx9000, Compaq Evo Notebook N1050v and N1010v, and Compaq Presario 2100 and 1100 Models 2-18 Removal and Replacement Service Manual Unplug the...
... 4-wire cables that secures the keyboard, and then switchboard PCA to HP Pavilion 4x00, HP Compaq nx9005 and nx9000, Compaq Evo Notebook N1050v and N1010v, and Compaq Presario 2100 and 1100 models. Removing the Switchboard PCA HP Pavilion 4x00, HP Compaq nx9005 and nx9000, Compaq Evo Notebook N1050v and N1010v, and Compaq Presario 2100 and 1100 Models 2-18 Removal and Replacement Service Manual Unplug the...

Maintenance and Service Guide
Page 49
... PCA to HP Pavilion 5x00, HP Compaq nx9010 and nx9008, and Compaq Presario 2500 models. Removing the Switchboard PCA HP Pavilion 5x00, HP Compaw nx9010 and nx9008, and Compaq Presario 2500 Models Service Manual Removal and Replacement 2-19 NOTE: This section applies only to disconnect the PCA from the motherboard. 6. Required Equipment 1 Phillips screwdriver Removal Procedure 1. Remove the keyboard cover (page 2-13). 3. Remove the switchboard...
... PCA to HP Pavilion 5x00, HP Compaq nx9010 and nx9008, and Compaq Presario 2500 models. Removing the Switchboard PCA HP Pavilion 5x00, HP Compaw nx9010 and nx9008, and Compaq Presario 2500 Models Service Manual Removal and Replacement 2-19 NOTE: This section applies only to disconnect the PCA from the motherboard. 6. Required Equipment 1 Phillips screwdriver Removal Procedure 1. Remove the keyboard cover (page 2-13). 3. Remove the switchboard...
Maintenance and Service Guide
Page 50
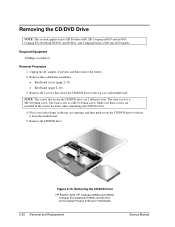
... a M2.5×4.0mm screw. Make sure these additional assemblies: • Keyboard cover (page 2-13) • Keyboard (page 2-16) 3. Removing the CD/DVD Drive HP Pavilion 4x00, HP Compaq nx9005 and nx9000, Compaq Evo Notebook N1050v and N1010v, and Compaq Presario 2100 and 1100 Models 2-20 Removal and Replacement Service Manual Remove the 2 screws that secure the CD/DVD drive are installed...
... a M2.5×4.0mm screw. Make sure these additional assemblies: • Keyboard cover (page 2-13) • Keyboard (page 2-16) 3. Removing the CD/DVD Drive HP Pavilion 4x00, HP Compaq nx9005 and nx9000, Compaq Evo Notebook N1050v and N1010v, and Compaq Presario 2100 and 1100 Models 2-20 Removal and Replacement Service Manual Remove the 2 screws that secure the CD/DVD drive are installed...

Maintenance and Service Guide
Page 51
.../DVD Drive HP Pavilion 5x00, HP Compaq nx9010 and HP nx9008, and Compaq Presario 2500 Models Service Manual Removal and Replacement 2-21 Remove the CD/DVD drive. Remove these additional assemblies: • Keyboard cover (page 2-13) • Keyboard (page 2-16) 3. Place your index finger in the top case opening and push out on the CD/DVD drive to the top case...
.../DVD Drive HP Pavilion 5x00, HP Compaq nx9010 and HP nx9008, and Compaq Presario 2500 Models Service Manual Removal and Replacement 2-21 Remove the CD/DVD drive. Remove these additional assemblies: • Keyboard cover (page 2-13) • Keyboard (page 2-16) 3. Place your index finger in the top case opening and push out on the CD/DVD drive to the top case...

Maintenance and Service Guide
Page 52
... away from the notebook rear panel. 4. Lift the display assembly off of the notebook. 2-22 Removal and Replacement Service Manual Remove the two M2.5×6.0mm retaining screws from the display assembly hinges. 5. Remove the M2.5×4.0mm screws from the motherboard. 6. Remove the six M2.5×... case. (Note that there is a grounding strap at the left and right antenna PCAs. Remove the keyboard cover (page 2-13). 3. Disconnect the display assembly cable from the left hinge.) 7. Removing the Display Assembly (Service Partners Only) Required Equipment 1 Phillips screwdriver...
... away from the notebook rear panel. 4. Lift the display assembly off of the notebook. 2-22 Removal and Replacement Service Manual Remove the two M2.5×6.0mm retaining screws from the display assembly hinges. 5. Remove the M2.5×4.0mm screws from the motherboard. 6. Remove the six M2.5×... case. (Note that there is a grounding strap at the left and right antenna PCAs. Remove the keyboard cover (page 2-13). 3. Disconnect the display assembly cable from the left hinge.) 7. Removing the Display Assembly (Service Partners Only) Required Equipment 1 Phillips screwdriver...

Maintenance and Service Guide
Page 54
...Removal Procedure 1. Remove the remaining 14 M2.5×6.0mm screws. 6. Turn the notebook top side up with the rear panel facing forward. 7. Remove the two M2.5×6.0mm screws from the motherboard. 2-24 Removal and Replacement Service Manual Remove these additional assemblies: • Hard disk drive (page 2-9) • Keyboard...the rear panel. 8. Removing the Top Case (Service Partners Only) NOTE: This section applies only to HP Pavilion 4x00, HP Compaq nx9005 and nx9000, Compaq Evo Notebook N1050v and N1010v, and Compaq Presario 2100 and 1100 models. Remove the two M2.5×4.0mm...
...Removal Procedure 1. Remove the remaining 14 M2.5×6.0mm screws. 6. Turn the notebook top side up with the rear panel facing forward. 7. Remove the two M2.5×6.0mm screws from the motherboard. 2-24 Removal and Replacement Service Manual Remove these additional assemblies: • Hard disk drive (page 2-9) • Keyboard...the rear panel. 8. Removing the Top Case (Service Partners Only) NOTE: This section applies only to HP Pavilion 4x00, HP Compaq nx9005 and nx9000, Compaq Evo Notebook N1050v and N1010v, and Compaq Presario 2100 and 1100 models. Remove the two M2.5×4.0mm...

Maintenance and Service Guide
Page 56
... forward. 4. NOTE: This section applies only to the notebook. 2-26 Removal and Replacement Service Manual Remove these additional assemblies: • Hard disk drive (page 2-9) • Keyboard cover (page 2-13) • Speaker assembly (page 2-15) • Keyboard (page 2-16) • Switchboard PCA (page 2-19...result in damage to HP Pavilion 5x00, HP Compaq nx9010 and HP nx9008, and Compaq Presario 2500 models. Unplug the AC adapter, if present, and then remove the battery. 2. Be sure to note of the correct location of the notebook CAUTION: The 16 screws removed in the correct ...
... forward. 4. NOTE: This section applies only to the notebook. 2-26 Removal and Replacement Service Manual Remove these additional assemblies: • Hard disk drive (page 2-9) • Keyboard cover (page 2-13) • Speaker assembly (page 2-15) • Keyboard (page 2-16) • Switchboard PCA (page 2-19...result in damage to HP Pavilion 5x00, HP Compaq nx9010 and HP nx9008, and Compaq Presario 2500 models. Unplug the AC adapter, if present, and then remove the battery. 2. Be sure to note of the correct location of the notebook CAUTION: The 16 screws removed in the correct ...


