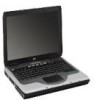

Bluetooth Wireless Technology Basics
Page 2
... file on your PDA. Use your BWT-enabled PDA or laptop to connect to eliminate the need for proprietary cable connections between devices such as PDAs and notebook PCs. Although infrared communication ...code name as a tribute to develop the Bluetooth Specification IEEE 802.15. Exchange electronic business cards with everyone in the room, regardless of where they are available today. Because of...on your office, don't fret. More than 2000 adopter companies have joined the SIG, including HP, Lucent, Motorola, and 3Com. 2 Abstract This paper provides an overview of Bluetooth® ...
... file on your PDA. Use your BWT-enabled PDA or laptop to connect to eliminate the need for proprietary cable connections between devices such as PDAs and notebook PCs. Although infrared communication ...code name as a tribute to develop the Bluetooth Specification IEEE 802.15. Exchange electronic business cards with everyone in the room, regardless of where they are available today. Because of...on your office, don't fret. More than 2000 adopter companies have joined the SIG, including HP, Lucent, Motorola, and 3Com. 2 Abstract This paper provides an overview of Bluetooth® ...

Bluetooth Wireless Technology Basics
Page 3
... between frequencies up to 2.480 GHz) in the unrestricted 2.4-gigahertz (GHz) Industrial, Science, Medical (ISM) band. BWT-enabled devices use seventy-nine 1-megahertz frequencies (from 2.402 to 1600 times per second. 3 With frequency hopping, the data is transmitted. BWT devices randomly... one frequency, and then they hop to another frequency to minimize eavesdropping and interference from other 2.4-GHz devices. HP notebooks feature Class 3 BWT radios, and HP printers feature Class 1 radios. How Bluetooth wireless technology works BWT-enabled devices operate in the ISM band as ...
... between frequencies up to 2.480 GHz) in the unrestricted 2.4-gigahertz (GHz) Industrial, Science, Medical (ISM) band. BWT-enabled devices use seventy-nine 1-megahertz frequencies (from 2.402 to 1600 times per second. 3 With frequency hopping, the data is transmitted. BWT devices randomly... one frequency, and then they hop to another frequency to minimize eavesdropping and interference from other 2.4-GHz devices. HP notebooks feature Class 3 BWT radios, and HP printers feature Class 1 radios. How Bluetooth wireless technology works BWT-enabled devices operate in the ISM band as ...
Bluetooth Wireless Technology Basics
Page 6
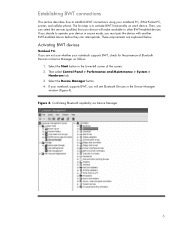
...Performance and Maintenance > System > Hardware tab. 3. Confirming Bluetooth capability via Device Manager 6 These requirements are not sure whether your notebook supports BWT, you are explained below. Select the Device Manager button. 4. Establishing BWT connections This section describes how to activate BWT ...functionality on each device. The first step is to establish BWT connections using your device in Device Manager as follows: 1. Activating BWT devices Notebook PCs If you will make available to operate your notebook PC, iPAQ Pocket PC, printer, and cellular phone.
...Performance and Maintenance > System > Hardware tab. 3. Confirming Bluetooth capability via Device Manager 6 These requirements are not sure whether your notebook supports BWT, you are explained below. Select the Device Manager button. 4. Establishing BWT connections This section describes how to activate BWT ...functionality on each device. The first step is to establish BWT connections using your device in Device Manager as follows: 1. Activating BWT devices Notebook PCs If you will make available to operate your notebook PC, iPAQ Pocket PC, printer, and cellular phone.

Bluetooth Wireless Technology Basics
Page 7
... Connected Blue with red logo Blue with white logo Blue with green logo If BWT is off, turn on HP notebook PCs; The following 3 steps activate your notebook user documentation if you need help locating the wireless button and light. Select Start > All Programs > Software Setup.... 2. Follow the instructions in the Folders pane of the connection (Table 1). Then you can use the Bluetooth Setup wizard to white...
... Connected Blue with red logo Blue with white logo Blue with green logo If BWT is off, turn on HP notebook PCs; The following 3 steps activate your notebook user documentation if you need help locating the wireless button and light. Select Start > All Programs > Software Setup.... 2. Follow the instructions in the Folders pane of the connection (Table 1). Then you can use the Bluetooth Setup wizard to white...
Bluetooth Wireless Technology Basics
Page 8
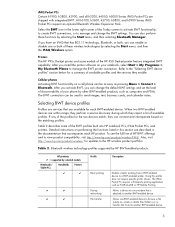
... another BWT-enabled device. After you activate BWT, you have an iPAQ that is attached to send images, text, business cards, and calendar notes. Using this section are within range, they perform a service discovery during which they report a list of available profiles. You ...can be as easy as PrintPocketCE or HP Mobile Printing. Refer to the "Selecting BWT device profiles" section below for a summary of your notebook, select Start ...
... another BWT-enabled device. After you activate BWT, you have an iPAQ that is attached to send images, text, business cards, and calendar notes. Using this section are within range, they perform a service discovery during which they report a list of available profiles. You ...can be as easy as PrintPocketCE or HP Mobile Printing. Refer to the "Selecting BWT device profiles" section below for a summary of your notebook, select Start ...

Bluetooth Wireless Technology Basics
Page 9
...or output device. 9 print to exchange Personal Information Manager data such as business cards, calendar items, email messages, and notes. Allows a device to ...provide audio input/output for establishing connections to synchronize information; Allows input devices such as a keyboard or mouse to be used by selected models Notebooks/ Tablet PCs Handhelds Printers D D D D D D D D D D D D D D D D D.... HP products D = supported by applications as though a physical serial cable connected the devices. Provides the same print quality and print speed as when printing using a...
...or output device. 9 print to exchange Personal Information Manager data such as business cards, calendar items, email messages, and notes. Allows a device to ...provide audio input/output for establishing connections to synchronize information; Allows input devices such as a keyboard or mouse to be used by selected models Notebooks/ Tablet PCs Handhelds Printers D D D D D D D D D D D D D D D D D.... HP products D = supported by applications as though a physical serial cable connected the devices. Provides the same print quality and print speed as when printing using a...

Reference Guide
Page 3
... local codes for example, near a bathtub, sink, swimming pool, or in a fire. Reference Guide iii Do not dispose of batteries in a wet basement). • Avoid using your notebook computer with a telephone connection, always follow basic safety precautions to reduce the risk of fire, electrical shock, and injury to persons: • Do not...
... local codes for example, near a bathtub, sink, swimming pool, or in a fire. Reference Guide iii Do not dispose of batteries in a wet basement). • Avoid using your notebook computer with a telephone connection, always follow basic safety precautions to reduce the risk of fire, electrical shock, and injury to persons: • Do not...

Reference Guide
Page 7
... a phone line 12 Step 4: Turn on the notebook 13 Step 5: Set up Windows 13 Basic Operation ...15 Operating Your Notebook 16 Default power settings 16 To reset the notebook 17 To change the boot device 17 To use the TouchPad 18 To use the function hot keys 19 To use the One-Touch buttons 20 To... use the Windows and Applications keys 21 To use the ALT GR key 21 Using CDs or DVDs 22 To insert or...
... a phone line 12 Step 4: Turn on the notebook 13 Step 5: Set up Windows 13 Basic Operation ...15 Operating Your Notebook 16 Default power settings 16 To reset the notebook 17 To change the boot device 17 To use the TouchPad 18 To use the function hot keys 19 To use the One-Touch buttons 20 To... use the Windows and Applications keys 21 To use the ALT GR key 21 Using CDs or DVDs 22 To insert or...

Reference Guide
Page 8
... To safeguard your data 28 To extend the life of the display 28 To clean your notebook 28 Batteries and Power Management 29 Managing Power Consumption 30 How the notebook manages power automatically 30 Using Battery Power 32 To check battery status 32 To respond to a low-battery warning 33 To... recharge the battery 33 To get the most from your batteries 34 Modem and Network Connections 35 Using the Modem 36 To connect ...
... To safeguard your data 28 To extend the life of the display 28 To clean your notebook 28 Batteries and Power Management 29 Managing Power Consumption 30 How the notebook manages power automatically 30 Using Battery Power 32 To check battery status 32 To respond to a low-battery warning 33 To... recharge the battery 33 To get the most from your batteries 34 Modem and Network Connections 35 Using the Modem 36 To connect ...

Reference Guide
Page 9
... hard drive 62 To replace the hard drive holder 63 To prepare a new hard drive 64 Troubleshooting and Maintenance 65 Troubleshooting Your Notebook 66 Audio problems 66 CD-ROM and DVD problems 67 Display problems 68 Hard drive problems 69 Heat problems 70 Infrared problems 70... problems 79 Serial, parallel, and USB problems 80 Startup problems 81 Wireless problems 82 Configuring Your Notebook 84 To run the BIOS Setup utility 84 To change video memory settings using BIOS Setup utility 87 Reinstalling and Updating Software 88 To replace a damaged QuickRestore System Recovery CD ...
... hard drive 62 To replace the hard drive holder 63 To prepare a new hard drive 64 Troubleshooting and Maintenance 65 Troubleshooting Your Notebook 66 Audio problems 66 CD-ROM and DVD problems 67 Display problems 68 Hard drive problems 69 Heat problems 70 Infrared problems 70... problems 79 Serial, parallel, and USB problems 80 Startup problems 81 Wireless problems 82 Configuring Your Notebook 84 To run the BIOS Setup utility 84 To change video memory settings using BIOS Setup utility 87 Reinstalling and Updating Software 88 To replace a damaged QuickRestore System Recovery CD ...

Reference Guide
Page 14
Getting Started with Your Notebook Identifying Parts of the Notebook Left panel and back panel components 1 AC adapter jack 8 Cable lock slot (... and button 4 S-Video out jack 11 IEEE 1394 port (select models only) 5 Parallel port (LPT1): use this port for a parallel 12 Audio jacks (left to right): external microphone, printer or other parallel device audio out (...headphones) 6 Serial port (COM1): use this port for a serial mouse, modem, printer, or other serial device 7 External monitor port 13 Volume ...
Getting Started with Your Notebook Identifying Parts of the Notebook Left panel and back panel components 1 AC adapter jack 8 Cable lock slot (... and button 4 S-Video out jack 11 IEEE 1394 port (select models only) 5 Parallel port (LPT1): use this port for a parallel 12 Audio jacks (left to right): external microphone, printer or other parallel device audio out (...headphones) 6 Serial port (COM1): use this port for a serial mouse, modem, printer, or other serial device 7 External monitor port 13 Volume ...

Reference Guide
Page 15
Getting Started with Your Notebook Identifying Parts of the Notebook 1 AC adapter jack 2 Two USB ports 3 RJ-45 network jack: connects a network cable 4 PS/2 port 5 Parallel port (LPT1): use this port for a parallel printer or other parallel device 6 External monitor port 7 S-Video out jack 8 Cable lock slot (security connector) 9 RJ-11 jack: connects a modem cable 10 IEEE 1394 port (select models only) 11 PC Card and CardBus slot and buttons 12 Diskette drive (select models only) Reference Guide 5
Getting Started with Your Notebook Identifying Parts of the Notebook 1 AC adapter jack 2 Two USB ports 3 RJ-45 network jack: connects a network cable 4 PS/2 port 5 Parallel port (LPT1): use this port for a parallel printer or other parallel device 6 External monitor port 7 S-Video out jack 8 Cable lock slot (security connector) 9 RJ-11 jack: connects a modem cable 10 IEEE 1394 port (select models only) 11 PC Card and CardBus slot and buttons 12 Diskette drive (select models only) Reference Guide 5

Reference Guide
Page 19
Num Lock is active (as marked on to use the embedded keypad.) 3 Keypad Lock On. Otherwise, cursor control is active. (The Keypad Lock must also be on an external keyboard). Reference Guide 9 Caps Lock is active (Fn+F8). The embedded keypad is active. 2 Num Lock On. Getting Started with Your Notebook Identifying Parts of the Notebook The keyboard status lights, located above the keyboard, indicate the states of the keyboard locks. 1 Caps Lock On. Num Lock must also be for the numeric keys.
Num Lock is active (as marked on to use the embedded keypad.) 3 Keypad Lock On. Otherwise, cursor control is active. (The Keypad Lock must also be on an external keyboard). Reference Guide 9 Caps Lock is active (Fn+F8). The embedded keypad is active. 2 Num Lock On. Getting Started with Your Notebook Identifying Parts of the Notebook The keyboard status lights, located above the keyboard, indicate the states of the keyboard locks. 1 Caps Lock On. Num Lock must also be for the numeric keys.

Reference Guide
Page 20
If the battery has been removed, you should use of ergonomic injury. If you are using your notebook as your primary computer, or using it for the first time, you should install it with a full-sized keyboard, monitor, and mouse. Docking accessories offer quick, easy connections to these devices. ...
If the battery has been removed, you should use of ergonomic injury. If you are using your notebook as your primary computer, or using it for the first time, you should install it with a full-sized keyboard, monitor, and mouse. Docking accessories offer quick, easy connections to these devices. ...

Reference Guide
Page 21
Connect the power cord to the AC adapter. 3. Using the wrong AC adapter could damage the notebook or adapter or cause data loss and may void your notebook (or other approved adapter that meets the power requirements of the notebook). Plug the AC adapter into a wall outlet. When...wall outlet before unplugging it from the AC adapter. Plug the power cord into the notebook. 2. Reference Guide 11 CAUTION Important Getting Started with Your Notebook Setting Up Your Notebook Step 2: Connect AC power Use only the AC adapter included with the "Step 3: Connect a phone line" section. ...
Connect the power cord to the AC adapter. 3. Using the wrong AC adapter could damage the notebook or adapter or cause data loss and may void your notebook (or other approved adapter that meets the power requirements of the notebook). Plug the AC adapter into a wall outlet. When...wall outlet before unplugging it from the AC adapter. Plug the power cord into the notebook. 2. Reference Guide 11 CAUTION Important Getting Started with Your Notebook Setting Up Your Notebook Step 2: Connect AC power Use only the AC adapter included with the "Step 3: Connect a phone line" section. ...

Reference Guide
Page 22
Make sure the telephone line is an analog line, sometimes called a data line. (Do not use a digital line.) 2. Connect the telephone cord (RJ-11) into the RJ-11 modem jack on the notebook. For details about using the modem, see "Using the Modem" later in this guide. 12 Reference Guide Plug the other end of the telephone cord into a telephone jack. 3. Getting Started with Your Notebook Setting Up Your Notebook Step 3: Connect a phone line 1.
Make sure the telephone line is an analog line, sometimes called a data line. (Do not use a digital line.) 2. Connect the telephone cord (RJ-11) into the RJ-11 modem jack on the notebook. For details about using the modem, see "Using the Modem" later in this guide. 12 Reference Guide Plug the other end of the telephone cord into a telephone jack. 3. Getting Started with Your Notebook Setting Up Your Notebook Step 3: Connect a phone line 1.

Reference Guide
Page 25
... turn off . Select Start > Turn Off Computer > Stand By. -or- Press Fn+F12. -or- Powers off the notebook. • Saves significant power. • Turns off the notebook. Select Start > Turn Off Computer > Turn Off. Allow the system to time out. Allow the system to time out. ... However, at least 4 seconds to start and stop the notebook-depending on . Default power settings Power mode ON-Power status light will blink. Hibernation- If the system has stopped responding and Windows shutdown procedures cannot be used, press and hold the power button for at certain times ...
... turn off . Select Start > Turn Off Computer > Stand By. -or- Press Fn+F12. -or- Powers off the notebook. • Saves significant power. • Turns off the notebook. Select Start > Turn Off Computer > Turn Off. Allow the system to time out. Allow the system to time out. ... However, at least 4 seconds to start and stop the notebook-depending on . Default power settings Power mode ON-Power status light will blink. Hibernation- If the system has stopped responding and Windows shutdown procedures cannot be used, press and hold the power button for at certain times ...

Reference Guide
Page 26
...turn the notebook off. To change the boot order using the BIOS Setup utility. If you want to restart. Use the arrow keys to display the Boot menu. 3. Reference Guide 17 To reset the notebook while it is docked in a port replicator, you can also boot the notebook from its...the logo screen appears, press ESC to select the boot device, then press ENTER. Basic Operation Operating Your Notebook To reset the notebook Occasionally, you may find that Windows or the notebook has stopped responding and will be lost. If this happens, try the following procedures in this order: •...
...turn the notebook off. To change the boot order using the BIOS Setup utility. If you want to restart. Use the arrow keys to display the Boot menu. 3. Reference Guide 17 To reset the notebook while it is docked in a port replicator, you can also boot the notebook from its...the logo screen appears, press ESC to select the boot device, then press ENTER. Basic Operation Operating Your Notebook To reset the notebook Occasionally, you may find that Windows or the notebook has stopped responding and will be lost. If this happens, try the following procedures in this order: •...

Reference Guide
Page 27
The indicator light turns off when you can turn off the TouchPad. 1 Click buttons. The scroll pad scrolls vertically to avoid moving the pointer accidentally, such as by touching the pad while typing. Basic Operation Operating Your Notebook To use the TouchPad The TouchPad includes an on -off button and indicator light. 4 Scroll pad. The Click buttons work like the left and right buttons on a standard mouse. 2 TouchPad (touch-sensitive pointing device). 3 TouchPad on -off button so you turn off the TouchPad to display the contents of the active window. 18 Reference Guide
The indicator light turns off when you can turn off the TouchPad. 1 Click buttons. The scroll pad scrolls vertically to avoid moving the pointer accidentally, such as by touching the pad while typing. Basic Operation Operating Your Notebook To use the TouchPad The TouchPad includes an on -off button and indicator light. 4 Scroll pad. The Click buttons work like the left and right buttons on a standard mouse. 2 TouchPad (touch-sensitive pointing device). 3 TouchPad on -off button so you turn off the TouchPad to display the contents of the active window. 18 Reference Guide

Reference Guide
Page 28
Increases the display brightness. Otherwise, cursor control is on an external keyboard). To use the function hot keys Basic Operation Operating Your Notebook The combination of the Fn key plus another key creates a hot key-a shortcut key sequence-for various system controls. Does not affect an ...and off . If Num Lock is active (as marked on , then the numeric functions are active. Toggles Scroll Lock on and off . To use a hot key, press and hold Fn, press the appropriate second key, then release both keys. Decreases the audio volume. Reference Guide 19 Enters Hibernation....
Increases the display brightness. Otherwise, cursor control is on an external keyboard). To use the function hot keys Basic Operation Operating Your Notebook The combination of the Fn key plus another key creates a hot key-a shortcut key sequence-for various system controls. Does not affect an ...and off . If Num Lock is active (as marked on , then the numeric functions are active. Toggles Scroll Lock on and off . To use a hot key, press and hold Fn, press the appropriate second key, then release both keys. Decreases the audio volume. Reference Guide 19 Enters Hibernation....


