Backup and Recovery - Windows Vista
Page 6
... to its original factory state if you experience serious system failure or instability. DVDs and BDs have finished creating the recovery discs. Follow the on battery power, you will be prompted to connect to AC power before you can exit the program before you have a much higher capacity than CDs.... If you use an optional external optical drive (purchased separately) to create recovery discs, or you can restore your computer from the HP Web site. To create a set of recovery discs. NOTE: If you are required. Click Advanced Options. 2 Creating recovery discs...
... to its original factory state if you experience serious system failure or instability. DVDs and BDs have finished creating the recovery discs. Follow the on battery power, you will be prompted to connect to AC power before you can exit the program before you have a much higher capacity than CDs.... If you use an optional external optical drive (purchased separately) to create recovery discs, or you can restore your computer from the HP Web site. To create a set of recovery discs. NOTE: If you are required. Click Advanced Options. 2 Creating recovery discs...

Wireless (Select Models Only) - Windows Vista
Page 18
For information on a label inside the battery bay of your computer. For additional information, see the HP Web site at http://www.hp.com/go/mobilebroadband (US only). 12 Chapter 3 Using HP Mobile Broadband (select models only) The serial number is printed on inserting and removing the SIM, refer to the...more places and over larger areas than are on the code division multiple access (CDMA) telecommunications standard. You may be provided in the battery bay. Some computers include a SIM that is similar to networks based on the road or outside the range of a subscriber identity ...
For information on a label inside the battery bay of your computer. For additional information, see the HP Web site at http://www.hp.com/go/mobilebroadband (US only). 12 Chapter 3 Using HP Mobile Broadband (select models only) The serial number is printed on inserting and removing the SIM, refer to the...more places and over larger areas than are on the code division multiple access (CDMA) telecommunications standard. You may be provided in the battery bay. Some computers include a SIM that is similar to networks based on the road or outside the range of a subscriber identity ...

Wireless (Select Models Only) - Windows Vista
Page 19
Shut down the computer through the operating system. 2. Remove the battery. 7. Replace the battery. NOTE: HP Mobile Broadband will be disabled if the battery is firmly seated. 8. Inserting a SIM 13 Turn the computer upside down on by pressing the power button. Reconnect external power. ...devices. 11. If you are not sure whether the computer is off or in Hibernation, turn the computer on a flat surface, with the battery bay toward you. 6. Close the display. 3. Then shut down the computer. Disconnect all external devices connected to the connectors, use minimal force ...
Shut down the computer through the operating system. 2. Remove the battery. 7. Replace the battery. NOTE: HP Mobile Broadband will be disabled if the battery is firmly seated. 8. Inserting a SIM 13 Turn the computer upside down on by pressing the power button. Reconnect external power. ...devices. 11. If you are not sure whether the computer is off or in Hibernation, turn the computer on a flat surface, with the battery bay toward you. 6. Close the display. 3. Then shut down the computer. Disconnect all external devices connected to the connectors, use minimal force ...

Wireless (Select Models Only) - Windows Vista
Page 20
Then shut down the computer. Replace the battery. 9. Turn the computer upside down on a flat surface, with the battery bay toward you are not sure whether the computer is off or in on the computer. 14 Chapter 3 Using HP Mobile Broadband (select models only) Press in Hibernation, ...turn the computer on by pressing the power button. Reconnect external power. 10. Disconnect all external devices connected to the computer. 4. Remove the battery. 7. Turn on the SIM (1), and then...
Then shut down the computer. Replace the battery. 9. Turn the computer upside down on a flat surface, with the battery bay toward you are not sure whether the computer is off or in on the computer. 14 Chapter 3 Using HP Mobile Broadband (select models only) Press in Hibernation, ...turn the computer on by pressing the power button. Reconnect external power. 10. Disconnect all external devices connected to the computer. 4. Remove the battery. 7. Turn on the SIM (1), and then...
Software Updates - Windows Vista
Page 8
... the screen to download. 3. Determining the BIOS version To determine whether available BIOS updates contain later BIOS versions than the BIOS version currently installed on battery power, docked in Windows) or by pressing fn+esc (if you want to identify your computer. Access the page on the... HP Web site that is later than those currently installed on or restarting the computer, and then pressing f10 while the "Press to enter Setup" message ...
... the screen to download. 3. Determining the BIOS version To determine whether available BIOS updates contain later BIOS versions than the BIOS version currently installed on battery power, docked in Windows) or by pressing fn+esc (if you want to identify your computer. Access the page on the... HP Web site that is later than those currently installed on or restarting the computer, and then pressing f10 while the "Press to enter Setup" message ...

HP Mobile Remote Control (Select Models Only) - Windows Vista
Page 3
Table of contents 1 Component functions 2 Button quick reference 3 Inserting the battery 4 Troubleshooting Index ...8 iii
Table of contents 1 Component functions 2 Button quick reference 3 Inserting the battery 4 Troubleshooting Index ...8 iii

HP Mobile Remote Control (Select Models Only) - Windows Vista
Page 9
... Help and Support, select Start > Help and Support > User Guides. 3 Inserting the battery WARNING! To reduce potential safety issues, use only the battery provided with the computer, a replacement battery provided by HP, or a compatible battery purchased from HP. On the back of used batteries according to the instructions in the Regulatory, Safety and Environmental Notices located in...
... Help and Support, select Start > Help and Support > User Guides. 3 Inserting the battery WARNING! To reduce potential safety issues, use only the battery provided with the computer, a replacement battery provided by HP, or a compatible battery purchased from HP. On the back of used batteries according to the instructions in the Regulatory, Safety and Environmental Notices located in...
HP Mobile Remote Control (Select Models Only) - Windows Vista
Page 10
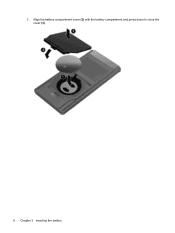
Align the battery compartment cover (2) with the battery compartment and press down to close the cover (3). 6 Chapter 3 Inserting the battery 3.
Align the battery compartment cover (2) with the battery compartment and press down to close the cover (3). 6 Chapter 3 Inserting the battery 3.

HP Mobile Remote Control (Select Models Only) - Windows Vista
Page 11
4 Troubleshooting Try the following solutions if your remote control does not function properly: ● Be sure that you have a clear line of sight from the remote control to the IR port on the computer or expansion product. ● Be sure that you are within range of the IR port on the computer or expansion product. ● Be sure that you are using the remote control with a supported computer or expansion product. 7 Replace the battery if necessary. ● Be sure that the battery is properly installed and has a charge.
4 Troubleshooting Try the following solutions if your remote control does not function properly: ● Be sure that you have a clear line of sight from the remote control to the IR port on the computer or expansion product. ● Be sure that you are within range of the IR port on the computer or expansion product. ● Be sure that you are using the remote control with a supported computer or expansion product. 7 Replace the battery if necessary. ● Be sure that the battery is properly installed and has a charge.

HP Mobile Remote Control (Select Models Only) - Windows Vista
Page 12
... 3 quick reference 2 rewind 3 right 3 stop 3 up 3 volume down 4 volume up 4 Windows Media Center 2 D down button 3 DVD button 2 F fast forward button 3 I information button 4 infrared lens 1 inserting battery 5 L left button 3 8 Index M media button 2 mute button 4 N next button 3 O Ok button 3 P play/pause button 2 power button 2 previous button 3 Q QuickPlay 1 R rewind button 3 right button 3 S stop button...
... 3 quick reference 2 rewind 3 right 3 stop 3 up 3 volume down 4 volume up 4 Windows Media Center 2 D down button 3 DVD button 2 F fast forward button 3 I information button 4 infrared lens 1 inserting battery 5 L left button 3 8 Index M media button 2 mute button 4 N next button 3 O Ok button 3 P play/pause button 2 power button 2 previous button 3 Q QuickPlay 1 R rewind button 3 right button 3 S stop button...

Drives - Windows Vista
Page 6
.... Do not type on the keyboard or move a computer that check carry-on the computer. When the battery is the only source of information, observe these precautions: Before you are fragile computer components that the battery is sufficiently charged before writing to a disc. Avoid exposing a drive to vibration. Handle a drive carefully; The...
.... Do not type on the keyboard or move a computer that check carry-on the computer. When the battery is the only source of information, observe these precautions: Before you are fragile computer components that the battery is sufficiently charged before writing to a disc. Avoid exposing a drive to vibration. Handle a drive carefully; The...

Drives - Windows Vista
Page 12
... write to a disc while the computer is writing to the software manufacturer's instructions, which may be provided on disc, in the software Help, or on battery power. The write process is copied, the disc you are using software included with the computer, refer to a disc. Click Copy at the bottom right...
... write to a disc while the computer is writing to the software manufacturer's instructions, which may be provided on disc, in the software Help, or on battery power. The write process is copied, the disc you are using software included with the computer, refer to a disc. Click Copy at the bottom right...

Drives - Windows Vista
Page 16
...while the computer is protected by HP ProtectSmart Hard Drive Protection. 5 Using HP ProtectSmart Hard Drive Protection HP ProtectSmart Hard Drive Protection protects the hard drive by HP ProtectSmart Hard Drive Protection. Hard drives installed in the hard drive bay is running on battery power. NOTE: A hard ...drive in optional docking devices or connected to USB ports are not protected by parking the drive and halting I/O requests under either of these events, HP ProtectSmart Hard Drive Protection returns the hard ...
...while the computer is protected by HP ProtectSmart Hard Drive Protection. 5 Using HP ProtectSmart Hard Drive Protection HP ProtectSmart Hard Drive Protection protects the hard drive by HP ProtectSmart Hard Drive Protection. Hard drives installed in the hard drive bay is running on battery power. NOTE: A hard ...drive in optional docking devices or connected to USB ports are not protected by parking the drive and halting I/O requests under either of these events, HP ProtectSmart Hard Drive Protection returns the hard ...

Drives - Windows Vista
Page 17
To determine whether the drive is currently protected, select Start > Control Panel > Mobile PC > Windows Mobility Center: The Mobility Center also indicates HP ProtectSmart Hard Drive Protection status: ● If the software is enabled, a green check mark is superimposed over the hard ...the notification area icon. NOTE: If the computer is running on battery power and reaches a critical battery level, HP ProtectSmart Hard Drive Protection allows the computer to initiate Hibernation. ● The computer will not activate battery alarms set on the computer changes to an amber color to ...
To determine whether the drive is currently protected, select Start > Control Panel > Mobile PC > Windows Mobility Center: The Mobility Center also indicates HP ProtectSmart Hard Drive Protection status: ● If the software is enabled, a green check mark is superimposed over the hard ...the notification area icon. NOTE: If the computer is running on battery power and reaches a critical battery level, HP ProtectSmart Hard Drive Protection allows the computer to initiate Hibernation. ● The computer will not activate battery alarms set on the computer changes to an amber color to ...

Drives - Windows Vista
Page 19
... toward you are not sure whether the computer is on, in the Sleep state, or in Hibernation, turn the computer on a flat surface. 6. Remove the battery from the hard drive bay. To remove the hard drive: 1. Do not remove the hard drive while the computer is off or in Hibernation. If...
... toward you are not sure whether the computer is on, in the Sleep state, or in Hibernation, turn the computer on a flat surface. 6. Remove the battery from the hard drive bay. To remove the hard drive: 1. Do not remove the hard drive while the computer is off or in Hibernation. If...

Memory Modules - Windows Vista
Page 5
...the computer through the operating system. 3. Before beginning any procedure, ensure that both memory modules are the same size. Remove the battery from the AC outlet. 5. Then shut down the computer and close the display. Adding or replacing a memory module The computer... primary memory module slot. Unplug the power cord from the computer. 7. Loosen the 2 memory module compartment screws (1). 1 Disconnect all batteries before installing a memory module. To reduce the risk of static electricity by touching a grounded metal object. WARNING! The memory capacity of...
...the computer through the operating system. 3. Before beginning any procedure, ensure that both memory modules are the same size. Remove the battery from the AC outlet. 5. Then shut down the computer and close the display. Adding or replacing a memory module The computer... primary memory module slot. Unplug the power cord from the computer. 7. Loosen the 2 memory module compartment screws (1). 1 Disconnect all batteries before installing a memory module. To reduce the risk of static electricity by touching a grounded metal object. WARNING! The memory capacity of...

Memory Modules - Windows Vista
Page 7
... memory module compartment cover with the tab in the memory module slot. Close the cover (2). 13. Tighten the 2 memory module compartment screws (3). 14. Replace the battery. 3 Gently press the memory module (3) down, applying pressure to the memory module, hold the memory module by the edges only. With the memory module at...
... memory module compartment cover with the tab in the memory module slot. Close the cover (2). 13. Tighten the 2 memory module compartment screws (3). 14. Replace the battery. 3 Gently press the memory module (3) down, applying pressure to the memory module, hold the memory module by the edges only. With the memory module at...

Notebook Tour - Windows Vista
Page 10
... the computer is open or closed. 4 Chapter 2 Components Component Description (8) Battery light ● On: A battery is charging. ● Blinking: A battery that is the only available power source has reached a low battery level or a critical battery level. ● Off: If the computer is plugged into an external power... source, the light stays off until the battery reaches a low battery level. (9) Drive light Blinking: The hard drive or optical drive is turned off when all batteries in the computer are fully charged. The power light on the power ...
... the computer is open or closed. 4 Chapter 2 Components Component Description (8) Battery light ● On: A battery is charging. ● Blinking: A battery that is the only available power source has reached a low battery level or a critical battery level. ● Off: If the computer is plugged into an external power... source, the light stays off until the battery reaches a low battery level. (9) Drive light Blinking: The hard drive or optical drive is turned off when all batteries in the computer are fully charged. The power light on the power ...

Notebook Tour - Windows Vista
Page 17
... country or region. Releases the optical drive. Bottom components Component (1) Battery release latches (2) (2) Battery bay (3) Memory module compartment (4) Vents (5) (5) Wireless module compartment (6) Optical drive release latch (7) Hard drive bay Description Release the battery from the battery bay. NOTE: To prevent an unresponsive system, replace the wireless module... technical support through Help and Support. Enable airflow to cool internal components and prevent overheating. Holds the battery. NOTE: The computer fan starts up automatically to cool internal components.
... country or region. Releases the optical drive. Bottom components Component (1) Battery release latches (2) (2) Battery bay (3) Memory module compartment (4) Vents (5) (5) Wireless module compartment (6) Optical drive release latch (7) Hard drive bay Description Release the battery from the battery bay. NOTE: To prevent an unresponsive system, replace the wireless module... technical support through Help and Support. Enable airflow to cool internal components and prevent overheating. Holds the battery. NOTE: The computer fan starts up automatically to cool internal components.
Notebook Tour - Windows Vista
Page 20
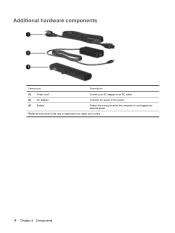
Additional hardware components Component Description (1) Power cord* Connects an AC adapter to an AC outlet. (2) AC adapter Converts AC power to DC power. (3) Battery* Powers the computer when the computer is not plugged into external power. *Batteries and power cords vary in appearance by region and country. 14 Chapter 2 Components
Additional hardware components Component Description (1) Power cord* Connects an AC adapter to an AC outlet. (2) AC adapter Converts AC power to DC power. (3) Battery* Powers the computer when the computer is not plugged into external power. *Batteries and power cords vary in appearance by region and country. 14 Chapter 2 Components


