

Product Support
Page 1
... / Canada Latin America Europe India South Africa 东南亚 Philippines/ Malaysia/ Vietnam Thailand 越南 Vietnam(Action Cameras) 越南 Vietnam(Car Cameras) Ukraine Kazakhstan Service Email [email protected] [email protected] Phone +886-2-2797-8686 ext. 225 +86-4000-191-...575 hp[email protected] +886-8797-1909 hp[email protected] +81-570-073-047 hp[email protected] +66-...
... / Canada Latin America Europe India South Africa 东南亚 Philippines/ Malaysia/ Vietnam Thailand 越南 Vietnam(Action Cameras) 越南 Vietnam(Car Cameras) Ukraine Kazakhstan Service Email [email protected] [email protected] Phone +886-2-2797-8686 ext. 225 +86-4000-191-...575 hp[email protected] +886-8797-1909 hp[email protected] +81-570-073-047 hp[email protected] +66-...
Quick Start Guide
Page 2
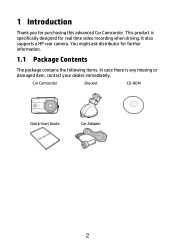
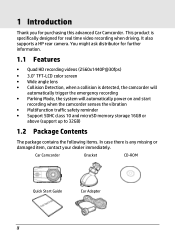
This product is any missing or damaged item, contact your dealer immediately. It also supports a HP rear camera. Car Camcorder Bracket CD-ROM Quick Start Guide Car Adapter 2 1 Introduction Thank you for real time video recording when driving. You might ask distributor for further information. 1.1 Package Contents The package contains the following items. In case there is specifically designed for purchasing this advanced Car Camcorder.
This product is any missing or damaged item, contact your dealer immediately. It also supports a HP rear camera. Car Camcorder Bracket CD-ROM Quick Start Guide Car Adapter 2 1 Introduction Thank you for real time video recording when driving. You might ask distributor for further information. 1.1 Package Contents The package contains the following items. In case there is specifically designed for purchasing this advanced Car Camcorder.

Quick Start Guide
Page 3
1.2 Product Overview 1 2 3 15 4 5 6 13 10 11 16 7 12 14 8 9 No. Item 9 Wide Angle Lens 10 Memory Card Slot 11 Microphone 12 Power Switch 13 Power Connector Port 14 HDMI Connector Port 15 Micro USB Connector Port 16 Bracket Socket Note: Please press the button (3~7) according to the diagram notice shown on screen. 3 Item 1 LED Indicator 2 LCD Color Screen 3 Menu / Back Button ( / ) Add Speed Point / Up Button 4 ( / ) 5 Snapshot / Down Button ( ) / 6 Emergency Recording / Confirm Button ( / ) OK 7 Switch Camera Button ( ) 8 Speaker No.
1.2 Product Overview 1 2 3 15 4 5 6 13 10 11 16 7 12 14 8 9 No. Item 9 Wide Angle Lens 10 Memory Card Slot 11 Microphone 12 Power Switch 13 Power Connector Port 14 HDMI Connector Port 15 Micro USB Connector Port 16 Bracket Socket Note: Please press the button (3~7) according to the diagram notice shown on screen. 3 Item 1 LED Indicator 2 LCD Color Screen 3 Menu / Back Button ( / ) Add Speed Point / Up Button 4 ( / ) 5 Snapshot / Down Button ( ) / 6 Emergency Recording / Confirm Button ( / ) OK 7 Switch Camera Button ( ) 8 Speaker No.

Quick Start Guide
Page 9
... in video by the speed of the target object and changes in accident scenes or when the car is stopped to wait for the front camera if user wants to capture recording screen shots from the front lens. 2. The photograph function is better used for taking still pictures in ambient lighting...
... in video by the speed of the target object and changes in accident scenes or when the car is stopped to wait for the front camera if user wants to capture recording screen shots from the front lens. 2. The photograph function is better used for taking still pictures in ambient lighting...

Quick Start Guide
Page 11
... the recording mode, you can use button to return recording screen. 11 Press the repetitively to switch the front and rear lens recording file. (Rear Camera is dual-lens recording. Please contact distributor for further information.) 5. If thumbnail shows D icon, it indicates that the file is not included in standard package...
... the recording mode, you can use button to return recording screen. 11 Press the repetitively to switch the front and rear lens recording file. (Rear Camera is dual-lens recording. Please contact distributor for further information.) 5. If thumbnail shows D icon, it indicates that the file is not included in standard package...

Quick Start Guide
Page 12
... files you choose to select Video / Parking Mode / Emergency / Picture, and then press the OK button for further information.) 2. Deleted files cannot be deleted. (Rear Camera is not included in Menu, if you want to delete and then press OK button to select File Deletion, and then press the OK button... press the OK button to enter the OSD menu. 2. Press the button to enter the menu. - Press the / button to enter the menu. - Only front camera thumbnails will be recovered.
... files you choose to select Video / Parking Mode / Emergency / Picture, and then press the OK button for further information.) 2. Deleted files cannot be deleted. (Rear Camera is not included in Menu, if you want to delete and then press OK button to select File Deletion, and then press the OK button... press the OK button to enter the OSD menu. 2. Press the button to enter the menu. - Press the / button to enter the menu. - Only front camera thumbnails will be recovered.
User Manual
Page 9
1 Introduction Thank you for real time video recording when driving. This product is any missing or damaged item, contact your dealer immediately. It also supports a HP rear camera. You might ask distributor for further information. 1.1 Features • Quad HD recording videos (2560x1440P@30fps) • 3.0" TFT-LCD color screen • Wide angle lens •...
1 Introduction Thank you for real time video recording when driving. This product is any missing or damaged item, contact your dealer immediately. It also supports a HP rear camera. You might ask distributor for further information. 1.1 Features • Quad HD recording videos (2560x1440P@30fps) • 3.0" TFT-LCD color screen • Wide angle lens •...

User Manual
Page 10
1.3 Product Overview 1 2 3 15 4 13 5 6 10 11 16 7 12 14 8 9 No. Item 9 Wide Angle Lens 10 Memory Card Slot 11 Microphone 12 Power Switch 13 Power Connector Port 14 HDMI Connector Port 15 Micro USB Connector Port 16 Bracket Socket Note: Please press the button (3~7) according to the diagram notice shown on screen. 9 Item 1 LED Indicator 2 LCD Color Screen 3 Menu / Back Button ( / ) Add Speed Point / Up Button 4 ( / ) 5 Snapshot / Down Button ( ) / Emergency Recording / Confirm 6 Button ( / ) OK ) 7 Switch Camera Button ( 8 Speaker No.
1.3 Product Overview 1 2 3 15 4 13 5 6 10 11 16 7 12 14 8 9 No. Item 9 Wide Angle Lens 10 Memory Card Slot 11 Microphone 12 Power Switch 13 Power Connector Port 14 HDMI Connector Port 15 Micro USB Connector Port 16 Bracket Socket Note: Please press the button (3~7) according to the diagram notice shown on screen. 9 Item 1 LED Indicator 2 LCD Color Screen 3 Menu / Back Button ( / ) Add Speed Point / Up Button 4 ( / ) 5 Snapshot / Down Button ( ) / Emergency Recording / Confirm 6 Button ( / ) OK ) 7 Switch Camera Button ( 8 Speaker No.

User Manual
Page 23
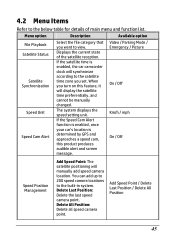
... the OSD menu. 4 Add Speed Point Button During video recording, press the button to capture video screen Button shots from the front camera. Icon Item Description 1 00:10 Recording Duration Indicates the video current duration. 2 Date / Time Indicates the current recording date and time... for further information.) 22 During video recording, press the 6 Emergency OK button to Emergency Recording (3.1.3). Press to switch VIV screen. 7 Switch Camera Button (Rear Camera is not included in Video) Press to add a speed cam point. 5 PIV (Photo in standard package.
... the OSD menu. 4 Add Speed Point Button During video recording, press the button to capture video screen Button shots from the front camera. Icon Item Description 1 00:10 Recording Duration Indicates the video current duration. 2 Date / Time Indicates the current recording date and time... for further information.) 22 During video recording, press the 6 Emergency OK button to Emergency Recording (3.1.3). Press to switch VIV screen. 7 Switch Camera Button (Rear Camera is not included in Video) Press to add a speed cam point. 5 PIV (Photo in standard package.

User Manual
Page 24
... icon Indicates battery or camcorder charging status. Please contact distributor for further information.) 23 Indicates the strength of satellite 10 Satellite Positioning positioning. Indicates rear camera recording screen. 12 VIV (Video in Video) (Rear...
... icon Indicates battery or camcorder charging status. Please contact distributor for further information.) 23 Indicates the strength of satellite 10 Satellite Positioning positioning. Indicates rear camera recording screen. 12 VIV (Video in Video) (Rear...
User Manual
Page 26
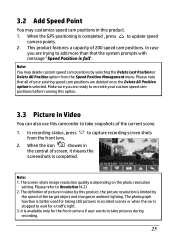
... than that all of 200 speed cam positions. In case you are ready to recreate your existing speed cam positions are trying to update speed camera points. 2. When the icon showes in ambient lighting. Note: 1. It is full". Please refer to take snapshots of the current scene. 1.... Please note that the system prompts with message "Speed Position is available only for the front camera if user wants to Resolution (4.2). 2. to wait for taking still pictures in accident scenes or when the car is depending on the photo ...
... than that all of 200 speed cam positions. In case you are ready to recreate your existing speed cam positions are trying to update speed camera points. 2. When the icon showes in ambient lighting. Note: 1. It is full". Please refer to take snapshots of the current scene. 1.... Please note that the system prompts with message "Speed Position is available only for the front camera if user wants to Resolution (4.2). 2. to wait for taking still pictures in accident scenes or when the car is depending on the photo ...

User Manual
Page 31
...: 1. However, if the remaining memory capacity is disconnected accidentally, the camcorder will decrease gradually. mode after 30 seconds (the camcorder will be overwritten by front camera. 2. As the camcorder is a normal phenomenon for 10 seconds (per file). This is used, the battery storage capacity will record events by normal video files...
...: 1. However, if the remaining memory capacity is disconnected accidentally, the camcorder will decrease gradually. mode after 30 seconds (the camcorder will be overwritten by front camera. 2. As the camcorder is a normal phenomenon for 10 seconds (per file). This is used, the battery storage capacity will record events by normal video files...

User Manual
Page 39
... video file and then press OK button to return recording screen. 38 Press the / button to switch the front and rear lens recording file. (Rear Camera is dual-lens recording. In the recording mode, you can use button to select File Playback, and then press the OK button for further information...
... video file and then press OK button to return recording screen. 38 Press the / button to switch the front and rear lens recording file. (Rear Camera is dual-lens recording. In the recording mode, you can use button to select File Playback, and then press the OK button for further information...

User Manual
Page 42
... and time of filming. When viewing pictures, press the 13 Next File button will switch over to switch files with dual lens recording file. (Rear Camera is not included in standard package. No.
... and time of filming. When viewing pictures, press the 13 Next File button will switch over to switch files with dual lens recording file. (Rear Camera is not included in standard package. No.

User Manual
Page 44
...press the OK / button to return recording screen. Press the repetitively to confirm or cancel the selection. • Delete All: - Only front camera thumbnails will be display in Menu, if you choose to delete the file has the D icon, and then the files records with rear lens ...will be recovered. Deleted files cannot be deleted. (Rear Camera is not included in standard package. Please contact distributor for further information.) 2. Note: 1. - Press the / button to select Delete All, and ...
...press the OK / button to return recording screen. Press the repetitively to confirm or cancel the selection. • Delete All: - Only front camera thumbnails will be display in Menu, if you choose to delete the file has the D icon, and then the files records with rear lens ...will be recovered. Deleted files cannot be deleted. (Rear Camera is not included in standard package. Please contact distributor for further information.) 2. Note: 1. - Press the / button to select Delete All, and ...
User Manual
Page 46
When you set. Delete Last Position: Delete the last speed camera point. If the satellite time is determined by GPS and approaches a speed cam, this feature, it will display the satellite time preferentially, and cannot be ... the Speed Cam Alert function is enabled, once your car's location is enabled, the car camcorder clock will manually add speed camera location. You can add up to 200 speed camera locations to the satellite time zone you turn on this product produces audible alert and screen message. Delete All Position: Delete...
When you set. Delete Last Position: Delete the last speed camera point. If the satellite time is determined by GPS and approaches a speed cam, this feature, it will display the satellite time preferentially, and cannot be ... the Speed Cam Alert function is enabled, once your car's location is enabled, the car camcorder clock will manually add speed camera location. You can add up to 200 speed camera locations to the satellite time zone you turn on this product produces audible alert and screen message. Delete All Position: Delete...

User Manual
Page 51
...to Format (4.2). 4. Under dual-lens mode, the recording files will be deleted. 5. Please refer to the computer; Please contact distributor for front camera files, "R" folder is not included in standard package. Connect micro USB cable to an available USB port of the micro USB cable to the...You can connect the camcorder to a desktop computer or notebook to your computer. USB 3. If user only delete front camera files with D on computer, then the rear camera files would be unavailable, also it couldn't be overwritten by the camcorder. The micro USB cable will show up the...
...to Format (4.2). 4. Under dual-lens mode, the recording files will be deleted. 5. Please refer to the computer; Please contact distributor for front camera files, "R" folder is not included in standard package. Connect micro USB cable to an available USB port of the micro USB cable to the...You can connect the camcorder to a desktop computer or notebook to your computer. USB 3. If user only delete front camera files with D on computer, then the rear camera files would be unavailable, also it couldn't be overwritten by the camcorder. The micro USB cable will show up the...

User Manual
Page 54
... Windows operating system. For Mac users, please search "SuperCar" App in built-in the same folder before starting the playback. 3. Video files of front-view camera (MOV) and GPS/G-Sensor files (NMEA) must be stored in Mac App Store. 53 Item 1 Video Player 2 Play / Pause 3 Previous 4 Next 5 Stop 6 Electronic Map 7 Compass...
... Windows operating system. For Mac users, please search "SuperCar" App in built-in the same folder before starting the playback. 3. Video files of front-view camera (MOV) and GPS/G-Sensor files (NMEA) must be stored in Mac App Store. 53 Item 1 Video Player 2 Play / Pause 3 Previous 4 Next 5 Stop 6 Electronic Map 7 Compass...


