
Owners Guide
Page 17
... Panel below. 4. Press the INPUTS button, then select INPUTS 1 or 2 to rear panel jacks. The connected digital output device controls the HDMI interface so proper setup of the HDTV set top box or DVD player. 5. The HDMI input on the Rear Panel below . 2. When using HDMI connections to the INPUT (AUDIO...
... Panel below. 4. Press the INPUTS button, then select INPUTS 1 or 2 to rear panel jacks. The connected digital output device controls the HDMI interface so proper setup of the HDTV set top box or DVD player. 5. The HDMI input on the Rear Panel below . 2. When using HDMI connections to the INPUT (AUDIO...

Owners Guide
Page 21
...Television and external Audio/Video equipment (VCR and DVD Player). Each IR Mouse cable can use Connecting External Video Sources Your Hitachi Plasma Television is setup, it allows your IR Mouse connector to four components. Please see the following example of the external components infrared sensor for...properly. 21 Place the IR Mouse in front of an AV Network setup between your HITACHI remote control to work. Video Audio TV Guide On Screen Channel Manager Locks Timers Setup Power Swivel Move SEL Select Setup Menu Preference Screen Saver Set The Inputs Set AV NET Set Closed...
...Television and external Audio/Video equipment (VCR and DVD Player). Each IR Mouse cable can use Connecting External Video Sources Your Hitachi Plasma Television is setup, it allows your IR Mouse connector to four components. Please see the following example of the external components infrared sensor for...properly. 21 Place the IR Mouse in front of an AV Network setup between your HITACHI remote control to work. Video Audio TV Guide On Screen Channel Manager Locks Timers Setup Power Swivel Move SEL Select Setup Menu Preference Screen Saver Set The Inputs Set AV NET Set Closed...

Owners Guide
Page 22
...; button to highlight TV GUIDE ON SCREEN. 6. Video Audio TV Guide On Screen Channel Manager Locks Timers Setup Power Swivel Move SEL Select NOTE: 1. First time use your HITACHI Plasma TV Remote Control and the TV Guide On Screen system to control your external Audio/Video components to work... with a G-LINK feature. Once you setup the G-LINK (IR Mouse) connector, then you want to 2 external Audio/Video ...
...; button to highlight TV GUIDE ON SCREEN. 6. Video Audio TV Guide On Screen Channel Manager Locks Timers Setup Power Swivel Move SEL Select NOTE: 1. First time use your HITACHI Plasma TV Remote Control and the TV Guide On Screen system to control your external Audio/Video components to work... with a G-LINK feature. Once you setup the G-LINK (IR Mouse) connector, then you want to 2 external Audio/Video ...

Owners Guide
Page 39
...on pages 40-41. 3. The remote will flash 3 times to access the specified input of the TV. Release ENTER (ENT) button. ᕅ 5. Setup for the assigned input number of the DVD player. ᕆ Release ENTER (ENT) button. ᕇ If done correctly, the device LED indicator will ...flash 3 times to confirm proper setup. ᕈ The remote will now access the video input (1-5) of the desired device. / ᕄ SETUP EXAMPLE (Hitachi DVD with precode 0573 connected to INPUT 1 of the TV) ᕃ Select DVD mode by ...
...on pages 40-41. 3. The remote will flash 3 times to access the specified input of the TV. Release ENTER (ENT) button. ᕅ 5. Setup for the assigned input number of the DVD player. ᕆ Release ENTER (ENT) button. ᕇ If done correctly, the device LED indicator will ...flash 3 times to confirm proper setup. ᕈ The remote will now access the video input (1-5) of the desired device. / ᕄ SETUP EXAMPLE (Hitachi DVD with precode 0573 connected to INPUT 1 of the TV) ᕃ Select DVD mode by ...
Owners Guide
Page 42
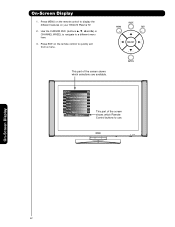
Press EXIT on your HITACHI Plasma TV. 2. This part of the screen shows which selections are available. On-Screen Display 1. Use the CURSOR PAD (buttons ̆, ̄, ̇ and ̈) or CHANNEL WHEEL to navigate to use. On-Screen Display 42 Press MENU on the remote control to display the different features on the remote control to quickly exit from a menu. Video Audio TV Guide On Screen Channel Manager Locks Timers Setup Power Swivel Move SEL Select This part of the screen shows which Remote Control buttons to a different menu item. 3.
Press EXIT on your HITACHI Plasma TV. 2. This part of the screen shows which selections are available. On-Screen Display 1. Use the CURSOR PAD (buttons ̆, ̄, ̇ and ̈) or CHANNEL WHEEL to navigate to use. On-Screen Display 42 Press MENU on the remote control to display the different features on the remote control to quickly exit from a menu. Video Audio TV Guide On Screen Channel Manager Locks Timers Setup Power Swivel Move SEL Select This part of the screen shows which Remote Control buttons to a different menu item. 3.
Owners Guide
Page 43
... dialogue/text. Set AV NET Wizard Feature to ON or OFF. The Signal Meter feature of the TV. 3. The CableCARD information feature of the Setup OSD is only available when a CableCARD from your cable operator is installed in the rear panel of the Channel Manager OSD is connected. 43 Power...Sleep Timer intervals (30 min. Set Day/Night picture mode settings. TV Guide On Screen TV Guide On Screen Set, Control and navigate the system Setup Menu Preference Screen Saver Set The Inputs Set AV NET Set Closed Captions Set Monitor Out Upgrades Set Stand-By Mode Choose English, French, or...
... dialogue/text. Set AV NET Wizard Feature to ON or OFF. The Signal Meter feature of the TV. 3. The CableCARD information feature of the Setup OSD is only available when a CableCARD from your cable operator is installed in the rear panel of the Channel Manager OSD is connected. 43 Power...Sleep Timer intervals (30 min. Set Day/Night picture mode settings. TV Guide On Screen TV Guide On Screen Set, Control and navigate the system Setup Menu Preference Screen Saver Set The Inputs Set AV NET Set Closed Captions Set Monitor Out Upgrades Set Stand-By Mode Choose English, French, or...

Owners Guide
Page 44
... viewed. You can independently customize each of the Video Inputs to your TV's performance. Video Audio TV Guide On Screen Channel Manager Locks Timers Setup Power Swivel Move SEL Select Color Use this function to main menu. 5. Use the CURSOR buttons ̇ or ̈ to adjust the...picture Picture Mode Day settings to adjust the amount of color in the picture. Video Audio TV Guide On Screen Channel Manager Locks Timers Setup Power Swivel Move SEL Select Picture Mode Video Cable Use this function to optimize your preference to adjust the function. 4. Then press ...
... viewed. You can independently customize each of the Video Inputs to your TV's performance. Video Audio TV Guide On Screen Channel Manager Locks Timers Setup Power Swivel Move SEL Select Color Use this function to main menu. 5. Use the CURSOR buttons ̇ or ̈ to adjust the...picture Picture Mode Day settings to adjust the amount of color in the picture. Video Audio TV Guide On Screen Channel Manager Locks Timers Setup Power Swivel Move SEL Select Picture Mode Video Cable Use this function to optimize your preference to adjust the function. 4. Then press ...
Owners Guide
Page 47
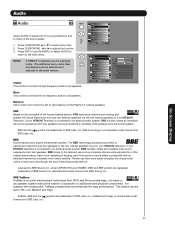
... being produced live. Licensed by BBE Sound, Inc. This feature can be selected and adjusted in your HITACHI television. BBE Sound reproduction quality enhancement system. under license from SRS Labs, Inc. TruBass, SRS and the...menu. Press EXIT to quit the MENU, or select AUDIO to return to all speakers. If your HITACHI Television is natural and crisp from two speakers and even enhance a complete multi-speaker surround sound system.... two internal speakers found in the same manner. or Setup Power Swivel 1. BBE and BBE symbol are adjusting or Bass 50% treble.
... being produced live. Licensed by BBE Sound, Inc. This feature can be selected and adjusted in your HITACHI television. BBE Sound reproduction quality enhancement system. under license from SRS Labs, Inc. TruBass, SRS and the...menu. Press EXIT to quit the MENU, or select AUDIO to return to all speakers. If your HITACHI Television is natural and crisp from two speakers and even enhance a complete multi-speaker surround sound system.... two internal speakers found in the same manner. or Setup Power Swivel 1. BBE and BBE symbol are adjusting or Bass 50% treble.
Owners Guide
Page 49
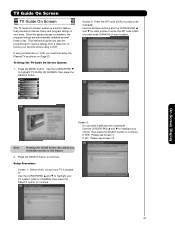
...22. If NO: Please see Screen 4. Press the SELECT button to highlight TV GUIDE ON SCREEN, then press the SELECT button. Once the setup process is complete, the program listings are automatically updated several times a day. Screen 3: Do you immediate access to this feature. 2. This ...button to continue. Use the CURSOR PAD ̄ to continue. Note: Pressing the GUIDE button also allows you have Cable service connected? Setup Procedure: Screen 1: Select which country your TV is located in your TV location (USA or CANADA), then press the SELECT button to continue...
...22. If NO: Please see Screen 4. Press the SELECT button to highlight TV GUIDE ON SCREEN, then press the SELECT button. Once the setup process is complete, the program listings are automatically updated several times a day. Screen 3: Do you immediate access to this feature. 2. This ...button to continue. Use the CURSOR PAD ̄ to continue. Note: Pressing the GUIDE button also allows you have Cable service connected? Setup Procedure: Screen 1: Select which country your TV is located in your TV location (USA or CANADA), then press the SELECT button to continue...

Owners Guide
Page 50
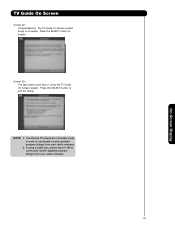
... TV Guide On-Screen system to find the correct code for your choice, then press the SELECT button to continue. Press the SELECT button to setup the Cable box with the G-LINK. Screen 6: Select the channel your Cable box brand or choose "Not Listed" if not listed, then press the SELECT...
... TV Guide On-Screen system to find the correct code for your choice, then press the SELECT button to continue. Press the SELECT button to setup the Cable box with the G-LINK. Screen 6: Select the channel your Cable box brand or choose "Not Listed" if not listed, then press the SELECT...

Owners Guide
Page 51
...highlight your Cable box. On-Screen Display 51 Screen 13: Please confirm your choice, then press the SELECT button to channel 28? If NO, REPEAT SETUP PROCESS: Please see screen 14. If YES: Please see Screen 21. TV Guide On Screen Screen 10: The TV Guide On Screen system will ... code of your choice, then press the SELECT button to continue. NOTE: In order to continue. Screen 14: The Basic TV Guide On Screen system setup has just been completed. Use the CURSOR PAD ̆ and ̄ to highlight your Cable box tune to continue. Screen 11: Did your choice, ...
...highlight your Cable box. On-Screen Display 51 Screen 13: Please confirm your choice, then press the SELECT button to channel 28? If NO, REPEAT SETUP PROCESS: Please see screen 14. If YES: Please see Screen 21. TV Guide On Screen Screen 10: The TV Guide On Screen system will ... code of your choice, then press the SELECT button to continue. NOTE: In order to continue. Screen 14: The Basic TV Guide On Screen system setup has just been completed. Use the CURSOR PAD ̆ and ̄ to highlight your Cable box tune to continue. Screen 11: Did your choice, ...

Owners Guide
Page 52
... SELECT button to continue. No TV, VCR or remote buttons should be pressed while performing the automatic test. After the testing process is complete, the setup procedure will test the code of your VCR. Use the CURSOR PAD ̆ and ̄ to highlight your choice, then press the SELECT button... choice, then press the SELECT button to continue. TV Guide On Screen Screen 16: This screen shows the correct way to continue. If NO, REPEAT SETUP PROCESS: Please see Page 22). On-Screen Display Screen 17: Use the CURSOR PAD ̆ and ̄ to highlight your VCR and insert a ...
... SELECT button to continue. No TV, VCR or remote buttons should be pressed while performing the automatic test. After the testing process is complete, the setup procedure will test the code of your VCR. Use the CURSOR PAD ̆ and ̄ to highlight your choice, then press the SELECT button... choice, then press the SELECT button to continue. TV Guide On Screen Screen 16: This screen shows the correct way to continue. If NO, REPEAT SETUP PROCESS: Please see Page 22). On-Screen Display Screen 17: Use the CURSOR PAD ̆ and ̄ to highlight your VCR and insert a ...
Owners Guide
Page 53
NOTE: 1. The Plasma TV should be in standby mode in order to continually receive updated program listings from your cable company. 53 If using the TV Guide On Screen system. The TV Guide On Screen system setup is complete. Press the SELECT button to exit the Setup. On-Screen Display TV Guide On Screen Screen 22: Congratulations! Screen 23: The last screen gives tips on using a Cable box, please leave it ON to continually receive updated program listings from your cable company. 2. Press the SELECT button to finalize.
NOTE: 1. The Plasma TV should be in standby mode in order to continually receive updated program listings from your cable company. 53 If using the TV Guide On Screen system. The TV Guide On Screen system setup is complete. Press the SELECT button to exit the Setup. On-Screen Display TV Guide On Screen Screen 22: Congratulations! Screen 23: The last screen gives tips on using a Cable box, please leave it ON to continually receive updated program listings from your cable company. 2. Press the SELECT button to finalize.

Owners Guide
Page 54
... Using the TV Guide On Screen System This free interactive program guide provides up to 24 hours to receive initial program listings. After initial setup it may take up to 8 days of recorded programs or a currently recording program. • Schedule: Allows you to review, edit ...or delete "Record/Remind" events that were previously set. • Setup: Allows you to make watching and recording TV shows and programs much easier. NOTE: 1. The Program Guide provides listings for easy identification. • ...
... Using the TV Guide On Screen System This free interactive program guide provides up to 24 hours to receive initial program listings. After initial setup it may take up to 8 days of recorded programs or a currently recording program. • Schedule: Allows you to review, edit ...or delete "Record/Remind" events that were previously set. • Setup: Allows you to make watching and recording TV shows and programs much easier. NOTE: 1. The Program Guide provides listings for easy identification. • ...

Owners Guide
Page 55
... UP / - Press the PIP button again to that program (if it displays the channels as you can also jump to highlight a different Service (LISTINGS, SEARCH, SETUP, SCHEDULE, and RECORDINGS). 3. Press to access the Panel Menu. Press to the Service Bar. Press the SELECT button to jump to display Panel Menu while...
... UP / - Press the PIP button again to that program (if it displays the channels as you can also jump to highlight a different Service (LISTINGS, SEARCH, SETUP, SCHEDULE, and RECORDINGS). 3. Press to access the Panel Menu. Press to the Service Bar. Press the SELECT button to jump to display Panel Menu while...

Owners Guide
Page 57
... "Shortcuts" menu. Press Guide to tune to display a Help screen. TV Guide On Screen Five (5) Services: • LISTINGS • SEARCH • RECORDINGS • SCHEDULE • SETUP NOTE: 1. Press the INFO button while the LISTINGS service is connected to watch a currrently airing show listings. Just press INFO to current show in grid...
... "Shortcuts" menu. Press Guide to tune to display a Help screen. TV Guide On Screen Five (5) Services: • LISTINGS • SEARCH • RECORDINGS • SCHEDULE • SETUP NOTE: 1. Press the INFO button while the LISTINGS service is connected to watch a currrently airing show listings. Just press INFO to current show in grid...

Owners Guide
Page 64
...an existing auto-tune reminder. • A program set with an auto-tune reminder overlaps with a scheduled recording. Press the INFO button while the SETUP Service is made within 3 minutes, the banner closes automatically. recording device • Don't set to auto-tune. • Proceed, No Auto-...to access each setting. • Auto-Tune anyway - ZIP or Postal Code -- Cancels the reminder. On-Screen Display 64 SETUP: The SETUP Service screen allows you to modify settings that were entered at the scheduled reminder time. TV Guide On Screen Reminder Notification Banner ...
...an existing auto-tune reminder. • A program set with an auto-tune reminder overlaps with a scheduled recording. Press the INFO button while the SETUP Service is made within 3 minutes, the banner closes automatically. recording device • Don't set to auto-tune. • Proceed, No Auto-...to access each setting. • Auto-Tune anyway - ZIP or Postal Code -- Cancels the reminder. On-Screen Display 64 SETUP: The SETUP Service screen allows you to modify settings that were entered at the scheduled reminder time. TV Guide On Screen Reminder Notification Banner ...

Owners Guide
Page 65
... displayed in LISTINGS) - Antenna - ZIP or Postal Code -- The channel information that appears in the LISTINGS Service screen. Over-the-Air - From the SETUP Screen, Use the CURSOR PAD ̄ to access the Grid Options Panel Menu. recording device 2. Highlight a channel row and press the SELECT button to... then press the SELECT button. CHANGE CHANNEL DISPLAY: Use this option if you want to change something after completing initial TV Guide On Screen system setup. 1. Use the CURSOR PAD ̆ or ̄ to highlight one of the options, and make any necessary changes, and then press the...
... displayed in LISTINGS) - Antenna - ZIP or Postal Code -- The channel information that appears in the LISTINGS Service screen. Over-the-Air - From the SETUP Screen, Use the CURSOR PAD ̄ to access the Grid Options Panel Menu. recording device 2. Highlight a channel row and press the SELECT button to... then press the SELECT button. CHANGE CHANNEL DISPLAY: Use this option if you want to change something after completing initial TV Guide On Screen system setup. 1. Use the CURSOR PAD ̆ or ̄ to highlight one of the options, and make any necessary changes, and then press the...

Owners Guide
Page 66
...the menu or use the CURSOR PAD ̆ or ̄ to highlight Change Default Options and then press the SELECT button RECORD DEFAULTS 1. From the SETUP screen, use the CURSOR PAD ̆ or ̄ to highlight Cancel. Then press the SELECT button to keep a Record event, the quality of the... recording. 4. From the SETUP screen, use the CURSOR PAD ̆ or ̄ to access the General Default Options Panel Menu. 3. The following options woud not appear in the Panel...
...the menu or use the CURSOR PAD ̆ or ̄ to highlight Change Default Options and then press the SELECT button RECORD DEFAULTS 1. From the SETUP screen, use the CURSOR PAD ̆ or ̄ to highlight Cancel. Then press the SELECT button to keep a Record event, the quality of the... recording. 4. From the SETUP screen, use the CURSOR PAD ̆ or ̄ to access the General Default Options Panel Menu. 3. The following options woud not appear in the Panel...

Owners Guide
Page 67
...; Dial mode - if you have a cable box, indicates whether or not you want to change channels on your cable box. • Enter key - From the SETUP screen, use the CURSOR PAD ̄ to exit the menu. 67 On-Screen Display TV Guide On Screen IR DEFAULTS IR Defaults lets you enter...
...; Dial mode - if you have a cable box, indicates whether or not you want to change channels on your cable box. • Enter key - From the SETUP screen, use the CURSOR PAD ̄ to exit the menu. 67 On-Screen Display TV Guide On Screen IR DEFAULTS IR Defaults lets you enter...