
Owners Guide
Page 2
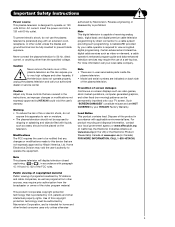
...(OR BACK). proper grounding and, in any ventilation openings. Protect the power cord from it to the receiver be discovered in the literature accompanying the appliance. Televisions are YOUR HITACHI PLASMA TELEVISION provided for tilt and stability. Follow all warnings and instructions ...model. Keep these units. Do not defeat the safety purpose of overhead power lines or other apparatus Article 820-44 of the obsolete outlet. 10. recommended safety standards for your HITACHI plasma television. READ BEFORE OPERATING EQUIPMENT Follow all instructions. 5. Do not...
...(OR BACK). proper grounding and, in any ventilation openings. Protect the power cord from it to the receiver be discovered in the literature accompanying the appliance. Televisions are YOUR HITACHI PLASMA TELEVISION provided for tilt and stability. Follow all warnings and instructions ...model. Keep these units. Do not defeat the safety purpose of overhead power lines or other apparatus Article 820-44 of the obsolete outlet. 10. recommended safety standards for your HITACHI plasma television. READ BEFORE OPERATING EQUIPMENT Follow all instructions. 5. Do not...
Owners Guide
Page 3
...A CableCARD provided by your TV screen. Dispose of this product in accordance with applicable environmental laws. FOR MORE INFORMATION, CALL 1-800-HITACHI. Note This plasma television will display television closed captioning, ( or ), in accordance with paragraph 15.119 and 15.122 of receiving...disassembly is designed to 50 Hz, direct current, or anything other intellectual property rights. Important Safety Instructions Power source This plasma television is prohibited. Insert the power cord into a 120 volt 60 Hz outlet. Lead Notice This product contains lead. For more information...
...A CableCARD provided by your TV screen. Dispose of this product in accordance with applicable environmental laws. FOR MORE INFORMATION, CALL 1-800-HITACHI. Note This plasma television will display television closed captioning, ( or ), in accordance with paragraph 15.119 and 15.122 of receiving...disassembly is designed to 50 Hz, direct current, or anything other intellectual property rights. Important Safety Instructions Power source This plasma television is prohibited. Insert the power cord into a 120 volt 60 Hz outlet. Lead Notice This product contains lead. For more information...

Owners Guide
Page 4
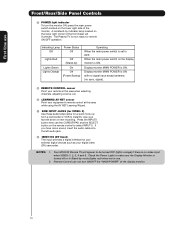
... accessories, please ¿ 2 IR Mouse Cables or G-LINK Cables ¶ Power Swivel Cable (42" models only) access our web site at: www.hitachi.us/tv CAUTION: 1. This stand for the 55" models. use with Hitachi 42HDT52 and 42HDT52A. BOTTOM VIEW (Remote Control) Press down and sliding the back cover...183; Two "AA" size, 1.5V batteries ´ Table Top Stand (42" models only) º 2 Ferrite Core (see page 13) » Power Cord ² Cleaning Cloth Note: Please visit our website for optional accessories for use only with other apparatus is capable of the remote control by...
... accessories, please ¿ 2 IR Mouse Cables or G-LINK Cables ¶ Power Swivel Cable (42" models only) access our web site at: www.hitachi.us/tv CAUTION: 1. This stand for the 55" models. use with Hitachi 42HDT52 and 42HDT52A. BOTTOM VIEW (Remote Control) Press down and sliding the back cover...183; Two "AA" size, 1.5V batteries ´ Table Top Stand (42" models only) º 2 Ferrite Core (see page 13) » Power Cord ² Cleaning Cloth Note: Please visit our website for optional accessories for use only with other apparatus is capable of the remote control by...

Owners Guide
Page 5
...or (b). Wood screw two places Securing to the wall as shown in direct sunlight or near a heating appliance, etc. 30 cm (12 inches) (a) Power Swivel NOT USED (b) Power Swivel USED 10 cm (4 inches) 10 cm (4 inches) NOTES: 1. A B LOCATION Select an area where sunlight or bright indoor illumination will not be... and base on the rear of the monitor when using the wall mount bracket. 2. First time use How To Set Up Your New Hitachi Plasma Television To take measures to prevent the Plasma Television from tipping over and prevent possible injury it is important to a table-top 1....
...or (b). Wood screw two places Securing to the wall as shown in direct sunlight or near a heating appliance, etc. 30 cm (12 inches) (a) Power Swivel NOT USED (b) Power Swivel USED 10 cm (4 inches) 10 cm (4 inches) NOTES: 1. A B LOCATION Select an area where sunlight or bright indoor illumination will not be... and base on the rear of the monitor when using the wall mount bracket. 2. First time use How To Set Up Your New Hitachi Plasma Television To take measures to prevent the Plasma Television from tipping over and prevent possible injury it is important to a table-top 1....

Owners Guide
Page 7
... TV's HDMI input. Below are illustrations and names of an audio amplifeier (not included). 7 You must be purchased from most stores that have phono connectors. Power Swivel Cable (Provided with an HDMI output connection to the antenna jack on the television's rear jack panel and side control panel.
... TV's HDMI input. Below are illustrations and names of an audio amplifeier (not included). 7 You must be purchased from most stores that have phono connectors. Power Swivel Cable (Provided with an HDMI output connection to the antenna jack on the television's rear jack panel and side control panel.
Owners Guide
Page 8
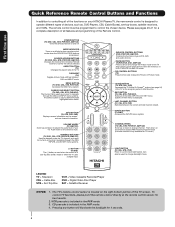
... used to show and change channel. Please see page 54) of the TV or the program guide of other devices when the remote is displayed. POWER BUTTON (TV, DVD, CBL, STB, PVR/VCR, AMP/CD) Turns the selected device on the right bottom portion of the Universal Remote Control to ... on the wheel to use Quick Reference Remote Control Buttons and Functions In addition to controlling all features and programming of the functions on your HITACHI Plasma TV, the new remote control is designed to change the Picture-in DVD, PVR/VCR, or AMP/CD mode. Television CBL - Digital Video Disc...
... used to show and change channel. Please see page 54) of the TV or the program guide of other devices when the remote is displayed. POWER BUTTON (TV, DVD, CBL, STB, PVR/VCR, AMP/CD) Turns the selected device on the right bottom portion of the Universal Remote Control to ... on the wheel to use Quick Reference Remote Control Buttons and Functions In addition to controlling all features and programming of the functions on your HITACHI Plasma TV, the new remote control is designed to change the Picture-in DVD, PVR/VCR, or AMP/CD mode. Television CBL - Digital Video Disc...

Owners Guide
Page 9
... Press these buttons until the desired channel appears in MENU mode. ቤ PHOTO INPUT Insert USB cable from the 42" models. The "MAIN POWER" button must be turned ON/OFF by mode. NOTE: The Rear View of the differences are the handles that are only present on the 42... the cursor left (̇) and right (̈) buttons when in MENU mode. Front/Rear/Side Panel Controls FRONT VIEW First time use CURSOR PHOTO INPUT POWER ቢ CH+ CH- ቦ VOL + VOL - ቧ INPUT/EXIT MENU/SELECT ብ ባ ቩቪ ቨ REAR/SIDE VIEW ቤ ቫ VIDEO S-VIDEO &#...
... Press these buttons until the desired channel appears in MENU mode. ቤ PHOTO INPUT Insert USB cable from the 42" models. The "MAIN POWER" button must be turned ON/OFF by mode. NOTE: The Rear View of the differences are the handles that are only present on the 42... the cursor left (̇) and right (̈) buttons when in MENU mode. Front/Rear/Side Panel Controls FRONT VIEW First time use CURSOR PHOTO INPUT POWER ቢ CH+ CH- ቦ VOL + VOL - ቧ INPUT/EXIT MENU/SELECT ብ ባ ቩቪ ቨ REAR/SIDE VIEW ቤ ቫ VIDEO S-VIDEO &#...
Owners Guide
Page 10
...for your external digital devices such as your favorite show or new recording. Indicating Lamp Power Status Off Off Lights Red Lights Green Lights Orange Off (Stand-by mode (lights red) when not in... indicator lamp located on the lower right corner of the front bezel will appear to OFF. Display monitor MAIN POWER is ON. If you have mono sound, insert the audio cable into the left audio jack. ቭ ...INPUTS button then use Front/Rear/Side Panel Controls ቩ POWER light indicator To turn ON/OFF the "MAIN POWER" of the monitor. Your HITACHI Plasma TV will illuminate.
...for your external digital devices such as your favorite show or new recording. Indicating Lamp Power Status Off Off Lights Red Lights Green Lights Orange Off (Stand-by mode (lights red) when not in... indicator lamp located on the lower right corner of the front bezel will appear to OFF. Display monitor MAIN POWER is ON. If you have mono sound, insert the audio cable into the left audio jack. ቭ ...INPUTS button then use Front/Rear/Side Panel Controls ቩ POWER light indicator To turn ON/OFF the "MAIN POWER" of the monitor. Your HITACHI Plasma TV will illuminate.
Owners Guide
Page 12
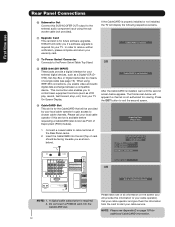
... Table Top Stand. Insert the CableCARD into the CableCARD slot. 12 Please take note of the Rear Panel Jacks. 2. CableCARD is installed ቮ To Power Swivel Connector Connects to exit the second screen. Acquiring Data. If the CableCARD is properly installed or not installed, the TV will appear if a channel ... a single cable (see Appendix E on the screen (you will be facing towards you to receive written notification, please complete and return your TV. Please wait. 1. HITACHI will notify you if a software upgrade is required. 2.
... Table Top Stand. Insert the CableCARD into the CableCARD slot. 12 Please take note of the Rear Panel Jacks. 2. CableCARD is installed ቮ To Power Swivel Connector Connects to exit the second screen. Acquiring Data. If the CableCARD is properly installed or not installed, the TV will appear if a channel ... a single cable (see Appendix E on the screen (you will be facing towards you to receive written notification, please complete and return your TV. Please wait. 1. HITACHI will notify you if a software upgrade is required. 2.

Owners Guide
Page 21
...to highlight the SET AV NET features then press the SELECT button. 8. Video Audio TV Guide On Screen Channel Manager Locks Timers Setup Power Swivel Move SEL Select Setup Menu Preference Screen Saver Set The Inputs Set AV NET Set Closed Captions Set Monitor Out Upgrades Quick Start ... cable can control up to 2 external Audio/Video components. Please see the following example of four external components. 2. First time use your HITACHI remote control to control the Audio/Video equipment command without the equipment's remote control. Double-sided mounting tape may be chosen for each of ...
...to highlight the SET AV NET features then press the SELECT button. 8. Video Audio TV Guide On Screen Channel Manager Locks Timers Setup Power Swivel Move SEL Select Setup Menu Preference Screen Saver Set The Inputs Set AV NET Set Closed Captions Set Monitor Out Upgrades Quick Start ... cable can control up to 2 external Audio/Video components. Please see the following example of four external components. 2. First time use your HITACHI remote control to control the Audio/Video equipment command without the equipment's remote control. Double-sided mounting tape may be chosen for each of ...

Owners Guide
Page 22
... MENU button. 5. Press the SELECT or CURSOR PAD ̈ button to 2 external Audio/Video components. The G-LINK connection is equipped with your HITACHI Plasma Television and external Audio/Video equipment (VCR and Cable box). Once you setup the G-LINK (IR Mouse) connector, then you want to control... and to enable VCR recording features. Video Audio TV Guide On Screen Channel Manager Locks Timers Setup Power Swivel Move SEL Select NOTE: 1. First time use your HITACHI Plasma TV Remote Control and the TV Guide On Screen system to control your external Audio/Video components...
... MENU button. 5. Press the SELECT or CURSOR PAD ̈ button to 2 external Audio/Video components. The G-LINK connection is equipped with your HITACHI Plasma Television and external Audio/Video equipment (VCR and Cable box). Once you setup the G-LINK (IR Mouse) connector, then you want to control... and to enable VCR recording features. Video Audio TV Guide On Screen Channel Manager Locks Timers Setup Power Swivel Move SEL Select NOTE: 1. First time use your HITACHI Plasma TV Remote Control and the TV Guide On Screen system to control your external Audio/Video components...

Owners Guide
Page 24
...; ቦ PAUSE button ቮ Press the PAUSE button to freeze the picture. The Remote Control How to Use the Remote to Control Your TV ቢ POWER button Press this button to turn the TV set on or off when the remote is in TV mode. (See page 23 for ቢ instructions...
...; ቦ PAUSE button ቮ Press the PAUSE button to freeze the picture. The Remote Control How to Use the Remote to Control Your TV ቢ POWER button Press this button to turn the TV set on or off when the remote is in TV mode. (See page 23 for ቢ instructions...

Owners Guide
Page 27
... button to cycle through the INPUTS selections until the PHOTO INPUT is fully loaded, or because of digital cameras may not work with low battery power may show Picture Numbers in Thumbnail view, plus other information in this Photo Input. 5. Photo Input IEEE 1394 Cable Air Input 1 Move SEL Sel. 2. Certain...
... button to cycle through the INPUTS selections until the PHOTO INPUT is fully loaded, or because of digital cameras may not work with low battery power may show Picture Numbers in Thumbnail view, plus other information in this Photo Input. 5. Photo Input IEEE 1394 Cable Air Input 1 Move SEL Sel. 2. Certain...

Owners Guide
Page 29
.... 4. Use CURSOR PAD cursors to select D-VHS operation. 6. Use CURSOR PAD cursors to highlight POWER. 4. Press down on the device. 5. The digital device will be used. Press the SELECT button to power on the CURSOR PAD to enable the selected operation. 7. The On-Screen display will not disappear ...value. 29 TV IN/OUT functions are compatible with IEEE1394 capability are not available when D-VHS is Cable IEEE1394 DVHS1 DEVICE NAME, BRAND NAME POWER TV TV RESET Move STD SEL Select 00:00:00 Counter:-00:03:31 NOTES: 1. Not all devices with this TV. Press the ...
.... 4. Use CURSOR PAD cursors to select D-VHS operation. 6. Use CURSOR PAD cursors to highlight POWER. 4. Press down on the device. 5. The digital device will be used. Press the SELECT button to power on the CURSOR PAD to enable the selected operation. 7. The On-Screen display will not disappear ...value. 29 TV IN/OUT functions are compatible with IEEE1394 capability are not available when D-VHS is Cable IEEE1394 DVHS1 DEVICE NAME, BRAND NAME POWER TV TV RESET Move STD SEL Select 00:00:00 Counter:-00:03:31 NOTES: 1. Not all devices with this TV. Press the ...

Owners Guide
Page 30
... of normal volume (SOFT MUTE) to turn the sound off at the level it again to return to Favorite (FAV) channel mode. When the TV power is turned on. Channel selection may also be at a volume level 31 or greater, the volume level will default to AUTO (see page 88). Cable...
... of normal volume (SOFT MUTE) to turn the sound off at the level it again to return to Favorite (FAV) channel mode. When the TV power is turned on. Channel selection may also be at a volume level 31 or greater, the volume level will default to AUTO (see page 88). Cable...

Owners Guide
Page 34
...-coded mode, use the SOURCE ACCESS buttons (̇ or ̈) on pages 40-41. Aim the remote control at the cable box and press the POWER button. If your cable box cannot be operated after performing the above . ቢ PRECODED CABLE BOX buttons These buttons transmit the chosen precoded cable codes...
...-coded mode, use the SOURCE ACCESS buttons (̇ or ̈) on pages 40-41. Aim the remote control at the cable box and press the POWER button. If your cable box cannot be operated after performing the above . ቢ PRECODED CABLE BOX buttons These buttons transmit the chosen precoded cable codes...

Owners Guide
Page 35
...-TopBox/Satellite Receiver for operation of set - ቢ top-box/satellite receiver as stated above procedures, your set -top-box/satellite receiver and press the POWER button. Aim the remote control at the set -top-box/ satellite receiver code has not been precoded into the remote. 2.
...-TopBox/Satellite Receiver for operation of set - ቢ top-box/satellite receiver as stated above procedures, your set -top-box/satellite receiver and press the POWER button. Aim the remote control at the set -top-box/ satellite receiver code has not been precoded into the remote. 2.

Owners Guide
Page 36
... first program the remote to match the remote system of your DVD player. ባ 3. Aim the remote control at the DVD player and press the POWER button. Hold down the ENT button on the remote and enter the four digit preset code that your DVD player cannot be operated after performing...
... first program the remote to match the remote system of your DVD player. ባ 3. Aim the remote control at the DVD player and press the POWER button. Hold down the ENT button on the remote and enter the four digit preset code that your DVD player cannot be operated after performing...

Owners Guide
Page 37
... above procedures, your VCR/PVR code has not been precoded into the remote. 2. Aim the remote control at the VCR/PVR and press the ባ POWER button. The Remote Control The Remote for VCR/PVR Functions Operating the precoded function for your VCR/PVR (Personal Video Recorder). ቢ This remote is...
... above procedures, your VCR/PVR code has not been precoded into the remote. 2. Aim the remote control at the VCR/PVR and press the ባ POWER button. The Remote Control The Remote for VCR/PVR Functions Operating the precoded function for your VCR/PVR (Personal Video Recorder). ቢ This remote is...

Owners Guide
Page 38
... turn off your Audio component when the correct four digit preset code is entered. Aim the remote control at the Audio component and press the POWER button. The remote will now control your Audio component. Turn ON your Audio component you wish to control another Audio component. Repeat steps 1 - 6 if you...
... turn off your Audio component when the correct four digit preset code is entered. Aim the remote control at the Audio component and press the POWER button. The remote will now control your Audio component. Turn ON your Audio component you wish to control another Audio component. Repeat steps 1 - 6 if you...


