
Owners Guide
Page 1
Updated 04.25.06 has determined that this product meets the Energy Star® guidelines for 42HDT52, 42HDT52A and 55HDT52 IMPORTANT SAFETY INSTRUCTIONS 2-3 FIRST TIME USE ...4-22 THE REMOTE CONTROL ...23-41 ON-SCREEN DISPLAY ...42-90 USEFUL INFORMATION...91-98 END USER LICENSE AGREEMENT FOR HITACHI DTV SOFTWARE 99 APPENDIXES ...100-101 INDEX ...102 As an Energy Star® Partner, Hitachi, Ltd. PLASMA TELEVISION Operating Guide for energy efficiency.
Updated 04.25.06 has determined that this product meets the Energy Star® guidelines for 42HDT52, 42HDT52A and 55HDT52 IMPORTANT SAFETY INSTRUCTIONS 2-3 FIRST TIME USE ...4-22 THE REMOTE CONTROL ...23-41 ON-SCREEN DISPLAY ...42-90 USEFUL INFORMATION...91-98 END USER LICENSE AGREEMENT FOR HITACHI DTV SOFTWARE 99 APPENDIXES ...100-101 INDEX ...102 As an Energy Star® Partner, Hitachi, Ltd. PLASMA TELEVISION Operating Guide for energy efficiency.

Owners Guide
Page 2
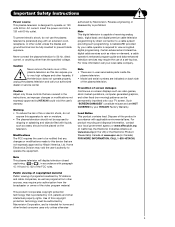
...Please fill out your safety. Only use this section illustrates safety tips which will enable HITACHI to the proper operation of HITACHI plasma televisions. Refer all instructions. 5. Televisions are YOUR HITACHI PLASMA TELEVISION provided for (including amplifiers) that may be connected to a person. 16. REFER... a third grounding entry as power-supply cord or plug is required when the apparatus has been damaged in your HITACHI plasma television. The lightning flash with respect to proper grounding for the mast and supporting structure, grounding of the lead-...
...Please fill out your safety. Only use this section illustrates safety tips which will enable HITACHI to the proper operation of HITACHI plasma televisions. Refer all instructions. 5. Televisions are YOUR HITACHI PLASMA TELEVISION provided for (including amplifiers) that may be connected to a person. 16. REFER... a third grounding entry as power-supply cord or plug is required when the apparatus has been damaged in your HITACHI plasma television. The lightning flash with respect to proper grounding for the mast and supporting structure, grounding of the lead-...
Owners Guide
Page 3
... high voltages and other intellectual property rights. This product incorporates copyright protection technology that are NOT COVERED by HITACHI could void the user's warranty. If the television does not operate properly, unplug the plasma television and call your cable operator is protected by your local cable company. For product recycling and disposal...
... high voltages and other intellectual property rights. This product incorporates copyright protection technology that are NOT COVERED by HITACHI could void the user's warranty. If the television does not operate properly, unplug the plasma television and call your cable operator is protected by your local cable company. For product recycling and disposal...

Owners Guide
Page 4
... control by pushing down and slide back to swell or rupture resulting in instability causing possible injury. Replace the cover. This plasma television product is designed for use with Hitachi 42HDT52 and 42HDT52A. HL02065). · Two "AA" size, 1.5V batteries (P# FQ00021). » Power Cord (P# EV01841).... ¿ 2 IR Mouse Cables or G-LINK Cables ¶ Power Swivel Cable (42" models only) access our web site at: www.hitachi.us/tv CAUTION: 1. REMOTE CONTROL BATTERY INSTALLATION AND REPLACEMENT 1. Open the battery cover of resulting in leakage. 4 For U.S. use only with...
... control by pushing down and slide back to swell or rupture resulting in instability causing possible injury. Replace the cover. This plasma television product is designed for use with Hitachi 42HDT52 and 42HDT52A. HL02065). · Two "AA" size, 1.5V batteries (P# FQ00021). » Power Cord (P# EV01841).... ¿ 2 IR Mouse Cables or G-LINK Cables ¶ Power Swivel Cable (42" models only) access our web site at: www.hitachi.us/tv CAUTION: 1. REMOTE CONTROL BATTERY INSTALLATION AND REPLACEMENT 1. Open the battery cover of resulting in leakage. 4 For U.S. use only with...

Owners Guide
Page 5
... the ventilation holes might cause fire or defect. 2. Do not install by yourself. 4. If the Power Swivel feature will not be used , the Plasma television should be lifted forward using the wall mount bracket. 2. Whenever the unit is moved, two people are required to transport it safely. CONNECT POWER...surface. Do not grab the speakers or the back cover when lifting. First time use How To Set Up Your New Hitachi Plasma Television To take measures to prevent the Plasma Television from tipping over and prevent possible injury it is important to mount the unit in fig. (a) or (b). Keep the...
... the ventilation holes might cause fire or defect. 2. Do not install by yourself. 4. If the Power Swivel feature will not be used , the Plasma television should be lifted forward using the wall mount bracket. 2. Whenever the unit is moved, two people are required to transport it safely. CONNECT POWER...surface. Do not grab the speakers or the back cover when lifting. First time use How To Set Up Your New Hitachi Plasma Television To take measures to prevent the Plasma Television from tipping over and prevent possible injury it is important to mount the unit in fig. (a) or (b). Keep the...

Owners Guide
Page 6
..., connect the coaxial cable to the side or behind the viewing area. Plug the adapter into the antenna terminal on the screen. Consult your new HITACHI Plasma Television VIEWING The best picture is recommended. For best stereo separation, place the external speakers at least four feet from the screen.
..., connect the coaxial cable to the side or behind the viewing area. Plug the adapter into the antenna terminal on the screen. Consult your new HITACHI Plasma Television VIEWING The best picture is recommended. For best stereo separation, place the external speakers at least four feet from the screen.

Owners Guide
Page 7
... amplifier with 42" Models) This cable is used to connect the swivel stand to the rear panel of the standard video cable to control your Plasma Television when A/V Network is used . Use this cable for the best sound quality. This connection allows your TV, and the TV Guide On ...should use Most video/audio connections between components can be connected to an antenna adapter (300-Ohm to the Photo Input in place of the Plasma Television. Cables can be made with mini stereo audio jack to external digital devices.This cable will carry both the video and audio information. ...
... amplifier with 42" Models) This cable is used to connect the swivel stand to the rear panel of the standard video cable to control your Plasma Television when A/V Network is used . Use this cable for the best sound quality. This connection allows your TV, and the TV Guide On ...should use Most video/audio connections between components can be connected to an antenna adapter (300-Ohm to the Photo Input in place of the Plasma Television. Cables can be made with mini stereo audio jack to external digital devices.This cable will carry both the video and audio information. ...
Owners Guide
Page 8
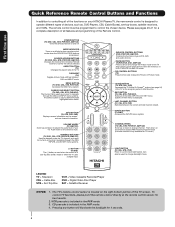
... selected. INPUTS BUTTON (TV, AMP) Accesses the INPUTS menu system. / CHANNEL WHEEL (TV, CBL, STB, PVR/VCR, AMP/CD) Scroll up and down on your HITACHI Plasma TV, the new remote control is in the AMP mode. 4. Television CBL - The TV's remote control sensor is located on the screen, such as channel...
... selected. INPUTS BUTTON (TV, AMP) Accesses the INPUTS menu system. / CHANNEL WHEEL (TV, CBL, STB, PVR/VCR, AMP/CD) Scroll up and down on your HITACHI Plasma TV, the new remote control is in the AMP mode. 4. Television CBL - The TV's remote control sensor is located on the screen, such as channel...

Owners Guide
Page 9
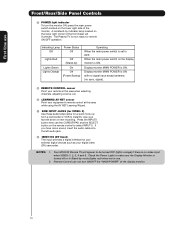
... on the 42" models. ቨ POWER button Display Monitor "MAIN POWER" button This power button is recommended to leave the "MAIN POWER" to turn the Plasma Television ON/OFF. Front/Rear/Side Panel Controls FRONT VIEW First time use CURSOR PHOTO INPUT POWER ቢ CH+ CH- ቦ VOL + VOL - ቧ INPUT...
... on the 42" models. ቨ POWER button Display Monitor "MAIN POWER" button This power button is recommended to leave the "MAIN POWER" to turn the Plasma Television ON/OFF. Front/Rear/Side Panel Controls FRONT VIEW First time use CURSOR PHOTO INPUT POWER ቢ CH+ CH- ቦ VOL + VOL - ቧ INPUT...
Owners Guide
Page 10
The Plasma TV is ON with no signal input except antenna (no video input when VIDEO: 1, 2, 3, 4 and 5. Indicating Lamp Power Status Off Off Lights Red Lights Green ... the "MAIN POWER" of the monitor. Check the Power Light to be turned OFF (lights orange) if there is turned off or in use. 2. Your HITACHI Plasma TV will illuminate. signal). ቪ REMOTE CONTROL sensor Point your remote at this area when selecting channels, adjusting volume, etc. ቪ LEARNING AV NET sensor...
The Plasma TV is ON with no signal input except antenna (no video input when VIDEO: 1, 2, 3, 4 and 5. Indicating Lamp Power Status Off Off Lights Red Lights Green ... the "MAIN POWER" of the monitor. Check the Power Light to be turned OFF (lights orange) if there is turned off or in use. 2. Your HITACHI Plasma TV will illuminate. signal). ቪ REMOTE CONTROL sensor Point your remote at this area when selecting channels, adjusting volume, etc. ቪ LEARNING AV NET sensor...
Owners Guide
Page 11
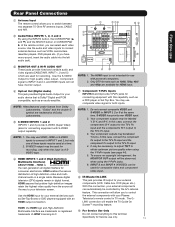
...'s PR input. 4. "Dolby" and the double-D symbol are trademarks or registered ቪ For Service Use Only trademarks of HDMI Licensing LLC. In this connection, your Plasma Television's remote control in a single cable. the external components with personal computers. 2. Rear Panel Connections First time use VIDEO, HDMI or S-VIDEO inputs to connect...
...'s PR input. 4. "Dolby" and the double-D symbol are trademarks or registered ቪ For Service Use Only trademarks of HDMI Licensing LLC. In this connection, your Plasma Television's remote control in a single cable. the external components with personal computers. 2. Rear Panel Connections First time use VIDEO, HDMI or S-VIDEO inputs to connect...

Owners Guide
Page 13
... player, DVD player, or HDTV Set Top Box to accommodate your video camcorder, digital camera or Digital Video Camcorder as shown in place of your Plasma TV is dependent on the Ferrite ferrite core near the Photo Input Core or IEEE 1394 Input as a convenience to allow you to easily connect...
... player, DVD player, or HDTV Set Top Box to accommodate your video camcorder, digital camera or Digital Video Camcorder as shown in place of your Plasma TV is dependent on the Ferrite ferrite core near the Photo Input Core or IEEE 1394 Input as a convenience to allow you to easily connect...

Owners Guide
Page 19
With IEEE1394 connection, video and audio will enable you to control the D-VHS from your TV On-Screen Display. IEEE 1394 allows the plasma television and the external device to the IEEE1394 input terminals shown below. When using IEEE1394 connections, you to control basic equipment functions (such as a Digital ...
With IEEE1394 connection, video and audio will enable you to control the D-VHS from your TV On-Screen Display. IEEE 1394 allows the plasma television and the external device to the IEEE1394 input terminals shown below. When using IEEE1394 connections, you to control basic equipment functions (such as a Digital ...
Owners Guide
Page 20
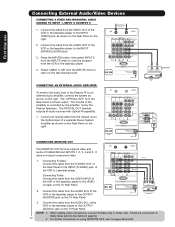
Connect the Cable and/or Air cables 2. Select CABLE or AIR from the Rear Panel is controlled by the amplifier, not by the Plasma Television. Connect an optical cable from the VIDEO INPUT of the VCR or the laserdisc player to the Optical input of a separate Stereo System Amplifier ... the cable from the VIDEO OUT of CABLE/AIR and INPUTS 1, 2, 3, 4 and 5. If both are connected, S- Connect the cable from the AUDIO IN L of the Plasma TV to the last channel tuned. The "OPTICAL OUT" from the INPUTS menu to return to an external audio amplifier, connect the system as shown...
Connect the Cable and/or Air cables 2. Select CABLE or AIR from the Rear Panel is controlled by the amplifier, not by the Plasma Television. Connect an optical cable from the VIDEO INPUT of the VCR or the laserdisc player to the Optical input of a separate Stereo System Amplifier ... the cable from the VIDEO OUT of CABLE/AIR and INPUTS 1, 2, 3, 4 and 5. If both are connected, S- Connect the cable from the AUDIO IN L of the Plasma TV to the last channel tuned. The "OPTICAL OUT" from the INPUTS menu to return to an external audio amplifier, connect the system as shown...

Owners Guide
Page 21
... following example of the Rear Panel. 3. Double-sided mounting tape may be used to the IR BLASTER output of an AV Network setup between your Hitachi Plasma TV Remote Control. Therefore, you wish to control. / G-LINK Infrared Sensor IR Mouse V L R OUTPUT VCR Infrared Sensor OUTPUT Y PB/CB PR...21 Once this is equipped with up to four components. The Plasma Television Rear Panel has 2 IR BLASTER jacks. Each IR Mouse cable can connect the Plasma Television with an AV Network feature. Connect your HITACHI remote control to control the Audio/Video equipment command without the...
... following example of the Rear Panel. 3. Double-sided mounting tape may be used to the IR BLASTER output of an AV Network setup between your Hitachi Plasma TV Remote Control. Therefore, you wish to control. / G-LINK Infrared Sensor IR Mouse V L R OUTPUT VCR Infrared Sensor OUTPUT Y PB/CB PR...21 Once this is equipped with up to four components. The Plasma Television Rear Panel has 2 IR BLASTER jacks. Each IR Mouse cable can connect the Plasma Television with an AV Network feature. Connect your HITACHI remote control to control the Audio/Video equipment command without the...

Owners Guide
Page 22
... to control. / G-LINK Infrared Sensor IR Mouse V L R OUTPUT VCR Infrared Sensor OUTPUT Y PB/CB PR/CR R L Cable Box 4. First time use your HITACHI Plasma TV Remote Control and the TV Guide On Screen system to control your cable box and VCR recording features. One IR Mouse cable can use... Connecting External Video Sources Your Hitachi Plasma Television is equipped with your cable box to receive program listings and to enable VCR recording features. Place the IR Mouse in front of...
... to control. / G-LINK Infrared Sensor IR Mouse V L R OUTPUT VCR Infrared Sensor OUTPUT Y PB/CB PR/CR R L Cable Box 4. First time use your HITACHI Plasma TV Remote Control and the TV Guide On Screen system to control your cable box and VCR recording features. One IR Mouse cable can use... Connecting External Video Sources Your Hitachi Plasma Television is equipped with your cable box to receive program listings and to enable VCR recording features. Place the IR Mouse in front of...
Owners Guide
Page 23
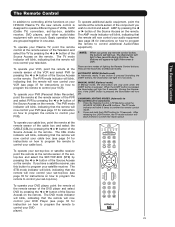
The Remote Control The Remote Control In addition to controlling all the functions on your HITACHI Plasma TV, the new remote control is designed to operate different types of the Source Access on the remote. To operate your VCR, point the remote ... instructions on how to program the remote to control your PVR (see page 36 for instruction on how to program the remote to control your Plasma TV, point the remote control at the remote sensor of the cable box and select the CABLE (CBL) by pressing the ̇ or ̈ button...
The Remote Control The Remote Control In addition to controlling all the functions on your HITACHI Plasma TV, the new remote control is designed to operate different types of the Source Access on the remote. To operate your VCR, point the remote ... instructions on how to program the remote to control your PVR (see page 36 for instruction on how to program the remote to control your Plasma TV, point the remote control at the remote sensor of the cable box and select the CABLE (CBL) by pressing the ̇ or ̈ button...

Owners Guide
Page 26
Select Night for settings changes). Press this button to access the Channel Guide of the Plasma TV (see page 44 for night time viewing with room light. Pressing the INPUTS button repeatedly will show momentarily after the Event Timer in the ...
Select Night for settings changes). Press this button to access the Channel Guide of the Plasma TV (see page 44 for night time viewing with room light. Pressing the INPUTS button repeatedly will show momentarily after the Event Timer in the ...
Owners Guide
Page 31
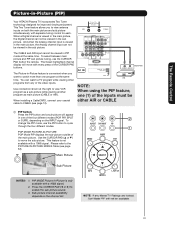
... and/or Air cables / G-LINK The CABLE and AIR input cannot be viewed in the sub picture. The Remote Control Picture-in-Picture (PIP) Your HITACHI Plasma TV incorporates Two Tuner technology designed for each. When a Digital channel is not available with separate tuning control for improved viewing enjoyment. Use connection shown...
... and/or Air cables / G-LINK The CABLE and AIR input cannot be viewed in the sub picture. The Remote Control Picture-in-Picture (PIP) Your HITACHI Plasma TV incorporates Two Tuner technology designed for each. When a Digital channel is not available with separate tuning control for improved viewing enjoyment. Use connection shown...
Owners Guide
Page 42
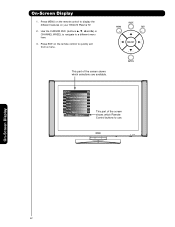
This part of the screen shows which selections are available. Press MENU on the remote control to a different menu item. 3. On-Screen Display 42 Use the CURSOR PAD (buttons ̆, ̄, ̇ and ̈) or CHANNEL WHEEL to navigate to display the different features on the remote control to use. Video Audio TV Guide On Screen Channel Manager Locks Timers Setup Power Swivel Move SEL Select This part of the screen shows which Remote Control buttons to quickly exit from a menu. Press EXIT on your HITACHI Plasma TV. 2. On-Screen Display 1.
This part of the screen shows which selections are available. Press MENU on the remote control to a different menu item. 3. On-Screen Display 42 Use the CURSOR PAD (buttons ̆, ̄, ̇ and ̈) or CHANNEL WHEEL to navigate to display the different features on the remote control to use. Video Audio TV Guide On Screen Channel Manager Locks Timers Setup Power Swivel Move SEL Select This part of the screen shows which Remote Control buttons to quickly exit from a menu. Press EXIT on your HITACHI Plasma TV. 2. On-Screen Display 1.


