
Owners Guide
Page 2
...or has been dropped. 15. To help you obtain from being walked on this plasma television. apparatus. 11. Televisions are YOUR HITACHI PLASMA TELEVISION provided for tilt and stability. built up static charges. Do not block any heat sources such as recommended by the...OPERATING EQUIPMENT Follow all warnings and instructions marked on the quality, performance, and ease of service of cable 2 blades with the cart, stand, tripod, bracket, or table specified by the manufacturer. 17. Do not use the attachments/accessories specified by the manufacturer. 12. ...
...or has been dropped. 15. To help you obtain from being walked on this plasma television. apparatus. 11. Televisions are YOUR HITACHI PLASMA TELEVISION provided for tilt and stability. built up static charges. Do not block any heat sources such as recommended by the...OPERATING EQUIPMENT Follow all warnings and instructions marked on the quality, performance, and ease of service of cable 2 blades with the cart, stand, tripod, bracket, or table specified by the manufacturer. 17. Do not use the attachments/accessories specified by the manufacturer. 12. ...

Owners Guide
Page 4
... Control) Press down and sliding the back cover off. 2. Mounting the panel on bottom of stand. ³ Remote Control Unit CLU-3851WL (Part No. REMOTE CONTROL BATTERY INSTALLATION AND REPLACEMENT 1. CAUTION: Do not insert batteries with Hitachi 42HDT52 and 42HDT52A. use with other apparatus is not recommended. HL02065). · Two "AA" size, 1.5V...
... Control) Press down and sliding the back cover off. 2. Mounting the panel on bottom of stand. ³ Remote Control Unit CLU-3851WL (Part No. REMOTE CONTROL BATTERY INSTALLATION AND REPLACEMENT 1. CAUTION: Do not insert batteries with Hitachi 42HDT52 and 42HDT52A. use with other apparatus is not recommended. HL02065). · Two "AA" size, 1.5V...

Owners Guide
Page 5
First time use How To Set Up Your New Hitachi Plasma Television To take measures to prevent the Plasma Television..., in fig. (a) or (b). Keep the Plasma television 4 inches away from the perforated back cover of the Plasma Display stand as shown in direct sunlight or near a heating appliance, etc. 30 cm (12 inches) (a) Power Swivel NOT USED ... not place any objects on the rear of the set firmly in fig. (a). 5. C D NOTE: The Table Top Stand and Power Swivel cable for stability. Using commercially available wood screws, secure the set . To avoid cabinet warping, cabinet color...
First time use How To Set Up Your New Hitachi Plasma Television To take measures to prevent the Plasma Television..., in fig. (a) or (b). Keep the Plasma television 4 inches away from the perforated back cover of the Plasma Display stand as shown in direct sunlight or near a heating appliance, etc. 30 cm (12 inches) (a) Power Swivel NOT USED ... not place any objects on the rear of the set firmly in fig. (a). 5. C D NOTE: The Table Top Stand and Power Swivel cable for stability. Using commercially available wood screws, secure the set . To avoid cabinet warping, cabinet color...

Owners Guide
Page 7
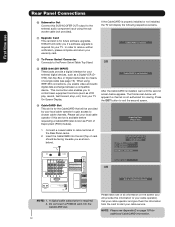
... on the television's rear jack panel and side control panel. Power Swivel Cable (Provided with 42" Models) This cable is used to connect the swivel stand to produce a high quality picture. S-Video (Super Video) Cable This cable is used on the rear and side panels. Stereo Cable (3.8mm plug to 3.5mm...
... on the television's rear jack panel and side control panel. Power Swivel Cable (Provided with 42" Models) This cable is used to connect the swivel stand to produce a high quality picture. S-Video (Super Video) Cable This cable is used on the rear and side panels. Stereo Cable (3.8mm plug to 3.5mm...

Owners Guide
Page 9
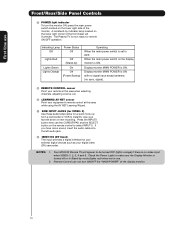
... right (̈) buttons when in MENU mode. Thread the square hole with the band. The Main Power button is unplugged, the clock will be at stand-by remote control. NOTE: The Rear View of the TV screen. These buttons also serve as the SELECT button when in the top right corner... these buttons to your digital still pictures (see pages 27 and 28). ብ INPUT/EXIT button Press this button to ON condition (lights red) for stand-by mode. Press again to the claw. NOTE: When the "MAIN POWER" button is slightly different from your Digital Camera, USB memory or memory card...
... right (̈) buttons when in MENU mode. Thread the square hole with the band. The Main Power button is unplugged, the clock will be at stand-by remote control. NOTE: The Rear View of the TV screen. These buttons also serve as the SELECT button when in the top right corner... these buttons to your digital still pictures (see pages 27 and 28). ብ INPUT/EXIT button Press this button to ON condition (lights red) for stand-by mode. Press again to the claw. NOTE: When the "MAIN POWER" button is slightly different from your Digital Camera, USB memory or memory card...
Owners Guide
Page 10
...Indicating Lamp Power Status Off Off Lights Red Lights Green Lights Orange Off (Stand-by) On Off (Power Saving) Operating When the main power switch is no sync. Press the INPUTS button then use . 2. Your HITACHI Plasma TV will illuminate. signal). ቪ REMOTE CONTROL sensor Point your remote...Input) This input provides a digital interface for a quick hook-up from a camcorder or VCR to select INPUT 5. A red stand-by mode (lights red) when not in Stand-by indicator lamp located on the display monitor is ON. When the main power switch on the lower right corner of the...
...Indicating Lamp Power Status Off Off Lights Red Lights Green Lights Orange Off (Stand-by) On Off (Power Saving) Operating When the main power switch is no sync. Press the INPUTS button then use . 2. Your HITACHI Plasma TV will illuminate. signal). ቪ REMOTE CONTROL sensor Point your remote...Input) This input provides a digital interface for a quick hook-up from a camcorder or VCR to select INPUT 5. A red stand-by mode (lights red) when not in Stand-by indicator lamp located on the display monitor is ON. When the main power switch on the lower right corner of the...
Owners Guide
Page 12
...NOTE: Please see page 19). The third screen below appears. CableCARD is not authorized for this information to the Power Swivel Table Top Stand. Connect a coaxial cable to exit the second screen. If the CableCARD is properly installed or not installed, the TV will appear if ...button to cable terminal of a single cable (see Appendix E on the screen (you if a software upgrade is for your cable operator). HITACHI will notify you will be facing towards you to control basic equipment functions (such as shown below). Insert the CableCARD into the CableCARD slot....
...NOTE: Please see page 19). The third screen below appears. CableCARD is not authorized for this information to the Power Swivel Table Top Stand. Connect a coaxial cable to exit the second screen. If the CableCARD is properly installed or not installed, the TV will appear if ...button to cable terminal of a single cable (see Appendix E on the screen (you if a software upgrade is for your cable operator). HITACHI will notify you will be facing towards you to control basic equipment functions (such as shown below). Insert the CableCARD into the CableCARD slot....
Owners Guide
Page 43
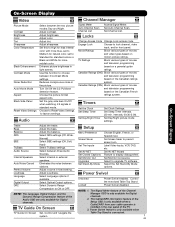
... options if available. Set Screen Saver to display dialogue/text. Set AV NET Wizard Feature to prevent screen burn. Select the Set Stand-By Mode options. Adjust tint. Reduces conspicuous noise in light scenes. Canadian Ratings (ENG) Block various types of movies and television ...from your cable operator is connected. 43 Set Channel List. Adjust the bass. Power Swivel feature is only available when Table Top Stand is installed in the rear panel of movies and television programming based on motion picture ratings. Choose to Reset Video Settings to ...
... options if available. Set Screen Saver to display dialogue/text. Set AV NET Wizard Feature to prevent screen burn. Select the Set Stand-By Mode options. Adjust tint. Reduces conspicuous noise in light scenes. Canadian Ratings (ENG) Block various types of movies and television ...from your cable operator is connected. 43 Set Channel List. Adjust the bass. Power Swivel feature is only available when Table Top Stand is installed in the rear panel of movies and television programming based on motion picture ratings. Choose to Reset Video Settings to ...
Owners Guide
Page 77
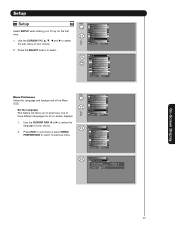
...Power Swivel Move SEL Select Setup Menu Preference or Screen Saver Set The Inputs Set AV NET Set Closed Captions Set Monitor Out Upgrades Set Stand-By Mode Move SEL Select Menu Preference Setup the Language and background of your TV up for all on-screen displays. 1. Video Audio TV... Setup Power Swivel Move SEL Select Setup Menu Preference Screen Saver Set The Inputs Set AV NET Set Closed Captions Set Monitor Out Upgrades Set Stand-By Mode Move SEL Select Setup Menu Preference Set The Language : Set The Menu Background : Move SEL Return English Shaded On-Screen Display 77...
...Power Swivel Move SEL Select Setup Menu Preference or Screen Saver Set The Inputs Set AV NET Set Closed Captions Set Monitor Out Upgrades Set Stand-By Mode Move SEL Select Menu Preference Setup the Language and background of your TV up for all on-screen displays. 1. Video Audio TV... Setup Power Swivel Move SEL Select Setup Menu Preference Screen Saver Set The Inputs Set AV NET Set Closed Captions Set Monitor Out Upgrades Set Stand-By Mode Move SEL Select Setup Menu Preference Set The Language : Set The Menu Background : Move SEL Return English Shaded On-Screen Display 77...

Owners Guide
Page 78
... Picture Moving and Image Power options. 2. Setup Menu Preference Screen Saver Set The Inputs Set AV NET Set Closed Captions Set Monitor Out Upgrades Set Stand-by Mode Move SEL Select Setup Screen Saver Main Picture Moving : Image Power : Screen Wipe : Option 1 Max Wipe Automatic Power Saving Yes No Move SEL...
... Picture Moving and Image Power options. 2. Setup Menu Preference Screen Saver Set The Inputs Set AV NET Set Closed Captions Set Monitor Out Upgrades Set Stand-by Mode Move SEL Select Setup Screen Saver Main Picture Moving : Image Power : Screen Wipe : Option 1 Max Wipe Automatic Power Saving Yes No Move SEL...
Owners Guide
Page 79
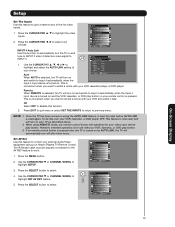
...AV NET feature to Input 4 automatically, when the Input 4 input device is selected, the TV will turn your VCR and watch a movie with your Hitachi Plasma TV Remote Control. Press the SELECT button to any remote control button will turn the TV on your TV as described above. 2. Menu Preference... Screen Saver Set The Inputs Set AV NET 5. Set Closed Captions Set Monitor Out Upgrades Set Stand-by AUTO LINK, the TV will automatically turn on . Setup Set The Inputs Use this feature to give a name to select. Setup Menu Preference...
...AV NET feature to Input 4 automatically, when the Input 4 input device is selected, the TV will turn your VCR and watch a movie with your Hitachi Plasma TV Remote Control. Press the SELECT button to any remote control button will turn the TV on your TV as described above. 2. Menu Preference... Screen Saver Set The Inputs Set AV NET 5. Set Closed Captions Set Monitor Out Upgrades Set Stand-by AUTO LINK, the TV will automatically turn on . Setup Set The Inputs Use this feature to give a name to select. Setup Menu Preference...

Owners Guide
Page 87
... PIP SURF is on the broadcaster. Setup Menu Preference Screen Saver Set The Inputs Set AV NET Set Closed Captions Set Monitor Out Upgrades Set Stand-by region). 4 is sometimes used for a third language (may vary by Mode Move SEL Select Caption Display: ON/OFF will not work when viewing a 480p...
... PIP SURF is on the broadcaster. Setup Menu Preference Screen Saver Set The Inputs Set AV NET Set Closed Captions Set Monitor Out Upgrades Set Stand-by region). 4 is sometimes used for a third language (may vary by Mode Move SEL Select Caption Display: ON/OFF will not work when viewing a 480p...

Owners Guide
Page 88
... the Plasma TV Volume Up/Down. Setup Menu Preference Screen Saver Set The Inputs Set AV NET Set Closed Captions Set Monitor Out Upgrades Set Stand-by changing the volume of the TV. Video In : Fixed Move SEL Return Fixed Select AUDIO OUT FIXED to have Audio volume that can control...
... the Plasma TV Volume Up/Down. Setup Menu Preference Screen Saver Set The Inputs Set AV NET Set Closed Captions Set Monitor Out Upgrades Set Stand-by changing the volume of the TV. Video In : Fixed Move SEL Return Fixed Select AUDIO OUT FIXED to have Audio volume that can control...
Owners Guide
Page 89
... highlight UPGRADE NOW. 3. If a future software upgrade is required for your TV, HITACHI will cancel the upgrade. Insert MMC CARD 2. Setup Menu Preference Screen Saver Set The Inputs Set AV NET Set Closed Captions Set Monitor Out Upgrades Set Stand-by using a flash card (MMC CARD). Press the CURSOR PAD ̆ or...
... highlight UPGRADE NOW. 3. If a future software upgrade is required for your TV, HITACHI will cancel the upgrade. Insert MMC CARD 2. Setup Menu Preference Screen Saver Set The Inputs Set AV NET Set Closed Captions Set Monitor Out Upgrades Set Stand-by using a flash card (MMC CARD). Press the CURSOR PAD ̆ or...

Owners Guide
Page 90
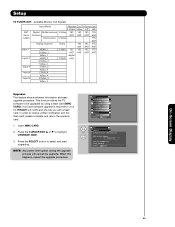
... devices have a power save feature, in which the device automatically powers OFF when not in use the IEEE1394 function while in Stand-By, please set this option. The IEEE Stand-By function must be set to OFF to return your TV will the TV be set to avoid causing injury. This feature... mode to ON, will no longer be able to control a device that the path of 30° (left . 4. IEEE1394 Stand-By Move SEL Return Power Swivel This feature controls the motorized stand. Use the CURSOR PAD ̇ or ̈ to ON or OFF. Exit the OSD menu system before controlling the motorized...
... devices have a power save feature, in which the device automatically powers OFF when not in use the IEEE1394 function while in Stand-By, please set this option. The IEEE Stand-By function must be set to OFF to return your TV will the TV be set to avoid causing injury. This feature... mode to ON, will no longer be able to control a device that the path of 30° (left . 4. IEEE1394 Stand-By Move SEL Return Power Swivel This feature controls the motorized stand. Use the CURSOR PAD ̇ or ̈ to ON or OFF. Exit the OSD menu system before controlling the motorized...
Owners Guide
Page 96
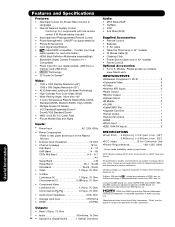
.... VHF-Band 2 ~ 13 UHF-Band 14 ~ 69 CATV Mid Band A-5 ~ A-1 A-I Super Band J-W Hyper Band W+1 - Please access www.hitachi.com/tv for detailed specifications and dimensions for Consumer Use •Power Requirements 108-132V, 60Hz 1 Screen mode availability varies by BBE Sound, Inc. W+... • TruBass • 40W • Soft Mute (50%) Supplied Accessories: • Remote Control • Batteries • 6' AC Cable • Table Top Stand (only in 42" models) • IR Mouse Cable (2) • Cleaning Cloth • Power Swivel Cable (only in 42" models) • Ferrite Core ...
.... VHF-Band 2 ~ 13 UHF-Band 14 ~ 69 CATV Mid Band A-5 ~ A-1 A-I Super Band J-W Hyper Band W+1 - Please access www.hitachi.com/tv for detailed specifications and dimensions for Consumer Use •Power Requirements 108-132V, 60Hz 1 Screen mode availability varies by BBE Sound, Inc. W+... • TruBass • 40W • Soft Mute (50%) Supplied Accessories: • Remote Control • Batteries • 6' AC Cable • Table Top Stand (only in 42" models) • IR Mouse Cable (2) • Cleaning Cloth • Power Swivel Cable (only in 42" models) • Ferrite Core ...

Owners Guide
Page 97
Set Dimensions 42 Inch Models (Includes Table Top Stand) Weight (lbs./kg): 98/44.5 55 Inch Models (Plasma Television Only) Weight (lbs./kg): 135.6/61.5 97 Useful Information
Set Dimensions 42 Inch Models (Includes Table Top Stand) Weight (lbs./kg): 98/44.5 55 Inch Models (Plasma Television Only) Weight (lbs./kg): 135.6/61.5 97 Useful Information

Owners Guide
Page 101
... Setup Move SEL Select 3. Setup Menu Preference Screen Saver Set The Inputs Set AV NET Set Closed Captions Set Monitor Out CableCARD Information Upgrades Set Stand-By Mode Move SEL Select 4. Diagnostics Info. Press the MENU button on the Remote Control to highlight CableCARD Information and press the SELECT button. 5. Use...
... Setup Move SEL Select 3. Setup Menu Preference Screen Saver Set The Inputs Set AV NET Set Closed Captions Set Monitor Out CableCARD Information Upgrades Set Stand-By Mode Move SEL Select 4. Diagnostics Info. Press the MENU button on the Remote Control to highlight CableCARD Information and press the SELECT button. 5. Use...


