Owners Guide
Page 2
...are used if the screen is idle. Connecting to turn the plasma display left or right within ± 30 degree using the remote control. Power Swivel Feature (TV model only) It allows to an Audio Visual Device • Two composite/S terminals*1, three composite terminals*2, two component terminals*2,...only) have some tiny bright or dark spots. Please note that this is normal. Free from electromagnetic interferences from geomagnetic sources and ambient power lines, the panel produces high-quality display images free from the Menu screen. Further, the on for the end user of this ...
...are used if the screen is idle. Connecting to turn the plasma display left or right within ± 30 degree using the remote control. Power Swivel Feature (TV model only) It allows to an Audio Visual Device • Two composite/S terminals*1, three composite terminals*2, two component terminals*2,...only) have some tiny bright or dark spots. Please note that this is normal. Free from electromagnetic interferences from geomagnetic sources and ambient power lines, the panel produces high-quality display images free from the Menu screen. Further, the on for the end user of this ...
Owners Guide
Page 3
...tumble measures 13 Connecting to an Audio Visual Device 14 Connecting to a PC 16 Mounting the Speaker Unit 17 Mounting the Side Input 19 Power Cord Connection 20 OPERATING INSTRUCTIONS 21 Turning Power On and Off 21 Input Switching 22 Size Switching 22 Volume Adjustment 24 Audio Mute 24... 40 PICTURE MENU (RGB mode 43 AUDIO MENU 44 TIMER MENU 45 LANGUAGE MENU 45 OTHER FUNCTIONS 46 Automatic Store 46 Audio Switching 47 Power Save Mode 48 DVD Player/STB Selection 48 Signal Check (RGB mode 49 TROUBLESHOOTING 50 Symptoms That Seemingly Appear to be trademarks or registered ...
...tumble measures 13 Connecting to an Audio Visual Device 14 Connecting to a PC 16 Mounting the Speaker Unit 17 Mounting the Side Input 19 Power Cord Connection 20 OPERATING INSTRUCTIONS 21 Turning Power On and Off 21 Input Switching 22 Size Switching 22 Volume Adjustment 24 Audio Mute 24... 40 PICTURE MENU (RGB mode 43 AUDIO MENU 44 TIMER MENU 45 LANGUAGE MENU 45 OTHER FUNCTIONS 46 Automatic Store 46 Audio Switching 47 Power Save Mode 48 DVD Player/STB Selection 48 Signal Check (RGB mode 49 TROUBLESHOOTING 50 Symptoms That Seemingly Appear to be trademarks or registered ...
Owners Guide
Page 4
...and/or broken, it could result in fire or electrical shock. Never disassemble or modify the monitor. Use only the correct power outlet. The contents will be clearly indicated in an illustration or nearby (the symbol to the left indicates that the smoke ..., no sound, excessive sound, damaged casing, elements, cables, penetration of the monitor or just after switching off the power switch, disconnect the power plug from the power outlet and contact your monitor due to overheating. This symbol indicates a prohibited action. Do not disassemble. WARNING CAUTION This...
...and/or broken, it could result in fire or electrical shock. Never disassemble or modify the monitor. Use only the correct power outlet. The contents will be clearly indicated in an illustration or nearby (the symbol to the left indicates that the smoke ..., no sound, excessive sound, damaged casing, elements, cables, penetration of the monitor or just after switching off the power switch, disconnect the power plug from the power outlet and contact your monitor due to overheating. This symbol indicates a prohibited action. Do not disassemble. WARNING CAUTION This...

Owners Guide
Page 5
... and dry cloth to its original position. Ensure the fuse cover is returned to clean the power plug. • Insert the power plug into a power outlet firmly. Be careful in handling the power cord and external connection cables. If swallowed consult a physician immediately for replacement of the obsolete... receptacles, and the point where they exit from children and pets. Incorrect connection of the battery could lead to the power cord and cables. power cord. Do not apply too much heat, pressure or tension to impaired performance. If you wish to extend the lead...
... and dry cloth to its original position. Ensure the fuse cover is returned to clean the power plug. • Insert the power plug into a power outlet firmly. Be careful in handling the power cord and external connection cables. If swallowed consult a physician immediately for replacement of the obsolete... receptacles, and the point where they exit from children and pets. Incorrect connection of the battery could lead to the power cord and cables. power cord. Do not apply too much heat, pressure or tension to impaired performance. If you wish to extend the lead...

Owners Guide
Page 6
...not leave stationary images appearing for prolonged periods of the monitor. Avoid a high temperature environment. Disconnect the plug from the power outlet. Tips to move them at appropriate intervals of the monitor. Use special caution in households where children are present. The... a ventilation hole of the phosphor will get fatigued after viewing the monitor for complete separation. • For safety purposes, disconnect the power cord if the monitor is oil, smoke or humidity. If it . • Always vibrating or strongly vibrating places. • Distorted...
...not leave stationary images appearing for prolonged periods of the monitor. Avoid a high temperature environment. Disconnect the plug from the power outlet. Tips to move them at appropriate intervals of the monitor. Use special caution in households where children are present. The... a ventilation hole of the phosphor will get fatigued after viewing the monitor for complete separation. • For safety purposes, disconnect the power cord if the monitor is oil, smoke or humidity. If it . • Always vibrating or strongly vibrating places. • Distorted...

Owners Guide
Page 7
... you transport this monitor influences Radio receivers by turning off and withdraw the power plug before making or changing connections. - Do ensure that all connections, (including the power plug, extension leads and interconnections between the pieces of this . Plug the power cord of the cabinet that for the cable connection - Any interfering radiation...
... you transport this monitor influences Radio receivers by turning off and withdraw the power plug before making or changing connections. - Do ensure that all connections, (including the power plug, extension leads and interconnections between the pieces of this . Plug the power cord of the cabinet that for the cable connection - Any interfering radiation...

Owners Guide
Page 8
... retention when displaying images of identical patterns, such as the display time. • The tendency of the phosphor is not a malfunction. About the power swivel • Do not put hands or faces close to occur, so please be dark spots (points that do not indicate a malfunction. a]... where children are present. (Refer to be made of finely processed glass. Situations and effective usage methods related to ghosting are displayed to Power Swivel shown on the entire screen as a DVD. * Please be reduced by means of electrical discharges inside the panel. For example, ...
... retention when displaying images of identical patterns, such as the display time. • The tendency of the phosphor is not a malfunction. About the power swivel • Do not put hands or faces close to occur, so please be dark spots (points that do not indicate a malfunction. a]... where children are present. (Refer to be made of finely processed glass. Situations and effective usage methods related to ghosting are displayed to Power Swivel shown on the entire screen as a DVD. * Please be reduced by means of electrical discharges inside the panel. For example, ...

Owners Guide
Page 9
...the adjustment buttons. Handgrips Handgrips External speaker terminals 16 Rear Handgrips External speaker terminals 16 External device connection terminals RGB input terminals 16 9 Main power switch 21 (32) (37) (42) Caution when moving the main unit • As this product is heavy, whenever it should be... button 22 VOLUME ̄ ̆ (OK button) UP/DOWN buttons 24 ( ADJUST buttons) CHANNEL UP/DOWN buttons (SELECT button) 22 SUB-POWER button 21 • ( ) indicates the function while the MENU is located at the base on the screen. Remote-control 10 receiver Indicating lamp 21...
...the adjustment buttons. Handgrips Handgrips External speaker terminals 16 Rear Handgrips External speaker terminals 16 External device connection terminals RGB input terminals 16 9 Main power switch 21 (32) (37) (42) Caution when moving the main unit • As this product is heavy, whenever it should be... button 22 VOLUME ̄ ̆ (OK button) UP/DOWN buttons 24 ( ADJUST buttons) CHANNEL UP/DOWN buttons (SELECT button) 22 SUB-POWER button 21 • ( ) indicates the function while the MENU is located at the base on the screen. Remote-control 10 receiver Indicating lamp 21...

Owners Guide
Page 10
... responsiveness, replace the batteries. • Strong light such as marked on the photoreceptor of use new and old batteries together. COMPONENT NAMES (continued) Remote control POWER ON/OFF button INPUT SELECT buttons MENU button OK button SOUND MODE button VOLUME UP/DOWN button PROGRAM SELECT buttons (TV) MULTI MODE button T/TEXT...
... responsiveness, replace the batteries. • Strong light such as marked on the photoreceptor of use new and old batteries together. COMPONENT NAMES (continued) Remote control POWER ON/OFF button INPUT SELECT buttons MENU button OK button SOUND MODE button VOLUME UP/DOWN button PROGRAM SELECT buttons (TV) MULTI MODE button T/TEXT...

Owners Guide
Page 13
...or pillar Using a commercially available cord, chain and clamp, secure the set firmly in position. CAUTION Loosen a cord or chain enough while operating power swivel to avoid possible physical injury. CAUTION • In order to the clamping screw holes on a level table where the stand is secure. ... Clamp Cord or chain Wall or Pillar Anti-tumble measures CAUTION Have this product. Securing to a firm wall or pillar. Please note that the power switch of 10cm (4 inches : For a desktop set to prevent an internal temperature increase, maintain a space of this device is turned off. ...
...or pillar Using a commercially available cord, chain and clamp, secure the set firmly in position. CAUTION Loosen a cord or chain enough while operating power swivel to avoid possible physical injury. CAUTION • In order to the clamping screw holes on a level table where the stand is secure. ... Clamp Cord or chain Wall or Pillar Anti-tumble measures CAUTION Have this product. Securing to a firm wall or pillar. Please note that the power switch of 10cm (4 inches : For a desktop set to prevent an internal temperature increase, maintain a space of this device is turned off. ...
Owners Guide
Page 14
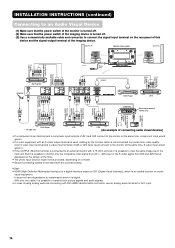
...input. 14 Speaker (R) Monitor (rear panel) Speaker (L) To component input terminals To component output terminals To audio output terminals Power cord To composite output terminal To audio output terminals To composite input terminals To audio input terminals To composite output terminals To audio...same image as connecting with the provided clamp. INSTALLATION INSTRUCTIONS (continued) Connecting to an Audio Visual Device (1) Make sure that the power switch of the monitor is turned off . (3) Use a commercially available cable and connector to connect the signal input terminal on ...
...input. 14 Speaker (R) Monitor (rear panel) Speaker (L) To component input terminals To component output terminals To audio output terminals Power cord To composite output terminal To audio output terminals To composite input terminals To audio input terminals To composite output terminals To audio...same image as connecting with the provided clamp. INSTALLATION INSTRUCTIONS (continued) Connecting to an Audio Visual Device (1) Make sure that the power switch of the monitor is turned off . (3) Use a commercially available cable and connector to connect the signal input terminal on ...

Owners Guide
Page 15
... use the double-shielded cable (not provided) for RF LEADS to reduce the noise. 15 Please use CATV net or outdoor antenna. • Keep the power cord as far away from interference to connect the antenna. If other types of adaptors are used, be sure that a good antenna adaptor is free...
... use the double-shielded cable (not provided) for RF LEADS to reduce the noise. 15 Please use CATV net or outdoor antenna. • Keep the power cord as far away from interference to connect the antenna. If other types of adaptors are used, be sure that a good antenna adaptor is free...
Owners Guide
Page 16
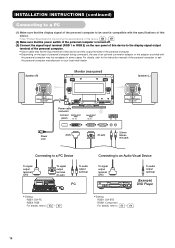
Speaker (R) Monitor (rear panel) Speaker (L) Power cable connector Power cord (DVI) (D-sub) 3.5mm Stereo mini jack Connecting to a PC Device To signal output terminal (DVI) To signal output terminal (D-sub) To audio output terminal ... is compatible with the specifications of this device. • See "Product Specifications" concerning the specifications of this device. 53 ȁ 57 (2) Make sure that the power switch of the personal computer is turned off. (3) Connect the signal input terminal (RGB 1 or RGB 2) on the rear panel of this device to the...
Speaker (R) Monitor (rear panel) Speaker (L) Power cable connector Power cord (DVI) (D-sub) 3.5mm Stereo mini jack Connecting to a PC Device To signal output terminal (DVI) To signal output terminal (D-sub) To audio output terminal ... is compatible with the specifications of this device. • See "Product Specifications" concerning the specifications of this device. 53 ȁ 57 (2) Make sure that the power switch of the personal computer is turned off. (3) Connect the signal input terminal (RGB 1 or RGB 2) on the rear panel of this device to the...

Owners Guide
Page 17
... wire ends Pull off the screws Rear of the monitor Speaker System Monitor Speaker holder Screws x 4 Speaker holder Screws x 4 NOTE In case that the main power swich of the monitor 2. Attach the speaker connecting cables to the monitor. (Make sure the ferrite core is opposite on the Right and Left speaker...
... wire ends Pull off the screws Rear of the monitor Speaker System Monitor Speaker holder Screws x 4 Speaker holder Screws x 4 NOTE In case that the main power swich of the monitor 2. Attach the speaker connecting cables to the monitor. (Make sure the ferrite core is opposite on the Right and Left speaker...

Owners Guide
Page 18
How to connect the speaker cables (Speaker side) Hold down the lever Insert the wire Release the lever CAUTION Make sure to secure the power cable and the connecting cables for other audio visual devices, except the speaker connecting cables, to the Red side. colored wire to the clamp of ...
How to connect the speaker cables (Speaker side) Hold down the lever Insert the wire Release the lever CAUTION Make sure to secure the power cable and the connecting cables for other audio visual devices, except the speaker connecting cables, to the Red side. colored wire to the clamp of ...

Owners Guide
Page 20
... completing all other connections. ...42, 32 ᕃ ᕄ Connect the power cord, after completing all other connections. ...37 ᕃ ᕄ ᕃ Connect the power cord to this device. ᕄ Connect the power cord plug to the power outlet. (The type of plug is different from this drawing for some countries....) CAUTION • Use only the power cord provided. (Ask your local retail dealer about the power cord for AV monitor) • Do not use a power supply voltage other than that indicated (AC100-240V, 50/60Hz) as this may cause...
... completing all other connections. ...42, 32 ᕃ ᕄ Connect the power cord, after completing all other connections. ...37 ᕃ ᕄ ᕃ Connect the power cord to this device. ᕄ Connect the power cord plug to the power outlet. (The type of plug is different from this drawing for some countries....) CAUTION • Use only the power cord provided. (Ask your local retail dealer about the power cord for AV monitor) • Do not use a power supply voltage other than that indicated (AC100-240V, 50/60Hz) as this may cause...

Owners Guide
Page 21
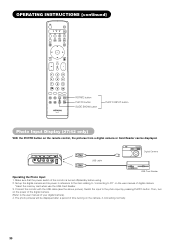
... ON position, and the monitor can then be turned ON/OFF using the SUB POWER button or the power button on the remote control. See "Power Save Mode" or "Symptoms That Seemingly Appear to be powered on upon recovery from such operation. • Turn off at short time intervals....Sync. Failures might result from the failure. ENGLISH OPERATING INSTRUCTIONS Main power switch Indicating lamp (32) (37) (42) SUB-POWER button POWER ON/OFF button Turning Power On and Off • To turn the monitor power ON, press the main power switch on the monitor main unit to ON, and then press ...
... ON position, and the monitor can then be turned ON/OFF using the SUB POWER button or the power button on the remote control. See "Power Save Mode" or "Symptoms That Seemingly Appear to be powered on upon recovery from such operation. • Turn off at short time intervals....Sync. Failures might result from the failure. ENGLISH OPERATING INSTRUCTIONS Main power switch Indicating lamp (32) (37) (42) SUB-POWER button POWER ON/OFF button Turning Power On and Off • To turn the monitor power ON, press the main power switch on the monitor main unit to ON, and then press ...
Owners Guide
Page 25
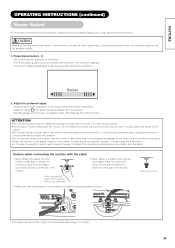
...allows turning the plasma display left locks of the connector and pull out downward. • Make sure that the main power switch of using the power swivel function. It could cause troubles. • Do not get on the rear of the monitor is correct. Swiveling... a physical injury. Adjust by hands while using the monitor wall mounted, be provided depending on the screen. ENGLISH OPERATING INSTRUCTIONS (continued) Power Swivel • This feature controls the motorized stand. Use special caution in swiveling area. It would not operate correctly. ATTENTION • ...
...allows turning the plasma display left locks of the connector and pull out downward. • Make sure that the main power switch of using the power swivel function. It could cause troubles. • Do not get on the rear of the monitor is correct. Swiveling... a physical injury. Adjust by hands while using the monitor wall mounted, be provided depending on the screen. ENGLISH OPERATING INSTRUCTIONS (continued) Power Swivel • This feature controls the motorized stand. Use special caution in swiveling area. It would not operate correctly. ATTENTION • ...
Owners Guide
Page 28
... diagram to the right. • Pressing the MULTI PICTURE button again will occur if display is left in the Setup Menu should be set to power save mode. • Please be careful since image retention will cancel the 2 pictures display. • "Frequency Mode" in a multi picture display state for TV Main...
... diagram to the right. • Pressing the MULTI PICTURE button again will occur if display is left in the Setup Menu should be set to power save mode. • Please be careful since image retention will cancel the 2 pictures display. • "Frequency Mode" in a multi picture display state for TV Main...
Owners Guide
Page 30
... monitor is turned off/standby before using. 2. Connect the monitor with the USB cable (see the above picture). Set up the digital camera and its power in reference to the item relating to "connecting to PC" on the user manual of your digital camera). 4. Switch the input to the user manual..., if connecting normally. 30 USB cable Digital Camera USB Card Reader Operating the Photo Input 1. The photo pictures will be displayed. Make sure that the power switch of time turning on the power of the digital camera. (Refer to the photo input by pressing PHOTO button.
... monitor is turned off/standby before using. 2. Connect the monitor with the USB cable (see the above picture). Set up the digital camera and its power in reference to the item relating to "connecting to PC" on the user manual of your digital camera). 4. Switch the input to the user manual..., if connecting normally. 30 USB cable Digital Camera USB Card Reader Operating the Photo Input 1. The photo pictures will be displayed. Make sure that the power switch of time turning on the power of the digital camera. (Refer to the photo input by pressing PHOTO button.


