
Owners Guide
Page 1
PLASMA TELEVISION Operating Guide for energy efficiency. CH1 Updated 12/13/2007 has determined that this product meets the Energy Star® guidelines for 42HDS69 and 55HDS69 IMPORTANT SAFETY INSTRUCTIONS 2-3 FIRST TIME USE ...4-22 THE REMOTE CONTROL...23-34 ON-SCREEN DISPLAY ...35-59 USEFUL INFORMATION...60-66 END USER LICENSE AGREEMENT FOR HITACHI DTV SOFTWARE 67-75 APPENDIXES...76-77 INDEX...78 As an Energy Star® Partner, Hitachi, Ltd.
PLASMA TELEVISION Operating Guide for energy efficiency. CH1 Updated 12/13/2007 has determined that this product meets the Energy Star® guidelines for 42HDS69 and 55HDS69 IMPORTANT SAFETY INSTRUCTIONS 2-3 FIRST TIME USE ...4-22 THE REMOTE CONTROL...23-34 ON-SCREEN DISPLAY ...35-59 USEFUL INFORMATION...60-66 END USER LICENSE AGREEMENT FOR HITACHI DTV SOFTWARE 67-75 APPENDIXES...76-77 INDEX...78 As an Energy Star® Partner, Hitachi, Ltd.
Owners Guide
Page 4
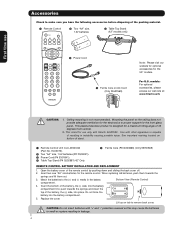
...batteries (P# FQ00021). » Power Cord (P# EV01841). ¿ Table Top Stand (P# QJ02681) 42" Only. ´ Ferrite Core (P# GX00666) (Only 55HDS69) REMOTE CONTROL BATTERY INSTALLATION AND REPLACEMENT 1. Insert two new "AA" size batteries for use » Power Cord ´ Ferrite Core on AC Cord (Only... 55HDS69) Note: Please visit our website for optional accessories for the front glass panel. Ceiling mounting is not recommended. Replace the cover. This stand for the remote control. models: For optional accessories, please access our web site at: www.hitachi.us/tv ...
...batteries (P# FQ00021). » Power Cord (P# EV01841). ¿ Table Top Stand (P# QJ02681) 42" Only. ´ Ferrite Core (P# GX00666) (Only 55HDS69) REMOTE CONTROL BATTERY INSTALLATION AND REPLACEMENT 1. Insert two new "AA" size batteries for use » Power Cord ´ Ferrite Core on AC Cord (Only... 55HDS69) Note: Please visit our website for optional accessories for the front glass panel. Ceiling mounting is not recommended. Replace the cover. This stand for the remote control. models: For optional accessories, please access our web site at: www.hitachi.us/tv ...

Owners Guide
Page 10
.... Video Cassette Recorder/Player SAT- To control TV functions, please point the remote control directly at the remote control sensor for a complete description of all of the functions on the right bottom portion of your HITACHI Plasma TV, the new remote control is designed to Select/Activate the highlighted menu item. Please see pages...
.... Video Cassette Recorder/Player SAT- To control TV functions, please point the remote control directly at the remote control sensor for a complete description of all of the functions on the right bottom portion of your HITACHI Plasma TV, the new remote control is designed to Select/Activate the highlighted menu item. Please see pages...
Owners Guide
Page 11
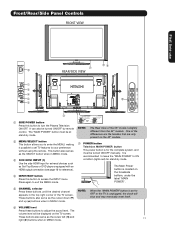
... buttons also serve as the cursor down (̄) and up (̆) buttons when in MENU mode. The "MAIN POWER" button must be at stand-by remote control. Firmly bind the cables. Hook the band to turn the Plasma Television ON/OFF. Press again to ON condition (lights red) for the complete... handles that are only present on the TV screen. NOTE: When the "MAIN POWER" button is set TV features to your preference without using the remote. These buttons also serve as the cursor left (̇) and 11 right (̈) buttons when in MENU mode. It can also be displayed on the...
... buttons also serve as the cursor down (̄) and up (̆) buttons when in MENU mode. The "MAIN POWER" button must be at stand-by remote control. Firmly bind the cables. Hook the band to turn the Plasma Television ON/OFF. Press again to ON condition (lights red) for the complete... handles that are only present on the TV screen. NOTE: When the "MAIN POWER" button is set TV features to your preference without using the remote. These buttons also serve as the cursor left (̇) and 11 right (̈) buttons when in MENU mode. It can also be displayed on the...
Owners Guide
Page 12
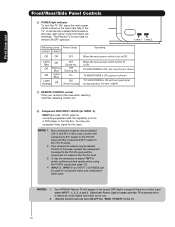
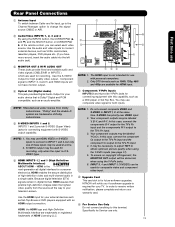
.... ቫ Component SIDE INPUT JACKS (for INPUT: 5) INPUT 5 provide Y-PBPR jacks for composite video and component video input. signal). ቪ REMOTE CONTROL sensor Point your remote at this input. NOTES: 1. Your component outputs may be turned OFF (lights orange) if there is turned off or in Stand-by mode... TV ON, press the main power switch located on the lower right corner of the front bezel will appear to be labeled Y-CBCR. Your HITACHI Plasma TV will illuminate. Check the Power Light to make sure the TV is no picture is ON ; Lamp 1 Lamp 2 Indicating Lamp ...
.... ቫ Component SIDE INPUT JACKS (for INPUT: 5) INPUT 5 provide Y-PBPR jacks for composite video and component video input. signal). ቪ REMOTE CONTROL sensor Point your remote at this input. NOTES: 1. Your component outputs may be turned OFF (lights orange) if there is turned off or in Stand-by mode... TV ON, press the main power switch located on the lower right corner of the front bezel will appear to be labeled Y-CBCR. Your HITACHI Plasma TV will illuminate. Check the Power Light to make sure the TV is no picture is ON ; Lamp 1 Lamp 2 Indicating Lamp ...
Owners Guide
Page 13
... (see page 37). 5. Your component outputs may be necessary to adjust TINT to the TV's PR input. 4. It may be used at the same time. HITACHI will not have mono sound, insert the audio cable into the left audio jack). ቨ ቫ ቩ ቧ ቤ MONITOR OUT & HI-FI AUDIO ... INPUTS 1, 2, 3 and 4 By using the INPUTS button, the CURSOR PAD (̆ ቪ and ̄), and the SELECT button or CURSOR PAD ̈ of the remote control, you can be used for composite video and component video input. ቩ Upgrade Card This card slot is for future software upgrades. HDMI is...
... (see page 37). 5. Your component outputs may be necessary to adjust TINT to the TV's PR input. 4. It may be used at the same time. HITACHI will not have mono sound, insert the audio cable into the left audio jack). ቨ ቫ ቩ ቧ ቤ MONITOR OUT & HI-FI AUDIO ... INPUTS 1, 2, 3 and 4 By using the INPUTS button, the CURSOR PAD (̆ ቪ and ̄), and the SELECT button or CURSOR PAD ̈ of the remote control, you can be used for composite video and component video input. ቩ Upgrade Card This card slot is for future software upgrades. HDMI is...

Owners Guide
Page 16
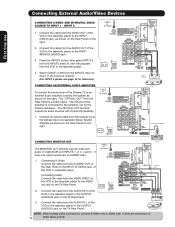
... signal. Back of video and audio inputs and outputs. Right Side Panel Left Side Panel INPUT 5 R L/MONO AUDIO PR PB Y / VIDEO On-Screen Display The Remote Control First time use to connect the VCR, camcorder, laserdisc player, DVD player, or HDTV Set Top Box to accommodate your choice (see page 26...
... signal. Back of video and audio inputs and outputs. Right Side Panel Left Side Panel INPUT 5 R L/MONO AUDIO PR PB Y / VIDEO On-Screen Display The Remote Control First time use to connect the VCR, camcorder, laserdisc player, DVD player, or HDTV Set Top Box to accommodate your choice (see page 26...
Owners Guide
Page 22
... select INPUT 2 from the Rear Panel is controlled by the amplifier, not by the Plasma Television. Connecting External Audio/Video Devices On-Screen Display The Remote Control First time use CONNECTING A VIDEO AND MONAURAL AUDIO SOURCE TO INPUT 1 ~ INPUT 5 CABLE or Air signal 1.
... select INPUT 2 from the Rear Panel is controlled by the amplifier, not by the Plasma Television. Connecting External Audio/Video Devices On-Screen Display The Remote Control First time use CONNECTING A VIDEO AND MONAURAL AUDIO SOURCE TO INPUT 1 ~ INPUT 5 CABLE or Air signal 1.

Owners Guide
Page 23
...the cable box and press the CABLE (CBL) button. The Remote Control The Remote Control In addition to controlling all the functions on your HITACHI Plasma Television , the new remote control is designed to control your SAT). The remote will now control your DVD player (see page 32 for ...instructions on how to program the remote to control your DVD player, point the remote at the remote sensor of the ...
...the cable box and press the CABLE (CBL) button. The Remote Control The Remote Control In addition to controlling all the functions on your HITACHI Plasma Television , the new remote control is designed to control your SAT). The remote will now control your DVD player (see page 32 for ...instructions on how to program the remote to control your DVD player, point the remote at the remote sensor of the ...
Owners Guide
Page 24
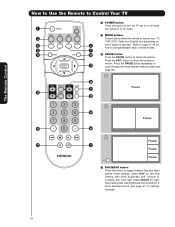
... How to Use the Remote to Control Your TV ³ POWER button Press this button to toggle between each of these modes. ´ ¶ º µ » PAUSE button Press ... EXIT ¿ DAY/NIGHT button Press this button to turn the TV set on or off when ³ the remote is in TV mode. · MODE buttons · These buttons allow the remote to control your TV, VCR, DVD, Cable box/Satellite box depending on ² ¿ which button is pressed. Refer...
... How to Use the Remote to Control Your TV ³ POWER button Press this button to toggle between each of these modes. ´ ¶ º µ » PAUSE button Press ... EXIT ¿ DAY/NIGHT button Press this button to turn the TV set on or off when ³ the remote is in TV mode. · MODE buttons · These buttons allow the remote to control your TV, VCR, DVD, Cable box/Satellite box depending on ² ¿ which button is pressed. Refer...
Owners Guide
Page 25
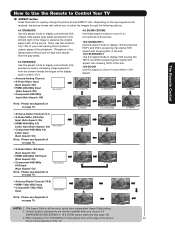
... aspect mode to display 16:9 sources like HDTV and DVD's preserving the original 16:9 aspect ratio showing 100% of the TV. The Remote Control How to Use the Remote to Control Your TV ´ ASPECT button Press this button to Zoom-in once while in 16:9 aspect. Phosphors in the lighted area...
... aspect mode to display 16:9 sources like HDTV and DVD's preserving the original 16:9 aspect ratio showing 100% of the TV. The Remote Control How to Use the Remote to Control Your TV ´ ASPECT button Press this button to Zoom-in once while in 16:9 aspect. Phosphors in the lighted area...

Owners Guide
Page 26
...On-Screen Display. ¾ GUIDE button [Cable Box (CBL), Satellite Receiver (SAT) modes only] The use of this button is only applicable when the remote control is in (CBL) and (SAT/STB) mode. INPUT 4 Select to normal viewing. INFO button display for numeric entries. AIR/CABLE Select between ...Air or Cable signal. How to Use the Remote to Control Your TV ² INPUTS button When the remote control is in TV mode, press this button to choose INPUT 3. Engl DTVCC Cable 8 -1 KXYZ-HD 1080i 3:17PM The show description will not be set . The Aspect ...
...On-Screen Display. ¾ GUIDE button [Cable Box (CBL), Satellite Receiver (SAT) modes only] The use of this button is only applicable when the remote control is in (CBL) and (SAT/STB) mode. INPUT 4 Select to normal viewing. INFO button display for numeric entries. AIR/CABLE Select between ...Air or Cable signal. How to Use the Remote to Control Your TV ² INPUTS button When the remote control is in TV mode, press this button to choose INPUT 3. Engl DTVCC Cable 8 -1 KXYZ-HD 1080i 3:17PM The show description will not be set . The Aspect ...

Owners Guide
Page 27
... until you obtain the desired sound level. Enter 0 first for channels 1 to 9, or simply press the single digit channel you are used when the remote control is in Satellite (SAT) mode. ƻ LAST CHANNEL (LC) button Press this button to toggle between the current and last channel viewed. &#...444; RECORD button Press twice (two times) to record programs when the remote is in Favorite Channel mode when (FAV) is displayed and the displayed channel is turned off completely (MUTE). When the TV power is GREEN....
... until you obtain the desired sound level. Enter 0 first for channels 1 to 9, or simply press the single digit channel you are used when the remote control is in Satellite (SAT) mode. ƻ LAST CHANNEL (LC) button Press this button to toggle between the current and last channel viewed. &#...444; RECORD button Press twice (two times) to record programs when the remote is in Favorite Channel mode when (FAV) is displayed and the displayed channel is turned off completely (MUTE). When the TV power is GREEN....

Owners Guide
Page 28
... CURSOR PAD (̆ or ̄) to move with separate control. To change the PIP mode, use the CURSOR PAD button the remote. The Remote Control Picture-in-Picture (PIP) Your HITACHI Plasma TV incorporates one program at right to view VCR program as a subpicture while viewing another program as main picture (CABLE/AIR...
... CURSOR PAD (̆ or ̄) to move with separate control. To change the PIP mode, use the CURSOR PAD button the remote. The Remote Control Picture-in-Picture (PIP) Your HITACHI Plasma TV incorporates one program at right to view VCR program as a subpicture while viewing another program as main picture (CABLE/AIR...

Owners Guide
Page 29
The Remote Control Main Picture Sub Picture SWAP PIP Specifications Table PIP Mode Sub Picture Digital Channel Component/Composite/S-lN/HDMI 1080i 720p 480p 480p 480i 480i ...
The Remote Control Main Picture Sub Picture SWAP PIP Specifications Table PIP Mode Sub Picture Digital Channel Component/Composite/S-lN/HDMI 1080i 720p 480p 480p 480i 480i ...

Owners Guide
Page 30
... to freeze the sub-picture, press the PAUSE button. This is the MAIN freeze followed by the SPLIT freeze and then the STROBE freeze. The Remote Control Picture-In-Picture (PIP) ባ PAUSE button If you are currently viewing and the frozen frame will freeze). Freeze Main Picture Sub Picture Freeze...
... to freeze the sub-picture, press the PAUSE button. This is the MAIN freeze followed by the SPLIT freeze and then the STROBE freeze. The Remote Control Picture-In-Picture (PIP) ባ PAUSE button If you are currently viewing and the frozen frame will freeze). Freeze Main Picture Sub Picture Freeze...

Owners Guide
Page 31
...; code. 6. In the unlikely event that matches your cable box, as stated above. ³ CABLE (CBL) button This button allows the remote to control your cable box by setting it to CABLE mode. · PRECODED CABLE BOX buttons These buttons transmit the chosen precoded cable codes. ...» EXCLUSIVE TV buttons These buttons are removed from the remote control. The remote control will remember the codes you have programmed until the batteries are for the Cable Box. 31 CABLE BRAND Analog Type CODES HAMLIN...
...; code. 6. In the unlikely event that matches your cable box, as stated above. ³ CABLE (CBL) button This button allows the remote to control your cable box by setting it to CABLE mode. · PRECODED CABLE BOX buttons These buttons transmit the chosen precoded cable codes. ...» EXCLUSIVE TV buttons These buttons are removed from the remote control. The remote control will remember the codes you have programmed until the batteries are for the Cable Box. 31 CABLE BRAND Analog Type CODES HAMLIN...
Owners Guide
Page 32
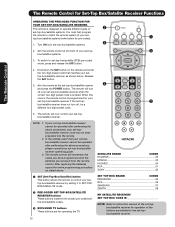
...preset code. 6. Turn ON your set -top- · box/satellite systems. 3. The remote will remember the codes you have programmed until the batteries are for operating the TV. 32 SATELLITE BRAND CODES ECOSTAR 03 HITACHI 00 HUGHES 04 RCA 01 SONY 02 SET TOP BOX BRAND CODES PANASONIC 05 RCA... 06 SAMSUNG 07 ZENITH 08 MY SATELLITE RECEIVER/ SET TOP BOX CODE IS NOTE: Refer to set -top-box/satellite systems. You must first program the remote to SET-TOPBOX/...
...preset code. 6. Turn ON your set -top- · box/satellite systems. 3. The remote will remember the codes you have programmed until the batteries are for operating the TV. 32 SATELLITE BRAND CODES ECOSTAR 03 HITACHI 00 HUGHES 04 RCA 01 SONY 02 SET TOP BOX BRAND CODES PANASONIC 05 RCA... 06 SAMSUNG 07 ZENITH 08 MY SATELLITE RECEIVER/ SET TOP BOX CODE IS NOTE: Refer to set -top-box/satellite systems. You must first program the remote to SET-TOPBOX/...
Owners Guide
Page 33
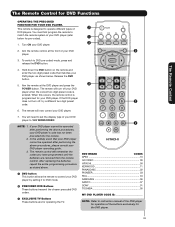
... the remote control at the DVD player and press the POWER button. You will remember the codes you have programmed until the batteries are for operating the TV. · DVD BRAND CODES APEX 10 GO VIDEO 09 HITACHI 00 KENWOOD 11 PANASONIC 02 PIONEER 03 RCA 04 SAMSUNG 06 SANYO... 07 SONY 01 TOSHIBA 05 MY DVD PLAYER CODE IS NOTE: Refer to set the display type of the buttons exclusively for DVD Functions OPERATING THE PRECODED FUNCTION FOR YOUR DVD PLAYER. The remote control ...
... the remote control at the DVD player and press the POWER button. You will remember the codes you have programmed until the batteries are for operating the TV. · DVD BRAND CODES APEX 10 GO VIDEO 09 HITACHI 00 KENWOOD 11 PANASONIC 02 PIONEER 03 RCA 04 SAMSUNG 06 SANYO... 07 SONY 01 TOSHIBA 05 MY DVD PLAYER CODE IS NOTE: Refer to set the display type of the buttons exclusively for DVD Functions OPERATING THE PRECODED FUNCTION FOR YOUR DVD PLAYER. The remote control ...

Owners Guide
Page 34
... guide. 3. NOTE: 1. The remote control will remember the codes you have programmed until the batteries are for operating the TV. 34 · · VCR BRAND CODES EMERSON 20, 21, 22, 23 ,24 FISHER 34, 37, 38, 39 FUNAI 52 GE 33 HITACHI 00, 01, 02, 03, ... 6. If your VCR cannot be operated after performing the above . 4. Release the VCR button. 5. When this » » occurs, the remote control is programmed for the VCR. This remote is entered. After replacing the batteries repeat the entire programming procedure as shown below for VCR Functions The...
... guide. 3. NOTE: 1. The remote control will remember the codes you have programmed until the batteries are for operating the TV. 34 · · VCR BRAND CODES EMERSON 20, 21, 22, 23 ,24 FISHER 34, 37, 38, 39 FUNAI 52 GE 33 HITACHI 00, 01, 02, 03, ... 6. If your VCR cannot be operated after performing the above . 4. Release the VCR button. 5. When this » » occurs, the remote control is programmed for the VCR. This remote is entered. After replacing the batteries repeat the entire programming procedure as shown below for VCR Functions The...


