Owners Guide
Page 3
...122 of the FCC rules. Operation is capable of receiving analog basic, digital basic and digital premium cable television programming by your Plasma TV This digital television is subject to the following measures: • Reorient or relocate the receiving antenna. • Increase the ... automatically so that are supplied with the instructions, may void the user's authority to radio communications. FOR MORE INFORMATION, CALL 800-HITACHI. Reverse engineering or disassembly is protected by one or more than 2.5 minutes, protection function will restore after moving ) patterns can...
...122 of the FCC rules. Operation is capable of receiving analog basic, digital basic and digital premium cable television programming by your Plasma TV This digital television is subject to the following measures: • Reorient or relocate the receiving antenna. • Increase the ... automatically so that are supplied with the instructions, may void the user's authority to radio communications. FOR MORE INFORMATION, CALL 800-HITACHI. Reverse engineering or disassembly is protected by one or more than 2.5 minutes, protection function will restore after moving ) patterns can...

Owners Guide
Page 6
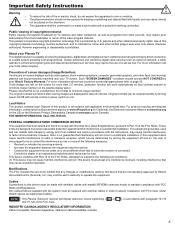
...or proper support for the Remote Control. Match the batteries to be used for P50V702 IMPORTANT SAFETY INSTRUCTIONS 2-4 FIRST TIME USE 5-17 THE REMOTE CONTROL 18-30 ON...the remote control is not going to the (+) and (-) marks in the device at : www.hitachi.us/tv CAUTION • Ceiling mounting is designed for important information related to wall mounting. When replacing old batteries...Check to make sure you have the following accessories before disposing of the arrow. 2. This plasma television product is not recommended. CAUTION • Do not insert batteries with '+' and ...
...or proper support for the Remote Control. Match the batteries to be used for P50V702 IMPORTANT SAFETY INSTRUCTIONS 2-4 FIRST TIME USE 5-17 THE REMOTE CONTROL 18-30 ON...the remote control is not going to the (+) and (-) marks in the device at : www.hitachi.us/tv CAUTION • Ceiling mounting is designed for important information related to wall mounting. When replacing old batteries...Check to make sure you have the following accessories before disposing of the arrow. 2. This plasma television product is not recommended. CAUTION • Do not insert batteries with '+' and ...
Owners Guide
Page 7
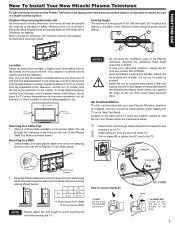
... to reduce the reflection. Using 2 commercially available wood screws fasten the set failure, do not place the TV where temperatures can be sure that could cause personal injury. Wire 50" 10 cm. 30 cm. Wire A: Power Swivel NOT USED B: Power Swivel USED NOTE Please adjust the... objects in the direction of the Plasma Television. Securing to the TV. FIRST TIME USE 30° How To Install Your New Hitachi Plasma Television To take measures to prevent the Plasma Television from tipping over and prevent possible injury it to the TV. Turning Angle The maximum turning angle...
... to reduce the reflection. Using 2 commercially available wood screws fasten the set failure, do not place the TV where temperatures can be sure that could cause personal injury. Wire 50" 10 cm. 30 cm. Wire A: Power Swivel NOT USED B: Power Swivel USED NOTE Please adjust the... objects in the direction of the Plasma Television. Securing to the TV. FIRST TIME USE 30° How To Install Your New Hitachi Plasma Television To take measures to prevent the Plasma Television from tipping over and prevent possible injury it to the TV. Turning Angle The maximum turning angle...

Owners Guide
Page 8
How To Install Your New Hitachi Plasma Television WALL MOUNTING SETUP STEP (1) : REMOVE THE TABLE TOP STAND FROM THE PLASMA TELEVISION Please remove the 4 screws shown below in the TV for the Wall Mount Bracket. Now the Table Top Stand can perform other mounting or installation orientations .... CAUTION Insertion length (B) of the Wall Mount Unit. Screw Length (A) Screw Mounting Holes (4 places). Call 800-HITACHI for any installation of this Plasma Display Panel can not be installed using wall mounting brackets/devices be within 9~11 mm. If the length is more...
How To Install Your New Hitachi Plasma Television WALL MOUNTING SETUP STEP (1) : REMOVE THE TABLE TOP STAND FROM THE PLASMA TELEVISION Please remove the 4 screws shown below in the TV for the Wall Mount Bracket. Now the Table Top Stand can perform other mounting or installation orientations .... CAUTION Insertion length (B) of the Wall Mount Unit. Screw Length (A) Screw Mounting Holes (4 places). Call 800-HITACHI for any installation of this Plasma Display Panel can not be installed using wall mounting brackets/devices be within 9~11 mm. If the length is more...

Owners Guide
Page 9
... Power Switch is set to OFF. • If Power Light Indicator Brightness is set to access the INPUT menu. TV Power is shown. NOTES • Your HITACHI Plasma TV will be displayed on the TV screen. Side Panel Jacks & Controls FRONT VIEW FIRST TIME USE CH t i CURSOR + VO_L r u INPUT/ EXIT... Blue Power Status Operating OFF OFF (Stand-by mode. picture is ON; A red standby indicator lamp located on the TV screen. The Plasma TV is selected. REMOTE CONTROL and AMBIENT LIGHT sensor Point your warranty card. CHANNEL selector Press these buttons to OFF. INPUT-3...
... Power Switch is set to OFF. • If Power Light Indicator Brightness is set to access the INPUT menu. TV Power is shown. NOTES • Your HITACHI Plasma TV will be displayed on the TV screen. Side Panel Jacks & Controls FRONT VIEW FIRST TIME USE CH t i CURSOR + VO_L r u INPUT/ EXIT... Blue Power Status Operating OFF OFF (Stand-by mode. picture is ON; A red standby indicator lamp located on the TV screen. The Plasma TV is selected. REMOTE CONTROL and AMBIENT LIGHT sensor Point your warranty card. CHANNEL selector Press these buttons to OFF. INPUT-3...

Owners Guide
Page 10
... in a single cable. This connection will allow you to control the external components with this case, connect the component CB output to the TV's PB input and the component CR output to obtain optimum picture quality when using the Y-PBPR inputs (see page 38). For Special AV ... TINT to the TV's PR input. • It may be labeled Y, B-Y, and R-Y. In this capability, such as an audio amplifier. HDMI is Dolby® Digital and PCM compatible, such as a DVD player or Set Top Box. Because digital television (DTV) signals remain in order to your Hitachi Plasma Television. (For...
... in a single cable. This connection will allow you to control the external components with this case, connect the component CB output to the TV's PB input and the component CR output to obtain optimum picture quality when using the Y-PBPR inputs (see page 38). For Special AV ... TINT to the TV's PR input. • It may be labeled Y, B-Y, and R-Y. In this capability, such as an audio amplifier. HDMI is Dolby® Digital and PCM compatible, such as a DVD player or Set Top Box. Because digital television (DTV) signals remain in order to your Hitachi Plasma Television. (For...
Owners Guide
Page 11
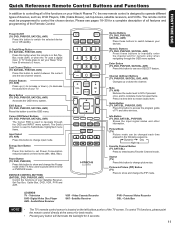
... at the sensor for best results. • Pressing any button will illuminate the backlight for a complete description of all of the functions on your Hitachi Plasma TV, the new remote control is located on three levels (Min, Med, Max). Please see pages 18~30 for 4 seconds. 11 Device Buttons...BUTTONS (SAT/CBL, DVD, PVR/VCR, AVR) Control the functions of TV and other information. Enter Button (TV, DVD, PVR/VCR, SAT/CBL, AVR) Press this button to change the PIP mode. Mute (TV, AVR) Reduces the audio level to 50% if pressed once, and to enter/access Favorite Channel mode. Press it...
... at the sensor for best results. • Pressing any button will illuminate the backlight for a complete description of all of the functions on your Hitachi Plasma TV, the new remote control is located on three levels (Min, Med, Max). Please see pages 18~30 for 4 seconds. 11 Device Buttons...BUTTONS (SAT/CBL, DVD, PVR/VCR, AVR) Control the functions of TV and other information. Enter Button (TV, DVD, PVR/VCR, SAT/CBL, AVR) Press this button to change the PIP mode. Mute (TV, AVR) Reduces the audio level to 50% if pressed once, and to enter/access Favorite Channel mode. Press it...
Owners Guide
Page 12
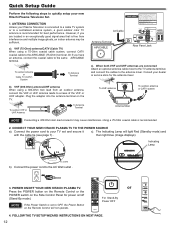
... UHF Antenna To Antenna Terminal Air/Cable Antenna Terminal Rear Panel Jack c). The Indicating Lamp will not operate. POWER ON/OFF YOUR NEW HITACHI PLASMA TV. Press the POWER button on the Remote Control or the POWER switch on the Side Control Panel for power on the... mode) and with the cable tie (see page 7) . FOLLOW THE TV SETUP WIZARD INSTRUCTIONS ON NEXT PAGE. 12 CH CURSOR + VO_L INPUT/ EXIT MENU / SELECT POWER NOTE If the Power Switch is recommended. 2. CONNECT YOUR NEW HITACHI PLASMA TV TO THE POWER SOURCE a). Quick Setup Guide Perform the following steps to quickly...
... UHF Antenna To Antenna Terminal Air/Cable Antenna Terminal Rear Panel Jack c). The Indicating Lamp will not operate. POWER ON/OFF YOUR NEW HITACHI PLASMA TV. Press the POWER button on the Remote Control or the POWER switch on the Side Control Panel for power on the... mode) and with the cable tie (see page 7) . FOLLOW THE TV SETUP WIZARD INSTRUCTIONS ON NEXT PAGE. 12 CH CURSOR + VO_L INPUT/ EXIT MENU / SELECT POWER NOTE If the Power Switch is recommended. 2. CONNECT YOUR NEW HITACHI PLASMA TV TO THE POWER SOURCE a). Quick Setup Guide Perform the following steps to quickly...

Owners Guide
Page 13
... on different channels in your Hitachi Plasma TV the Energy Savings Initial Settings screen will appear. If you select HOME mode this will save energy and is done the TV Guide On ScreenTM Setup screen as shown below will appear (refer to page 37). The TV Setup Wizard screen automatically starts...you see the screen above when you want to change the Energy Savings Initial Settings you can using the Setup Menu (refer to the TV Setup Wizard screen. Please use . This setting is selected proceed to begin scanning. Energy Savings Initial Settings Please Select HOME or RETAIL ...
... on different channels in your Hitachi Plasma TV the Energy Savings Initial Settings screen will appear. If you select HOME mode this will save energy and is done the TV Guide On ScreenTM Setup screen as shown below will appear (refer to page 37). The TV Setup Wizard screen automatically starts...you see the screen above when you want to change the Energy Savings Initial Settings you can using the Setup Menu (refer to the TV Setup Wizard screen. Please use . This setting is selected proceed to begin scanning. Energy Savings Initial Settings Please Select HOME or RETAIL ...

Owners Guide
Page 14
... to white, etc. • When making video connections, connect S-Video only or Video only. Then press the SELECT button or the CURSOR to confirm your Plasma TV is necessary for audio. The exact arrangement you do not, the played back picture may need to connect the audio output into L/Mono input jack...
... to white, etc. • When making video connections, connect S-Video only or Video only. Then press the SELECT button or the CURSOR to confirm your Plasma TV is necessary for audio. The exact arrangement you do not, the played back picture may need to connect the audio output into L/Mono input jack...

Owners Guide
Page 17
...outputs all audio sources to rear panel jacks. Match colors of video contents. • HDMI is controlled by the amplifier, not by the Plasma Television. Connect the HDMI or DVI to the Rear Panel INPUT 1 or 2 AUDIO jacks as shown on the Rear Panel on the Rear..., etc. • To return to the last channel viewed, select CABLE or AIR from the output of the HDTV set -up of the Plasma TV to HDMI Input DVI DIGITAL OHoUmTePvUidTeoCgAamPAe BsyIsLtIeTmY DVD PDlaVyDerp/laRyercorder [HDMI] DIGITAVLCORUTPUT [DVI] CamAuLcdoiordOeurtRput (White) (Red) Home video game system CONNECTING AN ...
...outputs all audio sources to rear panel jacks. Match colors of video contents. • HDMI is controlled by the amplifier, not by the Plasma Television. Connect the HDMI or DVI to the Rear Panel INPUT 1 or 2 AUDIO jacks as shown on the Rear Panel on the Rear..., etc. • To return to the last channel viewed, select CABLE or AIR from the output of the HDTV set -up of the Plasma TV to HDMI Input DVI DIGITAL OHoUmTePvUidTeoCgAamPAe BsyIsLtIeTmY DVD PDlaVyDerp/laRyercorder [HDMI] DIGITAVLCORUTPUT [DVI] CamAuLcdoiordOeurtRput (White) (Red) Home video game system CONNECTING AN ...

Owners Guide
Page 18
..., and other audio/video equipment with one touch. Use the CHANNEL SELECTOR buttons to enter one area. Enter 0 first for your Plasma TV, select TV by pressing and holding down the FAV CH button until the displayed channel turns from WHITE to control your Favorite channel list by CHANNEL...for instructions on your television. DEVICE buttons In addition to tune. Basic operation keys are used to your device. You will now control your HITACHI Plasma TV, the new remote control is in one , two, or three numbers to Favorite(FAV) channel mode. You can add any channel to ...
..., and other audio/video equipment with one touch. Use the CHANNEL SELECTOR buttons to enter one area. Enter 0 first for your Plasma TV, select TV by pressing and holding down the FAV CH button until the displayed channel turns from WHITE to control your Favorite channel list by CHANNEL...for instructions on your television. DEVICE buttons In addition to tune. Basic operation keys are used to your device. You will now control your HITACHI Plasma TV, the new remote control is in one , two, or three numbers to Favorite(FAV) channel mode. You can add any channel to ...

Owners Guide
Page 21
...day time viewing with more details about Photo Input refer to next page). 21 RECORD button Press to record programs when the remote is in TV mode, press this button to toggle between Air or Cable signal. HDMI 3 Select to freeze the picture. PAUSE button Press the PAUSE ... Use the Remote to Control your pictures from a SD Flash memory card connected to the Photo Input card slot in the side panel of the Plasma TV. (For more brightness and contrast to compete with less brightness and contrast for automatic brightness and contrast adjustment. INPUT 2 Select to choose Input 1....
...day time viewing with more details about Photo Input refer to next page). 21 RECORD button Press to record programs when the remote is in TV mode, press this button to toggle between Air or Cable signal. HDMI 3 Select to freeze the picture. PAUSE button Press the PAUSE ... Use the Remote to Control your pictures from a SD Flash memory card connected to the Photo Input card slot in the side panel of the Plasma TV. (For more brightness and contrast to compete with less brightness and contrast for automatic brightness and contrast adjustment. INPUT 2 Select to choose Input 1....

Owners Guide
Page 22
...is not inserted. 22 Date Resolution File name No. 02/08 06/13/05 2048x1536 DSC00467 Rotate Slideshow NOTES • The maximum number of your Hitachi Plasma Television. 1. Press the SELECT button to rotate selected photos either clockwise (CURSOR PAD ) and counterclockwise (CURSOR PAD ). + + or HDMI 2 HDMI...photos. • The screen may not be 8 characters (Ex. Photo Input This feature is useful for Camera File System). • This TV set . Press the CURSOR PAD or and the SELECT button to start a slideshow of the slideshow. JPEG format should be placed on a ...
...is not inserted. 22 Date Resolution File name No. 02/08 06/13/05 2048x1536 DSC00467 Rotate Slideshow NOTES • The maximum number of your Hitachi Plasma Television. 1. Press the SELECT button to rotate selected photos either clockwise (CURSOR PAD ) and counterclockwise (CURSOR PAD ). + + or HDMI 2 HDMI...photos. • The screen may not be 8 characters (Ex. Photo Input This feature is useful for Camera File System). • This TV set . Press the CURSOR PAD or and the SELECT button to start a slideshow of the slideshow. JPEG format should be placed on a ...

Owners Guide
Page 23
...right to view VCR program as a sub picture while viewing another program as main picture (CABLE/AIR Digital channel). Air or Cable signal TV REAR PANEL DVD player VVCCRR CamOcUoTrdPeUrT VIDEO L R (Yellow) (White) (Red) Home video game system REMOTE CONTROL Main Picture Sub Picture... on both the main picture and sub picture simultaneously with every press of the CURSOR PAD buttons. Picture-In Picture (PIP) Your HITACHI Plasma TV incorporates one Tuner technology designed for PIP availability. Analog channels cannot be viewed in Appendix B. • PIP MODE PICTURE-IN-PICTURE ...
...right to view VCR program as a sub picture while viewing another program as main picture (CABLE/AIR Digital channel). Air or Cable signal TV REAR PANEL DVD player VVCCRR CamOcUoTrdPeUrT VIDEO L R (Yellow) (White) (Red) Home video game system REMOTE CONTROL Main Picture Sub Picture... on both the main picture and sub picture simultaneously with every press of the CURSOR PAD buttons. Picture-In Picture (PIP) Your HITACHI Plasma TV incorporates one Tuner technology designed for PIP availability. Analog channels cannot be viewed in Appendix B. • PIP MODE PICTURE-IN-PICTURE ...
Owners Guide
Page 31
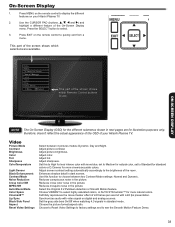
...set to quickly exit from a menu. Adjust picture contrast. Set this function to use. Faithfully reproduces the movie theater effect of your Hitachi Plasma TV. 2. Adjust picture brightness. Reduces conspicuous noise in standard mode. Set the gray side bars On/Off when watching 4:3 signals in ... menu. Choose to Reset Video Settings to factory settings and to select. 3. Choose VIBRANT to display the different features on your Hitachi Plasma TV. Press MENU on the remote control to select highly saturated colors, or AUTO STD/xvColor™ for more natural colors. Adjust ...
...set to quickly exit from a menu. Adjust picture contrast. Set this function to use. Faithfully reproduces the movie theater effect of your Hitachi Plasma TV. 2. Adjust picture brightness. Reduces conspicuous noise in standard mode. Set the gray side bars On/Off when watching 4:3 signals in ... menu. Choose to Reset Video Settings to factory settings and to select. 3. Choose VIBRANT to display the different features on your Hitachi Plasma TV. Press MENU on the remote control to select highly saturated colors, or AUTO STD/xvColor™ for more natural colors. Adjust ...

Owners Guide
Page 36
...signals decoded internally by simulating two or more realistic audio environment. 1. This is the concept of expanding the spatial imaging of the Plasma TV internal speakers. it will have English as the center speaker. If a channel is tuned and is ON. Digital Output This ... eliminate the audio for leveling the volume of the Digital Optical Output. Video Audio TV Guide On Screen Channel Manager Locks + Timers Setup Power Swivel Move SEL Select Audio Treble 50% Bass 50% Balance L R Surround Off OR Bass Boost Audio Source Off Stereo Internal Speakers ...
...signals decoded internally by simulating two or more realistic audio environment. 1. This is the concept of expanding the spatial imaging of the Plasma TV internal speakers. it will have English as the center speaker. If a channel is tuned and is ON. Digital Output This ... eliminate the audio for leveling the volume of the Digital Optical Output. Video Audio TV Guide On Screen Channel Manager Locks + Timers Setup Power Swivel Move SEL Select Audio Treble 50% Bass 50% Balance L R Surround Off OR Bass Boost Audio Source Off Stereo Internal Speakers ...
Owners Guide
Page 37
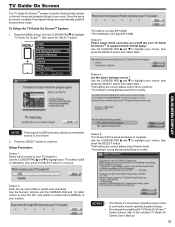
...please select Back to modify. To Setup the TV Guide On ScreenTM System: 1. Press the SELECT button to highlight your choice, then press the SELECT button then select Next: Screen 4: Are the above settings correct ? NOTES • The Plasma TV should be in standby mode in order to ...continually receive updated program listings. • For using and navigating the TV Guide On ScreenTM System please refer to highlight TV Guide On ScreenTM, then press the SELECT button. Press the MENU...
...please select Back to modify. To Setup the TV Guide On ScreenTM System: 1. Press the SELECT button to highlight your choice, then press the SELECT button then select Next: Screen 4: Are the above settings correct ? NOTES • The Plasma TV should be in standby mode in order to ...continually receive updated program listings. • For using and navigating the TV Guide On ScreenTM System please refer to highlight TV Guide On ScreenTM, then press the SELECT button. Press the MENU...

Owners Guide
Page 43
...20 minutes by one pixel. If caution is active. Press any one option. 2. Press the SELECT button to select one of OSD based on your Hitachi Plasma TV. Use the CURSOR PAD ◄ or ► to select. Use the CURSOR PAD ▲ or ▼ to enable power consumption saving settings ...43 ON-SCREEN DISPLAY Use the CURSOR PAD ▲ or ▼ to select the language of your choices. Press the SELECT button to the Plasma Television. It is recommended to use the Screen Wipe (White Field Signal) for extended periods of your choice. 2. Use the CURSOR PAD ▲...
...20 minutes by one pixel. If caution is active. Press any one option. 2. Press the SELECT button to select one of OSD based on your Hitachi Plasma TV. Use the CURSOR PAD ◄ or ► to select. Use the CURSOR PAD ▲ or ▼ to enable power consumption saving settings ...43 ON-SCREEN DISPLAY Use the CURSOR PAD ▲ or ▼ to select the language of your choices. Press the SELECT button to the Plasma Television. It is recommended to use the Screen Wipe (White Field Signal) for extended periods of your choice. 2. Use the CURSOR PAD ▲...
Owners Guide
Page 45
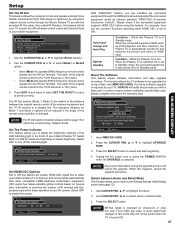
...external home theater components (VCR, DVD player or cable box) by using this happens, repeat the upgrade procedure. The reach of your Hitachi Plasma TV. Set The Power Indicator This feature allows you to adjust the brightness intensity of the LED indicating light in the Front of the ... the UPGRADE is in Standby mode. Switch between Home and Retail Mode This function allows you can interface the connected equipment through the Hitachi Plasma TV set to the distance between Home and Retail Mode Home Retail Move SEL Return 1. Use CURSOR PAD ▲,▼ to operate 38KHz...
...external home theater components (VCR, DVD player or cable box) by using this happens, repeat the upgrade procedure. The reach of your Hitachi Plasma TV. Set The Power Indicator This feature allows you to adjust the brightness intensity of the LED indicating light in the Front of the ... the UPGRADE is in Standby mode. Switch between Home and Retail Mode This function allows you can interface the connected equipment through the Hitachi Plasma TV set to the distance between Home and Retail Mode Home Retail Move SEL Return 1. Use CURSOR PAD ▲,▼ to operate 38KHz...


