

Owner's Manual
Page 1
... 11. Wire Wallplate Terminals...8 Step 8. Mount the Thermostat ...11 Step 10. Registered Trademark • Patents Pending Copyright © 2004 Honeywell International Inc. Special Installations...4 Step 4. Label Thermostat Wires ...5 Step 5. Check Operation of Heating and/or Cooling System 13 If You... techniques en français, veuillez consulter notre site web www.honeywell.com/yourhome. CT8775A,C THE DIGITAL ROUND™ NON-PROGRAMMABLE THERMOSTATS CT8775A Heat Only Thermostat (20 to 30 Vac) and CT8775C Heating-Cooling Thermostat (20 to 30 Vac) Para obtener un documento...
... 11. Wire Wallplate Terminals...8 Step 8. Mount the Thermostat ...11 Step 10. Registered Trademark • Patents Pending Copyright © 2004 Honeywell International Inc. Special Installations...4 Step 4. Label Thermostat Wires ...5 Step 5. Check Operation of Heating and/or Cooling System 13 If You... techniques en français, veuillez consulter notre site web www.honeywell.com/yourhome. CT8775A,C THE DIGITAL ROUND™ NON-PROGRAMMABLE THERMOSTATS CT8775A Heat Only Thermostat (20 to 30 Vac) and CT8775C Heating-Cooling Thermostat (20 to 30 Vac) Para obtener un documento...

Owner's Manual
Page 3
... any 120/240 volt system. drywall, 7/32 in . or 3-wire WhiteRodgers zone valves (No. 1311 and 1361). If your system. Not compatible with 2-wire Honeywell zone valves. System Type Gas or Oil Warm Air Electric Warm Air Gas or Oil Hot Water Gas or Oil Steam Gas or Oil Gravity...Air Conditioning Baseboard Electric (120/240 line volt)b Single Stage Heat Pump Multistage Heat Pumps/Multistage Equipment Compatibility with CT8775A Yes No Yesa Yes Yes No No No No No Compatibility with CT8775C Yes Yes Yesa Yes Yes No Yes No Yes No aCompatible with Taco zone valves and 2- Package Contents &#...
... any 120/240 volt system. drywall, 7/32 in . or 3-wire WhiteRodgers zone valves (No. 1311 and 1361). If your system. Not compatible with 2-wire Honeywell zone valves. System Type Gas or Oil Warm Air Electric Warm Air Gas or Oil Hot Water Gas or Oil Steam Gas or Oil Gravity...Air Conditioning Baseboard Electric (120/240 line volt)b Single Stage Heat Pump Multistage Heat Pumps/Multistage Equipment Compatibility with CT8775A Yes No Yesa Yes Yes No No No No No Compatibility with CT8775C Yes Yes Yesa Yes Yes No Yes No Yes No aCompatible with Taco zone valves and 2- Package Contents &#...

Owner's Manual
Page 5
... from falling back into the wall. Separate the wallplate from the thermostat by setting the thermostat fan switch to ON, the CT8775C Thermostat will only work with the old terminal designation. For details, call your thumb on the top between the wallplate and ... with this application. M5136 COVER REMOVED THERMOSTAT WALL PLATE STEP 6. LABEL THERMOSTAT WIRES ❑ Disconnect the wires from the wallplate. The CT8775A thermostat is not compatible with the installation at the right. WIRES THROUGH WALL OPENING STEP 5. Replacing a thermostat that is connected to three...
... from falling back into the wall. Separate the wallplate from the thermostat by setting the thermostat fan switch to ON, the CT8775C Thermostat will only work with the old terminal designation. For details, call your thumb on the top between the wallplate and ... with this application. M5136 COVER REMOVED THERMOSTAT WALL PLATE STEP 6. LABEL THERMOSTAT WIRES ❑ Disconnect the wires from the wallplate. The CT8775A thermostat is not compatible with the installation at the right. WIRES THROUGH WALL OPENING STEP 5. Replacing a thermostat that is connected to three...

Owner's Manual
Page 9
... 1) W, W1, H Y, Y1, M G, F O B (see Note 3) C (see Note 4) X (see Note 4) B (see Note 3) W2, H2 Y2 Connect to Terminals Connect To Terminals on CT8775A on the new thermostat and connect Rh to R and R to a single stage heat pump. Call 1-800468-1502. Call 1-800468-1502. Second stage cool. Do not... connect both R and Rc on the new thermostat, remove jumper between R and Rc on CT8775C R R (see Note 3) Do not connect. cal tape and do not use . 4. Rc (see Note 2) W Y G O B (see Note 2) ...
... 1) W, W1, H Y, Y1, M G, F O B (see Note 3) C (see Note 4) X (see Note 4) B (see Note 3) W2, H2 Y2 Connect to Terminals Connect To Terminals on CT8775A on the new thermostat and connect Rh to R and R to a single stage heat pump. Call 1-800468-1502. Call 1-800468-1502. Second stage cool. Do not... connect both R and Rc on the new thermostat, remove jumper between R and Rc on CT8775C R R (see Note 3) Do not connect. cal tape and do not use . 4. Rc (see Note 2) W Y G O B (see Note 2) ...
Owner's Manual
Page 10
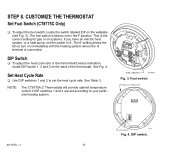
...on the wallplate (see Fig. 3). See Table 3. BACK OF THERMOSTAT ON 123 69-1676-1 DIP SWITCH M19567 Fig. 4. STEP 8. NOTE: The CT8775A,C Thermostats will provide optimal temperature control if DIP switches 1 and 2 are set according to set the heat cycle rate. FUEL SWITCH M19497 Fig. 3. ... Set Heat Cycle Rate ❑ Use DIP switches 1 and 2 to your particular heating system. Fuel switch. CUSTOMIZE THE THERMOSTAT Set Fuel Switch (CT8775C Only) ❑ To adjust the fuel switch, locate the switch labeled E/F on the back of the thermostat. See Fig. 4. The E setting...
...on the wallplate (see Fig. 3). See Table 3. BACK OF THERMOSTAT ON 123 69-1676-1 DIP SWITCH M19567 Fig. 4. STEP 8. NOTE: The CT8775A,C Thermostats will provide optimal temperature control if DIP switches 1 and 2 are set according to set the heat cycle rate. FUEL SWITCH M19497 Fig. 3. ... Set Heat Cycle Rate ❑ Use DIP switches 1 and 2 to your particular heating system. Fuel switch. CUSTOMIZE THE THERMOSTAT Set Fuel Switch (CT8775C Only) ❑ To adjust the fuel switch, locate the switch labeled E/F on the back of the thermostat. See Fig. 4. The E setting...

